GlusterFS : How-to Install and Overview
UPDATE: Note that GluserFS Cinder support was deprecated in OpenStack Newton & will not be supported on Platform9 as of 3.6 release.
Traditional hardware-based storage has two issues: scalability and centralized storage. The storage arrays scale vertically so storage capacity cannot be increased on-demand, and once the array is filled, another array must be bought. Centralized storage requires specialized hardware, including arrays and in some cases, specialized storage networks using Fiber Channel. Information becomes expensive and is difficult to locate and manage. This is why cloud storage is so attractive to organizations, but cloud storage requires the ability to grow or shrink storage capacity on demand. Gluster File System allows you to scale out large, unstructured data on premise, in Linux containers, or in public, private, or hybrid clouds. This blog shows how-to install GlusterFS and gives an overview.
GlusterFS connects storage servers over TCP/IP or Infiniband Remote Direct Memory Access(RDMA), clustering disk and memory together. Data management is centralized under a global namespace so that data is accessible throughout multiple data storage locations. It supports multi-tenancy by dividing users and groups into logical volumes on shared storage, which eliminates user dependency on traditional storage arrays. Capacity may be added throughout a variety of workloads without affecting performance, thus increasing storage efficiency and capacity.
Gluster Deployment Considerations
One thing to watch out for before you start building your Gluster volume is split brain, or in other words, when a cluster of nodes gets partitioned so that each divided set of nodes acts independently. Split brain is specific to GlusterFS with replication. The most effective way of preventing split brain is to ensure you have the ability to tolerate multiple simultaneous failures in each volume. In GlusterFS with replication, this means that you’ll lose 67% of your data (or more) to redundancy. This is where Arbiter volumes come in handy. An Arbiter volume is a mechanism to define a smaller “Voting” disk that doesn’t store any real data but does “Vote” on which “side” of the replica pair has the most consistent state of data. Note that Arbiter volumes do nothing to increase redundancy.
Which leads into our next consideration, failures to tolerate. When it comes to software defined storage, remember that the data is being hosted by servers. Servers need maintenance windows from time to time. If you only tolerate one failure, you will be without any redundancy to speak of during a standard maintenance window. This is why most Software Defined Storage recommend (or require) the ability to tolerate two simultaneous failures.
GlusterFS allows for multiple methods to protect your data. These methods are Replication and Erasure Coding. Each of these methods have their pros and cons, and we’ll be diving deeper into each of these.
Getting started with Gluster
Assumptions
- CentOS 7 Installed
- 6x Disks(/dev/sdb-/dev/sdg)
- Server names: Gluster01-Gluster06
- Logged in as root
Below are the steps for a successful GlusterFS deployment, followed by details for each step:
- Install GlusterFS
- Format and mount the disks that will be used for GlusterFS bricks
- Start the GlusterFS service
- Probe your hosts to form a cluster
- Choose your data protection method and Create your volume
- Expand your volume
- Start your volume
- Mount your volume
- Monitor your filesystem as well as hosts
1) Install GlusterFS
Add the upstream and gluster repos
[code lang=”bash”]$ yum -q -y install centos-release-gluster epel-release[/code]Install GlusterFS and dependencies
[code lang=”bash”]$ yum -q -y install glusterfs-server glusterfs-fuse attr xfsprogs xfsdump[/code]2) Prepare bricks
The first thing we’ll do is prepare our raw disks to be added into a GlusterFS volume.
Create folders to mount bricks
[code lang=”bash”]$ mkdir -p /bricks/brick{1..6}[/code]Format the volumes
[code lang=”bash”]$ mkfs.xfs -f /dev/sdb
mkfs.xfs -f /dev/sdc
mkfs.xfs -f /dev/sdd
mkfs.xfs -f /dev/sde
mkfs.xfs -f /dev/sdf
mkfs.xfs -f /dev/sdg[/code]
Add your mount points to fstab for persistence
[code lang=”bash”]$ cat <<-EOF >> /etc/fstab/dev/sdb /bricks/brick1 xfs defaults 0 0
/dev/sdv /bricks/brick2 xfs defaults 0 0
/dev/sdd /bricks/brick3 xfs defaults 0 0
/dev/sdr /bricks/brick4 xfs defaults 0 0
/dev/sdf /bricks/brick5 xfs defaults 0 0
/dev/sdg /bricks/brick6 xfs defaults 0 0
EOF[/code]
Mount all of the bricks
[code lang=”bash”]$ mount -a[/code]Create an empty folder on each brick for the gluster data to live in
[code lang=”bash”]$ mkdir -p /bricks/brick{1..6}/brick[/code]3) Start and enable the GlusterFS service
Enable Glusterd
[code lang=”bash”]$ systemctl enable glusterd.service[/code]Start Glusterd
[code lang=”bash”]$ systemctl start glusterd.service[/code]4) Probe your hosts to form a cluster
This will loop through and probe hosts 2-6 to add them to a cluster
Only run this from the gluster01 host:
[code lang=”bash”]$ for i in {2..6}; do gluster peer probe gluster0$i; done<[/code]5) Choose your data protection method
Replication
GlusterFS with replication provides simple redundancy over multiple storage nodes by creating multiple copies of data throughout other storage locations. So, in the case of disk failure, data availability is unaffected.
- Pros
- Less CPU intensive = faster write performance
- Simple restore = faster rebuild performance
- Cons
- Requires 2x or more of the original storage space
- Susceptible to Split-Brain
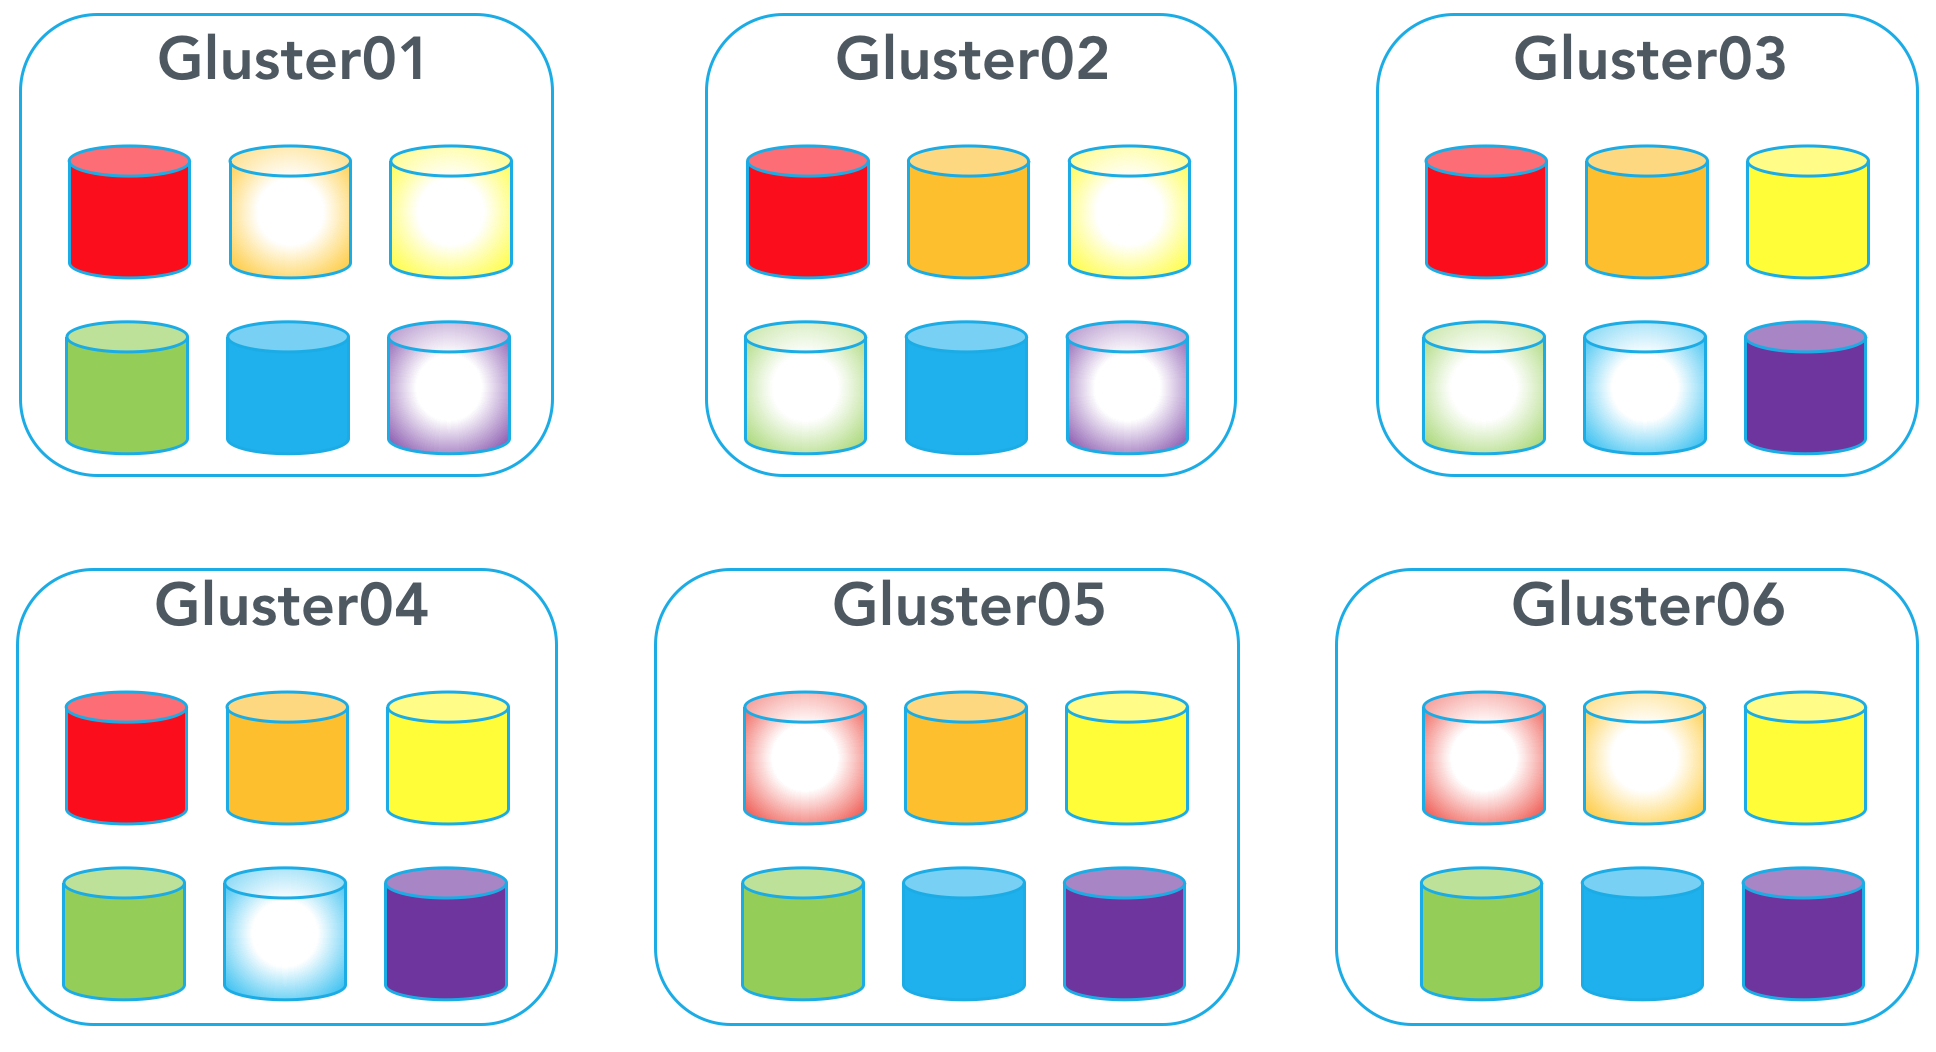
Here are the steps to create a Gluster volume using replication:
Let’s say you are starting off with 36 disks total. If we wanted tolerate two simultaneous failures without data loss, we would use 12 disks as data disks, and 24 as redundant disks.

Create the volume using the following command. *The order of bricks matters because you are creating replica pairs. For example, Gluster1:Brick1 pairs with Gluster2:Brick1 and Gluster3:Brick1.
[code lang=”bash”]$ gluster volume create pf9 replica 3 transport tcp \gluster01:/bricks/brick1/brick gluster02:/bricks/brick1/brick gluster03:/bricks/brick1/brick \
gluster04:/bricks/brick1/brick gluster05:/bricks/brick1/brick gluster06:/bricks/brick1/brick \
gluster01:/bricks/brick2/brick gluster02:/bricks/brick2/brick gluster03:/bricks/brick2/brick \
gluster04:/bricks/brick2/brick gluster05:/bricks/brick2/brick gluster06:/bricks/brick2/brick \
gluster01:/bricks/brick3/brick gluster02:/bricks/brick3/brick gluster03:/bricks/brick3/brick \
gluster04:/bricks/brick3/brick gluster05:/bricks/brick3/brick gluster06:/bricks/brick3/brick \
gluster01:/bricks/brick4/brick gluster02:/bricks/brick4/brick gluster03:/bricks/brick4/brick \
gluster04:/bricks/brick4/brick gluster05:/bricks/brick4/brick gluster06:/bricks/brick4/brick \
gluster01:/bricks/brick5/brick gluster02:/bricks/brick5/brick gluster03:/bricks/brick5/brick \
gluster04:/bricks/brick5/brick gluster05:/bricks/brick5/brick gluster06:/bricks/brick5/brick \
gluster01:/bricks/brick6/brick gluster02:/bricks/brick6/brick gluster03:/bricks/brick6/brick \
gluster04:/bricks/brick6/brick gluster05:/bricks/brick6/brick gluster06:/bricks/brick6/brick
[/code]
Erasure Coding
Erasure coding is a parity based protection method where data is broken up into fragments, encoded, and stored across multiple storage locations with some fragments being redundant. Erasure coding enables corrupted data in the disk storage process to be reconstructed by using data stored elsewhere in the array. In the case that node partitioning occurs, data can be evaluated as good or bad by having a quorum and at least 2 redundancy bricks. In comparison to traditional RAID methods, erasure coding is faster for data reconstruction, but is CPU-intensive, as well as having a penalty on writes in order to calculate the parity checksum.
- Pros
- Consumes less storage than replication – good for cheap/deep
- Allows for the failure of one or more elements of the storage system
- Cons
- Parity calculation is CPU-intensive
- Rebuild times are slower and are CPU-intensive
- Increased latency can slow production writes and rebuilds
- 10Gbps Nics and SSDs can alleviate most of this.
Here are the following steps to erasure coding:
Let’s say you are starting off with 36 disks total. If we wanted tolerate two simultaneous failures without data loss, we would have 24 disks used as data disks, and 12 as redundant disks.
In order to create a volume using erasure coding, do the following: *The order of bricks matters because you are creating dispersed pairs. For example, Gluster1:Brick1 pairs with Gluster2:Brick1, Gluster3:Brick1, Gluster4:Brick1, Gluster5:Brick1, and Gluster6:Brick1.
[code lang=”bash”]$ gluster volume create pf9 disperse-data 4 redundancy 2 transport tcp \gluster01:/bricks/brick1/brick gluster02:/bricks/brick1/brick gluster03:/bricks/brick1/brick \
gluster04:/bricks/brick1/brick gluster05:/bricks/brick1/brick gluster06:/bricks/brick1/brick \
gluster02:/bricks/brick2/brick gluster03:/bricks/brick2/brick gluster04:/bricks/brick2/brick \
gluster05:/bricks/brick2/brick gluster06:/bricks/brick2/brick gluster01:/bricks/brick2/brick \
gluster03:/bricks/brick3/brick gluster04:/bricks/brick3/brick gluster05:/bricks/brick3/brick \
gluster06:/bricks/brick3/brick gluster01:/bricks/brick3/brick gluster02:/bricks/brick3/brick \
gluster04:/bricks/brick4/brick gluster05:/bricks/brick4/brick gluster06:/bricks/brick4/brick \
gluster01:/bricks/brick4/brick gluster02:/bricks/brick4/brick gluster03:/bricks/brick4/brick \
gluster05:/bricks/brick5/brick gluster06:/bricks/brick5/brick gluster01:/bricks/brick5/brick \
gluster02:/bricks/brick5/brick gluster03:/bricks/brick5/brick gluster04:/bricks/brick5/brick \
gluster06:/bricks/brick6/brick gluster01:/bricks/brick6/brick gluster02:/bricks/brick6/brick \
gluster03:/bricks/brick6/brick gluster04:/bricks/brick6/brick gluster05:/bricks/brick6/brick
[/code]
6) Expand your volume
Replication:
To add a new node to your gluster cluster, use the following command:
[code lang=”bash”]$ gluster peer probe gluster07[/code]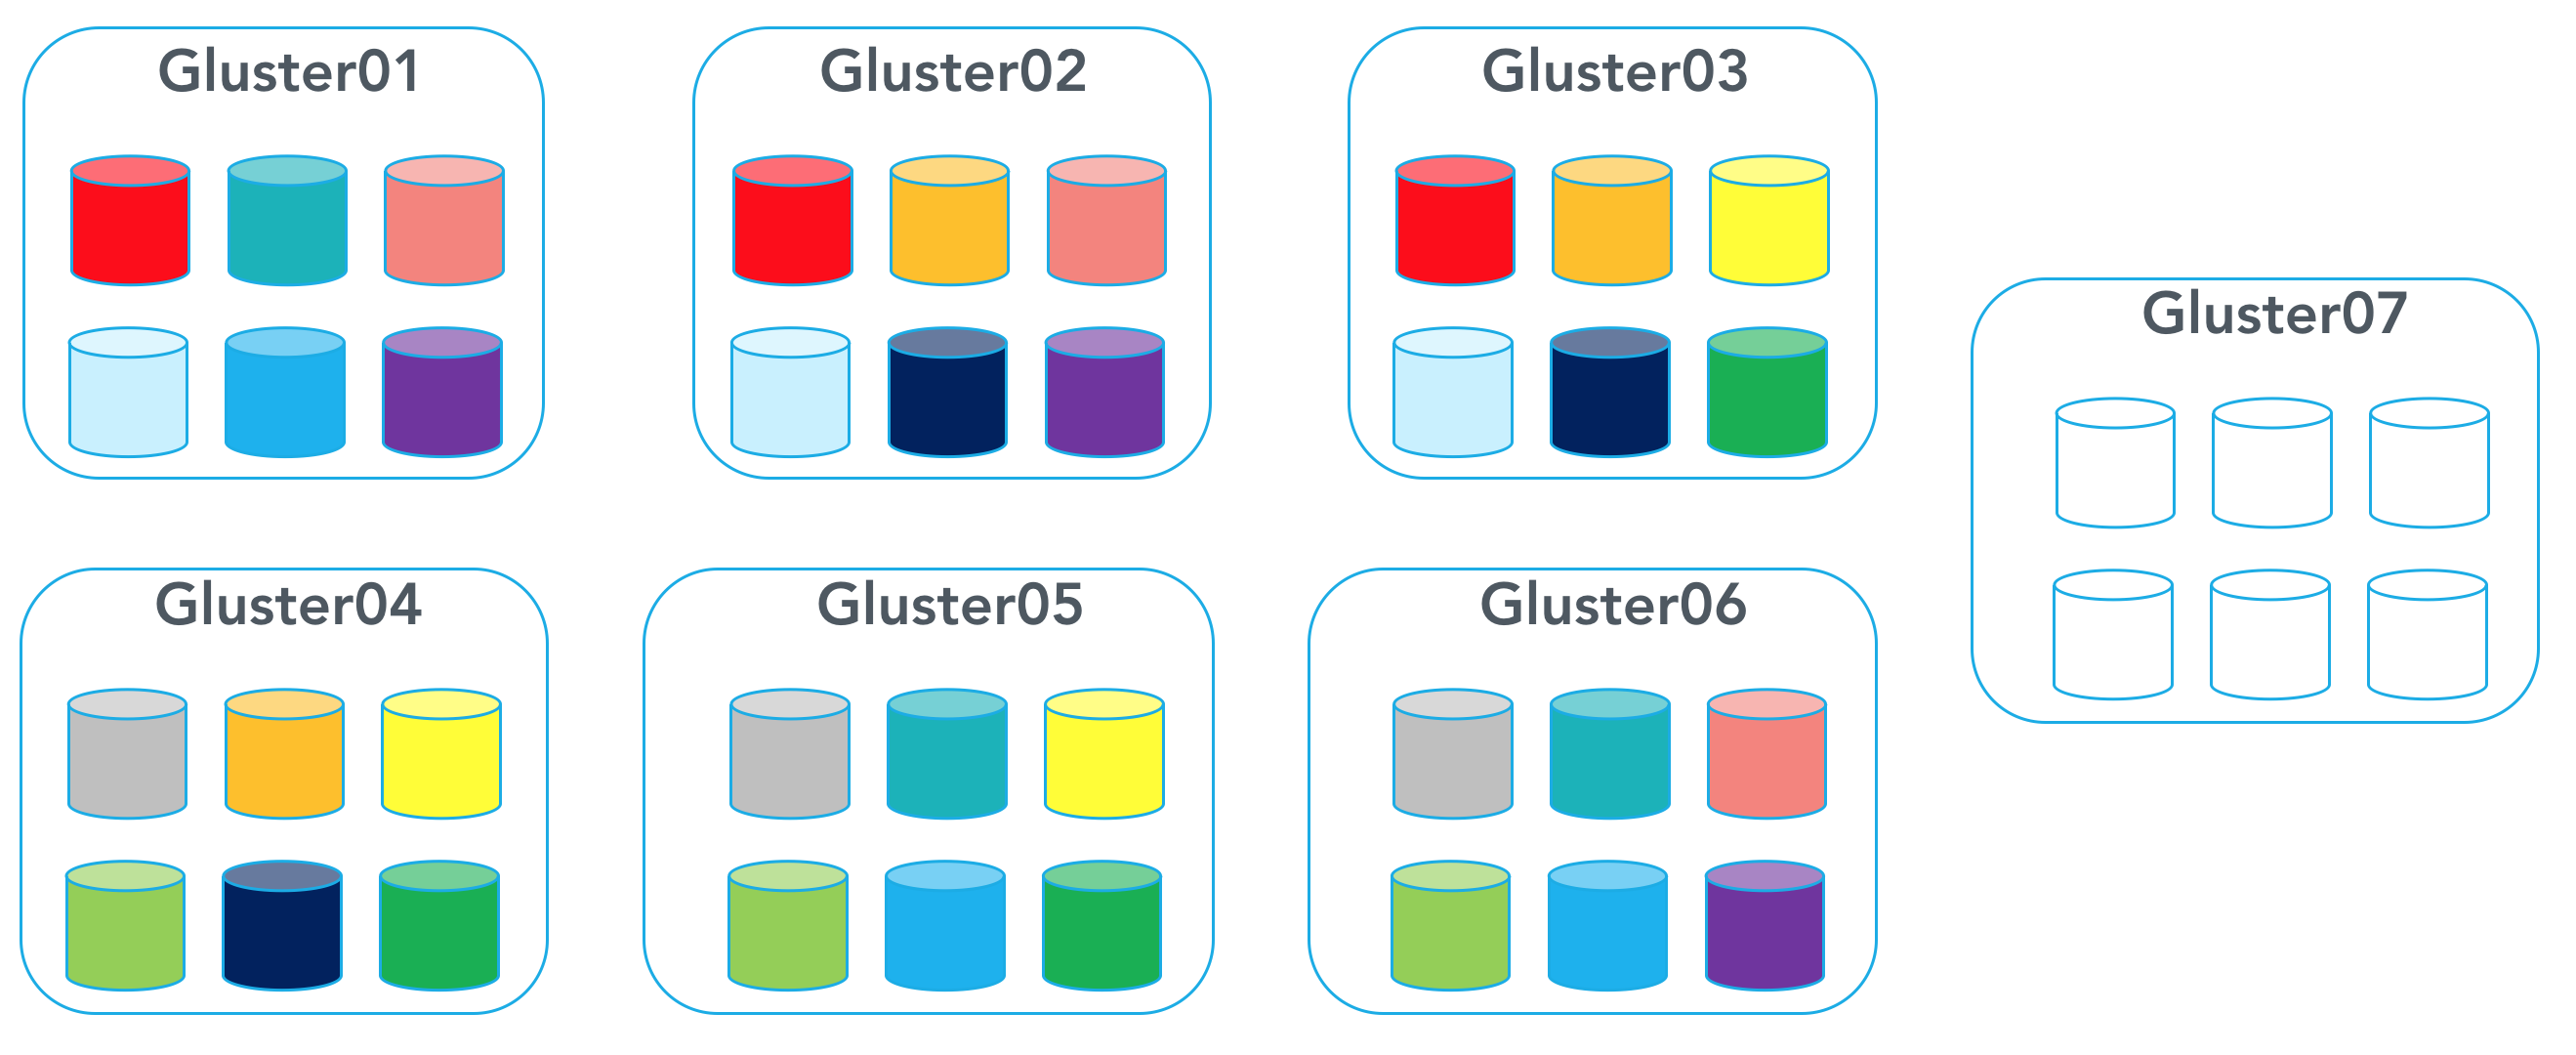
Relocate the replica bricks by allocating them across the new node to make sure data is spread evenly:
[code lang=”bash”]$ gluster volume replace-brick pf9 gluster03:/bricks/brick1/brick gluster07:/bricks/brick1/brick commit force$ gluster volume replace-brick pf9 gluster04:/bricks/brick2/brick gluster07:/bricks/brick2/brick commit force
$ gluster volume replace-brick pf9 gluster05:/bricks/brick3/brick gluster07:/bricks/brick3/brick commit force
$ gluster volume replace-brick pf9 gluster06:/bricks/brick4/brick gluster07:/bricks/brick4/brick commit force
[/code]
You must clean up the old bricks to be able to use these bricks again to expand the volume.
[code lang=”bash”]$ gluster03:$ rm -rf /bricks/brick1/brickgluster03:$ mkdir –p /bricks/brick1/brick
gluster04:$ rm -rf /bricks/brick2/brick
gluster04:$ mkdir –p /bricks/brick2/brick
gluster05:$ rm -rf /bricks/brick3/brick
gluster05:$ mkdir –p /bricks/brick3/brick
gluster06:$ rm -rf /bricks/brick4/brick
gluster06:$ mkdir –p /bricks/brick4/brick
[/code]
To expand volume, add new bricks using the old bricks that you have relocated and the new bricks from the new node you have created:
[code lang=”bash”]$ gluster volume add-brick pf9 replica 3 gluster03:/bricks/brick1/brick gluster04:/bricks/brick2/brick gluster07:/bricks/brick5/brick$ gluster volume add-brick pf9 replica 3 gluster05:/bricks/brick3/brick gluster06:/bricks/brick4/brick gluster07:/bricks/brick6/brick
[/code]
Rebalance volume:
[code lang=”bash”]$ gluster volume rebalance pf9 start[/code]You have now replicated some of your disks by expanding volume to 42 total disks, with 28 disks being redundant and 14 being data disks
 \
\
Erasure Coding
If you want to expand this volume, you first need to add a new node with available disks.
[code lang=”bash”]$ gluster peer probe gluster07[/code]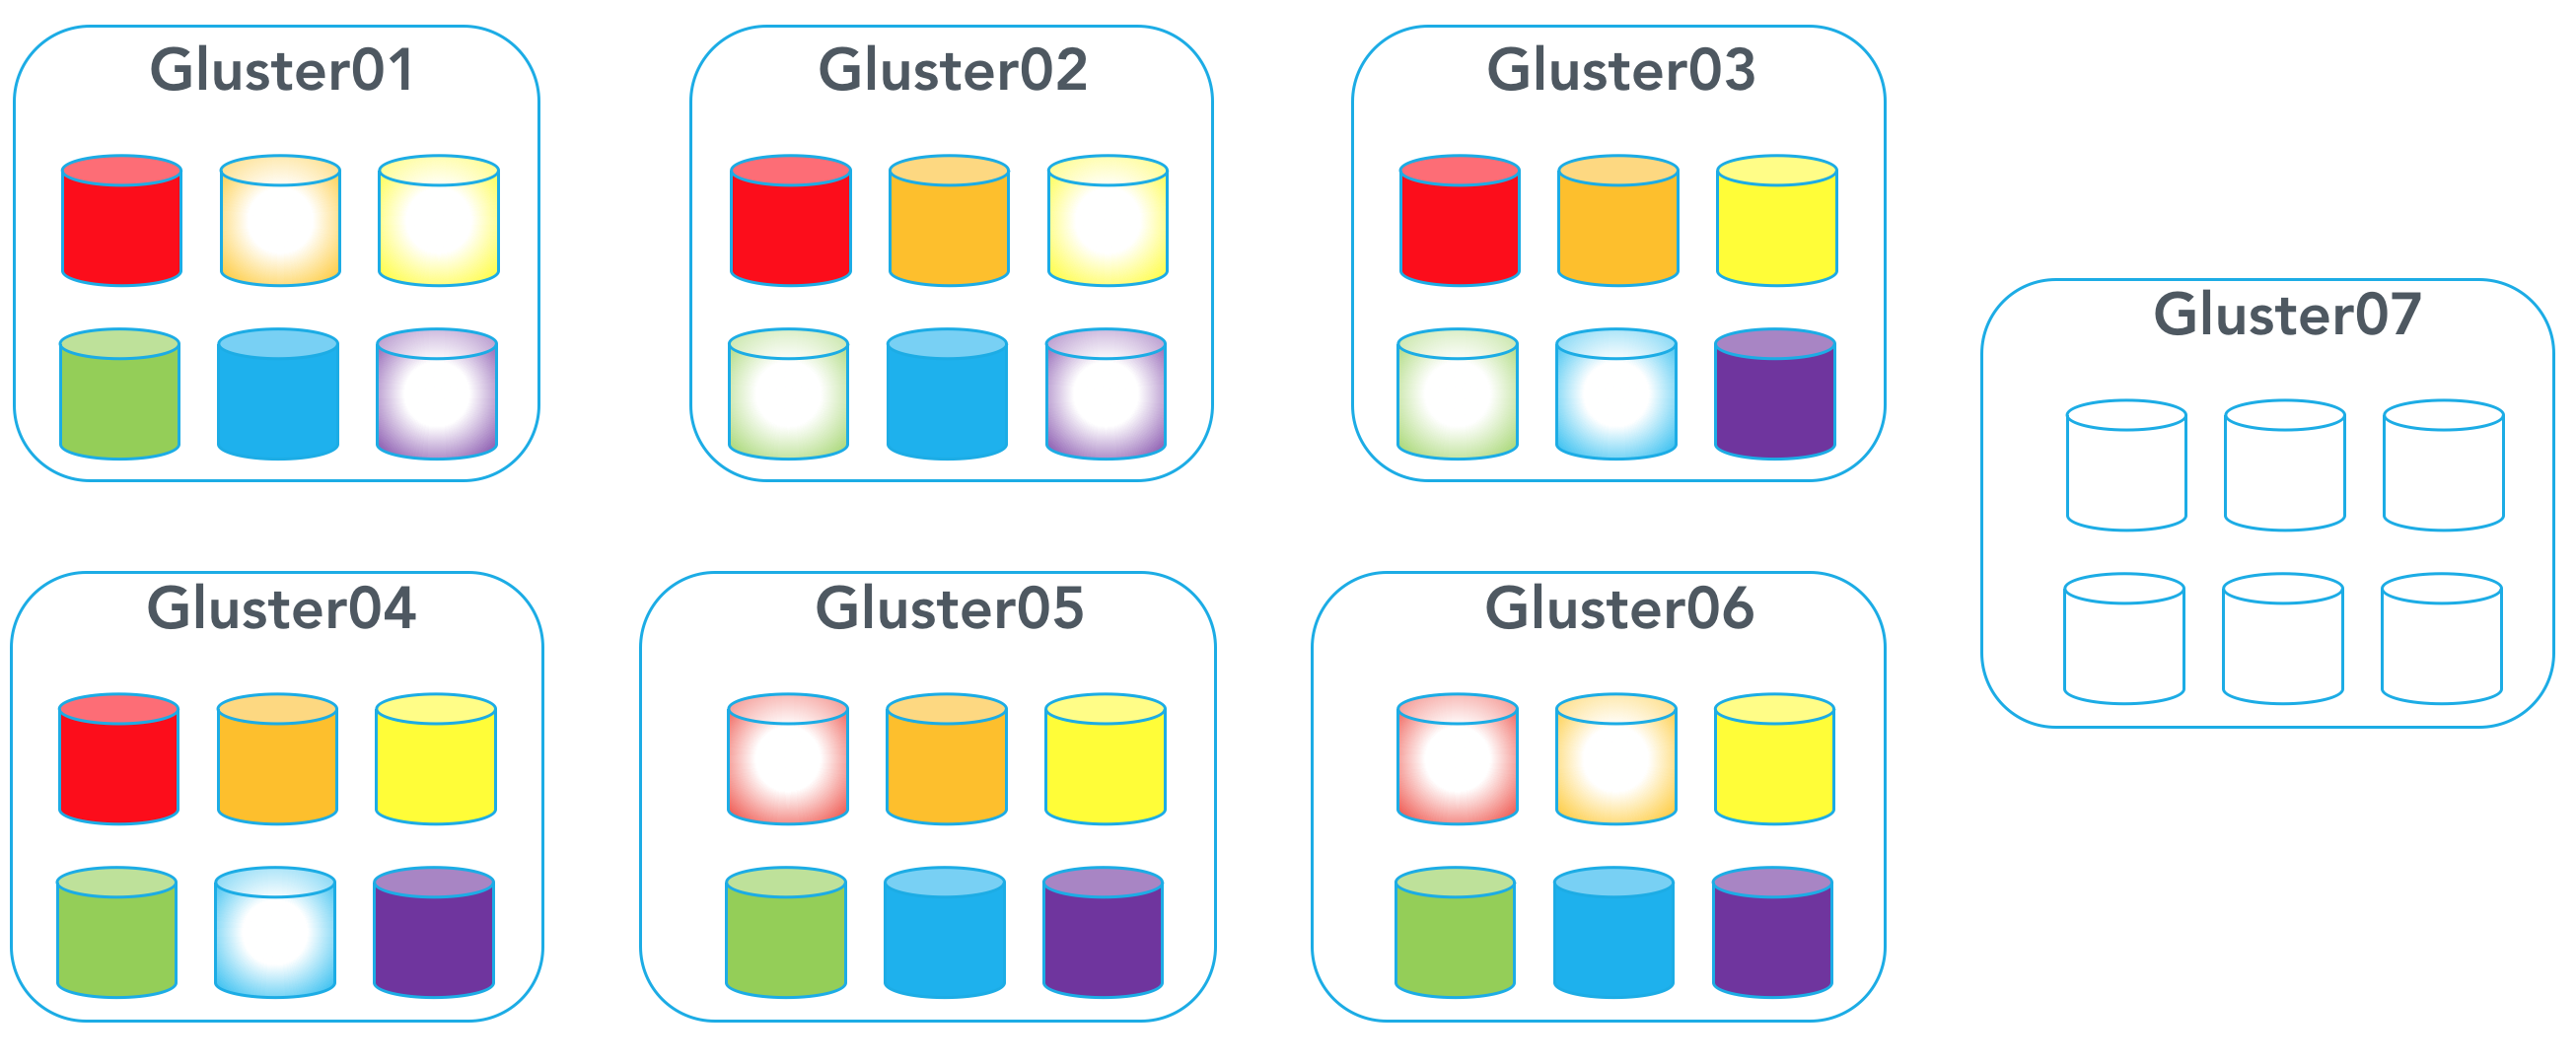
You will now need to relocate existing bricks from the old nodes to the new nodes in order to make room to create another dispersed data set.
[code lang=”bash”]$ gluster volume replace-brick pf9 gluster01:/bricks/brick1/brick gluster07:/bricks/brick1/brick commit force$ gluster volume replace-brick pf9 gluster02:/bricks/brick2/brick gluster07:/bricks/brick2/brick commit force
$ gluster volume replace-brick pf9 gluster03:/bricks/brick3/brick gluster07:/bricks/brick3/brick commit force
$ gluster volume replace-brick pf9 gluster04:/bricks/brick5/brick gluster07:/bricks/brick5/brick commit force
$ gluster volume replace-brick pf9 gluster06:/bricks/brick6/brick gluster07:/bricks/brick6/brick commit force
[/code]

Clean up old bricks to be able to use these bricks again to expand the volume:
[code lang=”bash”]gluster01:$ rm -rf /bricks/brick1/brickgluster01:$ mkdir –p /bricks/brick1/brick
gluster02:$ rm -rf /bricks/brick2/brick
gluster02:$ mkdir –p /bricks/brick2/brick
gluster03:$ rm -rf /bricks/brick3/brick
gluster03:$ mkdir –p /bricks/brick3/brick
gluster04:$ rm -rf /bricks/brick5/brick
gluster04:$ mkdir –p /bricks/brick5/brick
gluster06:$ rm -rf /bricks/brick6/brick
gluster06:$ mkdir –p /bricks/brick6/brick
[/code]
Expand the volume by adding new bricks by using the old bricks that you relocated and new bricks from the new node you created.
[code lang=”bash”]$ gluster volume add-brick pf9 disperse-data 4 redundancy 2 \gluster01:/bricks/brick1/brick gluster02:/bricks/brick2/brick gluster03:/bricks/brick3/brick \
gluster04:/bricks/brick5/brick gluster06:/bricks/brick6/brick gluster07:/bricks/brick4/brick
[/code]
Rebalance volume:
[code lang=”bash”]$ gluster volume rebalance pf9 start[/code]You are left with 42 disks, with 14 redundant disks and 28 data disks.

7) Start your volume:
You’ll need to start the GlusterFS volume
[code lang=”bash”]$ gluster volume start pf9[/code]8) Mount your volume:
Create a directory to mount your gluster volume
[code lang=”bash”]$ mkdir -p /volumes/glusterfs/pf9[/code]Add your gluster volume to fstab
[code lang=”bash”]$ echo ‘gluster01:/pf9 /volumes/glusterfs/pf9 glusterfs defaults,_netdev 0 0’ >> /etc/fstab[/code]Mount the volume
[code lang=”bash”]$ mount -a[/code]Bitrot Detection
Bitrot Daemon is used to locate silent data corruption on a disk where there is no indication from the disk to the storage software layer that a disk error occurred. When BitRot Daemon is enabled on a volume, it signs all of the files and objects in the volume with a hash, which is a checksum calculated on the data of the file and is stored in a persistent data store. It checks data periodically for signature verification and makes note of all anomalies and records them on log files. Files or objects are only signed when they are considered stable, meaning there are no modifications to the file or object for “X” amount of time and all file descriptors are closed (release()). Modification is indicated by O_WRONLY or O_RDWR.
File Integrity
Scrubber validates the integrity of a file by comparing the checksum on the file data with the stored checksum. When there is silent data corruption, scrubbing will mark the files as bad and try to recover the files. Since scrubbing must be done on the entire filesystem tree for the checksum computations, it is CPU-intensive and can be done bi-weekly or monthly.
Other Filesystems
Other open source file systems like GlusterFS include Ceph, OpenStack Swift, Lustre, OpenAFS, HDFS etc. Ceph is one of GlusterFS’s main competitors, each offering different approach to file systems solutions. Ceph, along with OpenStack Swift and Amazon S3, are object-store systems where data is stored as binary objects. However, GlusterFS’s specialty is that it does not use any metadata servers; instead it uses the extended attributes of the back-end filesystem for storing metadata.
Summary
GlusterFS allows you to build a multi-tenant storage system that is centrally managed, so your data is accessible by your IT staff from any location. GlusterFS improves back-end storage by enhancing the performance of frequently accessed files through automatic storage tiering and allowing for quick deployment of additional storage capacity. The risk of data corruption is lowered while the integrity of your data is preserved.
- Beyond Kubernetes Operations: Discover Platform9’s Always-On Assurance™ - November 29, 2023
- Platform9 Introduces Elastic Machine Pool (EMP) at KubeCon 2023 to Optimize Costs on AWS EKS - November 15, 2023
- KubeCon 2023 Through Platform9’s Lens: Key Takeaways and Innovative Demos - November 14, 2023