How to Install OpenStack using DevStack
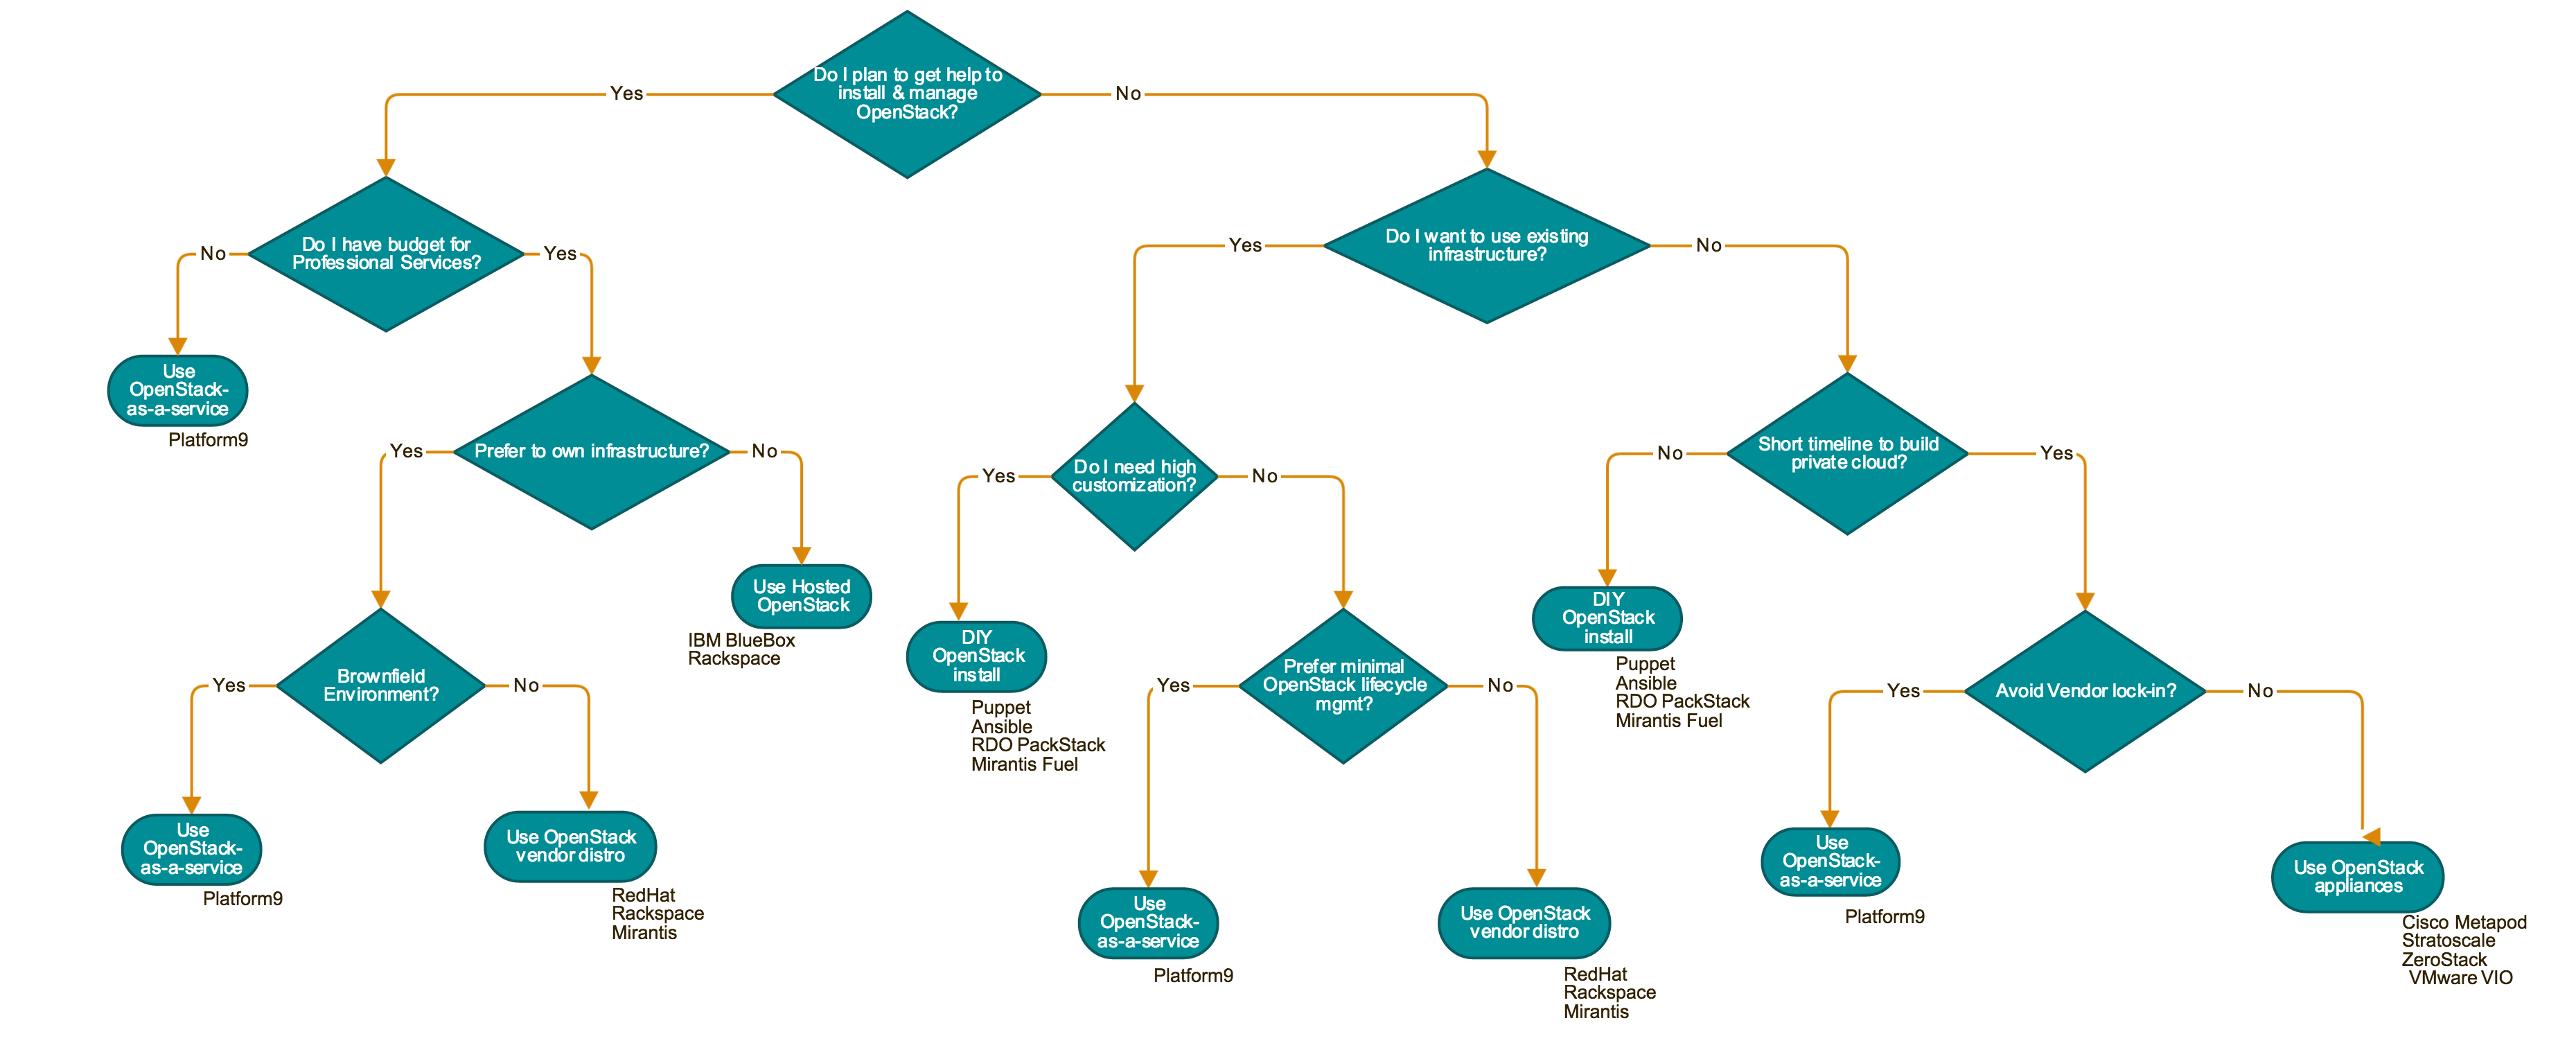
One of the great things about OpenStack is all the options you have for deploying it. A recent blog mentioned various deployment models – and the flowchart below may help as you decide which model is best for you. For example, if you need a highly customized OpenStack deployment, then DIY may be the way to go. Then, there’s the question of which tool to use. Previously, we discussed how to install OpenStack using RDO Packstack, Openstack-Ansible or TripleO. This blog will give an overview of the steps required to install OpenStack using DevStack. For detailed instructions, refer to the DevStack documentation.
DevStack is a series of extensible scripts used to quickly bring up a complete OpenStack environment suitable for non-production use. It is used interactively as a development environment. Since DevStack installs all-in-one OpenStack environment, it can be used to deploy OpenStack on a single VM, a physical server or a single LXC container. Each option is suitable depending on the hardware capacity available and the degree of isolation required. A multi-node OpenStack environment can also be deployed using DevStack, but that’s not a thoroughly tested use-case.
For either kind of setup, the steps would involve installing a minimal version of one of the supported Linux distributions and downloading the DevStack git repository. The repo contains a script stack.sh that must be run as a non-root user and will perform the complete install based on configuration settings.
The official approved and tested Linux distributions are Ubuntu(LTS plus current dev release), Fedora(latest and previous release) and CentOS/RHEL 7(latest major release). The supported databases are MySQL and PostgreSQL. RabbitMQ and Qpid are the recommended messaging service along with Apache as the webserver. The setup defaults to a FlatDHCP network using Nova Network or a similar configuration in Neutron.
The default services configured by DevStack are Keystone, Swift, Glance, Cinder, Nova, Nova Networking, Horizon and Heat. DevStack has a plugin architecture to include additional services that are not included directly in the install.
Summary of the Installation Process
- Install one of the supported Linux Distributions
- Download DevStack from git
[code lang=”bash”]git clone https://git.openstack.org/openstack-dev/devstack[/code] - Make any desired changes to the configuration
- Add a non-root user, with sudo enabled, to run the install script
[code lang=”bash”]devstack/tools/create-stack-user.sh; su stack[/code] - Run the install and go grab a coffee
[code lang=”bash”]cd devstack
./stack.sh[/code]
Configuration Options
local.conf
DevStack configuration is modified via the file local.conf. It is a modified INI format file that introduces a meta-section header to carry additional information regarding the configuration files to be changed.
The new header is similar to [[‘ <phase> ‘|’ <config–file–name> ‘]]’, where <phase> is one of a set of phase names defined by stack.sh and <config-file-name> is the configuration filename. If the path of the config file does not exist, it is skipped. The file is processed strictly in sequence and any repeated settings will override previous values.
The defined phases are:
- local – extracts localrc from local.conf before stackrc is sourced
- post-config – runs after the layer 2 services are configured and before they are started
- extra – runs after services are started and before any files in extra.d are executed
- post-extra – runs after files in extra.d are executed
A specific meta-section local|localrc is used to provide a default localrc file. This allows all custom settings for DevStack to be contained in a single file. If localrc exists it will be used instead to preserve backward-compatibility.
[code lang=”bash”][[local|localrc]] FIXED_RANGE=10.20.30.40/49
ADMIN_PASSWORD=secret
LOGFILE=$DEST/logs/stack.sh.log[/code]
openrc
openrc configures login credentials suitable for use with the OpenStack command-line tools. Openrc sources stackrc at the beginning in order to pick up HOST_IP and/or SERVICE_HOST to use in the endpoints. The values shown below are the default values.
[code lang=”bash”]OS_PROJECT_NAME=demoOS_USERNAME=demo
OS_PASSWORD=secret #The usual cautions about putting passwords in environment variables apply
HOST_IP=127.0.0.1 #Typically set in thelocalrc section
SERVICE_HOST=$HOST_IP
OS_AUTH_URL=http://$SERVICE_HOST:5000/v2.0
#commented out by default
# export KEYSTONECLIENT_DEBUG=1
# export NOVACLIENT_DEBUG=1[/code]
Minimal Configuration
While stack.sh can run without a localrc section in local.conf, it is easier to repeat installs by setting a few minimal variables. Below is an example of a minimal configuration for values that are often modified. If the *_PASSWORD variables are not set, the install script will be prompt for values.
- no logging
- pre-set the passwords to prevent interactive prompts
- move network ranges away from the local network
- set the host IP if detection is unreliable
DATABASE_PASSWORD=$ADMIN_PASSWORD
RABBIT_PASSWORD=$ADMIN_PASSWORD
SERVICE_PASSWORD=$ADMIN_PASSWORD
#FIXED_RANGE=172.31.1.0/24
#FLOATING_RANGE=192.168.20.0/25
#HOST_IP=10.3.4.5[/code]
Service Repositories
The Git repositories used to check out the source for each service are controlled by a pair of variables set for each service. *_REPO points to the repository and *_BRANCH selects which branch to check out. These may be overridden in local.conf to pull source from a different repo. GIT_BASE points to the primary repository server.
[code lang=”bash”]NOVA_REPO=$GIT_BASE/openstack/nova.gitNOVA_BRANCH=master[/code]
The installation directory defaults to /opt/stack and can be set by the DEST parameter
[code lang=”bash”]DEST=/opt/stack[/code]
Logging
By default stack.sh output is only written to the console where it runs. It can be sent to a file in addition to the console by setting LOGFILE to the fully-qualified name of the destination log file. Old log files are cleaned automatically if LOGDAYS is set to the number of days of old log files to keep.
DevStack will log the stdout output of the services it starts. When using screen this logs the output in the screen windows to a file. Without screen this simply redirects stdout of the service process to a file in LOGDIR. Some of the project logs will be colorized by default and can be turned off as below
[code lang=”bash”]LOGFILE=$DEST/logs/stack.sh.log
LOGDAYS=1
LOG_COLOR=False
LOGDIR=$DEST/logs[/code]
Logging all services to a single syslog can be convenient. If the destination log host is not localhost, the settings below can be used to direct the message stream to the log host.
[code lang=”bash”]SYSLOG=True
SYSLOG_HOST=$HOST_IP
SYSLOG_PORT=516[/code]
Database Backend
The available databases are defined in the lib/databases directory. MySQL is the default database but can be replaced in the localrc section:
[code lang=”bash”]disable_service mysqlenable_service postgresql[/code]
Messaging Backend
Support for RabbitMQ is included. Additional messaging backends may be available via external plugins. Enabling or disabling RabbitMQ is handled via the usual service functions
[code lang=”bash”]disable_service rabbit[/code]
Apache Frontend
The Apache web server can be enabled for wsgi services that support being deployed under HTTPD + mod_wsgi. Each service that can be run under HTTPD + mod_wsgi also has an override toggle available that can be set. See examples below
[code lang=”bash”]KEYSTONE_USE_MOD_WSGI=”True”NOVA_USE_MOD_WSGI=”True”[/code]
Clean Install
By default stack.sh only clones the project repos if they do not exist in $DEST. This can be overridden as below and avoids having to manually remove repos to get the current branch from $GIT_BASE.
[code lang=”bash”]RECLONE=yes[/code]Guest Images
Images provided in URLS via the comma-separated IMAGE_URLS variable will be downloaded and uploaded to glance by DevStack. Default guest-images are predefined for each type of hypervisor and their testing-requirements in stack.sh and can be overridden as below.
[code lang=”bash”]DOWNLOAD_DEFAULT_IMAGES=FalseIMAGE_URLS=”http://pf9.com/image1.qcow,”
IMAGE_URLS+=”http://pf9.com/image2.qcow”[/code]
Instance Type
DEFAULT_INSTANCE_TYPE can be used to configure the default instance type. When this parameter is not specified, Devstack creates additional micro & nano flavors for really small instances to run Tempest tests.
[code lang=”bash”]DEFAULT_INSTANCE_TYPE=m1.tiny[/code]Cinder
The logical volume group, logical volume name prefix and the size of the volume backing file are set as below.
[code lang=”bash”]VOLUME_GROUP=”stack-volumes”
VOLUME_NAME_PREFIX=”volume-”
VOLUME_BACKING_FILE_SIZE=10250M[/code]
Disable Identity API v2
The Identity API v2 is deprecated as of Mitaka and it is recommended to only use the v3 API.
[code lang=”bash”]ENABLE_IDENTITY_V2=False[/code]Tempest
If tempest has been successfully configured, a basic set of smoke tests can be run as below.
[code lang=”bash”]$ cd /opt/stack/tempest$ tox -efull tempest.scenario.test_network_basic_ops[/code]
Things to Consider
In choosing ease-of-use over highly customized installation, DevStack supplies a monolithic installer script that installs all the configured modules. To add or remove modules, the whole environment must be torn down using unstack.sh. Then, the updated configuration is installed by re-running stack.sh.
DevStack installs OpenStack modules in a development environment, which is very different from a typical production deployment. It is not possible to mix and match components with some being in production configuration and others in development configuration. (See Installing with OpenStack-Ansible if you are interested in doing this.)
In DevStack, dependencies are shared among all the modules. So a simple action of syncing the dependencies for one module may unintentionally update several other modules.
DevStack is popular with developers working on OpenStack. It is used to test changes and verify they work in a running OpenStack deployment. Since it easy to use, DevStack can setup a OpenStack environment for use in demos and PoC. For production-grade installs see OpenStack-Ansible or TripleO below.
Check out these other resources below for more options on installing OpenStack
- Beyond Kubernetes Operations: Discover Platform9’s Always-On Assurance™ - November 29, 2023
- Platform9 Introduces Elastic Machine Pool (EMP) at KubeCon 2023 to Optimize Costs on AWS EKS - November 15, 2023
- KubeCon 2023 Through Platform9’s Lens: Key Takeaways and Innovative Demos - November 14, 2023