Deploy an Upstream Kubernetes to Google Cloud
But, what do you do if you want to create and manage clusters with Google Cloud? In this tutorial, we’re going to walk through steps that you can follow to set up a Platform9 supported Cluster in your Google Cloud account.
You can learn more and sign up for the GCP (Google Cloud Platform) Free Tier here.
Setting Up The Infrastructure
We’ll be using the Platform9 CLI and the Google Cloud CLI for most of this example. The Platform9 CLI is only available for installation on Ubuntu 16.04 at this time. If you don’t have access to an Ubuntu installation to run this example, the tutorials listed below walk you through setting up a virtual machine that lets you run this locally on a Windows or macOS system.
- Create a Single Node Cluster on VirtualBox VM on Mac OS
- Getting Started with PMKFT on a Windows Machine
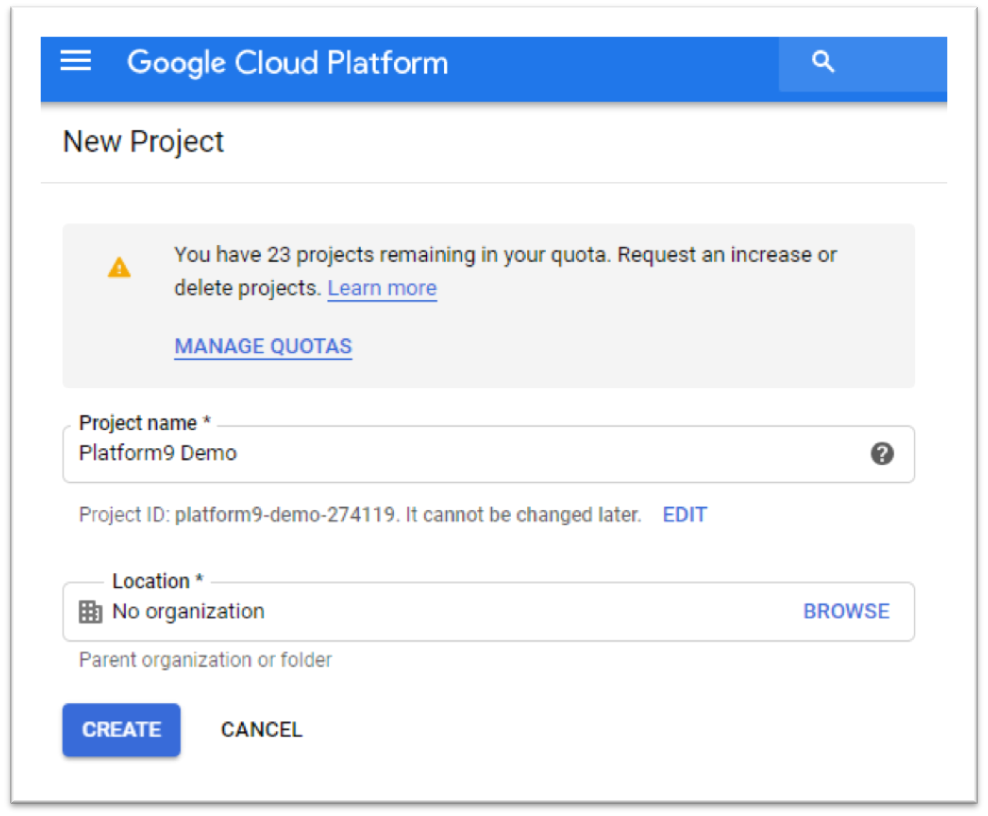
The first thing we’ll need for this example is a Google Cloud project. You can create a new one by logging into your Google Cloud account and navigating to the New Project page. I’ll be calling this project Platform9 Demo. The project ID appears below the project name, and we’ll keep the default value for this example. The project ID can be edited at this point if you wish.
While Google completes the setup of our project, we can enable the Compute Engine API. This API allows us to provision Google Compute resources from the CLI. You can enable the API here.
At this point, we can return to the terminal on our Ubuntu machine, and begin installing the tools for the next part of the process.
Installing Local Tools
The following steps require you to have curl installed. In case you don’t, run the following:
$ sudo apt-get update && sudo apt-get install curl
Then, run the following commands. I copied them into a file called install_gc_sdk and then ran them using $ bash install_gc_sdk
# Add the Cloud SDK distribution URI as a package source
echo "deb [signed-by=/usr/share/keyrings/cloud.google.gpg] http://packages.cloud.google.com/apt cloud-sdk main" | sudo tee -a /etc/apt/sources.list.d/google-cloud-sdk.list

# Import the Google Cloud Platform public key
curl https://packages.cloud.google.com/apt/doc/apt-key.gpg | sudo apt-key --keyring /usr/share/keyrings/cloud.google.gpg add -

# Update the package list and install the Cloud SDK
sudo apt-get update && sudo apt-get install google-cloud-sdk
Once we’ve installed the Google Cloud CLI, we need to configure it to point to our account. We do this with the init command. The process prompts you to log in to your Google account. A redirect takes you to the Google website for this part of the process. You’ll need to complete the authentication steps, and then grant the CLI access to your account.
$ gcloud init
Following authentication, the next step is to select the default project for the CLI.
You are logged in as: [mike@gmail.com].

Pick cloud project to use:
 [1] platform9-demo-274119
 [2] Create a new project
Please enter numeric choice or text value (must exactly match list item):
The first project matches the one we set up in Google, so we’ll select it. We’ll also want to set the default zone, which makes it easier to provision new compute resources. I’m going to set mine to us-west1-a because I live in the Pacific Northwest.
$ gcloud config set compute/zone us-west1-a
Next, we can use the following command to install the Platform9 CLI. You need to be prepared to provide:
- Your Platform9 account management URL, which looks like https://pmkft-123456789-0123.plaform9.io
- The email address you used to sign up
- Your Platform9 password
$ bash <(curl -sL http://pf9.io/get_cli)
At this point, we have everything we need to provision a new Google Cloud instance and then begin managing it with Platform9.
Creating and Preparing the Cluster
We’re going to create an instance running Ubuntu 16.04. At the time of writing, the latest image available from Google Cloud is named ubuntu-1604-xenial-v20200407, which is in the ubuntu-1604-lts family, and the ubuntu-os-cloud project. You can find the latest by running the following command and searching for the Ubuntu images.
$ gcloud compute images list
Using that information, we can now create an instance from the Ubuntu image. I’m going to name the instance demo-cluster-1.
$ gcloud compute instances create demo-cluster-1 --image-family ubuntu-1604-lts --image-project ubuntu-os-cloud
The process prompts you to select a deployment zone from a list. The list only displays the first 50 options. For the zone I wanted (us-west1-a), I had to type list and then type 59. You should see output similar to that shown below, indicating that your instance has been provisioned and is running.
Created [https://www.googleapis.com/compute/v1/platform9-demo-274119/zones/us-west1-a/instances/demo-cluster-1].
NAME            ZONE         MACHINE_TYPE   PREEMPTIBLE   INTERNAL_IP
EXTERNAL_IP    STATUS
Demo-cluster-1  us-west1-a   n1-standard-1                10.138.0.2
35.233.254.6   RUNNING
Take note of the external IP address, as we need to use it in a few minutes.
Now that the instance is running, we need to configure SSH access to the box. The easiest way to do this is to use the GCloud CLI to create an SSH connection, and this walks you through the process of creating an SSH key and propagating it to your Google Cloud project.
$ gcloud compute ssh demo-cluster-1
This command creates the keys, and logs you into the instance. The username is the same name you used to log into the Ubuntu machine from which you’re working. It’s a good idea to validate this at this point, and then type exit to close the connection.
mike@demo-cluster-1:~$ exit
In this example, my username is mike, and the Google Cloud SSH key is stored in ~/.ssh/google_compute_engine. We use this information, and the external IP address of the instance to connect and configure it to be a Platform9-managed cluster. Replace the user name and IP address in the statement below with the ones for your account.
$ pf9ctl cluster prep-node -u mike -i 35.233.254.6 -s ~/.ssh/google_compute_engine
You’ll be prompted for your password, so it can execute some commands with administrator privileges, and then it’ll connect to the instance and install the necessary infrastructure to support Platform9.
This command may fail. I had it fail because I misspelled the name of my SSH key, and then another failure due to a timeout downloading a dependency. The referenced logs are helpful for troubleshooting, following which, you can rerun the command.
One problem that I have encountered is the version of python installed on the instance was not compatible with the prep-node process.
Preparing nodes   [#############################################]  100%
Preparing the provided nodes to be added to Kubernetes cluster was successful
Exploring and Learning More
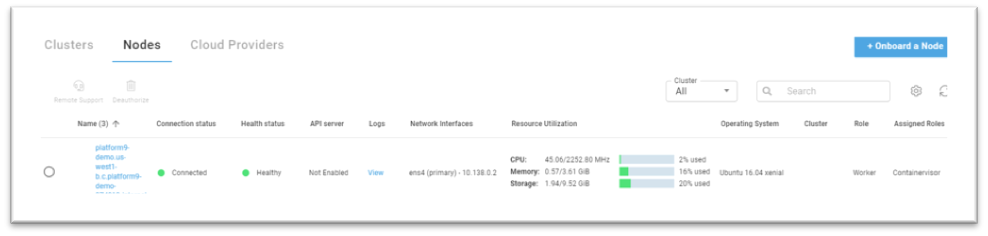
If you log into your Platform9 account and navigate to Infrastructure -> Nodes, you’ll see the new node ready to be managed from your Platform9 account.
To learn more about Platform9 and how it can assist you with seamless management of your Kubernetes deployments, visit the Platform9 documentation or contact them directly for more information.