Tutorial: Set Up Resource Tiers Using OpenStack Host Aggregates
Platform9 enables creation of efficient and scalable resource tiers using OpenStack host aggregates. Aggregates allow you to:
- Create virtual clusters or tiers of resources by grouping together one or more hypervisors using simple key-value pair tagging.
- Utilize the tiers across different tenants, to restrict placement of specific groups of virtual machines to only the tier that is applicable to them.
- Define availability zones by tagging a group of one or more hypervisors with an availability zone name so that application users can define zones across which to span the application, in terms of geographic regions or other availability criteria.
For example,
- An SSD tier can be created to ensure that all production workloads get efficient and fast storage I/O access
- A Production tier and Dev-Test tier strategy can be used to separate your workloads.
- A Zone-1 tier and Zone-2 tier segregation of hypervisors can be defined to represent two different availability zones so that applications can be spanned across both availability zones to make sure at least one zone is available or to specify one of these tiers if geographic colocation is the criteria to segregate hypervisors.
In this tutorial, we will demonstrate creating host aggregates and utilizing them as part of your Platform9 Managed OpenStack private cloud.
Step 1 – Create a New Host Aggregate
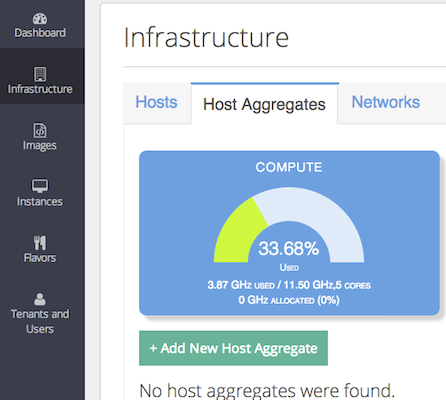
After signing into your Platform9 account, switch to the Infrastructure View. Click on the Host Aggregates tab, as shown here.
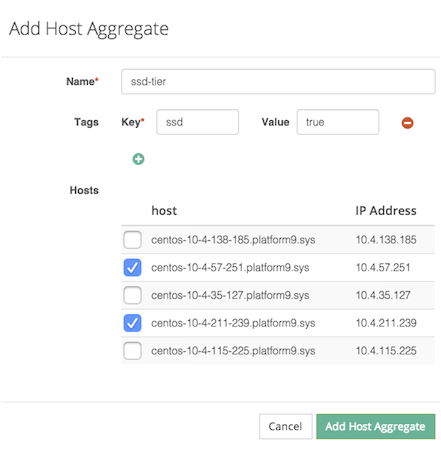
Click on the button to create a new host aggregate. In the wizard that pops up, you can
- Give the aggregate a name.
- Define one or more key-value pair tags to associate with the aggregate
- Select hypervisors that should be part of this aggregate.
- Submit the form.
Congratulations! At this point, the host aggregate is created and should be listed as part of the host aggregates tab.
Step 2 – View Utilization/Allocation Across Aggregate
Once you define an aggregate, Platform9 immediately gives you visibility into your current resource utilization and allocation, across compute, storage, and memory, in the context of the specific aggregate. This information can be used to answer questions such as how much capacity do I have in my Palo Alto data center, etc.

Step 3 – Optionally associate an Availability Zone
You can now choose to associate an availability zone with this host aggregate, which would create that availability zone, if it doesn’t exist already, and put all the hosts from this aggregate into that availability zone. A hypervisor can only belong to one availability zone, but you can choose to assign the same availability zone tag to multiple host aggregates. All the hypervisors, by default, belong to the ‘nova’ availability zone initially. Associating the aggregate with a new availability zone tag means removing all its hypervisors from this default zone and disassociating the tag ends up putting these hypervisors back in the default zone.
Availability zones are designed to be accessible to the end users, unlike host aggregates, by providing them a way to specify what logical zone to run their application in. The administrator can define what factors represent a zone, like geographic location of the hypervisors, their hardware capabilities or maybe some other availability criteria.
Step 4 – Add to Flavor
At this point, you are ready to start utilizing the resource tier as part of your multi-tenancy, or VM deployment. You do this by adding the aggregate to a new flavor.
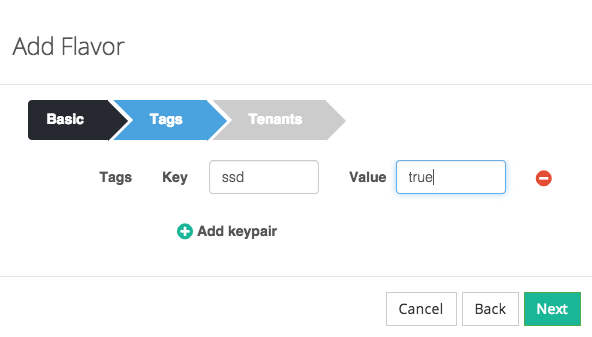
- Go to the flavors tab, and create new flavor.
- Specify the right amount of RAM, CPU, disk, for the flavor.
- Specify one or more tags to be included in the flavor.
- NOTE: If the tags specified in the flavor correspond to multiple aggregates, the OpenStack scheduler will choose one of the host aggregates when scheduling an instance.
- Select one or more tenants the flavor should belong to.
- Submit the form. This flavor is now ready to be used with the host aggregate created in step 1.
Step 5 – Launch an Instance
Now that we have set up the host aggregates and flavors, we will launch an instance on the host aggregate.
1. Go to the instances view, and click the button to create a new VM instance.
2. Select the image that the instance will use.
3. Select the flavor created in step 2 or specify an availability zone to spawn the instance.
Congratulations! The instance should now be running on the host aggregate created in step 1.
Step 6 – Aggregates and Multi-Tenancy
By giving access to the flavors that include the host aggregate to one or more tenants, OpenStack allows you to restrict access from that tenant to only resources that are part of that host aggregate. This is the mechanism to achieve isolation of resources across different tenants.