Setting up Kubernetes Clusters on Amazon VPC based Private Subnets
Using Amazon Virtual Private Cloud (VPC) based private subnets to deploy Platform9 Managed Kubernetes clusters improves the security of your application deployment.
Putting both master and worker nodes on private subnets prevents direct reachability to the nodes from the Internet, and reduces the overall attack surface. All master and worker nodes can access the Internet through a NAT gateway. The nodes can be accessed via a bastion host, if required.
If you are using site-to-site VPNs from your corporate network to Amazon Web Services (AWS), you may want to utilize private subnets, so that you can deploy the Kubernetes hosts on the address space that matches what you use internally. In this case, the Kubernetes hosts would be reachable from the corporate network via a secure VPN or a dedicated AWS connection, instead of transiting the insecure public Internet.
The following diagram is a conceptual representation of an Amazon VPC with a public subnet and a private subnet.
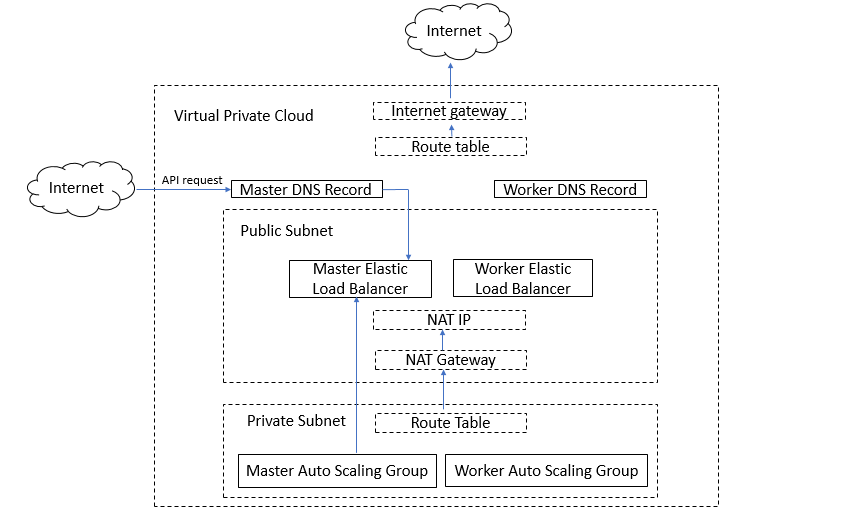
You can deploy your Kubernetes cluster on a setup that is similar to the setup seen in the above diagram.
Before you can create a Kubernetes cluster on an Amazon VPC based private subnet, you must have added AWS as your cloud provider. Refer to this article to add AWS as your cloud provider.
You can then take one of the following two paths to create a Kubernetes cluster.
- Create a Kubernetes cluster on an existing private subnet on your Amazon VPC.
- Create a VPC with public and private subnets during the creation of a Kubernetes cluster, and then create the cluster on the newly created private subnet.
The sections that follow provide details to
- Create a VPC
- Create a Kubernetes Cluster with Clarity UI
Create VPC
The following criteria must be satisfied by the Amazon VPC based private subnet, on which you want to deploy your Kubernetes cluster.
- A private subnet and a public subnet must be provided for each availability zone selected from the Amazon VPC.
- The private subnet should have external connectivity through a NAT gateway.
- The NAT gateway itself should be in the public subnet in order to get external connectivity.
Follow the steps given below to create a VPC and configure public and private subnets required for the Kubernetes cluster.
- Create a VPC with a /16 IPv4 CIDR block. Refer to Step 1-Create the VPC in http://docs.aws.amazon.com/AmazonVPC/latest/UserGuide/getting-started-ipv4.html for details.
- Edit the VPC to enable DNS hostname. Refer to http://docs.aws.amazon.com/AmazonVPC/latest/UserGuide/vpc-dns.html to enable DNS hostname.
- Create a subnet on the VPC that can be used by elastic load balancers(ELB). This is your public subnet. Refer to http://docs.aws.amazon.com/AmazonVPC/latest/UserGuide/VPC_Subnets.html#AddaSubnet to add a subnet.
- Enable auto-assignment of public IPv4 addresses for the public subnet created in the step above. Refer to http://docs.aws.amazon.com/AmazonVPC/latest/UserGuide/vpc-ip-addressing.html#subnet-public-ip to enable auto-assignment of IPv4 addresses.
- Create and attach an Internet gateway to your VPC. Refer to the Attaching an Internet Gateway section at http://docs.aws.amazon.com/AmazonVPC/latest/UserGuide/VPC_Internet_Gateway.html, to create and attach an internet gateway to the VPC.
- Create a route table in your VPC and add a route with a destination of 0.0.0.0/0 for IPv4 traffic. Refer to http://docs.aws.amazon.com/AmazonVPC/latest/UserGuide/VPC_Internet_Gateway.html for details.
- Forward all traffic to the Internet gateway for this route.
- Set the route table as the main route table. Refer to the Main Route Tables section in http://docs.aws.amazon.com/AmazonVPC/latest/UserGuide/VPC_Route_Tables.html for details.
- Create a subnet on the VPC. Ensure that the auto-assign IP address attribute is disabled so that this becomes a private subnet. Ensure that the availability zone for this subnet is the same as the one that is used in the public subnet.
- Create a NAT gateway on the public subnet. While creating the NAT gateway, create an Elastic IP and assign it to the NAT gateway. Refer to http://docs.aws.amazon.com/AmazonVPC/latest/UserGuide/vpc-nat-gateway.html#nat-gateway-creating for details.
- Create a route table for the private subnet. This is the NAT route table. Add a route for the NAT table and forward all traffic to the NAT gateway created on the VPC.
- Edit the route table subnet association to associate the NAT route table with the private subnet.
- Repeat the steps 3 to 12 for each availability zone to create public and private subnets for the availability zone.
The public subnet is accessible through the Internet gateway and the private network is accessible through the NAT gateway.
You can deploy your applications on the private subnet.
Platform9 Managed Kubernetes simplified the process by automating the deployment of a lot of the above components. Refer to this tutorial for more details on different networking configurations supported by Managed Kubernetes