Live Migration with Platform9 Managed OpenStack
Platform9 Managed OpenStack supports live migration on KVM.
What is live migration?
Live migration means migrating or transferring a virtual machine (VM) from one physical hypervisor (host) to another, while the VM is still running. The VM might have applications running on it.
The VM or application downtime during a live migration is very small or negligible.
The host from which a live or running VM is transferred, is called the source host. The host to which the running VM is transferred, is called the destination host.
When is live migration performed?
Live migration is performed in the following scenarios.
- It is not possible to bring down the running applications or VMs and have downtime for a cold migration.
- It is necessary to redistribute the load of multiple VMs running on the same physical machine.
Prepare hosts for live migration
You must be an administrator to perform live migration.
Note: When the instance storage is not shared between the source host and the destination host, block migration must be used. This type of migration can be slower, since it copies data and requires that both hosts have compatible CPU architectures.
The following steps must be performed on the source host and the destination host before you start with the live migration.
- TCP port 16509 must be open on both the source and the destination hosts.
Run the following command to add the text in the command to the end of /etc/libvirt/libvirtd.conf.cat<<-EOF>> /etc/libvirt/libvirtd.conf
listen_tcp=1
listen_tls=0
auth_tcp="none"
tcp_port="16509"
EOF - Run the following command to allow traffic for port 16509 on the host.
iptables -I INPUT 1 -p tcp --dport 16509 -j ACCEPT
- Run the following command to disable host key checking between the source host and destination host.
cat <<-EOF>> /etc/ssh/ssh_config

Host <host IP address>

StrictHostKeyChecking no

UserKnownHostsFile=/dev/null

EOF - Run the following command to enable a shell for the pf9 user.
chsh -s /bin/bash pf9
Note: After running the chsh command, you might get the message, ‘shell not changed’. You can safely ignore this message. - Configure all hypervisors to authenticate with each other via SSH Keys
- Register the private ssh key in /opt/pf9/home/.ssh/id_rsa on the host.
- Add the corresponding public ssh key to /opt/pf9/home/.ssh/authorized_keys on the host.
- Change the permissions on the public ssh key and the private ssh key such that both files are owned by the user pf9:pf9group.
The permissions for both of the public ssh key and the private ssh key must be “600” or read and write by owner only.
- Follow the operating system specific steps given below, based on your operating system.
- Steps for CentOS
- Configure libvirtd such that it is able to listen for migration requests and able to connect to other libvirtd services.
- Run the following command to add the text LIBVIRTD_ARGS=”–listen” to the end of /etc/sysconfig/libvirtd.
cat <<-EOF >> /etc/sysconfig/libvirtd

LIBVIRTD_ARGS="--listen"

EOF - Run the following command to restart the libvirtd service.
service libvirtd restart
- Steps for Ubuntu
- Configure libvirt-bin such that it is able to listen for migration requests and is able to connect to other libvirt-bin services.
- Run the following command to add the -l option to the libvirtd_opts.
vi /etc/default/libvirt-bin

libvirtd_opts="-d -l" - Run the following command to restart the libvirt-bin service.
service restart libvirt-bin
- Steps for CentOS
- Install the sysfsutils package. This is useful for resizing a VM or while performing a block migration.
Once the host preparation is complete, you are ready to perform a live migration of VM instances on Platform9 Managed OpenStack.
How to perform a live migration?
Live migration can be done in one of the following two ways.
- Using Clarity
- Using OpenStack Command Line Interface (CLI)
The steps for each of the above-mentioned ways are explained in the sections below.
Live Migration using Clarity
Live migration is a simple two-step process when it is performed by using the Clarity UI.
Note: Live migration through the Clarity UI is not enabled, by default. Contact Platform9 support to enable live migration in the Clarity UI, after you have completed the steps given above in this article.
Follow the steps given below to perform live migration through the Clarity UI.
- Log in to Clarity as an administrator.
- Click Instances and select the check box for the instance to migrate.
- Click More on the toolbar above the list of instances.
- Click the Migrate Instance option.
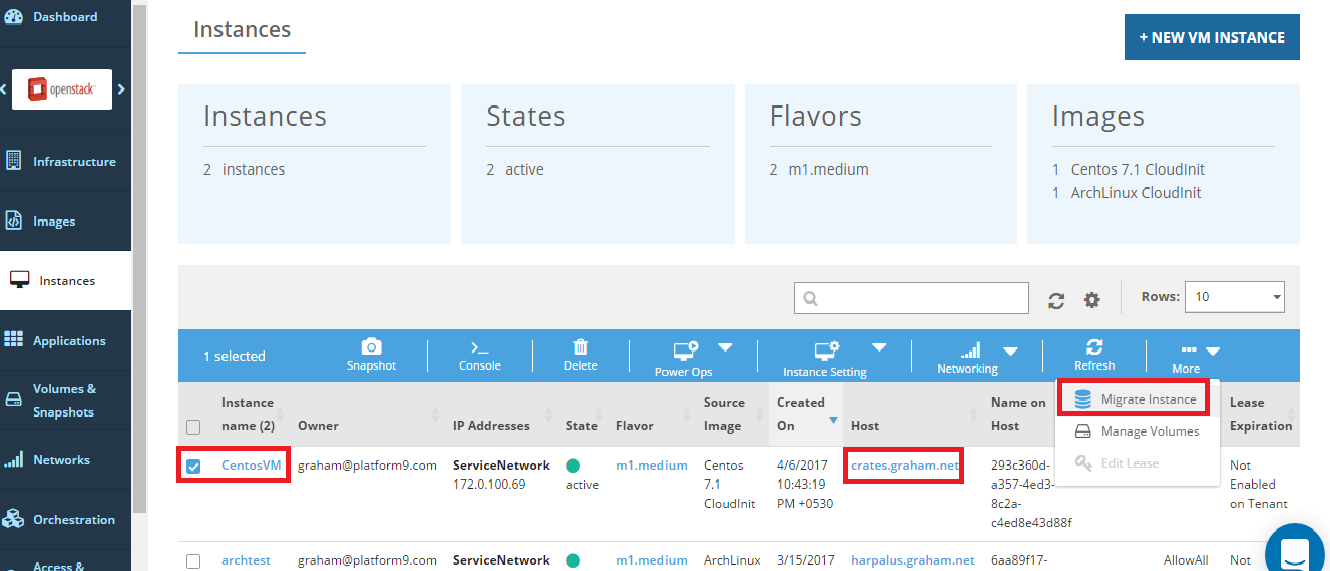
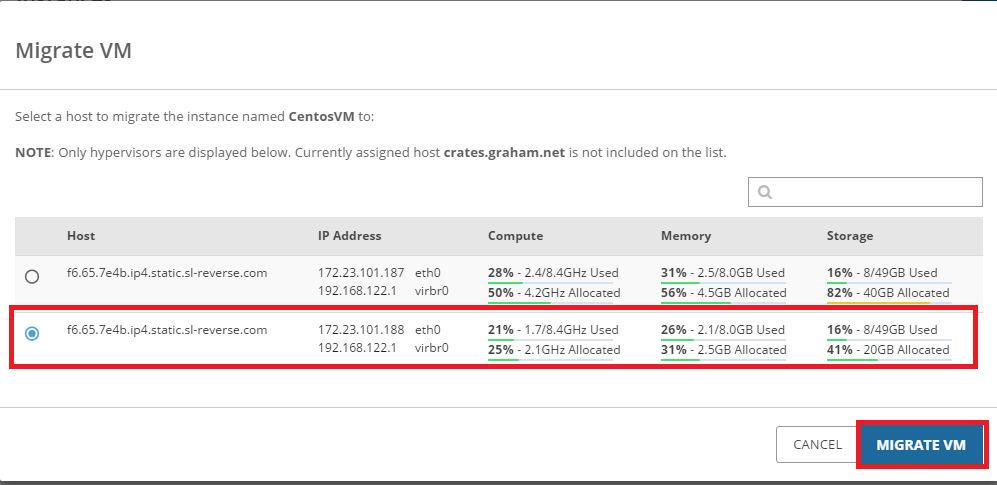
- Select the host to migrate the instance and click Migrate VM.
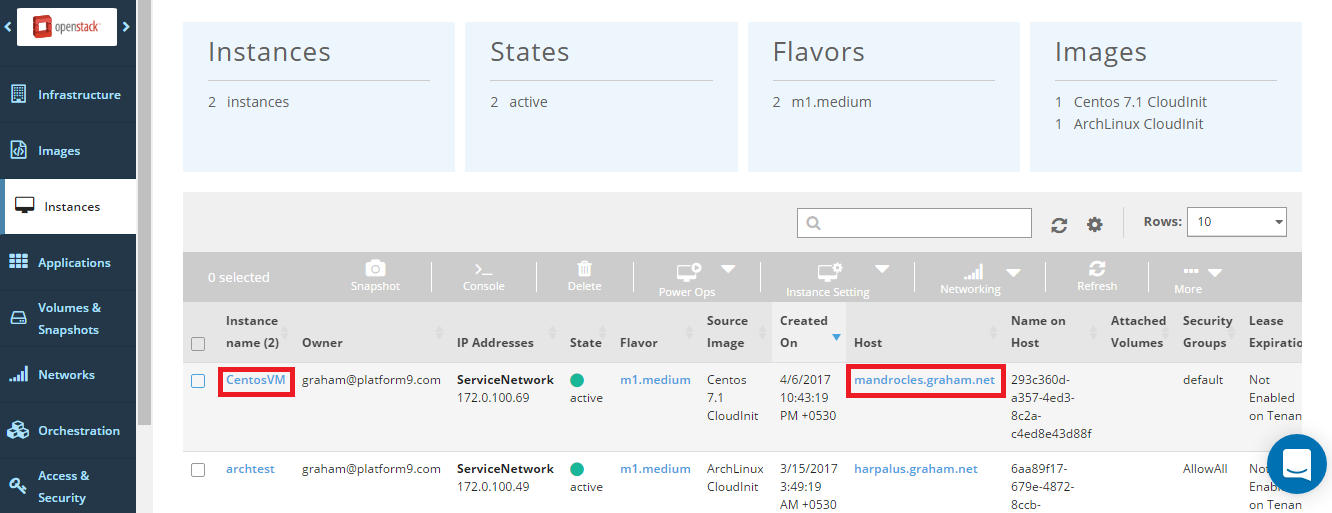
When the migration is successful, the destination host name appears as the host for the migrated VM instance.
Live Migration using OpenStack (CLI)
Run the following command on the OpenStack CLI, to perform live migration.
openstack server migrate --live <destination-host> <vm-name>
Note: The destination host is the UUID or OpenStack ID of the compute node. It can be obtained from Clarity.