Kubernetes FinOps: Elastic Machine Pool Step-by-Step guide : Part 2
If you’ve finished going through Part 1 of this post and are now back with a fresh beverage, welcome back. If everything went well in the previous steps, you now have a working EMP bare-metal pool with one or more EVMs attached to your EKS cluster. First, let’s ensure everything looks OK, and then we’ll go over your first steps to start using your new Elastic Machine Pool!
Verify your new EMP install
Quick console checks
In the EMP web console, if you click on your pool’s name in the list, you should see a dashboard something like this (the numbers of machines and the resource gauges may differ depending on what you selected during the pool creation):
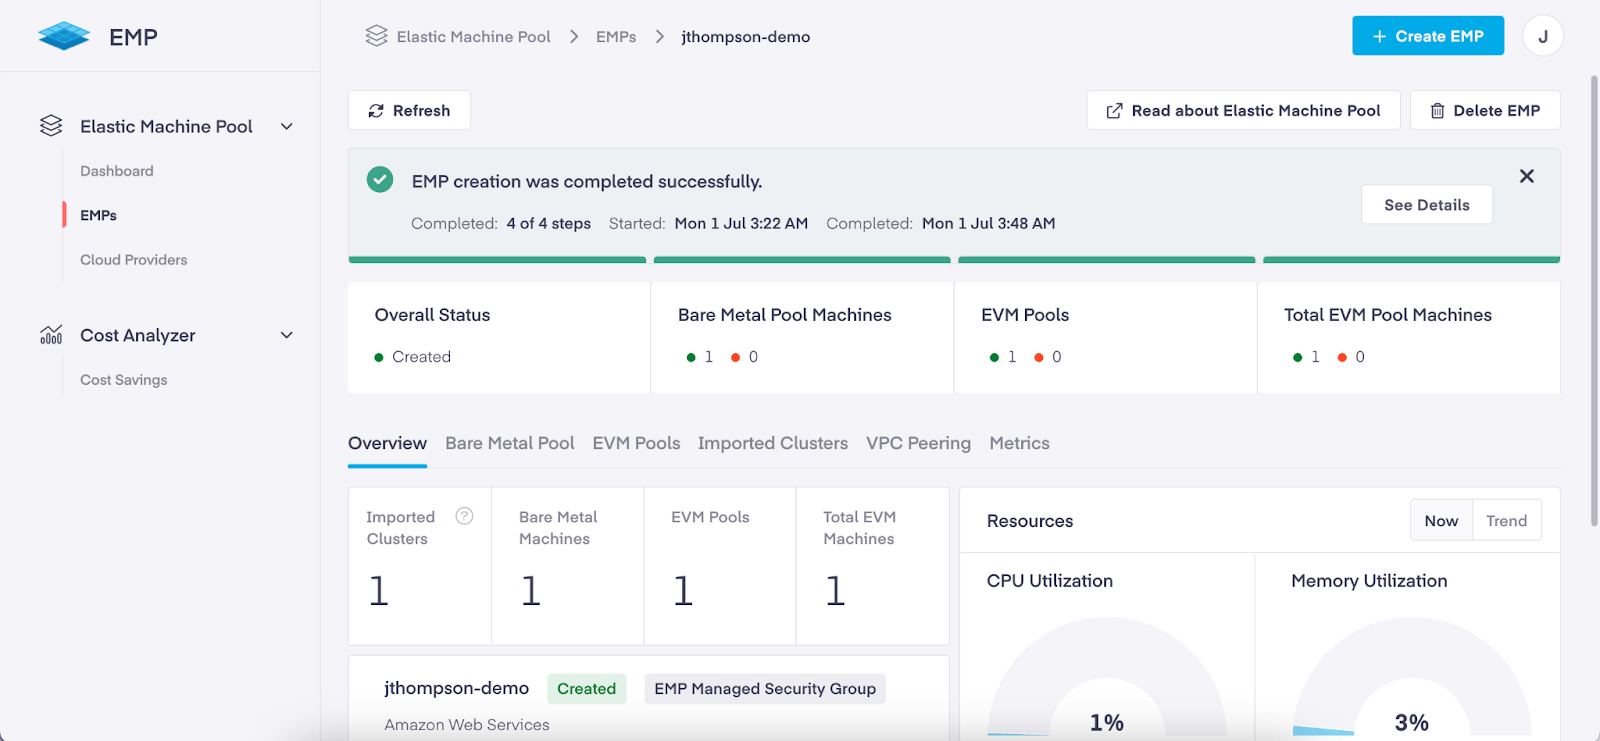
You can click on the “See Details” button and verify the completion of each step of provisioning EMP.
(You can also go into your AWS EC2 console, where you should see new bare-metal instances running in EC2.)
Check that EVMs are registered as worker nodes
In the AWS console view of your EKS cluster, you may or may not see the EVMs in the list of nodes created by EMP, depending on whether the cluster is configured to allow your AWS user logged into the console to access the cluster API. However, as long as you have a valid administrator kubeconfig, you can use kubectl to check the list of nodes:
$ kubectl get nodes
NAME                          STATUS   ROLES    AGE     VERSION
ip-10-9-148-10.ec2.internal   Ready    <none>   171m    v1.28.8-eks-ae9a62a
pf9-demo-ehmd82               Ready    <none>   6m14s   v1.28.0-emp.30
You can see that the ones registered by EMP will have versions that indicate they’re EMP VMs, but you can also verify by running the node list with a filter for nodes with a label specific to EMP:
$ kubectl get nodes -o jsonpath='{.items[?(@.metadata.labels.emp\.pf9\.io/owned=="true")].metadata.name}{"\n"}' That ugly-looking JSONPath filter will return just the names of the nodes with the label emp.pf9.io/owned: true: pf9-demo-ehmd82Run a test workload on EMP
To test EVM scale-up and scale-down, you can create a stub workload that requests a lot of resources but doesn’t actually do much. Apply this manifest to your cluster:
apiVersion: v1
kind: Namespace
metadata:
  name: emp-test
---
apiVersion: apps/v1
kind: Deployment
metadata:
  name: emp-test-deployment
  namespace: emp-test
spec:
  selector:
    matchLabels:
      app: emp-test-deployment
  template:
    metadata:
      labels:
        app: emp-test-deployment
    spec:
      tolerations:
      - key: "emp.pf9.io/EMPSchedulable"
        operator: "Equal"
        value: "true"
        effect: "NoSchedule"
      nodeSelector:
        emp.pf9.io/owned: "true"
      containers:
      - name: no-op
        image: alpine
        command:
        - "/bin/sh"
        args:
        - "-c"
        - "sleep 3600"
        resources:
          requests:
            memory: 3Gi
This will create a new namespace emp-test with a Deployment called emp-test-deployment running an Alpine Linux container that just sleeps for an hour, but each replica of that deployment will request 3 GiB of memory.
Notice two things in that manifest – we’ll talk about these shortly in the section about migrating your workloads:
- There’s a toleration for a taint named emp.pf9.io/EMPSchedulable.
- There’s a nodeSelector that selects nodes with the same label we used in our JSONPath filter for kubectl get nodes earlier.
After applying the manifest, you should now see the test deployment in the new test namespace running on an EVM – for example:
$ kubectl get pods -n emp-test -o wide
NAME                                  READY   STATUS    RESTARTS   AGE
IP             NODE              NOMINATED NODE   READINESS GATES
emp-test-deployment-ffd6c4578-krs9x   1/1     Running   0          17s   10.9.140.198   pf9-demo-ehmd82   <none>           <none>
Now, let’s scale that deployment up. In my example cluster with one EVM initially attached, after memory reservations for the OS and existing workloads were subtracted, a little under 15 GiB of memory was left for workloads on my EVM. Scaling that test workload to 5 replicas should therefore leave me with no room for one pod to schedule:
$ kubectl scale deployment --replicas 5 -n emp-test emp-test-deployment
deployment.apps/emp-test-deployment scaled
$ kubectl get po -n emp-test -o wide
NAME                                  READY   STATUS    RESTARTS   AGE
IP             NODE              NOMINATED NODE   READINESS GATES
emp-test-deployment-ffd6c4578-5gjzc   0/1     Pending   0          6s      <none>         <none>            <none>           <none>
emp-test-deployment-ffd6c4578-krs9x   1/1     Running   0          2m20s   10.9.140.198   pf9-demo-ehmd82   <none>           <none>
emp-test-deployment-ffd6c4578-v257c   1/1     Running   0          6s      10.9.139.61    pf9-demo-ehmd82   <none>           <none>
emp-test-deployment-ffd6c4578-z6v22   1/1     Running   0          6s      10.9.137.151   pf9-demo-ehmd82   <none>           <none>
emp-test-deployment-ffd6c4578-zttjl   1/1     Running   0          6s      10.9.137.203   pf9-demo-ehmd82   <none>
Note the Pending pod at the top of the list. We’ve consumed almost all of the available memory on the node with the other four, so it has nowhere to run – but EMP takes care of that, and after a few minutes we can see a new EVM spin up:
$ kubectl get no
NAME                          STATUS     ROLES    AGE     VERSION
ip-10-9-148-10.ec2.internal   Ready      <none>   3h36m   v1.28.8-eks-ae9a62a
pf9-demo-ehmd82               Ready      <none>   51m     v1.28.0-emp.30
pf9-demo-ercq4j               NotReady   <none>   24s     v1.28.0-emp.30
And shortly it becomes ready, and our pod can now run on it:
$ kubectl get no
NAME                          STATUS   ROLES    AGE     VERSION
ip-10-9-148-10.ec2.internal   Ready    <none>   3h37m   v1.28.8-eks-ae9a62a
pf9-demo-ehmd82               Ready    <none>   51m     v1.28.0-emp.30
pf9-demo-ercq4j               Ready    <none>   32s     v1.28.0-emp.30
$ kubectl get po -n emp-test -o wide
NAME                                  READY   STATUS    RESTARTS   AGE
IP             NODE              NOMINATED NODE   READINESS GATES
emp-test-deployment-ffd6c4578-5gjzc   1/1     Running   0          3m53s   10.9.140.126   pf9-demo-ercq4j   <none>           <none>
emp-test-deployment-ffd6c4578-krs9x   1/1     Running   0          6m7s    10.9.140.198   pf9-demo-ehmd82   <none>           <none>
emp-test-deployment-ffd6c4578-v257c   1/1     Running   0          3m53s   10.9.139.61    pf9-demo-ehmd82   <none>           <none>
emp-test-deployment-ffd6c4578-z6v22   1/1     Running   0          3m53s   10.9.137.151   pf9-demo-ehmd82   <none>           <none>
emp-test-deployment-ffd6c4578-zttjl   1/1     Running   0          3m53s   10.9.137.203   pf9-demo-ehmd82   <none>           <none>
(You can also watch the EMP console for these changes instead of running kubectl commands.)
Correspondingly, if you scale the deployment back down to 1 replica, you’ll shortly see the now-empty EVM deregister from the cluster. During all of this scale-up and scale-down, because the pods’ actual usage is minimal, the allocated memory on the Memory Utilization gauge on the dashboard for your Elastic Machine Pool will barely move.
Once you’re done, delete the test resources:
$ kubectl delete -f test-deployment.yaml
namespace "emp-test" deleted
deployment.apps "emp-test-deployment" deleted
Set up patch management for EMP-managed bare metal
Now that you’ve verified your EMP install is working, let’s do some housekeeping. To make sure that your EMP-based infrastructure continues to run well and stay secure you’ll want to set up AWS services to enable EMP to scan and patch the servers in your bare-metal pool. Platform9 publishes a CloudFormation template and an accompanying Python script to make this easy (you’ll need to run the Python script while authenticated to AWS as a user with the permissions required to create S3 buckets, apply CloudFormation templates, and manage the services defined in the template).
Migrate your first workloads to run on EMP-managed infrastructure
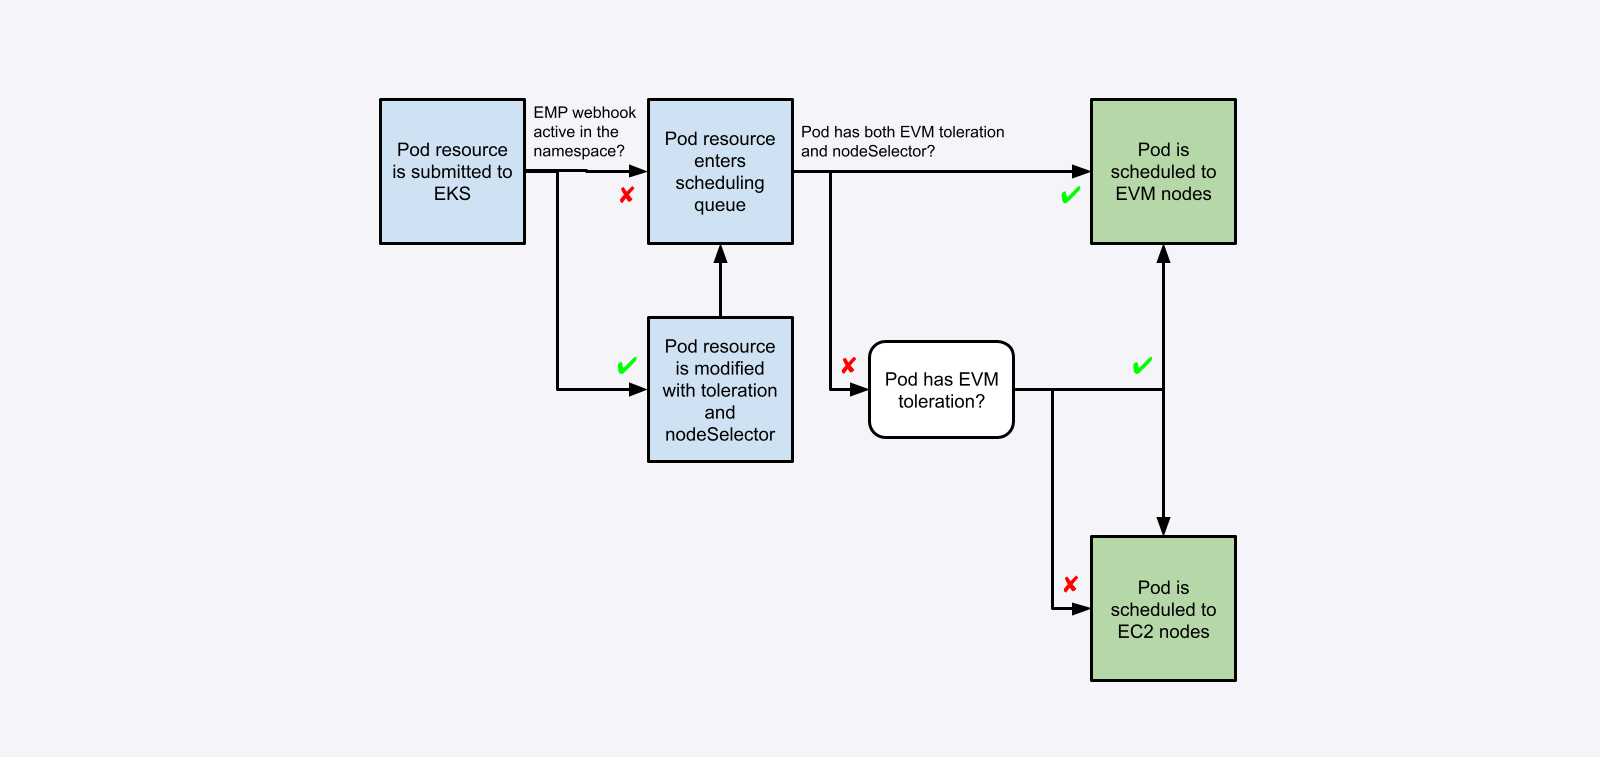
Even though you have EMP active in your cluster, you’ll notice that nothing runs on those nodes by default, even if you create a new Deployment (or modify or scale up an existing one). This is because EMP adds a NoSchedule taint to the EVM nodes it provisions: workloads that you want to be scheduled on these nodes need to be configured to tolerate the taint. You’ll also probably want to add a nodeSelector stanza to the workloads you migrate to EMP, so they run only on EVMs. You can make this happen primarily in two ways: manually add the toleration and the nodeSelector to your workloads (as we did earlier with our test workload), or use the webhook EMP installs to do this automatically.
This diagram provides an overview of the scheduling flow when EVMs are in use:
Manually configuring workloads
Using the manual method is a good first step to test workloads before enabling automatic configuration through the webhook; depending on how comprehensive any existing automation is, you might choose to use this method with your automation pipeline rather than using the webhook at all.
Add the following toleration to the spec field in your workload manifests:
    tolerations:
      - key: "emp.pf9.io/EMPSchedulable"
        operator: "Equal"
        value: "true"
        effect: "NoSchedule"
By default, the toleration will allow workloads to run on EVMs, but will not force them to do so. Since the end goal of migrating applications to run on EMP is generally to have them do so exclusively, you will also want to add a nodeSelector to the spec field to ensure those workloads are only scheduled to EVMs:
  nodeSelector:
        emp.pf9.io/owned: "true"
If you use Helm to deploy applications, charts often have a way to pass tolerations and nodeSelectors (or sometimes arbitrary fields within a pod spec, which could include both of those) as a value so that they can be rendered into the final manifest.
Using the EMP webhook
The EMP admission controller webhook looks for a ConfigMap named emp-profile-cm in the default namespace in the cluster. If that ConfigMap exists, the webhook parses it for a list of namespaces that the webhook should modify workloads on. The EMP admission controller will automatically add the toleration and the nodeSelector to new workloads deployed within those namespaces, if they don’t already have them. As an example, this ConfigMap will activate the webhook for all workloads in the default and my-application namespaces:
apiVersion: v1
kind: ConfigMap
metadata:
  name: emp-profile-cm
  namespace: default
data:
  namespaces: |
    [
        "default",
        "my-application"
    ]
(If you want to activate the webhook only for certain workloads in the designated namespaces, you can also use labels to select specific workloads – see the EMP documentation on workload configuration for details.)
Removing the EVM taints
NOTE: This generally should not be done in a production environment.
Removing the EVM taint from EVMs has the same effect as adding the toleration to all your workloads at once; workloads that do not run well on EVMs for any reason will be impacted if they are scheduled to those nodes, and may in some cases result in impacts to other workloads running on them as well (e.g. a new workload that uses non-io2 EBS volumes will cause the EVM it’s on to migrate much slower, impacting even workloads on the node that use io2 EBS volumes).
To remove the taint from an EVM and allow arbitrary workloads to be scheduled there, edit the node’s resource in Kubernetes. Once the taint has been removed, the EVM will be treated the same as other nodes by the scheduler and you will no longer need to add the toleration to workloads to allow them to run on EVMs.
Next steps
Now that you’ve successfully completed the Elastic Machine Pool installation in your cluster and started using it, don’t lose your momentum! We suggest the following as good followup actions to make sure you get the most out of EMP as soon as possible:
- Make sure you start watching for release notes and other updates from Platform9 – we’ll send them via e-mail but we’ll also publish release notes in the EMP documentation, as well as blog posts about key new features or use cases.
- Begin tracking your cost savings over time in the EMP console – and we’d love to hear from you as you do so, either about notable successes you’ve had, or cases you’re still struggling with that may help us improve EMP’s capabilities.
- Start your workload migration to EMP! As you migrate workloads, don’t forget to scale your EC2 node pools (if any) down appropriately so you can fully realize your cost savings.
Additional reading and reference
Previous articles and blog posts by Platform9
Kubernetes FinOps: Right-sizing Kubernetes workloads
Platform9 Elastic Machine Pool for EKS Cost Optimization
Documentation:
Kubernetes documentation:
Elastic Machine Pool documentation
- Kubernetes FinOps: Elastic Machine Pool Step-by-Step guide : Part 2 - July 9, 2024
- Kubernetes FinOps: Elastic Machine Pool(EMP) Step-by-Step guide : Part 1 - July 9, 2024
- Kubernetes FinOps: Right-sizing Kubernetes workloads - April 1, 2024