Configure NFS Shared Storage for OpenStack Glance Image Catalog or VM Storage
This article describes steps to configure NFS shared storage to get it working with your Platform9 OpenStack private cloud.
By default, Platform9 assumes certain locations on your Linux server for storage of virtual machine data and image catalog data. But you can customize those locations to better suit your environment.
On the NFS Server
Step 1 – Create and Export Shared Directories
You will want to create two separate directories, one for virtual machine storage and another for image catalog storage. Suppose that you want to create this directory structure under /pf9 on your NFS server.
[code lang=”bash”]mkdir -p /pf9/instancesmkdir /pf9/imagelibrary[/code]
Add a line to /etc/exports to export these directories with appropriate permissions. For more information on this, refer to How to Setup an NFS Server on CentOS
[code lang=”bash”]echo “/pf9 10.0.0.0/8(rw,no_root_squash)” > /etc/exports[/code]Restart NFS and export all directories.
[code lang=”bash”]service nfs restartexportfs -a[/code]
Step 2 – Configure Iptables
Configure iptables and open appropriate NFS port to allow NFS traffic.
[code lang=”bash”]iptables -I INPUT -p tcp –dport 2049 -j ACCEPT[/code]On the Physical Servers to Be Added to Platform9 OpenStack
Step 1 – Create User And Group
On each server that you plan to add to Platform9, create a “pf9” user, a “pf9group” group with “pf9” user being part of “pf9group” group. Make sure that the user and group have exact same UID and GIDs across all servers being added to Platform9. This step is critical for Platform9 to be able to register a virtual machine from one physical server to another.
Suppose you would like to assign UID 1024 to pf9 user and GID 500 to pf9group group.
On CentOS:
[code lang=”bash”]groupadd –gid 500 pf9groupadduser –comment “The Platform9 user” –gid 500 –uid 1024 pf9[/code]
On Ubuntu:
[code lang=”bash”]addgroup –gid 500 pf9groupadduser –disabled-password –gecos “Platform9” –uid 1024 pf9
adduser pf9 pf9group[/code]
Step 2 – Mount NFS Directory for Virtual Machine Storage
Suppose that your NFS server IP address is 10.1.1.1
On each Linux Server to be added to Platform9, mount the NFS directory that will store data for virtual machines. Suppose you would like to mount it to /mnt/nfs/instances.
[code lang=”bash”]mkdir -p /mnt/nfs/instancesmount 10.1.1.1:/pf9/hosts /mnt/nfs/instances[/code]
Step 3 – Mount NFS Directory for Image Catalog Storage
In addition, on the Linux server that will also host image catalog, mount the NFS directory that will store data for image catalog. Suppose you would like to mount it to /mnt/nfs/imagelibrary.
[code lang=”bash”]mkdir -p /mnt/nfs/imagelibrarymount 10.1.10.1:/pf9/imagelibrary /mnt/nfs/imagelibrary[/code]
Step 4 – Change Owner of Virtual Machine Storage and Image Catalog Storage
Now, change the owner of the virtual machine storage and the image catalog storage to pf9 user, by using the chown command.
[code lang=”bash”]chown -R pf9:pf9group /mnt/nfs/instanceschown -R pf9:pf9group /mnt/nfs/imagelibrary[/code]
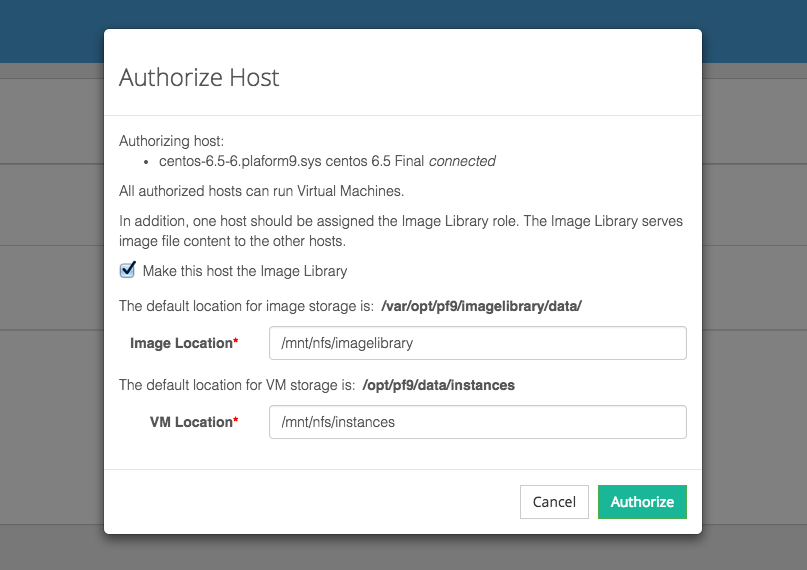
That’s it! And now you are ready to add these servers to Platform9. During authorization of the servers, you can customize the location of virtual machine and image catalog storage and specify the NFS directories we just configured above.
That’s it! At this point you can started using your NFS shared storage with your Platform9 OpenStack private cloud.