When you’re studying Kubernetes, one of the first things you learn is that it won’t handle any storage requests for your applications when deploying a new cluster by default. This is because K8s was initially designed only for stateless apps; thus, storage was considered to be an add-on. This was such a common problem that lots of companies in the past tried to find ways that they could address issues like data integrity, retention, replication, and the migration of their datasets into K8s.
K8s has become friendlier in that respect in recent years, and the storage options are now more mature. In this guide, we will explain the fundamental concepts of Kubernetes storage and its data persistence options. We’ll also take a look at how a typical administrator can create Persistent Volumes (PVs) and assign Persistent Volume Claims (PVCs) by applying specific storage manifests. Finally, we will dig a little deeper by introducing PortWorx and discussing its high-availability approach to provisioning storage in K8s.
Let’s get started.
Data Persistence Options in Kubernetes
The Kubernetes docs dedicate an entire section to storage and explain all of the available configuration options. While these docs are excellent reference material, this article will serve as an in-depth guide to K8s storage.
As with all K8s resources, you use yaml manifests to declare and assign persistence and configuration options for your infrastructure components. You treat storage as a resource that needs to be assigned to applications.
We’ll start by explaining how they are used in practice:
Persistent Volumes (PV)
When we talk about volumes, we usually associate them with physical disks for storing files and folders. For example, your applications might need temporary or permanent storage, so you’d install them in PVs. Most applications need storage to be available in order to function correctly. In K8s, pods run instances of your application (like a database or a fileserver), and they often have persistent storage requirements that outlast their life cycles.
A Persistent Volume represents persistent storage that may be reserved for pods in advance. In this particular case, there is a distinct separation of storage creation and management. A PV is used purely for creating the storage type and declaring the characteristics of the storage (i.e. capacity, access mode, storage class, or reclaim policy). On the other hand, the pod needs to use a Persistent Volume Claim in order to use a PV.
The process of creating and assigning PVs is specific to cloud providers. In the following steps, for example, we created two 10GB disks in GCloud and assigned PVs to them:
$ gcloud compute disks create gke-pv --size=10GB
$ gcloud compute disks create gke-pv-2 --size=10GB
NAME    ZONE            SIZE_GB  TYPE         STATUS
gke-pv  europe-west2-a  10       pd-standard  READY
gke-pv-2  europe-west2-a  10       pd-standard  READY
$ cat << EOF > pv-example.yml
apiVersion: v1
kind: PersistentVolume
metadata:
  name: pv-example
spec:
  accessModes:
  - ReadWriteOnce
  capacity:
    storage: 10Gi
  persistentVolumeReclaimPolicy: Recycle
  gcePersistentDisk:
    pdName: gke-pv
    fsType: ext4
  volumeMode: Filesystem
---
apiVersion: v1
kind: PersistentVolume
metadata:
  name: pv-example-2
spec:
  accessModes:
  - ReadWriteOnce
  capacity:
    storage: 10Gi
  persistentVolumeReclaimPolicy: Recycle
  gcePersistentDisk:
    pdName: gke-pv-2
    fsType: ext4
  volumeMode: Filesystem
EOF
$ kubectl apply -f pv-example.yml
persistentvolume/pv-example created
Some of the PV parameters in the spec are:
- persistentVolumeReclaimPolicy: Defines the reclaim policy (retain, recycle, or delete) when the user deletes the corresponding PersistentVolumeClaim.
- gcePersistentDisk: This is a GCloud-specific rule that mentions the specific disk name that we created earlier.
- capacity: This defines the amount of storage that we want to use in this volume scope.
- accessModes: This defines the kind of access mode we require on this volume.
Once you’ve registered this PV, it will be available for applications using a Persistent Volume Claim (PVC). Next, we’ll show you how you can use it.
Persistent Volume Claims (PVCs)
A Persistent Volume Claim (PVC) is a request for storage by a user. Because the request is separated from the creation, K8s can enforce access control mechanisms based on the user or pod credentials and the available PVs.
A PVC is directly related to a PV, and K8s will prevent an assignment if something does not match their respective requirements. For example, let’s create two PVCs and try to claim the available storage from the previous PV that we created:
$ cat pvc-example.yml
apiVersion: v1
kind: PersistentVolumeClaim
metadata:
  name: pvc-example-1
spec:
  storageClassName: ""
  volumeName: pv-example
  accessModes:
    - ReadWriteOnce
  resources:
    requests:
      storage: 5Gi
---
apiVersion: v1
kind: PersistentVolumeClaim
metadata:
  name: pvc-example-2
spec:
  storageClassName: ""
  volumeName: pv-example-2
  accessModes:
    - ReadOnlyMany
  resources:
    requests:
      storage: 10Gi
$ kubectl apply -f pvc-example.yml
persistentvolumeclaim/pvc-example-1 created
persistentvolumeclaim/pvc-example-2 createdIn pvc-example-2, we deliberately specified an accessMode that is incompatible with the PV accessMode. Because K8s will adhere to the available PV accessModes, it will not reserve the volume for that claim. When you inspect the status of the PVC, you will see that, although the first PVC was successfully bound, the second one wasn’t:
$ kubectl get pvc -w
NAME            STATUS    VOLUME       CAPACITY   ACCESS MODES   STORAGECLASS   AGE
pvc-example-1   Bound     pv-example   10Gi       RWO                           18s
pvc-example-2   Pending   pv-example-2   0                                        18s
As you can see, K8s will check various parameters like accessMode as well as the storage request versus the available storage in the PV or storageClassName. Speaking of storage classes, we’ll explain their role when requesting PVs next.
Storage Classes
A storage class represents a particular type of storage that a user wants to use. This can be either physical, virtual, or qualitative storage. Some users need PersistentVolumes with varying properties, such as performance, redundancy, or reliability.
Using the above example, we can create a standard disk in GCloud and assign a standard storage class plus another one for fast SSD as follows:
$ gcloud compute disks create gke-pv-ssd --type=pd-ssd --size=10GB
We create the storage classes (standard and fast) like this:
apiVersion: storage.k8s.io/v1
kind: StorageClass
metadata:
  name: standard
provisioner: kubernetes.io/gce-pd
volumeBindingMode: Immediate
allowVolumeExpansion: true
reclaimPolicy: Delete
parameters:
  type: pd-standard
  fstype: ext4
  replication-type: none
---
apiVersion: storage.k8s.io/v1
kind: StorageClass
metadata:
  name: fast
provisioner: kubernetes.io/gce-pd
volumeBindingMode: Immediate
allowVolumeExpansion: true
reclaimPolicy: Delete
parameters:
  type: pd-ssd
  fstype: ext4
  replication-type: none
When we apply this manifest, these two storage class types will be available for use within a PV manifest.
One thing to note is that some provisioners (like GlusterFS) are internal and supported by the K8s project itself. You can view the source code here. However, you also have the option to define and use external provisioners, which you can do by following this external provisioner specification.
Changing the PVCs in our examples is as easy as specifying the name of the storage class using the storageClassName field:
storageClassName: fast
Now, we’ll explain the role of the Container Storage Interface (CSI) in K8s storage.
The Container Storage Interface (CSI)
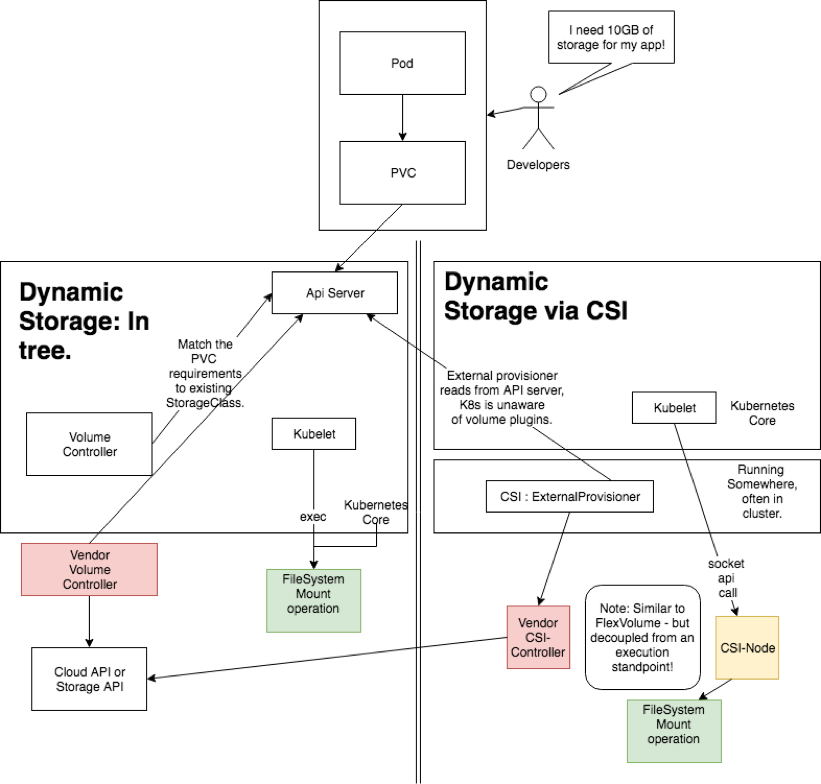
The CSI represents ongoing efforts to improve the option of adding extensible volume plugins in K8s. Originally, K8s offered a basic volume plugin system that was part of the internal K8s binary. It was very cumbersome to extend it or apply fixes, as it required a release process to match the main core K8s distribution.
With the CSI, though, any vendor can interface with the specification and write compatible storage plugins. The core specification exposes a RPC interface file, and it must be provided with gRPC endpoints that handle those calls. Once this is done, you will need to deploy the CSI driver to the K8s cluster using this recommended method.
Then, you can use these CSI volumes with the Kubernetes storage API objects that we explored earlier: PVCs, PVs, and StorageClasses. You usually specify StorageClasses pointing to the CSI provisioner and assign them to PVs and PVCs like this:
kind: StorageClass
apiVersion: storage.k8s.io/v1
metadata:
  name: premium-ssd
provisioner: csi-ssd-driver
---
apiVersion: v1
kind: PersistentVolumeClaim
metadata:
  name: request-for-ssd
spec:
  accessModes:
  - ReadWriteOnce
  resources:
    requests:
      storage: 5Gi
  storageClassName: premium-ssd
Now, we’ll explain the basic steps that a cluster admin follows to create PVs.
How a Cluster Admin Creates Kubernetes Storage PVs
Now, we can show you the fundamental steps that a cluster admin takes to manage clusters and create PVs.
- Provision disk storage: The first step is to provision blocks of available storage to be assigned as PVs. This storage can be from the K8s cloud provider, an external NAS server, or an external provider like PortWorx. You can also use different types, such as SSD, HDD, or replicated SSD.
- Create and assign storage classes: The second step is to create relevant storage classes for each use case that you want to offer. For example, the admin can create standard storage classes for development and fast storage classes for production databases. They can also maintain different types of storage classes for backup.
- Allocate PVs using relevant storage classes: The third and final step is to utilize existing or external CSI plugins to allocate PVs using the available storage classes defined in the previous step. These PVs should be namespaced and created on a use-by-use case. For example, cluster admins might create PVs for development that use standard storage classes, have a certain amount of storage, and are limited to a specific region. At that time, they might also create identical PVs for staging and production that offer premium performance, storage limits, or specific topologies.
Once the PVs and disks have been created, the cluster admins are responsible for maintaining their status and reliability. From the consumer’s point of view, they only need to create associated PVCs and reference them in their volume specs:
volumes:
    - name: application-pv-storage
      persistentVolumeClaim:
        claimName: pvc-example-1
This way, each pod instance will have a unique PVC claim that’s allocated to it when it gets deployed in the cluster.
In the last section, we’ll explain how to achieve production-grade K8s storage with PortWorx.
Achieving Production-Grade Kubernetes Storage with PortWorx
PortWorx is an external storage provider that offers premium K8s storage addons, among other services. PortWorx works by providing a custom CSI driver that you can either deploy on your cluster or let Portworx host for you. This way, PortWorx abstracts most of the details and complexity from the consumer while still offering the best storage services.
To get started with PortWorx, all you need to do is follow the proper tutorial for deploying K8s in Platform9. You need to use the PortWorx CSI driver and apply the spec. Within an hour, you will have a production-ready K8s storage solution.
Given the multiple options for configuring storage in a K8s cluster, you’ll want to invest a significant amount of time in learning about the different options and how to deploy the storage environment that’s most suitable for your needs. By using PortWorx to abstract storage and Platform9 to abstract the complexities of K8s away, you can get the best of both worlds.
Next Steps
If you have a cluster deployed and are ready to test out storage, check out our blog post on setting up Ceph with Rook: https://platform9.com/blog/how-to-set-up-rook-to-manage-a-ceph-cluster-within-kubernetes/.


