
Introduction
In the previous blog article “Kubernetes Helm Accelerates Production-Ready Deployments”, we provided an overview of Kubernetes Helm and the benefits it can offer in improving developer productivity, reducing deployment complexity, and achieving production readiness quickly. In this blog, we will provide an overview on deployment of Helm and Helm Charts. This can be carried out in one of two ways:
- Do It Yourself (DIY) deployment of Helm, Tiller, and Monocular
- Automated implementation using a vendor solution e.g. Platform9 Managed Kubernetes
DIY Installation of Helm and Tiller
Releases of Helm for Linux, OSX and Windows are available in Github. Each release can be downloaded, extracted from a tarball, and its binary file moved to the desired destination. A sample set of instructions for a Minikube installation of Helm 2.7.2 on Mac OSX is provided below:
# obtain the desired Helm release from Github - 2.7.2 in this case

$ curl -O https://github.com/kubernetes/helm/archive/v2.7.2.tar.gz

# extract the tarball

$ tar -zxvf helm-v2.7.2-linux-amd64.tgz

# move the “helm” binary to the appropriate location

$ mv linux-amd64/helm /usr/local/bin/helm
Upon installing the client, Tiller (the server component of Helm) can be installed using the helm init command.
Additional instructions to install Helm Client and Tiller using binary releases, Homebrew (for macOS), from script, from canary builds, and from source are available at helm.sh and the Helm install page. These instructions can be used to install Helm on Kubernetes clusters locally, on Ubuntu 16.04 and Fedora release 25, private clouds (VMware or OpenStack), and public clouds (AWS, GCP, Azure, etc.).
DIY Installation of Monocular
Monocular is a dashboard for managing Helm Charts. In order to manually install Monocular, users need to perform the following steps:
- Install Helm and Tiller on a Kubernetes cluster
- Install NGINX Ingress Controller
- Add the monocular repository and deploy monocular in your Kubernetes cluster
- Obtain the ingress endpoint and access its IP address for the Monocular UI. An example screenshot is provided below.

Further details on deployment are available in the Monocular Github repository.
Disadvantages of DIY Installations
The first disadvantage of manually installing and maintaining Helm is increased operational complexity. From October 2017 to January 2018, there have been five releases of Helm and Tiller. Keeping pace with these rapidly changing projects and ensuring timely upgrades, in addition to upgrading Kubernetes infrastructure, can be tedious for operations teams. Further, production-grade features such as high availability, multi-tenancy and security require additional time and effort on the part of operations teams.
Second, manually managing Helm deployments will have an adverse impact on time to value. Manual installation of Helm, Tiller and Monocular require proficiency working with Kubernetes and an understanding of Kubernetes resources. Deployments will require appropriate configurations of the Tiller server and Monocular API, UI, and MongoDB pods. Even in a scenario wherein a developer leverages a local Minikube installation to author a Helm Chart, it would not be possible for her to test the application in a production environment, which includes security configurations, multiple tenants, and highly available clusters.
Lastly, a manual installation does not provide any security configuration for production-grade deployments. These deployments can be associated with high-value data, include multiple tenants, and be exposed to potentially untrustable network actors or applications. In order to secure Helm and Tiller installations it is necessary to bootstrap and manually implement Role-based Access Control (RBAC) and Transport Layer Security (TLS), among other features.
- Role-based Access Control (RBAC): To limit Tiller’s actions within the Kubernetes cluster, Roles and Role Bindings should be implemented, thereby placing limits on the types of Tiller-based installations in the Kubernetes cluster. In addition, RBAC limits the scope of each user. Should a user’s credentials be compromised, RBAC ensures that damage from the security breach is limited since the user would have been granted a limited set of permissions.
- Tiller gRPC Endpoint and TLS: Default installations of Tiller provide no authentication, and any process within the cluster can use the Tiller gRPC endpoint to perform actions in the cluster. While this isn’t an issue for local Minikube clusters, production clusters with shared access among many users require proper authentication using TLS to ensure that malicious actions on the cluster are minimized.
The manual implementation of these security enhancing capabilities further increase the complexity of the deployment process.
Using Automation to Deploy Kubernetes Helm
Helm, Tiller and Monocular installations can be automated to provide simpler deployment of Kubernetes Apps via Charts. Platform9’s Kubernetes App Catalog is an example of a push-button production-grade implementation of Kubernetes Helm that reduces operational complexity and time-to-value by enabling easy provisioning and management of Helm Charts ( Kubernetes apps) while providing RBAC security configurations and TLS authentication capabilities out of the box. The App Catalog includes access to software packages through the official Helm Charts repositories (stable and incubator), as well as Fission repositories. In order to get started with Helm using Platform9 Managed Kubernetes, users need to perform the following three simple steps:
- Create a Kubernetes cluster with the App Catalog enabled
- Add any other Helm Charts repositories that are needed
- Optionally define a storage class if your app requires persistent storage
The App Catalog is enabled by a simple selection during the cluster creation wizard. On completion of the cluster creation, the apps can be accessed via Platform9’s Clarity UI, as shown below. Alternatively, the Helm CLI may also be used.
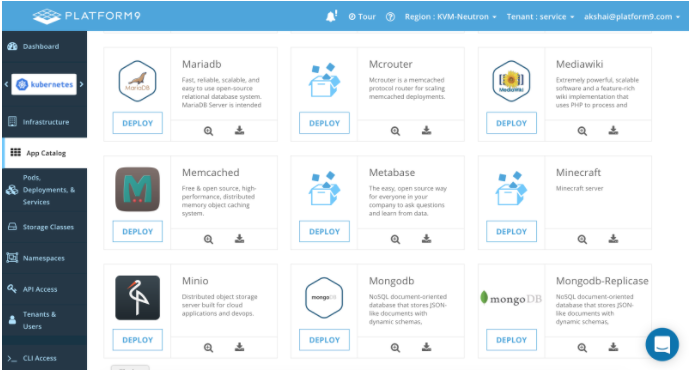
Accessing Platform9 App Catalog via the Clarity UI
Detailed instructions on configuring the App Catalog are available in the Deploying Kubernetes Apps support article.
Conclusion
Getting started with Helm can be accomplished through a DIY installation or by leveraging automated installation using a vendor such as Platform9. While a DIY installation is sufficient for a local cluster, it provides limited/no security and is associated with significantly higher operational complexity. Automated installations, such as Platform9’s App Catalog, can provide security through RBAC configurations and TLS authentication out of the box, while reducing operational complexity and time-to-value. Platform9 also offers zero-downtime Kubernetes upgrades and 24×7 support.