There are a number of different options that software engineering organizations can consider when evaluating which Kubernetes management solution is right for them. This article seeks to provide DevOps engineers with a clear picture of the similarities and differences between three popular Kubernetes deployment and management tools: Kops, EKS, and Platform9 Managed Kubernetes (PMK).
This article assumes that the reader is already familiar with Kubernetes; if not, you should review the Kubernetes documentation for a very clear explanation of what you need to know to get started. Platform9 has also posted a number of videos on YouTube covering all aspects of setting up and managing Kubernetes.
Here at Platform9, we often hear from IT teams who tell us that they want to move from Kops to PMK because they have found Kops to be difficult to set up and manage. Some teams have told us that they ended up defaulting to Amazon EKS as their Kubernetes solution, and now they’re looking to replace it with a multi-cloud solution that doesn’t have the limitations of EKS.
To show you how Kops, EKS, and PMK compare, we will examine each option based on the following:
- Setup and Deployment
- Configuration and Access
- Cluster Management
- Portability, Multi-Cloud Support, and Lock-In
- Networking and Load Balancing
At-A-Glance Comparison (tldr)
The following table can be used as a cheat sheet to compare each solution. We’ll go into more detail about each section below.
| Kops | EKS | Platform9 | |
| Setup and Deployment | Moderate (CLI only), requires some CLI knowledge to complete. | Simple to complex, depending on your chosen deployment methodology – e.g CLI vs UI. | Simple setup and deployment using web UI. CLI setup is also available. |
| Configuration and Access | Complex (CLI only), requires some CLI knowledge to complete. | Moderate, requires knowledge of other AWS services such as IAM and ECR. | Simple configuration for cluster via web UI. User access creation available via web UI as well. CLI also available. |
| Cluster Management | Complex (CLI only), requires more advanced CLI knowledge along with other tools such as kubectl. | Moderate, control plane is managed by AWS. Scaling and container deployment is user managed. | Simple to manage. Control plane is abstracted and managed by Platform9. Scaling easily done via CLI or web UI. |
| Portability | Good, but doesn’t run on bare metal or VMs outside of supported cloud providers. | Everything works best with AWS-based solutions (except containers which are portable). | Excellent portability across cloud providers as well as bare metal. |
| Networking | Good, but requires knowledge of CNI and Kubernetes network plugins. | Good when using AWS-based solutions. | Excellent. Multiple network plugins available depending on user requirements. |
Kops
Kops is the Kubernetes community’s officially supported method of setting up and maintaining Kubernetes clusters in the cloud. Kops is short for Kubernetes Operations and is more accurately written as “kOps,” but we’ll continue to refer to it as Kops for the sake of simplicity.
Kops is a CLI-based tool and is usually installed alongside kubectl for complete cluster management. It offers a number of features that are worth considering when you’re evaluating which solution you want to use for cluster setup.
Since Kops is supported directly by the Kubernetes community, it’s often the first solution that teams try. The most common issue that teams run into with Kops (depending on the use case), is the complexity of managing it.
Kops Features
- Granular control of Kubernetes cluster setup in the cloud via a CLI-based tool that can be installed locally on your laptop or a virtual instance.
- The ability to create, destroy, upgrade, and maintain Kubernetes clusters.
- Capable of deploying high-availability (HA) Kubernetes masters.
- Provisions the required cloud infrastructure on supported platforms. As of this writing, AWS is the only supported cloud provider, but support for other providers is available in either alpha or beta stages of development.
- The ability to generate Terraform configurations that can then be reviewed and deployed using terraform plan and terraform apply.
- This feature is very useful because you can diff your configs in git to see changes that are proposed or committed.
- It is somewhat limited in that kops still considers what it deploys to be the desired state, whereas Terraform configurations are considered a representation.
- Therefore, if you change your Terraform configs and apply them directly, you may run into conflicts. In other words, it’s probably best to make your changes through Kops rather than making them manually through Terraform unless you really know what you’re doing.
- Support for managed add ons, including:
- AWS Load Balancer Controller, which helps support AWS ALB and NLBs.
- Cluster autoscaler for adjusting the size and number of the worker nodes.
- Cert-manager, a native Kubernetes certificate management controller used for managing certs from different providers, such as Let’s Encrypt, Vault, or self-signed certs, etc.
- Metrics Server for collecting Kubernetes metrics via an API server for the purpose of cluster autoscaling. This feature is not meant for metrics forwarding or use with various monitoring or observability systems such as Prometheus.
- There are other features as well.
- Container Network Interface (CNI) is supported for different networking providers, including AWS VPC, Flannel, Kubenet, Kube-router, Weave, etc.
- Support for various other features if you want to start digging into the platform and what it can offer.
Probably the biggest benefit of Kops is the granularity and flexibility one gains when using it with Kubernetes. It’s a great way to dig into the nitty gritty of the platform and learn all of the parts that one wouldn’t normally learn with a hosted or managed service.
With that said, it also requires a significantly higher overhead since there is a learning curve associated with getting up to speed on Kubernetes setup, configuration, and maintenance. Therefore, it might not be feasible, depending on your available personnel, in-house skill sets, and time to deliver.
Setup and Deployment
The first step in setting up and deploying a cluster with Kops is to install Kops and kubectl. You might also want to consider installing other tools, such as minikube and kubeadm (which are also referenced in the link).
In general, these are relatively simple operations that can be performed by almost anyone who is familiar with the command line on any OS. It can be done via brew on macOS, curl on Linux or macOS, or via binary on Windows.
Configuration and Access
We will show you an example of configuration and access using AWS, since it is the only supported cloud platform.
You must have an AWS account set up and configured, and it should be configured using the recommended best practices.
You should not use the unified billing or organizations master account or the root user in any AWS account to perform the actions required to set up your Kubernetes cluster. Instead, you should use a sub-account with a named IAM user and least privileges.
We won’t do a deep dive on Kops setup and configuration here, but you should know that there are several other steps involved, including:
- Installation of the AWS CLI tools, which is the standard practice for any type of CLI access to AWS.
- You can then create the dedicated Kops IAM user, group, and associated policies for CLI access to your designated AWS account.
- Configuration of Route53 to add the required DNS records.
- Setup and configuration of an S3 bucket for storing cluster state.
- Creation of the cluster configuration using the Kops CLI.
- Building the cluster itself using the Kops CLI, which will create all the necessary AWS resources, such as VPC, EC2, EBS, and so on.
It takes about 30 minutes to get the necessary tools installed and run the required commands when you follow the steps listed on the Deploying to AWS page in the Kops documentation. After that, it takes about 10 minutes for Kops to instantiate all the components, including VPC, ASGs, EC2, and EBS volumes for the master and worker nodes, plus etcd.
When we followed this process, we experienced a hiccup in the form of an “unauthorized” error when we tried to get the cluster status using this command:
kops validate cluster
This appears to have been due to changes in the authentication mechanism in Kubernetes v1.19. In order to correct this, we found that simply running the following command corrected the issue for our test cluster:
kops export kubecfg --adminAfter that, the commands to check the status of the cluster were successful:
○ → kops validate cluster

Using cluster from kubectl context: testcluster001.example.com

Validating cluster testcluster001.example.com

INSTANCE GROUPS

NAME ROLE MACHINETYPE MIN MAX SUBNETS

master-us-west-2a Master t3.medium 1 1 us-west-2a

nodes-us-west-2a Node t3.medium 1 1 us-west-2a

NODE STATUS

NAME ROLE READY

ip-172-20-35-166.us-west-2.compute.internal master True

ip-172-20-52-15.us-west-2.compute.internal node True

Your cluster testcluster001.example.com is ready
Cluster Management
Once you’ve completed the steps above, you can manage the cluster using kubectl or the Kops CLI itself, depending on which actions you want to perform.
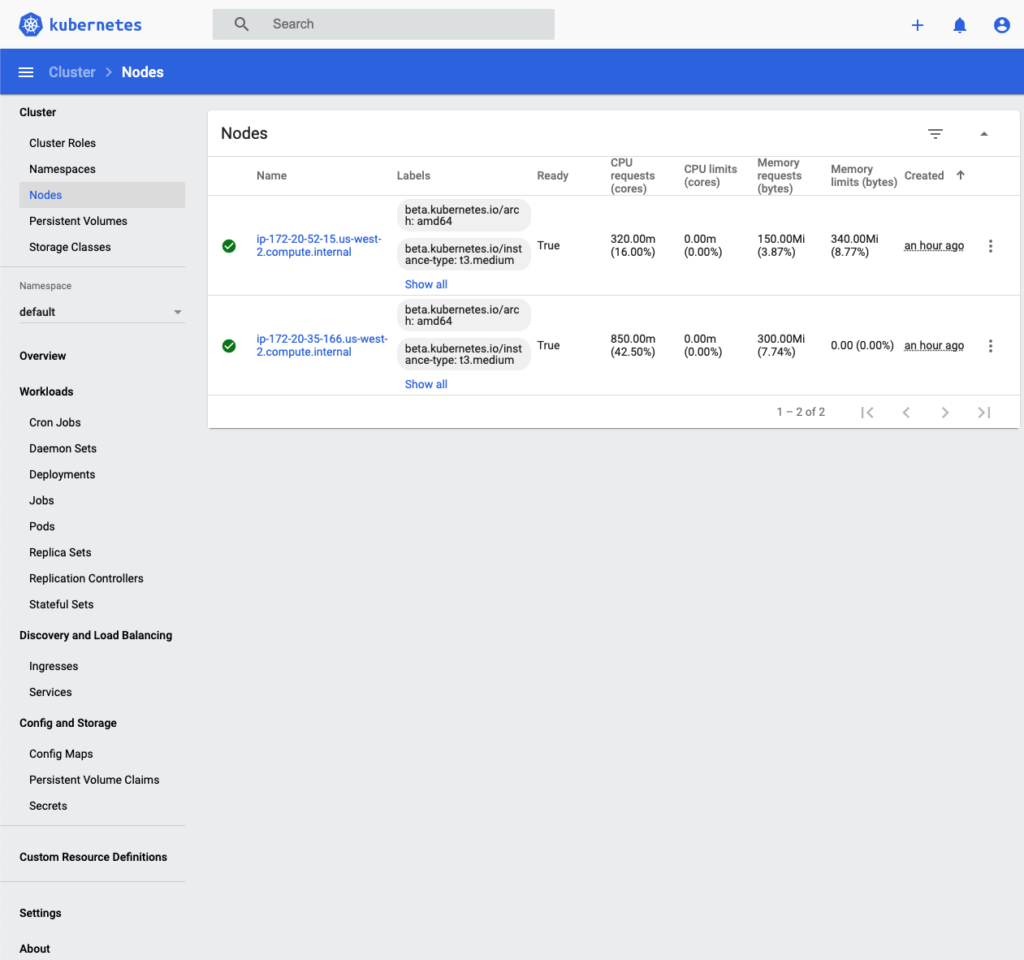
You could also install the Kubernetes Dashboard to perform some of the tasks normally done from the CLI, such as checking cluster status or managing application deployments. It doesn’t cover the full range of features that you get from the CLI tools, but it’s a good start.
Dashboard requires some additional configuration beyond just deploying it to the cluster in order to properly handle user authentication and make it available on localhost. This is covered in the documentation.
For the purposes of this article, we installed Dashboard to demonstrate the UI.

If the Dashboard isn’t suitable for your needs, there are other options for a Web UI with varying feature sets, such as Octant or Lens.
When you are finished with your cluster, you can delete it using the Kops CLI:
kops delete cluster --name ${NAME} --yesSince the kops delete output is rather profuse, we haven’t included it here. Suffice it to say that all of the AWS resources (such as EC2 and EBS) that were created to support the cluster will be deleted when running the </span><span style="font-weight: 400;">kops delete cluster command.
Portability
In terms of portability, any application that runs on a standard Kubernetes cluster will work when configuring the cluster with Kops, since it uses upstream Kubernetes.
Kops does not support bare metal or on-prem VMs for deploying clusters. It currently supports the following cloud providers:
- AWS (officially supported)
- Digital Ocean, GCE, and OpenStack (in beta)
- Azure and Alicloud (in alpha)
Networking
Depending on how you configure your cluster using Kops, it will take care of any basic networking tasks required to spin up a new cluster. Load balancing is supported through Elastic Load Balancers.
While a number of Kubernetes networking providers are in different stages of development, only Calico, Cilium, and Kubenet are currently stable. All others are still considered experimental.
The available features and limitations will be determined by the network provider that you choose. For example, when using the default provider, kubenet, there is effectively a limit of 50 nodes due to the AWS limit of 50 routes in the routing table. If you really want to use kubenet, there are some limited workarounds (such as requesting an AWS limit increase).
Even though kubenet is the default provider for Kops, it is not recommended for production clusters that are expected to grow significantly, due to its inherent limitations.
EKS
Elastic Kubernetes Service, or EKS, is Amazon Web Service’s implementation for hosted Kubernetes. EKS is often the first stop for teams that are new to Kubernetes. It’s a good option if you are looking to start out with Kubernetes and are already using AWS.
Since EKS exists within the AWS ecosystem, services like EC2, ELB, VPC, and Fargate are fully supported. AWS boasts a number of other features and integrations as well.
EKS Features
- Supports upstream Kubernetes and is certified Kubernetes conformant. Kubernetes applications can be ported to EKS without code modification.
- Managed, high-availability control plane runs across multiple AWS Availability Zones (AZs) with 99.95% SLA. This includes Kubernetes masters as well as etcd.
- EKS automatically replaces unhealthy control plane nodes.
- Managed, automatic security patching for the control plane.
- Supports AWS Fargate (serverless) as well as EC2 (for worker nodes).
- Supports EC2 spot instances for cost optimization.
- AWS EKS Console to view status and manage Kubernetes clusters.
- Ability to run Windows and Linux worker nodes side by side in the same cluster.
- Full Application Load Balancer (ALB), Network Load Balancer (NLB), and VPC support.
- Supports hybrid deployments (such as on-prem and cloud-based Kubernetes deployments) using a combination of AWS-hosted EKS alongside EKS Distro and EKS Anywhere (which hasn’t been released yet) for on-prem, bare metal, and VMs.
- Supports Kubeflow with EKS for Machine Learning on AWS GPU instances.
- Kubernetes Jobs API for scheduled batch jobs.
- AWS recently released support for Elastic Fabric Adaptor (EFA) for High-Performance Computing (HPC) workloads.
- and so on…
As you can see, AWS offers many features and options for EKS. The list is actually quite long, so we won’t dive into every single option in this article. For those who are just starting out with Kubernetes, AWS is a great choice for getting up and running relatively quickly.
There are some drawbacks to using EKS depending on your specific use case. For one, using EKS will somewhat limit you to using other AWS services to support it, if only for the sake of convenience. Each AWS service has its own advantages and disadvantages over similar offerings from other providers.
Cost can be another drawback. Each AWS service that you leverage usually has a cost component associated with it. These costs can add up quickly if you’re not careful, so you will need to monitor them closely to avoid going over budget when using additional AWS services.
With that said, EKS and the other AWS services do give you a more or less complete one-stop shop ecosystem with just a click (or several clicks) of a button.
Setup and Deployment
There are a variety of options for setting up EKS, including the AWS Console, cloudformation, Terraform, or eksctl, which uses cloudformation under the hood. There are pros and cons to using each.
Initially, we were going to demonstrate how to configure an EKS cluster with AWS Console to avoid the complexity of using additional tools and performing config editing. However, we discovered that it is easier to get up and running quickly using eksctl.
After deleting the Kops demo cluster, we didn’t have any infrastructure left in the AWS test account that we were using.
To set up our test cluster with eksctl, we followed the instructions in the AWS EKS documentation. Since we already had the AWS CLI and kubectl installed on our local machine, we didn’t need to install these prerequisites a second time.
Then, we installed eksctl. On macOS, the command was:
brew install eksctlWe didn’t want to worry about managing the worker nodes, so we chose AWS Fargate as our option for workers.
There was already an IAM user with administrative privileges in our AWS test account. We ran all of the commands in the context of that user.
We ran the following command to instantiate the cluster:
eksctl create cluster --name testcluster004 --region us-west-2 --fargateThe cluster was up and running in about 15 minutes.
○ → kubectl get nodes

NAME            STATUS   ROLES    AGE     VERSION

fargate-ip-192-168-145-179.us-west-2.compute.internal   Ready    <none>   2m5s    v1.18.9-eks-866667

fargate-ip-192-168-163-10.us-west-2.compute.internal    Ready    <none>   2m13s   v1.18.9-eks-866667
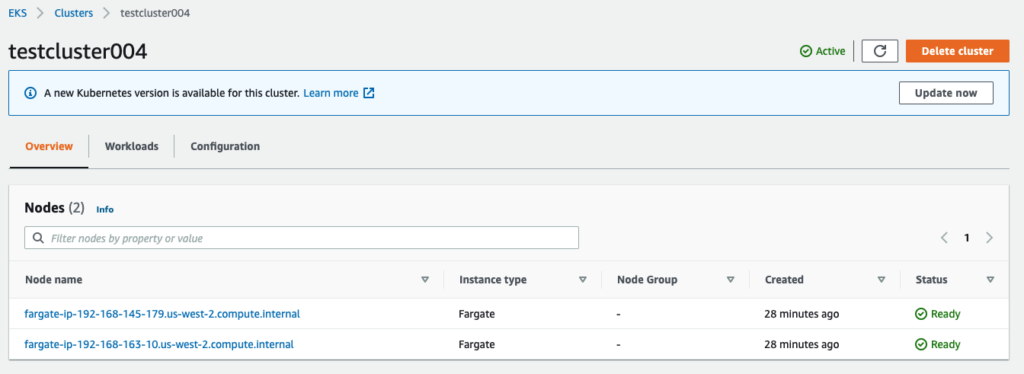
In the AWS Console, it looked like this:

Configuration and Access
The most recent upstream version of Kubernetes (1.21.0) was released in early April, 2021. At the time of writing this article, EKS supports Kubernetes versions up to 1.19, with the default version being 1.18.
When we installed our Kubernetes cluster with the default settings, we ended up with version 1.18. In the console, AWS immediately recommended updating to version 1.19, but we chose to skip that step. If you want to update, it will take you about an hour.
Since we used eksctl to create the cluster, it took care of several steps for us. For example, the IAM user that created the cluster was configured as the cluster administrator. If you plan on having a multi-user cluster, then you will need to configure additional IAM users.
There are additional steps to be performed in order to fully configure the cluster, including configuring the cluster autoscaler and preparing to deploy sample workloads.
Cluster Management
The EKS control plane is managed for you, so little is required for this once the cluster is instantiated. You will, however, have to manage worker nodes via EC2 or Fargate.
AWS has complete documentation for most of the other cluster management actions that you might want to perform, such as installing Metrics Server, Prometheus, and the Kubernetes Dashboard that we demonstrated above.
To delete the cluster, we ran:
eksctl delete cluster --name my-cluster --region regionPortability
Amazon provides an open source version of Kubernetes called EKS Distro, which can be used to install EKS on bare metal, VMs, or EC2. The advantage of this option is that you can use the AWS Console or API for management purposes without needing to use third-party dashboards or tooling.
Using EKS and ancillary services pretty much limits you to AWS-related products and distributions, whether on-prem or in the AWS cloud. This can be an advantage for teams that don’t want to deal with the complexities of managing external vendors, services, or packages. On the other hand, it’s a disadvantage if you’re looking for portability or flexibility across multiple providers.
Networking
In terms of networking, EKS supports Virtual Private Cloud (VPC) and related constructs, as well as Application Load Balancer (ALB) and Network Load Balancer (NLB) via the AWS Load Balancer Controller. CoreDNS and Calico are also supported.
Platform9
Platform9 Managed Kubernetes (PMK) is a SaaS-managed Kubernetes service, and it’s also certified Kubernetes conformant. It provides a cloud-hosted management plane and interface where all cluster management is performed.
Infrastructure can be deployed to your platform of choice, including bare metal, VMs, or cloud providers like Azure, GCP, and AWS. Tasks such as cluster deployment, management, monitoring, and upgrading can all be done within Platform9.
A more complete overview of PMK features and architecture can be found in the Platform9 documentation.
Platform9 Features
- Fully managed SaaS platform for Kubernetes
- Uses upstream Kubernetes
- Supports Ubuntu and CentOS/RHEL
- Zero downtime for cluster upgrades
- Deployable on-prem to bare metal or VMs
- Deployable to cloud providers such as Azure, GCP, and AWS
- Single view and management of multiple Kubernetes clusters
- Deploys highly available multi-master clusters
- Etcd backups
- CNI and CSI support
- Monitoring and logging
- CLI, Web UI, and REST API
- Works with Terraform
- Supports multiple region deployments
- Multi-tenancy and multi-user support
- SAML SSO
- Provides up to 24x7x365 support via email, phone, or live chat and video, depending on your plan
- 99.9% SLA for paid plans
Since PMK is a managed product, many of the problematic aspects of Kubernetes management can be offloaded to Platform9 – which can be a huge advantage. Features that would normally need to be built and configured by a Kubernetes administrator are provided as part of Platform9’s offerings. It also makes cluster instantiation and maintenance tasks much easier.
This frees up in-house resources for important engineering functions such as CI/CD, the Software Development Lifecycle (SDLC), and providing a stable platform for business applications.
Setup and Deployment
PMK can be deployed anywhere, including on fully managed bare metal or with VMs via KubeVirt. We will use AWS for our demonstration, and we’ll use the Web UI to deploy our cluster.
When creating a new cluster, we were presented with several options, including Amazon Web Services. We went with that, as well as the one-click cluster setup option.
Then, we created a Platform9 IAM user in the AWS Console and attached the policy provided by Platform9 directly to that user. Note that this wouldn’t necessarily be the way to configure permissions for production, but it works for our purposes.
Next, we copied the AWS Access Key and Secret Key for the new IAM user into the Platform9 Web UI and tested for access. From there, we continued with the cluster creation process.
To complete the cluster creation, we set a cluster name, cloud provider (AWS), region, and availability zone (us-west-2a). An SSH key and Route53 domain name were also required.
Platform9 currently supports Kubernetes versions up to 1.19.6, so we used that version for this cluster.
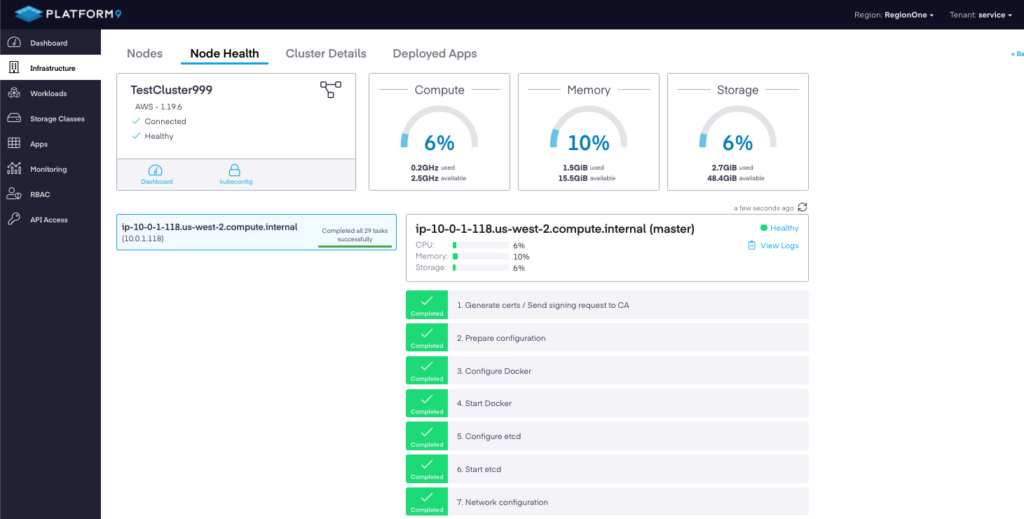
Finally, we clicked “create cluster.” It took a few minutes for the console to update, and then we were presented with a list of items that were being deployed for our cluster. Since the list of items was quite long, we decided to show you an abbreviated representation below:

Configuration and Access
The configuration process for using Platform9 on AWS is fairly straightforward. You will need the following:
- An AWS account that is not your master billing or AWS Organizations account.
- An IAM user for Platform9. This can be a pre-existing or newly created IAM user. You should note the Access Key and Secret Key, since you will need them when you add the AWS cloud provider to Platform9 via the console.
- Platform9 provides a downloadable IAM policy which you will need to attach directly to the IAM user. Better yet, we recommend adding that user to a group and then attaching the policy to the group.
- An EC2 keypair created before you add the cloud provider in Platform9. We hadn’t yet created one when we added the AWS cloud provider to Platform9, so it didn’t show up. Adding the EC2 keypair, then deleting and adding the cloud provider again via the console fixed this issue.
- A region with available EC2 instances.
- A Route53 domain name that’s already configured. Since we have a test domain for these purposes, that was already there for us.
With those in place, all we needed to do was add the cloud provider and select the requisite options described above. After that, adding a cluster was easy.
Cluster Management
Cluster management via the PMK console is very straightforward. Any actions that you need to perform (such as adding a cloud provider, cluster, node, or an application) can be done through the UI.
Deleting the cluster via the UI is just as simple.
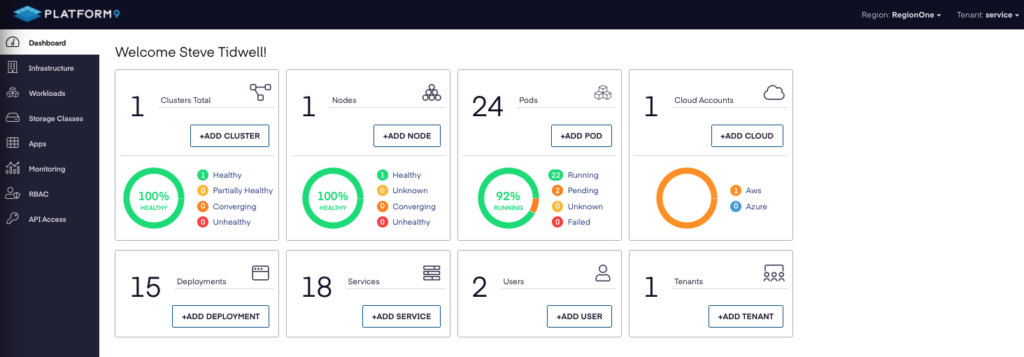
The Dashboard shows everything at a glance:

If we drill down to the new cluster itself, we can see more details:

Portability
Since Platform9 uses upstream Kubernetes and is certified Kubernetes conformant, any application that you would normally deploy on Kubernetes will work when using Platform9. Since it has multi-cloud support, you can centrally manage all of your Kubernetes clusters across all providers, including on-prem, bare metal, and VMs.
Lock-in isn’t really an issue, since Kubernetes is deployed into your own cloud accounts or onto your own servers or VMs. Applications are portable between clusters on different providers.
Networking
PMK comes with managed CNI, and Calico is the preferred plugin.
VPC, Route53, and Elastic Load Balancers are all supported on AWS. If you’re running on-prem, Platform9 supports MetalLB for load balancing with bare metal.
Conclusion
As you can see, evaluating various Kubernetes deployment and management solutions can be complicated. It’s very important to keep your use case and requirements in mind when looking for one.
Keep in mind that it will take time to evaluate, set up, configure, and test each solution. Last, but certainly not least, you want to consider the learning curve involved with each solution, as well as the knowledge, skills, and resources that you have in-house.


