MayaData Director is a remote SaaS management plane to provision and maintain OpenEBS persistent storage for your microservices running on Kubernetes.
Prerequisites:
- Kubernetes Cluster
- Each node should have at least one free unformatted disk attached to it. Prefer size larger than 10GB.
- Metallb loadbalancer configured on bare metal clusters to expose your services of type loadbalancer
- Flannel or Calico for CNI.
- Three Worker nodes size: 2VPUs x 8GB Memory (4VPU x 8GB recommended)
- One Master node size: 2VCPU x 8GB Memory (4VPU x 8GB recommended)
- CentOS 7.6/7.8 or Ubuntu 18.04 installed on the nodes with iSCSI client enabled
Configuration:
Enable iSCSI on the nodes
Check here for instructions.
yum install iscsi-initiator-utils -y
sudo systemctl enable --now iscsid
sudo systemctl status iscsid
Add cluster into the Kubera Director dashboard
Create kubera director login profile and login to the Kubera dashboard. Opt in for a basic plan for free access. This is sufficient to configure Kubera on couple of clusters.
On the Dashboard create a project e.g. platform9 and add a cluster:
You’ll get the name of your cluster from the Platform9 SaaS management plane:
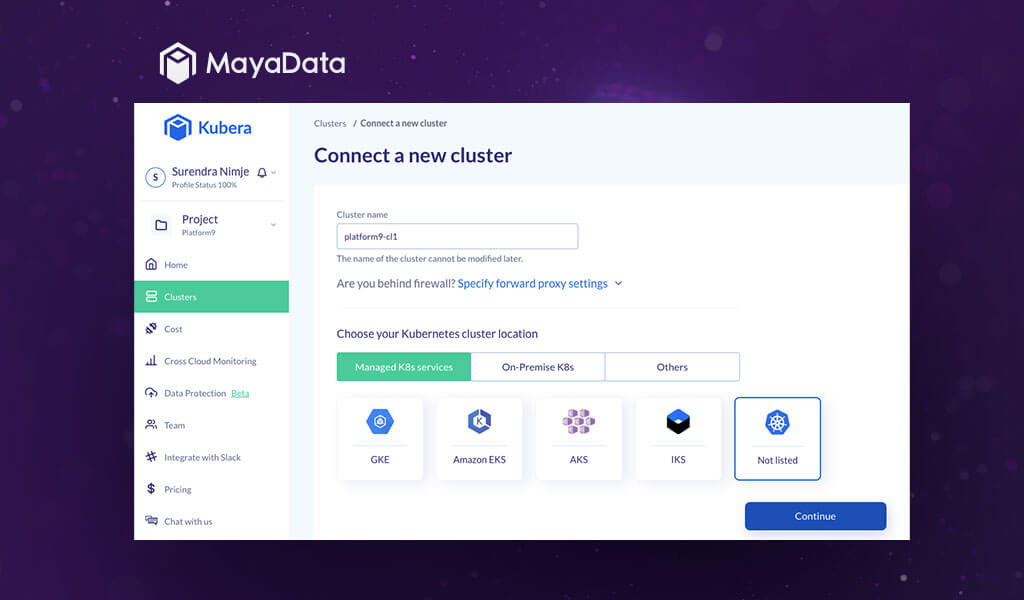
Now on the Kubera dashboard click ‘Connect a new cluster’ on the top right corner of the page. In the menu provide a name to your cluster, Select managed K8s services, select Not listed and click continue.
An ‘Activate cluster’ kubectl command will appear on your screen which should be simply copied as it is and run on your Platform9 kubernetes cluster.
How the above Manifest gets deployed on your platform9 cluster.
$ kubectl apply -f https://director.mayadata.io/v3/scripts/33CB85F3B5FC58858956:1609372800000:ZzmkeAxArnW8KkhsrBGSCZFrm2A.yaml
namespace/maya-system created
limitrange/maya-system-limit-range created
serviceaccount/maya-io created
clusterrolebinding.rbac.authorization.k8s.io/maya-io created
secret/maya-credentials-a640881c created
job.batch/cluster-register created
daemonset.apps/maya-io-agent created
deployment.apps/status-agent created
configmap/publish-config created
deployment.apps/openebs-manager created
service/openebs-manager-service created
customresourcedefinition.apiextensions.k8s.io/openebses.dao.mayadata.io created
customresourcedefinition.apiextensions.k8s.io/adoptopenebses.dao.mayadata.io created
deployment.apps/openebs-upgrade created
serviceaccount/cstorpoolauto created
clusterrole.rbac.authorization.k8s.io/cstorpoolauto created
clusterrolebinding.rbac.authorization.k8s.io/cstorpoolauto created
customresourcedefinition.apiextensions.k8s.io/cstorclusterconfigs.dao.mayadata.io created
statefulset.apps/cstorpoolauto created
daemonset.apps/pv-exporter created
configmap/cortex-agent-config created
deployment.apps/cortex-agent created
service/cortex-agent-service created
deployment.apps/upgrade-controller created
service/upgrade-controller-service created
In a few minutes activation is successful. After successful activation click Begin Installation on the ‘Install openEBS’ pop-up.
Select Advanced Installation
On the ‘Start installation’ screen click Next
Set resource limits suitable for a large applications
Select the Controler Nodes (for HA select all nodes in a small cluster)
Select Data nodes (Select all nodes with disks attached)
Setup filters to select disks for openEBS storage Pools
Confirm and deploy
Deployment progresses and finishes in few minutes
Verify deployment is running
Create new cStor Pool, select all nodes with disks attached and click create.
Validate Pool is ready
StorageClasses are created by default.
These Storage Classes will be visible in your platform9 SaaS management plane as well.
List down the storage classed via kubectl
$ kubectl get sc -o wide
NAME                        PROVISIONER                                                RECLAIMPOLICY   VOLUMEBINDINGMODE      ALLOWVOLUMEEXPANSION   AGE
openebs-device              openebs.io/local                                           Delete          WaitForFirstConsumer   false                  12m
openebs-hostpath            openebs.io/local                                           Delete          WaitForFirstConsumer   false                  12m
openebs-jiva-default        openebs.io/provisioner-iscsi                               Delete          Immediate              false                  12m
openebs-snapshot-promoter   volumesnapshot.external-storage.k8s.io/snapshot-promoter   Delete          Immediate              false                  12m
Volume Provisioning
Now proceed to test the volume provisioning. Initially there are no volumes in the clusters.
$ kubectl get pv,pvc
No resources found in default namespace.
Create a test deployment and verify the PVC can be bound to the pod across the cluster.
$ kubectl apply -f https://raw.githubusercontent.com/KoolKubernetes/csi/master/mayadata/kubera/test-deployment.yaml
persistentvolumeclaim/openebspodpvc created
deployment.apps/web-server created
The Pod, PV and PVC now can be seen default namespace
$ kubectl get pvc,pv,pods -o wide
NAME                                  STATUS   VOLUME                                     CAPACITY   ACCESS MODES   STORAGECLASS           AGE   VOLUMEMODE
persistentvolumeclaim/openebspodpvc   Bound    pvc-06c9d68f-7557-417a-8b53-4a3c0962d205   5Gi        RWO            openebs-jiva-default   20s   Filesystem

NAME                                                        CAPACITY   ACCESS MODES   RECLAIM POLICY   STATUS   CLAIM                   STORAGECLASS           REASON   AGE   VOLUMEMODE
persistentvolume/pvc-06c9d68f-7557-417a-8b53-4a3c0962d205   5Gi        RWO            Delete           Bound    default/openebspodpvc   openebs-jiva-default            19s   Filesystem

NAME                              READY   STATUS    RESTARTS   AGE   IP              NODE           NOMINATED NODE   READINESS GATES
pod/web-server-7658db5f8b-ksp2m   1/1     Running   0          20s   10.20.169.239   10.128.146.7   <none>           <none>
Login to the NGINX which is running on 10.20.146.7 node and create a 1GB file on the PVC mounted inside the container.
$ kubectl exec -it pod/web-server-7658db5f8b-ksp2m -- /bin/bash
root@web-server-7658db5f8b-ksp2m:/#
root@web-server-7658db5f8b-ksp2m:/# cd  /var/lib/www/html/
root@web-server-7658db5f8b-ksp2m:/var/lib/www/html# ls
lost+found
root@web-server-7658db5f8b-ksp2m:/var/lib/www/html# dd if=/dev/zero of=/var/lib/www/html/1GBfile bs=1M count=1024
1024+0 records in
1024+0 records out
1073741824 bytes (1.1 GB, 1.0 GiB) copied, 3.07405 s, 349 MB/s
root@web-server-7658db5f8b-ksp2m:/var/lib/www/html# ls -lrt
total 1048592
drwx------. 2 root root      16384 Apr 23 10:49 lost+found
-rw-r--r--. 1 root root 1073741824 Apr 23 10:52 1GBfile
root@web-server-7658db5f8b-ksp2m:/var/lib/www/html#
Now cordon the node and delete the pod so that it can start the container on another node.
$ kubectl cordon 10.128.146.7
node/10.128.146.7 cordoned
$ kubectl get nodes
NAME             STATUS                     ROLES    AGE   VERSION
10.128.146.196   Ready                      worker   15d   v1.18.10
10.128.146.56    Ready                      master   15d   v1.18.10
10.128.146.7     Ready,SchedulingDisabled   master   15d   v1.18.10
10.128.146.99    Ready                      master   15d   v1.18.10
$

$ kubectl delete pod/web-server-7658db5f8b-ksp2m
pod "web-server-7658db5f8b-ksp2m" deleted
$

$ kubectl get pv,pvc,pods -o wide
NAME                                                        CAPACITY   ACCESS MODES   RECLAIM POLICY   STATUS   CLAIM                   STORAGECLASS           REASON   AGE     VOLUMEMODE
persistentvolume/pvc-06c9d68f-7557-417a-8b53-4a3c0962d205   5Gi        RWO            Delete           Bound    default/openebspodpvc   openebs-jiva-default            4m33s   Filesystem

NAME                                  STATUS   VOLUME                                     CAPACITY   ACCESS MODES   STORAGECLASS           AGE     VOLUMEMODE
persistentvolumeclaim/openebspodpvc   Bound    pvc-06c9d68f-7557-417a-8b53-4a3c0962d205   5Gi        RWO            openebs-jiva-default   4m34s   Filesystem

NAME                              READY   STATUS    RESTARTS   AGE   IP              NODE            NOMINATED NODE   READINESS GATES
pod/web-server-7658db5f8b-8pthk   1/1     Running   0          28s   10.20.232.103   10.128.146.99   <none>           <none>
Login to the pod and verify the file is present under the mount point.
$ kubectl exec -it pod/web-server-7658db5f8b-8pthk -- /bin/bash
root@web-server-7658db5f8b-8pthk:/# ls -lrt  /var/lib/www/html
total 1048596
drwx------. 2 root root      16384 Apr 23 10:49 lost+found
-rw-r--r--. 1 root root 1073741824 Apr 23 10:52 1GBfile
root@web-server-7658db5f8b-8pthk:/#
Enable Volume Analytics from the Dashboard to vizualize the statitics


