
In a previous article, we discussed isolating workloads and took a deep dive into Kubernetes multi-tenancy and best practices. In this tutorial, we will show you some real-world examples using a Platform9 cluster environment, and we’ll introduce you to some useful techniques for setting up shared Kubernetes clusters by your development teams using Platform9 Managed Kubernetes.
Although administering a single cluster is easier than administering many clusters – which may or may not share the same configuration – configuring multi-tenant K8s is not trivial; there are many ways that different apps can step on each other. You can follow along this tutorial to recognize how you can typically run multiple instances of applications in diverse environments that all share the same Kubernetes cluster.
Let’s get started.
Setting Up the Platform9 Kubernetes Cluster on Azure
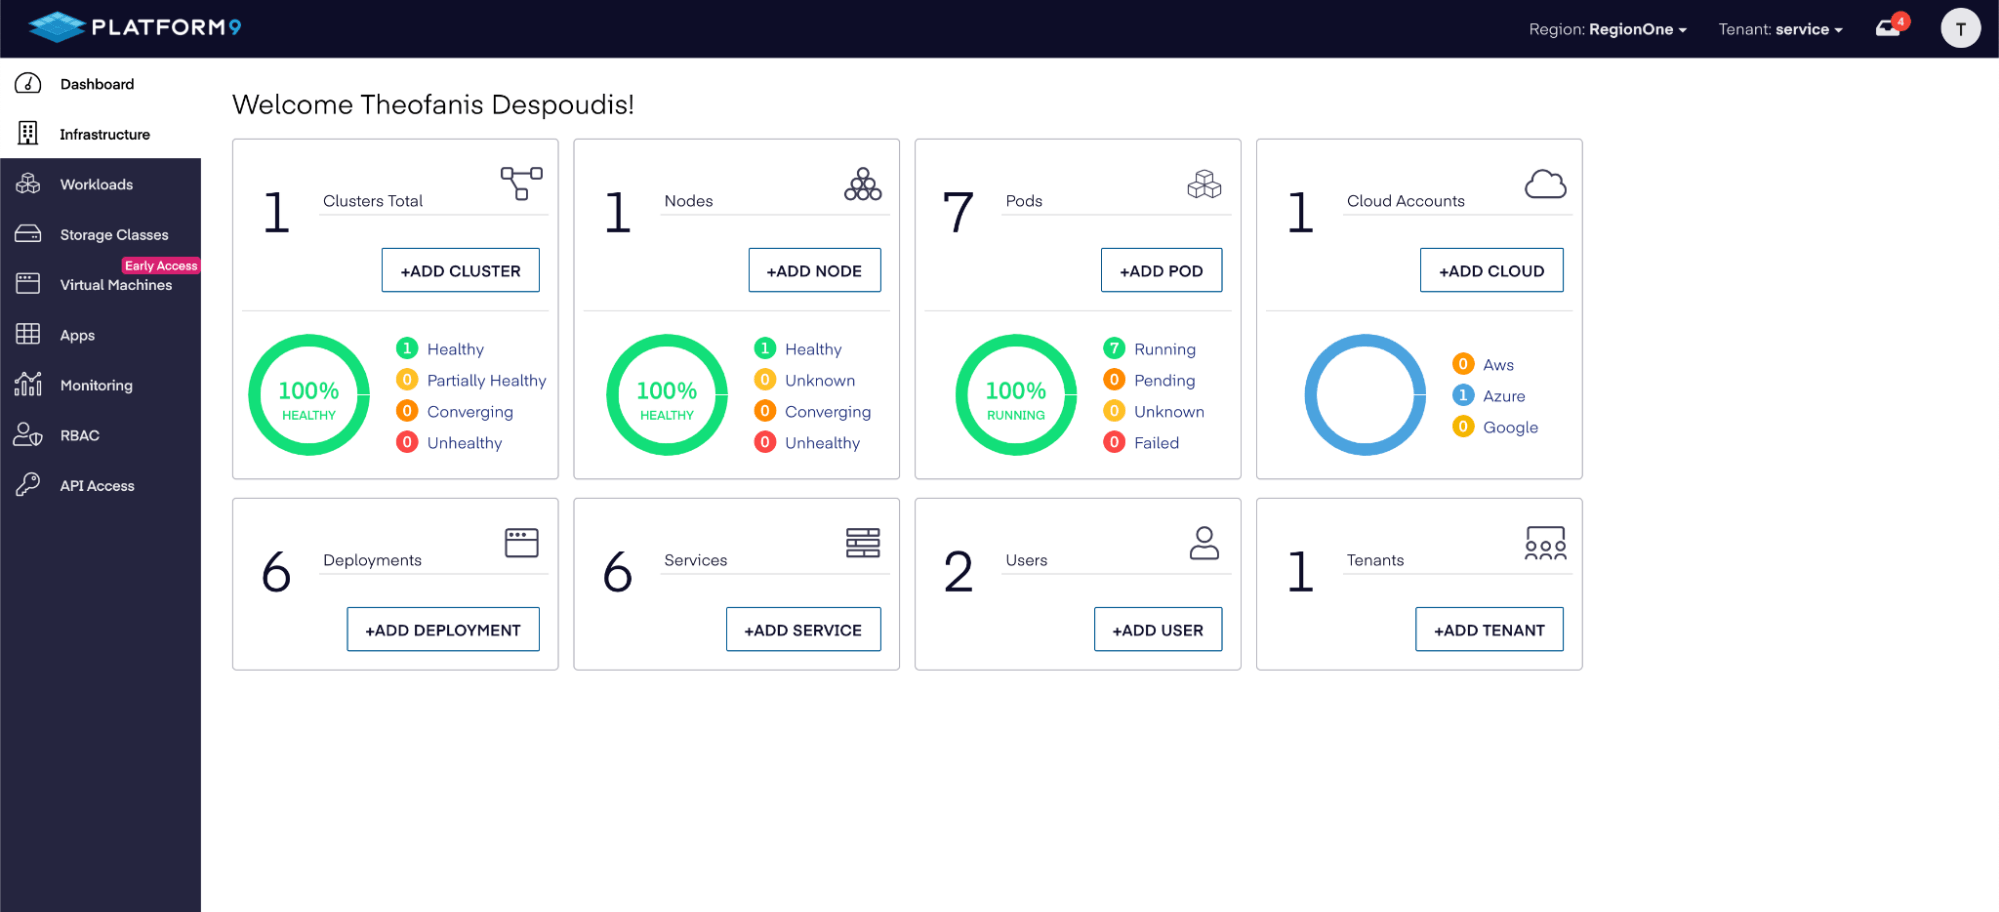
Before you can begin, you need to follow these steps to set up a Kubernetes cluster on Azure. After you’ve set up the cluster, you should check the Platform9 console to see that it is healthy, as shown below:
You can also check the Azure portal to verify that the resources have been created:
 When you create your first cluster, Platform9 will reserve only one master node by default. We will be assigning different environments to each node in the cluster. In this case we are going to have 3 environments (dev, test, prod). So we need at least 3 nodes including the master node in order to test the multi-tenant scenarios in this article.
So, you’ll need to create a cluster using the Advanced Cluster Setup. Make sure that you select the custom cluster template to configure the number of worker nodes, as shown below:
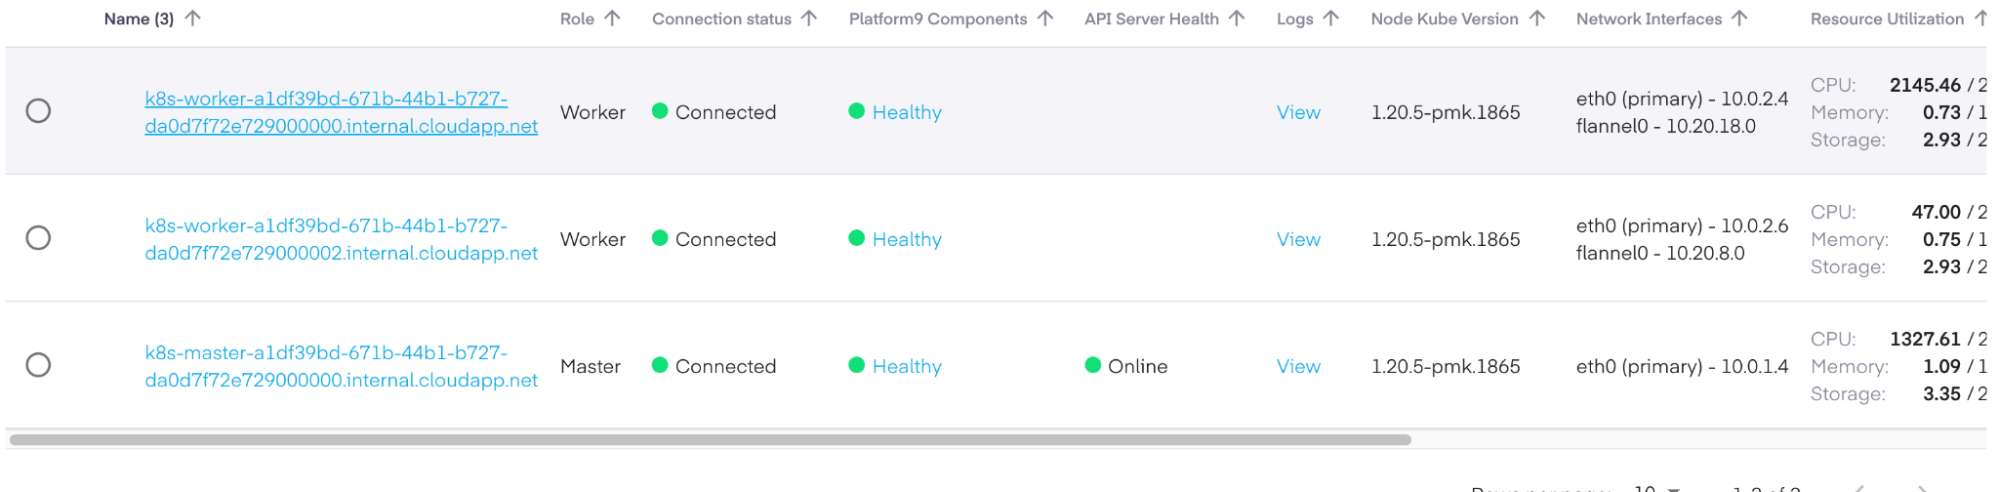
Once your cluster is healthy, you should be able to see the two worker nodes and the master node in the nodes panel:
Finally, you should download the kubeconfig file from the API Access-> Kubeconfig side menu options and verify that you can query the nodes:
❯ kubectl get nodes
NAME                                                    STATUS   ROLES    AGE     VERSION
k8s-master-a1df39bd-671b-44b1-b727-da0d7f72e729000000   Ready    master   4m55s   v1.20.5
k8s-worker-a1df39bd-671b-44b1-b727-da0d7f72e729000000   Ready    worker   4m55s   v1.20.5
k8s-worker-a1df39bd-671b-44b1-b727-da0d7f72e729000002   Ready    worker   4m56s   v1.20.5
Next, we’ll describe some of the most common ways to configure your cluster so that you can share it in development, testing, and production workloads.
Workload Isolation with Namespaces
The simplest and most common use of isolation is to define namespaces for each of our different environments. We assign labels for each environment (development, testing, and production), and then we define a nodeSelector section in the spec field for each pod or deployment.
For example, here is how we create our namespaces:
❯ cat namespaces.yml
apiVersion: v1
kind: Namespace
metadata:
  name: development
---
apiVersion: v1
kind: Namespace
metadata:
  name: staging
---
apiVersion: v1
kind: Namespace
metadata:
  name: production
Then, we apply them to the cluster:
❯ kubectl apply -f namespaces.yml
namespace/development created
namespace/staging created
namespace/production created
Before we can use the nodeSelector, we need to label our nodes. We can do that with the label nodes command:
❯ kubectl label nodes k8s-master-a1df39bd-671b-44b1-b727-da0d7f72e729000000 env=staging
node/k8s-master-a1df39bd-671b-44b1-b727-da0d7f72e729000000 labeled

❯ kubectl label nodes k8s-worker-a1df39bd-671b-44b1-b727-da0d7f72e729000000 env=development
node/k8s-worker-a1df39bd-671b-44b1-b727-da0d7f72e729000000 labeled

❯ kubectl label nodes k8s-worker-a1df39bd-671b-44b1-b727-da0d7f72e729000002 env=production
node/k8s-worker-a1df39bd-671b-44b1-b727-da0d7f72e729000002 labeled
Now, verify that the label exists on each node:
❯ kubectl get node k8s-master-a1df39bd-671b-44b1-b727-da0d7f72e729000000 -o=jsonpath='{.metadata.labels.env}' stagingDeploying a Workload
Now we are ready to deploy workloads for each environment. For example, we can deploy the following Docker image to both staging and development:
❯ cat pods.yml
apiVersion: apps/v1
kind: Deployment
metadata:
  name: nginx-stg
  namespace: staging
  labels:
    env: staging
spec:
  selector:
    matchLabels:
      run: nginx-stg
  template:
    metadata:
      labels:
        run: nginx-stg
    spec:
      containers:
      - name: nginx
        image: nginx
      nodeSelector:
        env: staging
---
apiVersion: apps/v1
kind: Deployment
metadata:
  name: nginx-dev
  namespace: development
  labels:
    env: development
spec:
  selector:
    matchLabels:
      run: nginx-dev
  template:
    metadata:
      labels:
        run: nginx-dev
    spec:
      containers:
      - name: nginx
        image: Nginx
      nodeSelector:
        env: development

❯ kubectl apply -f pods.yml
We made sure to use both the namespace metadata field and the nodeSelector field. The namespace field creates the pod in the specified namespace value. Then, the nodeSelector field instructs the scheduler to use the preferred node with the specified label value. This way, some workloads will reside within their own namespace and their own list of nodes.
Now, we verify that the pods were deployed on the correct node, as follows:
> kubectl get pod nginx-dev -n development -o wide
NAME        READY   STATUS    RESTARTS   AGE    IP           NODE                                                    NOMINATED NODE   READINESS GATES

nginx-dev   1/1     Running   0          4m8s   10.20.18.9   k8s-worker-a1df39bd-671b-44b1-b727-da0d7f72e729000000   <none>           <none>
Keep in mind that namespaces only provide minimal isolation between tenants. For example, when you create a service definition for the nginx images, they will be able to talk to each other using the following DNS format:
<service-name>.<namespace-name>.svc.cluster.local
We can define a service name nginx-dev-service and nginx-stg-service:
❯ cat services.yml
apiVersion: v1
kind: Service
metadata:
  name: nginx-dev
  namespace: development
  labels:
    run: nginx-dev
spec:
  ports:
    - port: 80
      protocol: TCP
  selector:
    run: nginx-dev
---
apiVersion: v1
kind: Service
metadata:
  name: nginx-stg
  namespace: staging
  labels:
    run: nginx-stg
spec:
  ports:
    - port: 80
      protocol: TCP
  selector:
    run: nginx-stg

 ❯ kubectl apply -f services.yml
Their DNS hostnames within the cluster will be:
nginx-dev.development
Nginx-stg.staging
So with this, we can run a container in the development namespace and request the staging deployment:
❯ kubectl run test-$RANDOM --namespace=development --rm -i -t --image=alpine -- sh
/ # wget -O- http://nginx-stg.staging
Connecting to nginx-stg.staging (10.21.183.197:80)
writing to stdout
<!DOCTYPE html>
<html>
<head>
<title>Welcome to nginx!</title>
It’s quite simple to add more namespaces, and you can give your teams their own namespaces to make things more manageable.
Next, we will explain how to use network policies to block traffic between namespaces so that they don’t interfere with each other.
Cluster Isolation by Block Traffic Between Namespaces
As you’ve seen, you’re able to access exposed services from different namespaces by default. That’s not good if you want to isolate different environments. To make it more secure, you can enforce a network policy, which is another configuration manifest that enables administrators to allow only traffic from the same namespace in which the pod is deployed.
This is how you would create and apply these policies:
❯ cat network-policies.yml
apiVersion: networking.k8s.io/v1
kind: NetworkPolicy
metadata:
  name: allow-only-same-namespace-stg
  namespace: staging
spec:
  podSelector:
    matchLabels: {}
  ingress:
    - from:
        - podSelector: {}
---
apiVersion: networking.k8s.io/v1
kind: NetworkPolicy
metadata:
  name: allow-only-same-namespace-dev
  namespace: development
spec:
  podSelector:
    matchLabels: {}
  ingress:
    - from:
        - podSelector: {}

❯ kubectl apply -f network-policies.yml
networkpolicy.networking.k8s.io/allow-only-same-namespace-stg created
networkpolicy.networking.k8s.io/allow-only-same-namespace-dev created
There are three things to keep in mind here:
- The namespace field specifies where the rule is applied for each policy.
- The matchLabels is empty, which means that it will apply the policy to all pods in this namespace.
- The podSelector is empty, which means that it will select all pods in this namespace and allow ingress traffic for all of them.
Leveraging Resource Quotas
Currently assigning a node per environment is not good use of available resources. Generally speaking, there is a case when the development namespace could reserve nodes that could have been better allocated in the production namespace instead.
As an example, even if you’ve reserved a few nodes for the development team, you might need to assign staging workloads to these nodes. You need to make certain that when you allocate resources across cluster nodes that this allocation is fair and cost effective.
Resource quotas allow you to fine-tune your resource allocations (CPU, memory, and storage) for the specified namespaces, as well as define soft and hard limits for your resources. We’ll show you how to do that for our staging and development namespaces.
You can easily see the available resources on the nodes dashboard:
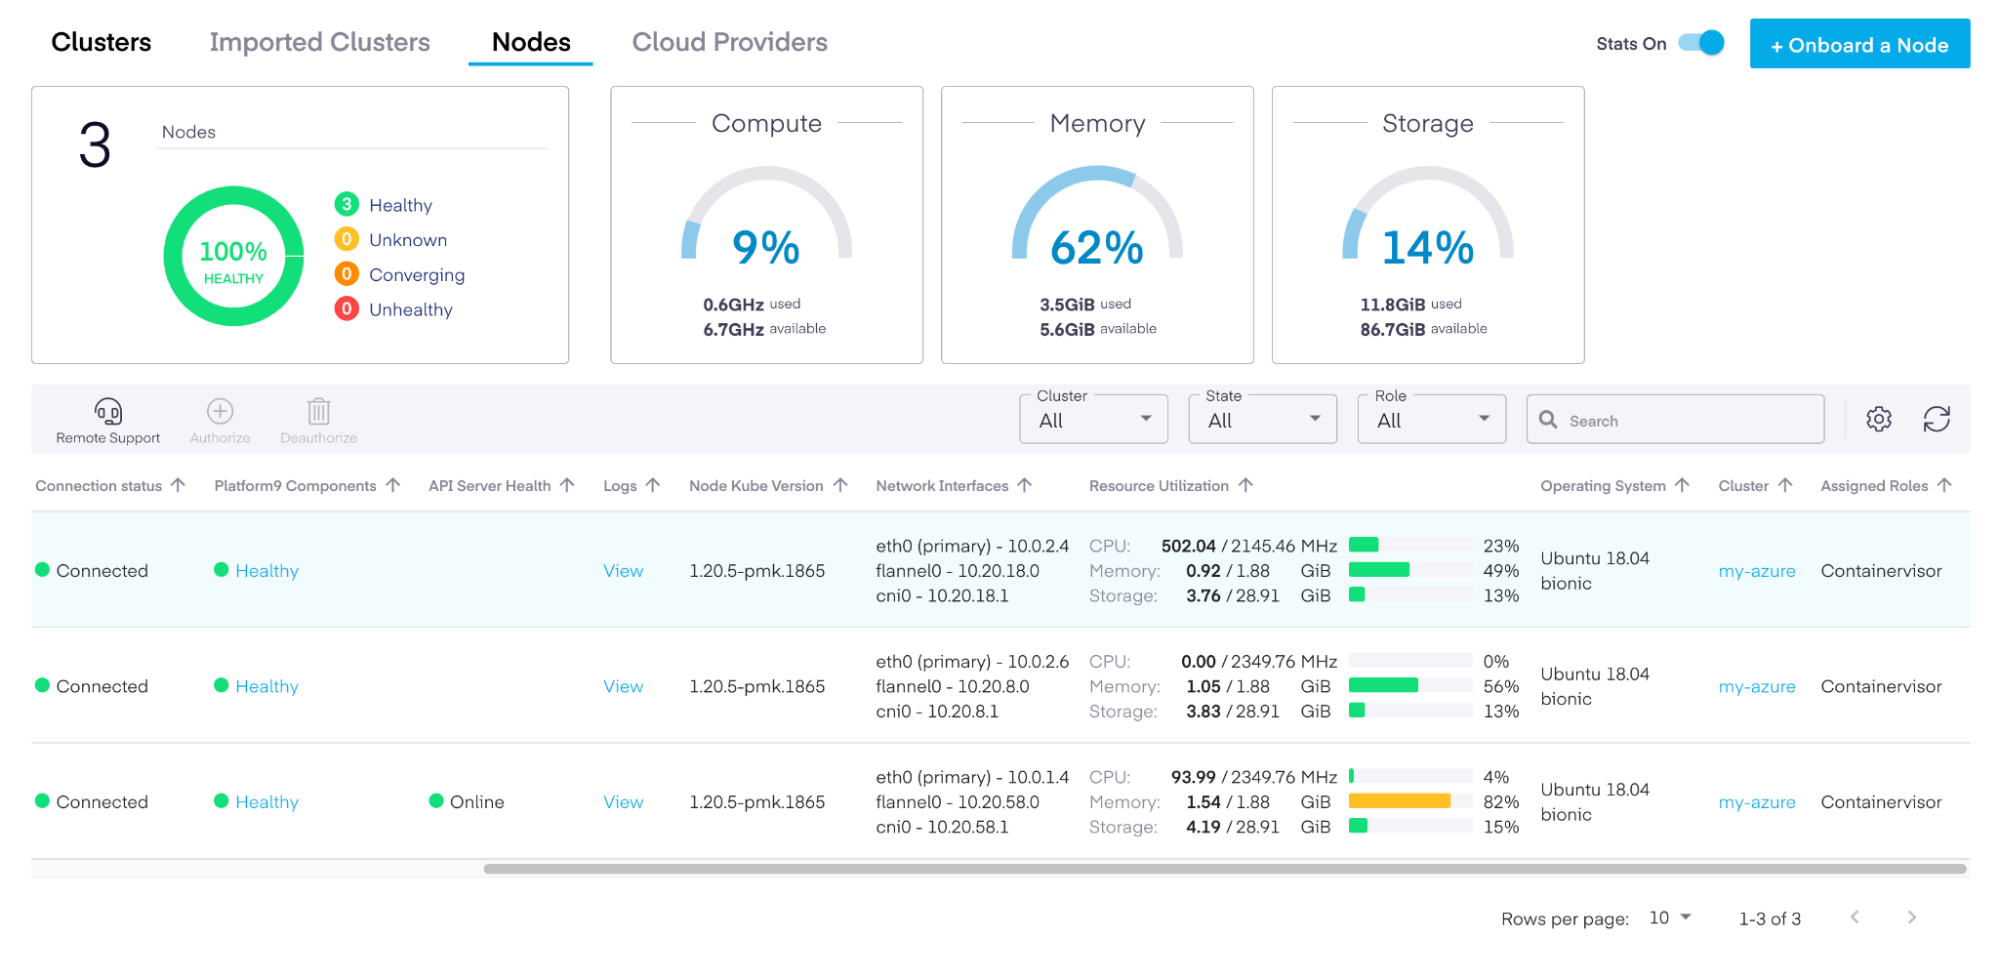
We have about 2.2 GHz of CPU and 2 GB of memory on each of the development and staging nodes. The worker VMs that we allocated from Azure offer 2 vCPUs, which translates to roughly 2 working threads per CPU. In total, we have 4 worker threads among those nodes. If we wanted to put them in one pool and allocate 75% of our resources to development and the other 25% to staging, we would first need to remove the nodeSelectors sections from our pods and apply the ResourceQuota configuration:
❯ cat quotas.yml
apiVersion: v1
kind: ResourceQuota
metadata:
  name: staging-quota
  namespace: staging
spec:
  hard:
    pods: "6"
    requests.cpu: "2"
    requests.memory: 2Gi
    requests.ephemeral-storage: 2Gi
    limits.cpu: "3"
    limits.memory: 3Gi
    limits.ephemeral-storage: 4Gi
---
apiVersion: v1
kind: ResourceQuota
metadata:
  name: staging-quota
  namespace: development
spec:
  hard:
    pods: "4"
    requests.cpu: "1"
    requests.memory: 1Gi
    requests.ephemeral-storage: 2Gi
    limits.cpu: "2"
    limits.memory: 2Gi
    limits.ephemeral-storage: 4Gi

❯ kubectl apply -f quotas.yml
resourcequota/staging-quota created
resourcequota/development-quota created
It’s a good idea to define resource constraints for each deployment so that the Kubernetes scheduler can find the best node that can fit that Pod.
apiVersion: apps/v1
kind: Deployment
metadata:
  name: nginx-dev
  namespace: development
  labels:
    env: development
spec:
  selector:
    matchLabels:
      run: nginx-dev
  template:
    metadata:
      labels:
        run: nginx-dev
    spec:
      containers:
      - name: nginx
        image: nginx
        resources:
          limits:
            memory: "800Mi"
            cpu: "800m"
          requests:
            memory: "600Mi"
            cpu: "400m"
Resource quotas can help you carefully refine and control deployment allocations across your shared resources.
Cluster Isolation Using RBAC to Control Access
RBAC or Role Based Access Control is a traditional way of restricting network access based on the roles of individual users. In our case, K8s offers a simple but powerful RBAC framework to allow developers to deploy certain apps only to a given namespace or to enforce read-only access to resources.
RBAC can be used to enforce security controls across namespaces based on the roles of individual users within your organization. The idea here is that RBAC can help prevent sensitive information (like configmaps or secrets) from being leaked to applications from different namespaces.
RBAC is not enabled by default, but if you create a cluster using Platform9, we automatically set things up for you, along with the proper roles and permissions. This makes it very easy to start defining your groups right away.
For our example, let’s create two service accounts using the staging namespace – one for the development team and one for the QA team:
❯ cat service-accounts.yml
apiVersion: v1
kind: ServiceAccount
metadata:
  name: development-service-account
  namespace: development
---
apiVersion: v1
kind: ServiceAccount
metadata:
  name: staging-service-account
  namespace: staging

❯ kubectl apply -f service-accounts.yml
serviceaccount/development-service-account created
serviceaccount/staging-service-account created
Next, we can switch into the UI and add roles for the development and QA teams. We’ll select the core API group with pods as our resources. Now, we can check the permissions and select get, list, and watch. Finally, we click on the pods/logs resources and add the get resource:
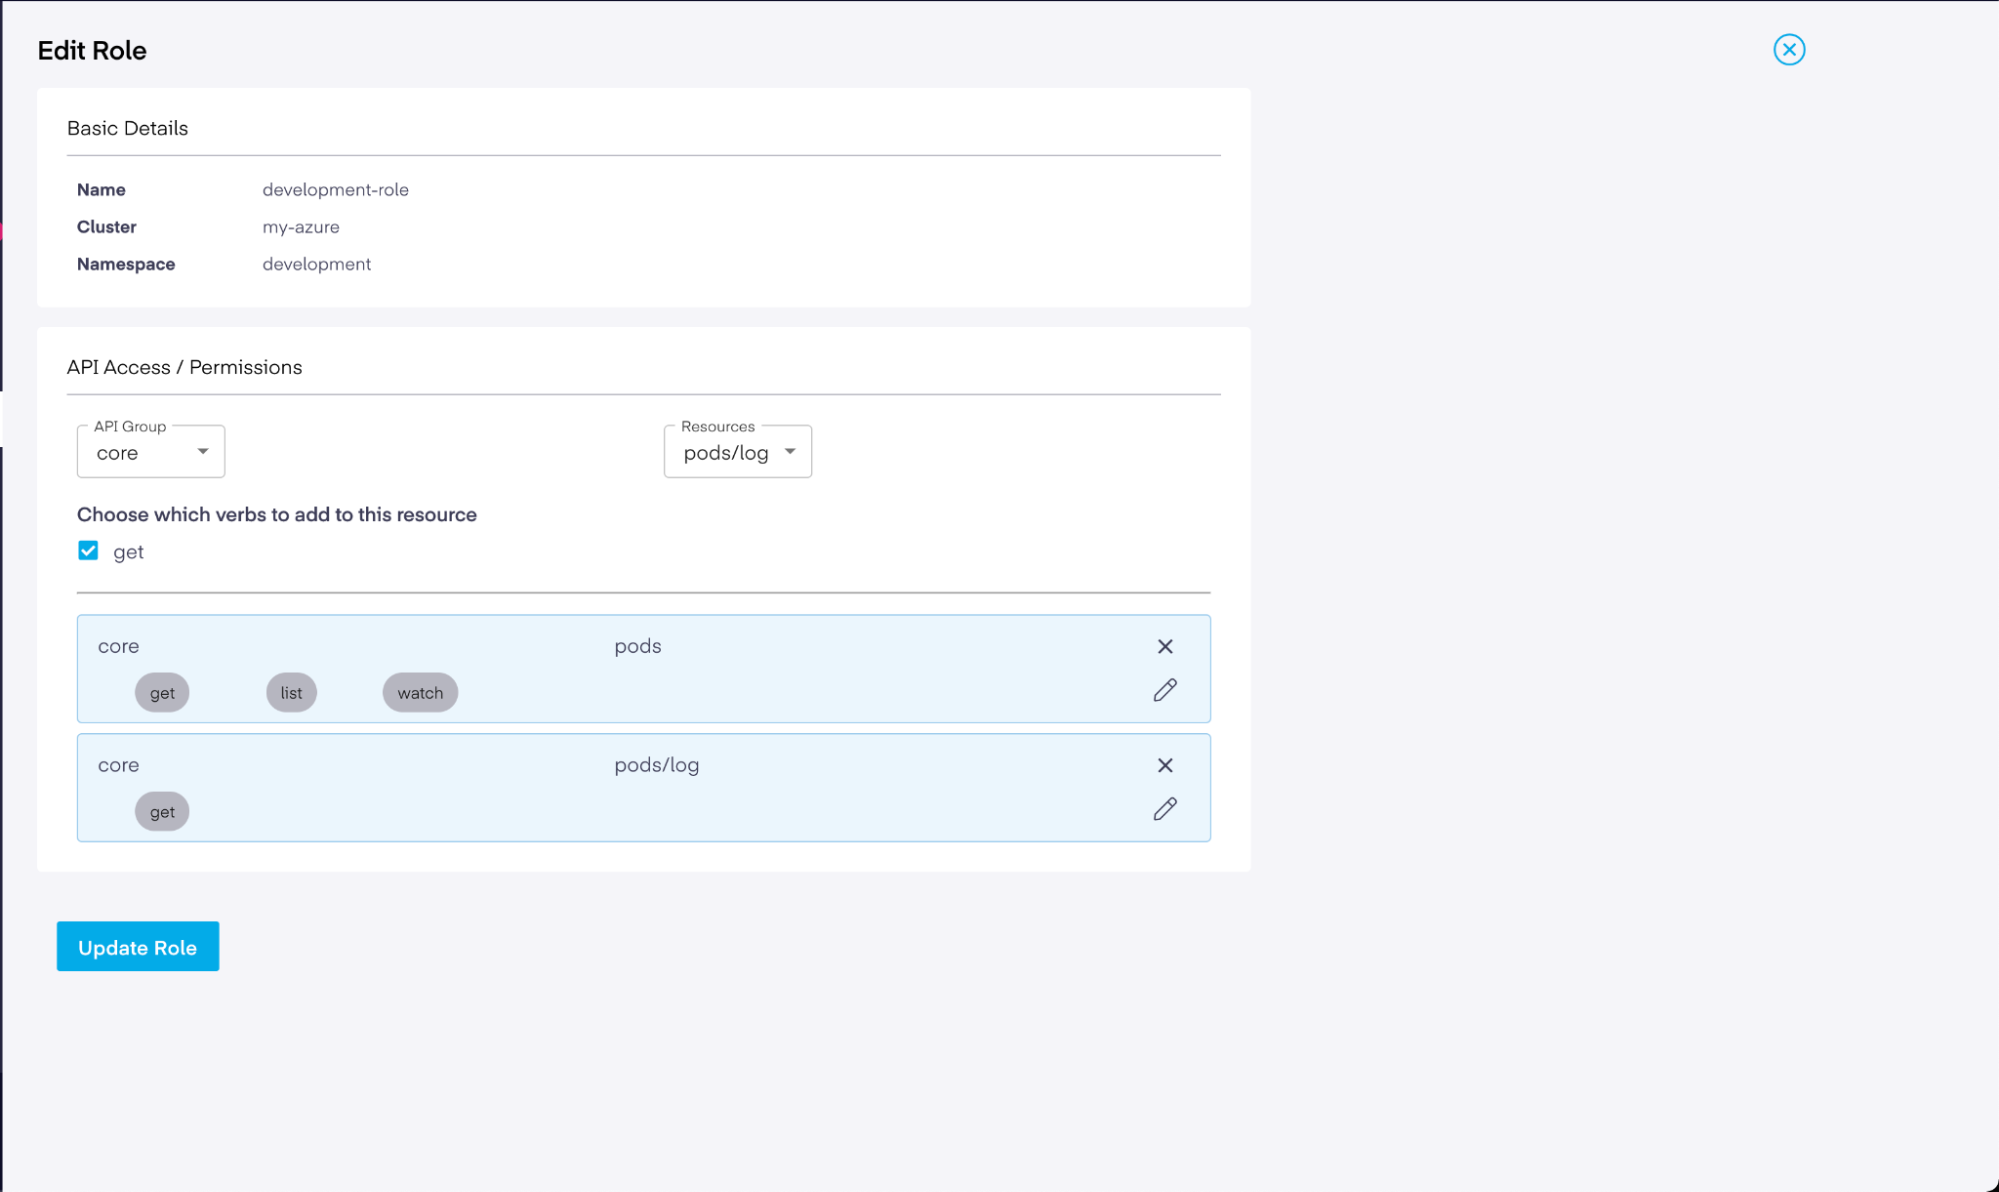
Basically, this role permission list allows you to query the available pods and their logs. If you’d like to query secrets from this namespace, for example, you’d add the secrets resource with get, list, and watch permissions. Feel free to add as many as you want.
Next, we need to bind a set of users to a role and its associated permissions. For this, we need another type of manifest called RoleBinding, which grants permissions within a specific namespace. You can select the RoleBinding option, fill in the form for the development namespace, and assign the development-role that we created earlier.
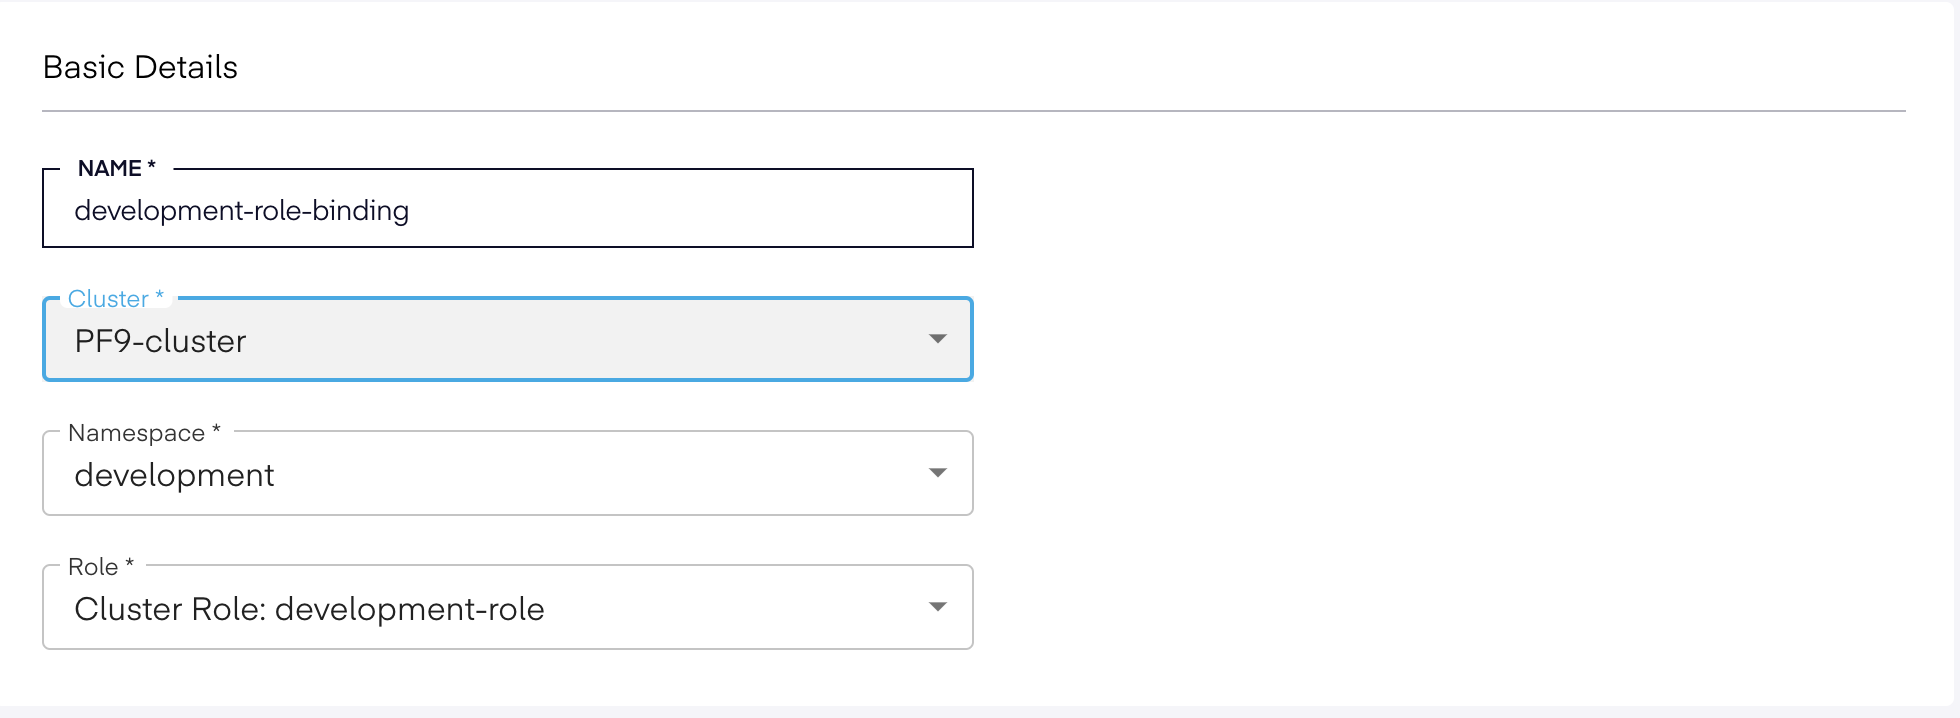
Finally, you can select a list of users. You can save this form, create the users that you want to assign to this RoleBinding, and then return to the form and add those users by editing the RoleBinding.
You can verify that the RoleBindings are propagated from the command line as well:
❯ kubectl get rolebindings -n development

NAME                       ROLE                    AGE
development-role-binding   Role/development-role   5m25s
Creating the roles and RoleBindings is the easy part. You need to create a context for each user in the system so that Kubernetes knows about the users and can authenticate them. You can find more detailed instructions on the CNF website. The steps include creating a pair of certificates for each user and uploading them to K8s. For example, if we had a user named “theo,” we would need to perform the following steps:
❯ kubectl config set-credentials theo --client-key theo.key --client-certificate theo.crt --embed-certs
❯ kubectl config set-context theo --cluster=my-azure --namespace=development --user=theo
After that, you can query the cluster resources using that particular user context. In this case, “theo” will only have access to the allowed KubeAPI server resources:
❯ kubectl get pods --context=theo-contextCaveats of Using Shared K8s Clusters
Naturally, there are some limitations to shared clusters, even when you perform the steps above to separate workloads and achieve isolation. You also need to be aware of the following issues when working on the same cluster.
For one, all nodes share the same API server. The common denominator inside our cluster is the KubeAPI server. This is divided between production and development workloads, meaning that all requests go through this API before being persisted into the cluster. If you are operating workloads that require strict zero trust security between tenants, then this may not be an ideal situation for your organization. If that’s the case, you might need to configure a physical cluster isolation or review these SIG implementations for virtual clusters.
However, a better option is to use Platform9 to create a nice multi-tenant topology without having to do much experimentation. For example, it allows you to leverage the concept of regions and tenants. Regions represent cluster locations that are physically separated or have a different type of computing resource. Tenants are groups of users who belong to an organization or a certain department within an organization. You can use both regions and tenants to create clusters that will be isolated and accessible only to the users within a specific tenant group. This way, you can establish a more streamlined and reliable way of compartmentalizing your infrastructure resources without having to do much configuration.
To learn how to create a new tenant, you can follow this documentation. Once you’ve created your new tenant, you can navigate to the main dashboard and select it from the top right dropdown list:

From there, you’ll be able to see all of the resources that are deployed on this tenant. This will be empty initially, since you haven’t deployed anything yet:
If you want to use regions other than the one that was assigned to your account when you registered, you will need to open a help desk request with Platform9 Support.
As you can see, the simplicity of the Platform9 dashboard makes it easy to start working straight away using the UI. In fact, I was able to create three clusters that each had their own tenants (development, staging, and production) within an hour, and I didn’t have to perform any manual steps or create more manifests.
Better yet, you can import existing clusters into the Platform9 management plane. To do that, you just need to select the Import Cluster option when you go to add a new cluster:
Compared to their competitors, using Platform9 as your managed K8s provider gives you much more flexibility when creating multi-tenant clusters.
Next Steps with Shared K8s Clusters on Azure with Platform9
In this article, we discussed options for securing, isolating, and managing shared, multi-tenancy K8s clusters on Azure with Platform9. We also showed you how Platform9 saves you the hassle of setting up and configuring namespaces, network policies, and resource quotas for each environment on your own. If you try out other supported K8s cloud providers like GCloud and AKS, you’ll really see the value of Platform9’s offerings.