For any cloud administrator, one of the essential starting points for managing their cloud deployment is to ensure there is a consistent set of base images from which appropriate instances can be spawned.
A popular tool that helps with such cloud image management is Packer, developed by HashiCorp, the makers of Vagrant. Packer allows you to create identical machine images for multiple platforms from a single source configuration. The idea is to use a configuration-driven, reliable and repeatable approach to build the same image across various platforms that Packer integrates with.
Spencer Smith from Solinea has a nice article on using Packer with OpenStack here that you should consider reading. Unfortunately for VMware users, Packer does not have any direct integration with vSphere APIs. However, since Packer does integrate with OpenStack, you can use an OpenStack VMware deployment for Packer to work with. Even then, the final result of a Packer run on OpenStack would be a vmdk image file, and not a vSphere template, which is by far the most common currency for images in the VMware world. At Platform9, we’ve helped address this by including the ability to snapshot VM instances directly to vSphere templates!
In this post we will talk about how you can use Platform9 vSphere deployments to effectively integrate with Packer and generate customized vSphere templates.
Step 1: Packer Setup
Installing Packer on a Mac is fairly straightforward – I used home-brew to aid this setup. You can refer to more detailed instructions for manual installs, and other operating systems here.
- In a terminal, ensure that you have homebrew setup by issuing brew.
- Add the necessary tap with brew tap homebrew/binary.
- Install packer with brew install packer.
Step 2: Establish a Base Image to Use
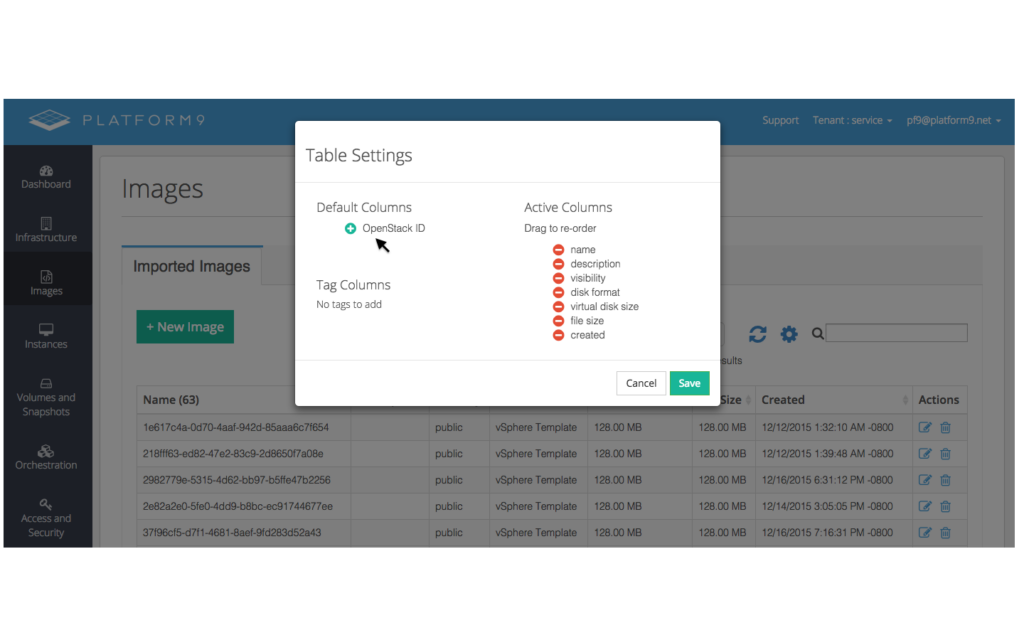
Platform9 will discover all the vSphere templates on the data stores that are paired with it, and make them available for you to use as Glance images. Once you have a base template that you’d like to use to build specific images from, you can retrieve its ID from the Platform9 UI by navigating to the “Images” tab. If you haven’t already, you can add the “OpenStack ID” as one of the columns to display in your Images view.
 Once this column has been added, you can select the ID of the image you’d like to use as the base image:
Step 3: Create Packer Template
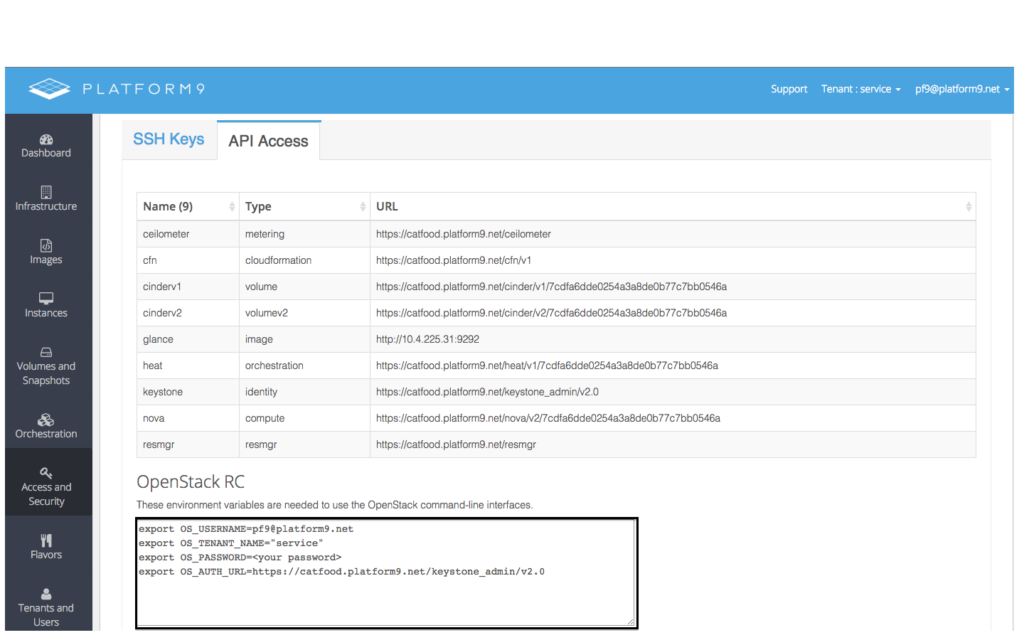
Once you have image ID ready, you will need to provide some other variables for packer to be able to communicate with your OpenStack cloud. Most of these can be found in the Platform9 UI under “Access & Security”, within “API Access.”

Exporting all of the values given in the box above should setup packer to be able to communicate with your Platform9 OpenStack setup.
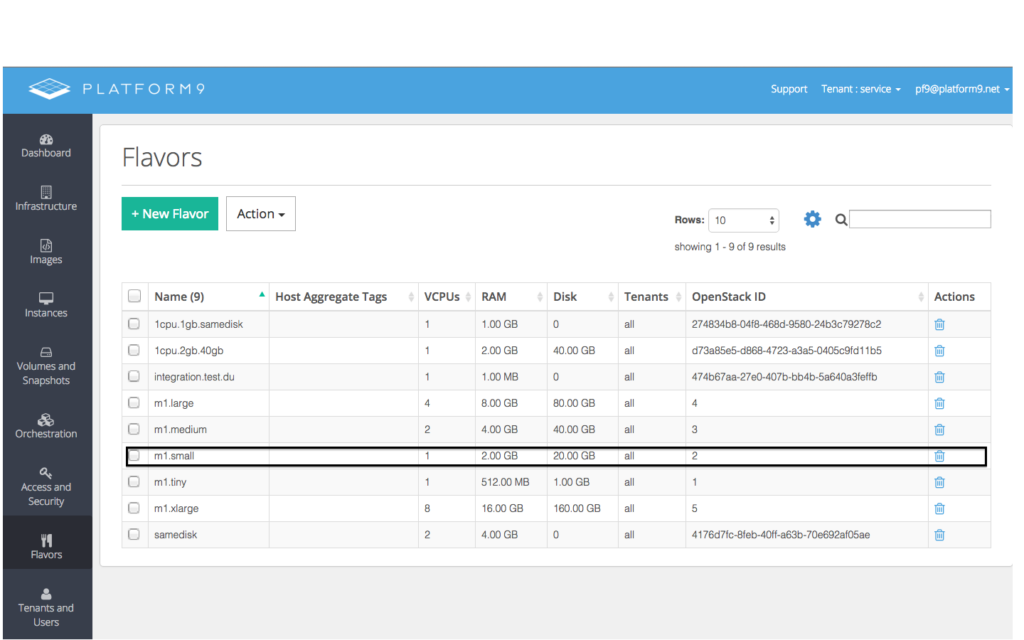
You will also need to choose a flavor for the instance size to be used for VM provisioning, to perform all the necessary customizations for the new image you’re building. Again, the OpenStack ID for the flavor can be obtained from the Platform9 UI, under the flavors tab.

Similarly, you will need to choose a network to which the instance will connect, whose ID can in turn be obtained from the “Infrastructure” tab, under “Networks”.
Putting all this together, this is the template I have:
[code lang=”js” smarttabs=”true”]
{
“builders”: [{
“type”: “openstack”,
“ssh_username”: “testuser”,
“image_name”: “Packer Test Image”,
“source_image”: “374880ec-6d93-4c6c-8aab-efc27e0ebc0e”,
“flavor”: “2”,
“networks”: [“b9f6f886-7f08-47d6-81d9-b9599db951fa”]
}
]
}
[/code]
Note the ssh_username field in this template – that is the user needed to ssh into the created instance by Packer.
Step 4: Execute!
Once you have all of this ready, you can run your test template by passing it to packer via the “build” command:
[code lang=”js” smarttabs=”true”]
packer build test_template.json
[/code]
Packer will now communicate with Platform9 OpenStack with the exported credentials provided, get it to spin up an instance using the base image from the template, ssh into the created instance, perform any needed customizations (more on that in a bit), and snapshot it so that we now have a new customized image to use for future deployments. Packer does this using the standard OpenStack APIs.
[code lang=”js” smarttabs=”true”]
openstack output will be in <span style=”color: #0000ff;”>this</span> color.
==> openstack: Discovering enabled extensions…
==> openstack: Loading flavor: <span style=”color: #339966;”>2</span>
openstack: Verified flavor. ID: <span style=”color: #339966;”>2</span>
==> openstack: Creating temporary keypair <span style=”color: #0000ff;”>for this</span> instance…
==> openstack: Launching server…
openstack: Server ID: 51175103-9623-4dd8-83f6-4fe9cf4ae3b5
==> openstack: Waiting <span style=”color: #0000ff;”>for <span style=”color: #000000;”>server </span></span>to become ready…
==> openstack: Waiting <span style=”color: #0000ff;”>for <span style=”color: #000000;”>SSH</span></span> to become available…
==> openstack: Connected to SSH!
==> openstack: Stopping server…
openstack: Waiting <span style=”color: #0000ff;”>for</span> server to stop…
==> openstack: Creating the image: Packer Test Image
openstack: Image: 132bb55a-7dec-467b-adca-<span style=”color: #339966;”>440231822223</span>
==> openstack: Waiting <span style=”color: #0000ff;”>for</span> image to become ready…
==> openstack: Terminating the source server…
==> openstack: Deleting temporary keypair…
Build ‘openstack’ finished.
==> Builds finished. The artifacts of successful builds are:
–> openstack: An image was created: 132bb55a-7dec-467b-adca-<span style=”color: #339966;”>440231822223</span>
[/code]
At Platform9, one of the key additions we’ve made to OpenStack’s vSphere support is the ability to snapshot an instance directly into a template, instead of the existing vmdk format. So once you execute the packer template, you will end up with a full-cloned vSphere template that you can also use outside of your OpenStack environment!
Further Customization
Now that we know how to create a customized vSphere template using packer with Platform9’s OpenStack deployment, what else can we do with it? Well, the power of packer comes from the various customizations you’re actually able to do once you have this flow in place. Packer provides a set of “provisioners” to do this. Here I will use a “File” provisioner to upload files to created instance, so that it will be available within the customized image.
[code lang=”js” smarttabs=”true”]
{
“type”: “file”,
“source”: “app.tar.gz”,
“destination”: “/tmp/app.tar.gz”
}
[/code]
This can then be added to your packer template:
[code lang=”js” smarttabs=”true”]
{
“builders”: [
{
“type”: “openstack”,
“ssh_username”: “testuser”,
“image_name”: “Packer Test Image”,
“source_image”: “74c08e26-ff35-46ad-bb81-cbb301de4a99”,
“flavor”: “2”,
“networks”: [“b9f6f886-7f08-47d6-81d9-b9599db951fa”]
}
],
“provisioners”: [
{
“type”: “file”,
“source”: “app.tar.gz”,
“destination”: “/tmp/app.tar.gz”
}]
}
[/code]
Now when you run the template through packer, the created image will be customized with the files specified above. There are other provisioners that can be used to perform more useful functions – like the “Shell” provisioner to execute bash scripts, to, for example, install any packages into the customized image.
You can read more about packer provisioners here.
Wrap Up
To summarize the key points made here:
- Packer is a useful tool for cloud image management, with many useful integrations, but vSphere users do not have a direct way of using it – enter OpenStack!
- Platform9 offers a simplified way of deploying OpenStack with VMware that discovers your existing templates to be used as images within OpenStack, which can then be used to seed packer.
- Platform9 also offers the ability to snapshot instances directly to vSphere templates, so that packer runs can create vSphere templates instead of vmdk files.
Packer is a great tool to have in your arsenal when working with cloud deployments, and we hope you find this post useful in your administrative endeavors!


