Volume
A volume represents a logical area on that storage device. Any data that is stored on a volume is persisted until it is erased from the volume.
A volume must be mounted on a virtual machine for it to be accessible within the guest operating system of that VM.
Volume Type
Volume Types are the mechanism used in Private Cloud Director to enable use of multiple storage backends within a single Private Cloud Director environment. A volume type enables you to define a class of block storage. You will typically create at least one distinct volume type for a distinct storage backend you are using. For example, you may have one storage type for your NetApp block storage and another one for block storage from Dell / EMC. In some cases, you may choose to create separate volume types for the same storage backend to expose different storage classes, each with different values for quality of service, offered by a single storage backend.
A volume type has following properties:
- Name - A descriptive name for the type
- One or more Volume Backend Configurations
- Key - value metadata - This key-value metadata corresponds to specific properties for your storage that you'd like to configure as part of defining this storage type. Any new volume created using this storage type will get the respective properties applied to it. For eg, the key-value metadata may represent QoS attributes, replication configuration etc. Each vendor has a specific schema that represents the supported key value attributes you can configure. You can refer to the driver configuration guide for your specific storage provider to find a detailed list of supported key-value attributes.
Volume Backend Configuration
A volume backend configuration enables you to choose a specific storage backend that you would like to associate with a given volume type.
A volume backend configuration has following properties:
- Name - A descriptive name for the volume backend configuration
- Storage driver - The driver for the specific storage backend that you are creating this volume backend configuration for.
- Key - value metadata - Key-value metadata that corresponds to configuration of the storage driver for the target storage. For eg, when the target storage is a SAN array, the key-value metadata in the volume backend configuration may include ip address of the array, along with other properties such as multi-pathing enablement etc that are required for the configuration of the storage driver for that array.
A volume type can map to multiple volume backend configurations. Following diagram describes the entity relationship model between volumes, volume types, and volume backend configurations.

When you have more than one volume backend configuration associated with a volume type, the block storage service scheduler may provision a new volume on any of the available backends, based on available capacity information that it has for those backends.
The following diagram illustrates an example where there are 4 volumes created using 'Volume Type 1' which internally is mapped to 3 volume backend configurations. Each volume backend configuration is mapped behind the scenes to a storage array. The volumes created using this volume type (volumes 1-4 in this case) may get placed on any one of the 3 storage arrays.
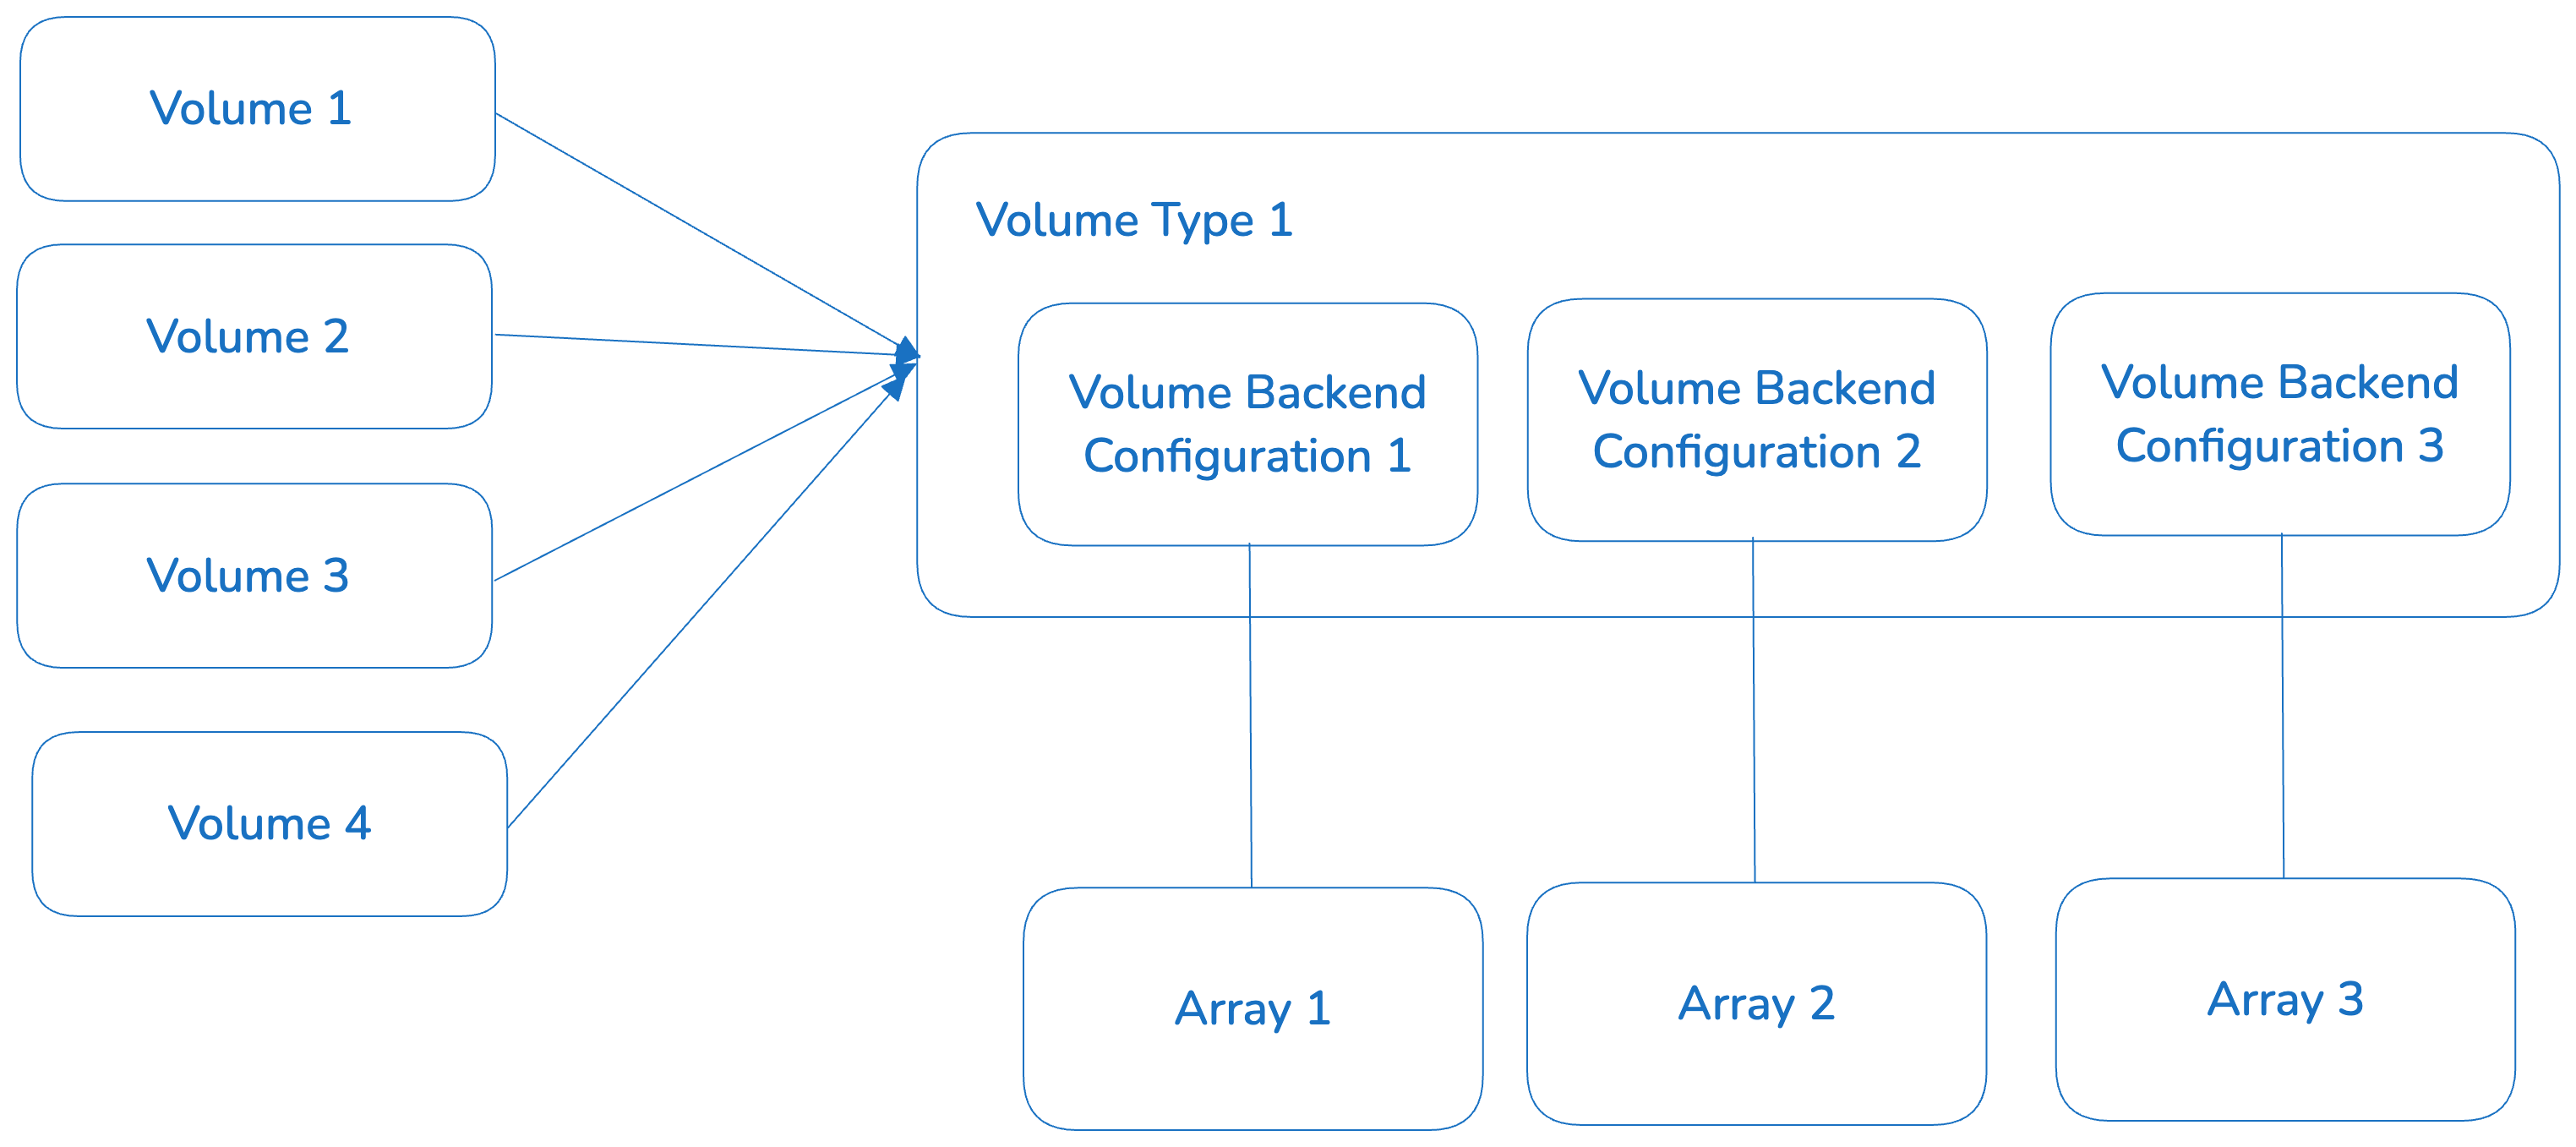
As shown in the diagram above, you will typically use multiple volume backend configurations within the same volume type when you have multiple instances of the same storage from the same vendor - although this is not a requirement, as you use multiple volume backend configurations within a volume type with each mapping to a target storage of different kind or from a different vendor. For example, you may create a volume type with two volume backend configurations, one mapping to NFS and another mapping to LVM. Creating a volume type essentially creates a single class of storage, with volumes created using that type being placed on any of the available underlying storage devices that map to the volume backend configurations for that type.
Configure Block Storage as part of Cluster Blueprint
The following section describes the steps you need to take to properly configure block (persistent) storage as part of creating or editing your cluster blueprint.
When creating or editing your Private Cloud Director cluster blueprint, you specify what storage options the clusters in your Private Cloud Director will use by creating one or more volume types and mapping each to one or more volume backend configurations.
Create a Volume Type
To create a new volume type:
- Navigate to the
Cluster Blueprintconfiguration underInfrastructurein the UI. - Locate the section called
Persistent Storage Connectivity. - Select the
Add Volume TypeunderStorage Volume Typesoption. - Give the volume type a name.
- Click on
Add Configurationto create one or more volume backend configurations.
Create a Volume Backend Configuration
You can create a new volume backend configuration by clicking on Add Configuration as part of volume type creation in a cluster blueprint. You will then be asked to specify the required properties for that volume backend.
Note that the UI shows a subset of supported drivers in the dropdown list as part of the creation of volume backend configuration. If you select one of the drivers listed, the UI will auto-populate the required key-value metadata for that driver for you to fill up. However, if your specific storage device is not explicitly listed here, you can still configure your storage backend, as long as it's supported based on the supported list of storage vendor drivers listed above, using key-value pair options in the Cluster Blueprint.
A full list of certified Cinder compatible block storage devices is listed here.
Configure a Host with Block (Persistent) Storage Node Role
When you assign the 'Block Storage Node' role to a server, behind the scenes:
- The host is configured to run Block Storage service data-plane components.
- The host will facilitate communication for control operations, such as provisioning and de-provisioning of storage volumes, between Private Cloud Director management plane and the underlying block storage device. For instance, a Block Storage host will help forward a volume creation command to a NetApp block storage backend when a virtual machine is being created.
- The storage driver(s) corresponding to the volume backend configuration(s) that you map to this host will get installed on the host.
- The actual data-path communication for storage I/O will happen directly between the hypervisor where that virtual machine is being created, and the storage backend. The host with block storage role installed does not get involved in the data path communication.
Assign Volume Backend Configuration to Block Storage Host
When you assign Block Storage Role to a host in your virtualized cluster, you are asked to choose one or more volume backend configurations as part of the drop down list to apply to the host.
- NOTE that you are not selecting a volume type in this drop down but the volume backend configuration.
When you choose a volume backend configuration, the drivers corresponding to that storage backend will be installed on the host.
The host then acts as conduit for control traffic between Private Cloud Director management plane and the storage device that maps to the volume backend configuration.
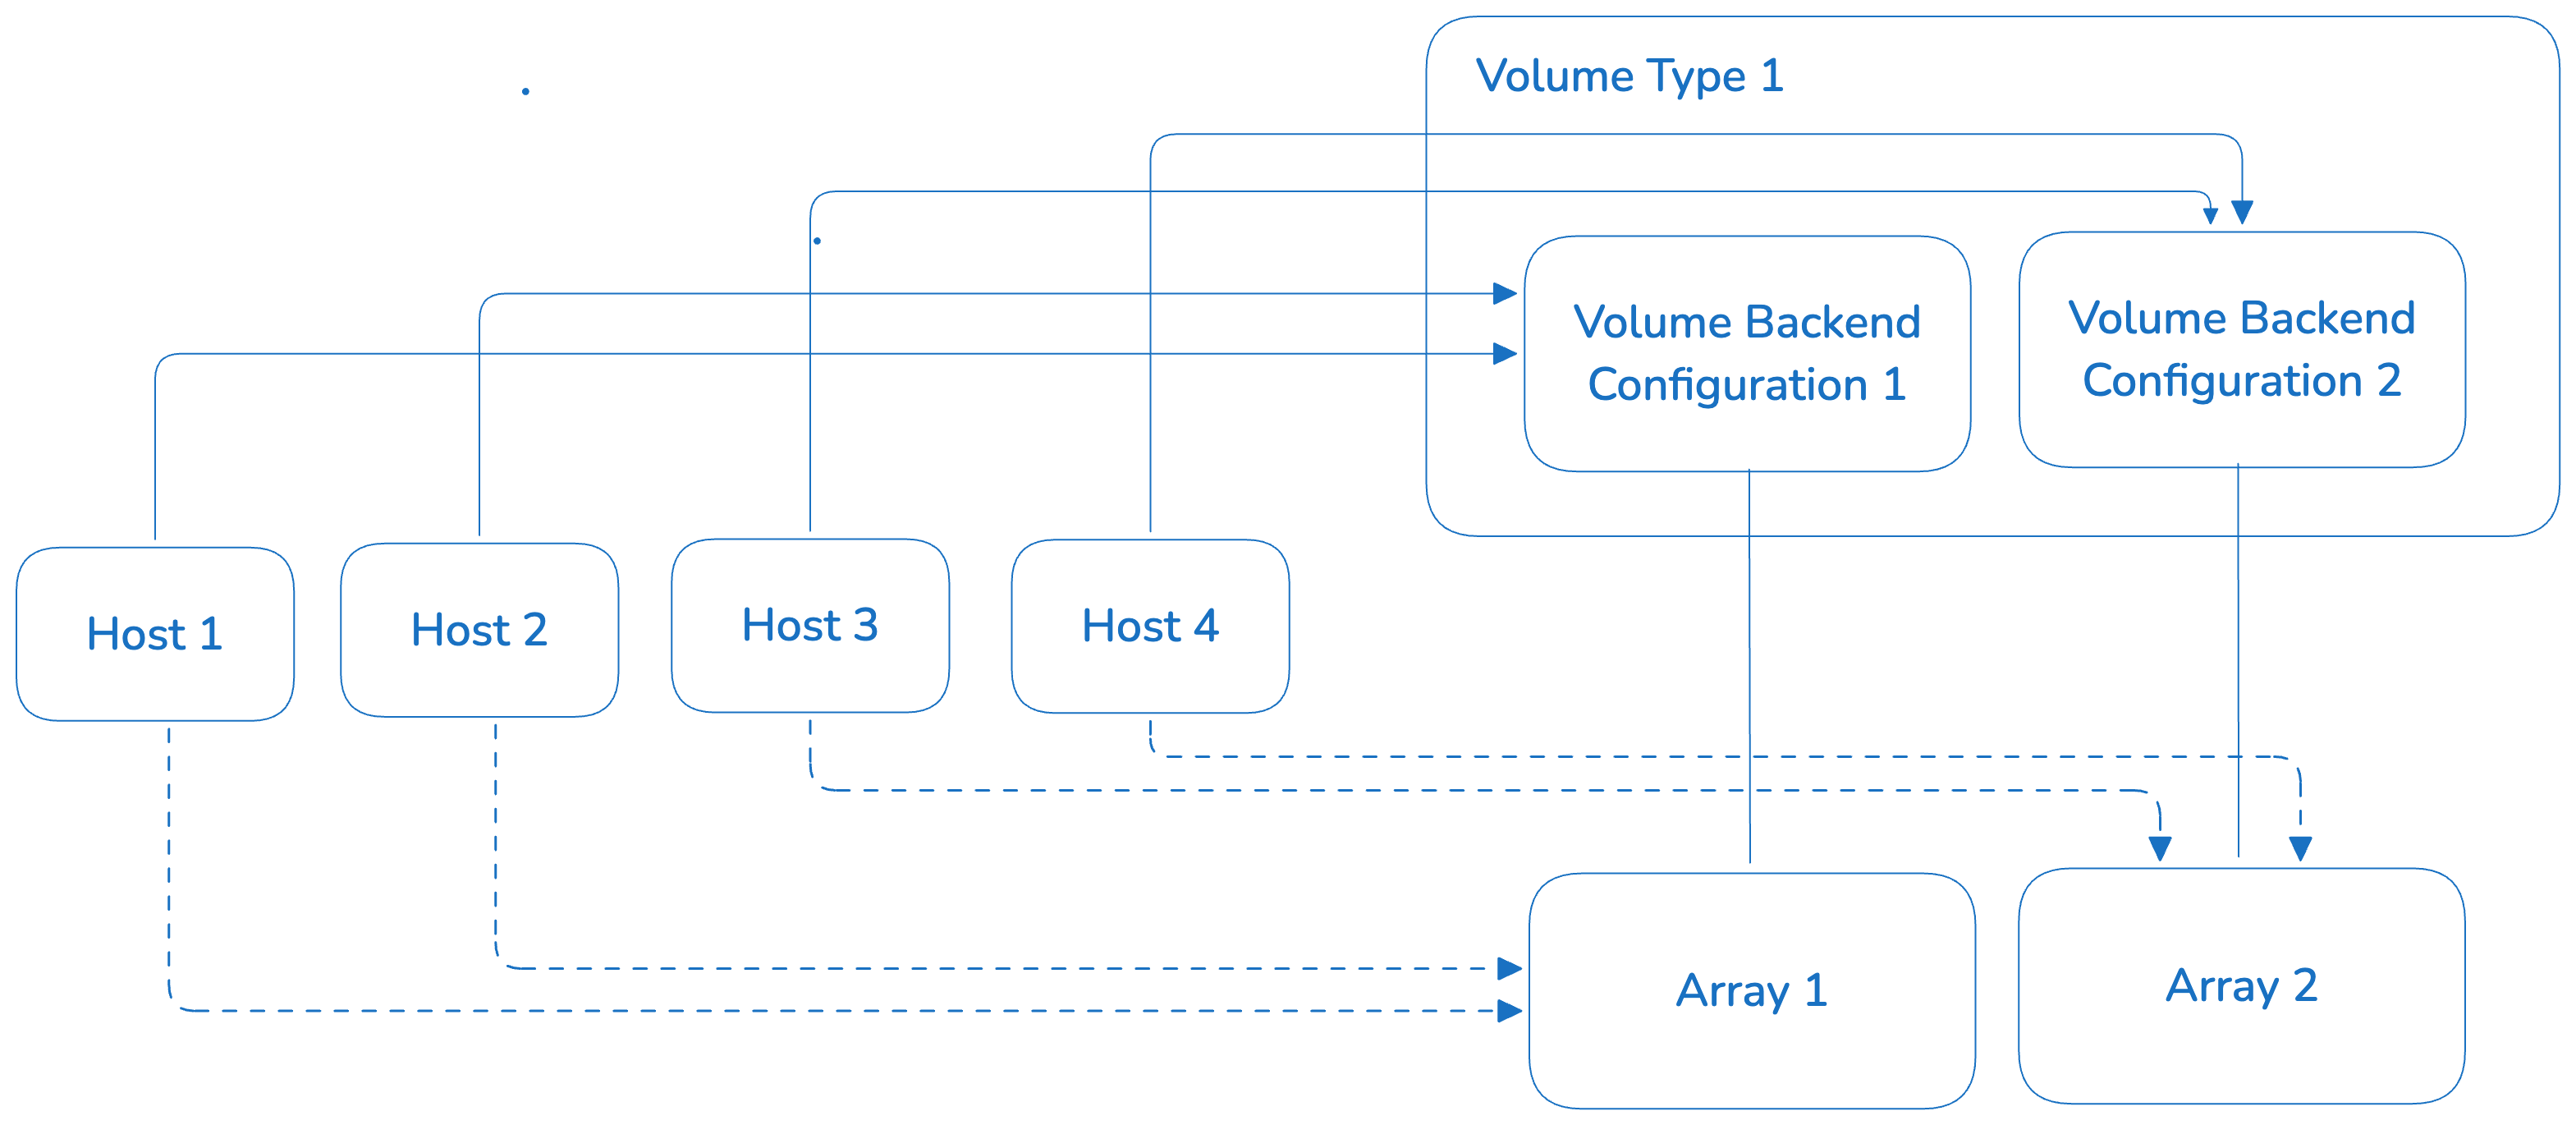
You can assign one or more volume backend configurations to a host and a given volume backend configuration can be mapped to multiple hosts. The following diagram expands the entity relationship model described above with addition of hosts.

This enables a model where a given volume type can be facilitated via multiple backends, each being supplied by multiple hosts. This enables a level of high availability where for a given backend, multiple hosts have the ability to server volume requests for that backend.
In the diagram below, we show a volume type with two volume backend configurations. We also have a total of four hosts with storage node role assigned, two of them map to one volume backend and the remaining two map to the other volume backend. A request to create a volume may at run time be forwarded to any of these four hosts.
Configure Storage Multi-path
Storage multi-pathing is a technique that provides redundant data paths between a server and storage devices, enhancing fault tolerance and performance. This capability is storage specific and may or may not be supported by your specific storage backend. Please check with your storage backend and ensure that the feature is supported, before you configure it for your product_name environment.
In order to enable multipath for your block storage backend, you need to take the following steps:
Step 1 - Enable multipath support for compute service
Follow the steps here to Enable Storage Multipath on each hypervisor host where VMs that will use volumes from this backend may reside. This may be all hosts in your current virtualized cluster, or all hosts in all of your virtualized clusters.
Step 2 - Turn on multipath for storage driver
Specify the following two properties when you Create a Volume Backend Configuration for your block storage driver.
use_multipath_for_image_xfer = trueenforce_multipath_for_image_xfer = trueCreate a Volume
A volume can be created from:
- A volume snapshot - The resulting volume may be an optimized clone depending on the storage backend. Many storage backends (eg Pure, NetApp) will create a copy-on-write clone or a thin clone, where instead of copying all data blocks right away, the new volume will initially reference the snapshot's data. Any subsequent write to the new volume will create new data blocks, preserving the snapshot. This implementation is fast and space efficient. Therefore, a volume that is created from a snapshot always has a persistent dependency on the snapshot. The volume must be deleted first, before the snapshot can be deleted. The
snapshot_idproperty of the volume will be populated with the id of the snapshot. - Another volume - A volume is created by making a full copy of the source volume. Once the volume is created, it is then fully independent of the source volume and can be operated on independently. Some storage backends may choose to create a copy-on-write or thin clone behind the scenes in this case. However, there is no persistent dependency between a volume and the source volume, once fully created. You can delete the source volume, even though a clone may exist. The backend in this case, may choose to retain the source as a hidden snapshot or promote the clone, making it fully independent. The
source_volidproperty of the volume will be populated with the id of the source volume. - An image - A volume is created by copying the image data from the image service into the volume backend associated with the volume type. Once the data is copied, the volume becomes independent of the image and can be operated on independently. The
image_idproperty of the volume will be populated with the id of the image. - As an empty / blank volume
Volume Properties
Following section describes all the properties of a volume.
Core Properties
id – Unique UUID of the volume
name – Name of the volume (optional)
description – Human readable description (optional)
size – Size of the volume in GB
status – Current state (creating, available, in-use, error, deleting, etc.)
bootable – Boolean flag, whether the volume can be used to boot a VM. Volumes can be bootable or non-bootable. A bootable volume can be used to boot a VM.
multiattach – Boolean, whether volume supports attaching to multiple instances simultaneously
created_at – Timestamp when the volume was created
updated_at – Timestamp when last updated
Volume Source Information
snapshot_id – ID of the snapshot used to create the volume (if any).
source_volid – ID of the source volume (if volume was cloned).
volume_image_metadata – Including ID, name and other information about the image if the volume was created from an image.
Ownership Information
user_id – User who created the volume
project_id – Tenant that owns the volume
metadata – Arbitrary key/value metadata pairs (user or system added)
volume_type – Volume type information
Volumes and Volume Snapshots
A volume snapshot is always created from a volume. You can not delete a volume if there are any volume snapshots associated with it. You need to delete all the volume snapshots first before you can successfully delete a volume.
Read more about Volume Snapshot here.
You can not delete a volume that has volume snapshots associated with it. You need to delete all the volume snapshots first before you can delete a volume.
Volume Actions
Attach or Detach Volume
You can attach or detach block storage volumes to virtual machines that use ephemeral root disk as well as virtual machines that use a block storage volume for root disk.
However, there are some caveats when attaching volumes to a VM that uses ephemeral root disk. Specifically, when you take a snapshot of such a VM, the resulting snapshot will be of type VM Ephemeral Disk Snapshot and will NOT include a snapshot of any attached volumes. Read the Virtual Machine Snapshot document for more details.
Extend Volume
Extending or resizing a volume allows you to increase the size of a volume.
To extend a volume that is not currently attached to a virtual machine, simply select the volume in the volume grid view under the Storage -> Volumes menu option in the Private Cloud Director UI. Then under Actions dropdown select the "Extend volume" action. Here you can specify the new size of the volume. Note that the new size must always be great than the current volume size.
Private Cloud Director block storage service also allows you to extending a volume that is currently attached to a virtual machine and in use, however, support for this feature is storage backend and driver dependent. See the matrix of drivers that support this feature. Make sure that the driver for your specific storage backend supports extending an attached volume, before you perform the operation.
Support for extending an attached and in use volume is driver and storage backend specific. See the matrix of drivers that support this feature to check if your specific storage backend supports this feature.
Volume Retype - Changing Volume Type & Migration Across Backends
Volume Retype operation enables you to change the volume type of a storage volume, which behind the scenes may invoke migration of the volume from one storage backend to another . This operation works as long as the underlying storage backend(s) support the required migration operation.
You can find out if the storage backend supports volume migration, and if it's supported for volumes not in use as well as volumes in use, review the documentation for the Cinder storage driver specific to your storage backend(s).
For changing a volume's type using the PCD UI:
- Navigate to the volumes menu. Then select the volume you'd like to migrate and choose the option 'Retype' from the Actions menu.
- This will present to you a dialog box which will provide options to switch the volume to a different storage type. Select the desired volume type and proceed with the operation.
- Under the hood, the volume will be migrated from current storage backend to the new destination backend that is the target of the new volume type.
Storage migration in Private Cloud Director can be done for both "available" volumes (cold migration) as well as or "in-use" volumes (live migration).
Volume Retyping Limitations / Things to Know
Please read below before you invoke retype operation on a storage volume.
Migration of Volumes across Different Storage Backends
Migration of volumes - both in-use and not in-use - across different storage backends is only supported in limited scenarios when both storage volume backends support this operation. Contact the Private Cloud Director support team with information specific to your environment to understand if the operation can be performed.
Migration of In-Use Volumes / Storage Live Migration
Volume migration of in-use volumes (live migration) has the following caveats:
Migration of an ‘in-use’ volume is only supported as long as the storage drivers for both the source and the destination storage types support the operation.
Migration of an "in-use" volume will not succeed for any backend if the volume is attached to a virtual machine that is currently in any of the following states:
- SHUTOFF,
- SUSPENDED,
- SOFT-DELETED
Retyping an "in-use" volume from a multi-attach-capable type to a non-multi-attach-capable type, or vice-versa, is not supported. It is generally not recommended to retype an in-use multi-attach volume if that volume has more than one active read/write attachments.
Retyping an unencrypted volume to an encrypted volume of the same size will likely fail, as the encrypted volume needs to store additional encryption information.
Volume Resize
You can resize a block storage volume regardless of whether it is in use. Read the Resize a volume tutorial to see steps to resize a volume.
Volume Transfer Between Tenants
Transferring a volume between tenants involves initiating the transfer from the source tenant and accepting it from the destination tenant using provided credentials. Any volume snapshots that were created using the selected volume as a base will also be moved to the destination tenant, and will no longer be accessible from the source tenant. Transfer of encrypted volumes is not supported.
Steps to Transfer a Volume:
- Select a Volume:
Start the volume transfer process from the source tenant by selecting the desired volume and clicking the Transfer Volume action in the UI. The volume must be in the
availablestate to be eligible for transfer. - Initiate the Transfer: After the volume transfer is initiated, copy the Transfer ID and Authorization Code displayed in the dialog before moving on, as they will be inaccessible once the dialog is closed.
- Share Transfer Credentials: Copy and securely share the Transfer ID and Authorization Code with a user in the receiving tenant.
- Accept the Transfer: A user in the destination tenant must click the Accept Volume Transfer button in the upper right corner and use the provided Transfer ID and Authorization Code to accept and complete the volume transfer.
Example Use Cases:
- Cross-Tenant Access to Data: A volume containing a large amount of data needs to be accessed from a Virtual Machine (VM) in another tenant. The volume is transferred to that tenant and then attached to the target VM.
- Managing Quota Limits: A tenant has reached its maximum volume quota, but the existing volumes need to be preserved. To free up space, the volumes are temporarily transferred to another tenant. Once quota is available again, the volumes can be transferred back.
- Sharing Volume Snapshots: A user wants the snapshots of a specific volume to be available in a different tenant. By transferring the volume to that tenant, all of its associated snapshots also become accessible there.
Log Files
See Log Files for locations of important log files, including the storage service logs.