Beginner’s Guide to Deploying PCD Community Edition
Hey everyone! 👋 So, you're curious about setting up your own little cloud haven? I've got you covered with this simple guide to getting started with Private Cloud Director Community Edition (CE). Think of it as your friendly "let's build something cool together" walkthrough.
What's Community Edition?
This version of Private Cloud Director is awesome for testing stuff out or if you're just starting small. You can deploy it on a bare-metal setup or inside a virtual machine. The infrastructure and workload regions run on the same VM, but a separate hypervisor host is needed. This can run as a VM alongside CE if needed. This guide will use a single bare-metal host to run the necessary VMs. Check out the official docs to learn more about Private Cloud Director Community Edition.
My Home Lab Setup
Since I'm a bit of a hardware geek (I build water-cooled gaming PCs in my spare time!), that's what we're using for our example. Here's the beast:
- Intel i9 12900k (16 cores, 24 threads)
- 64 GB RAM
- 2 TB SSD
- Nvidia 3090 Ti

But hey, feel free to use whatever you've got lying around. The minimum hardware requirements for a CE host are:
- 8 CPUs
- 32GB RAM
- 100GB local storage
In order to create virtual machines, at least one hypervisor host must be available. The minimum hardware requirements for a hypervisor host are:
- 8 CPUs
- 16GB RAM suggested
- 100GB local storage suggested
Let's Get Down to Business: Deployment Steps
Okay, here's the rundown of what we're going to do:
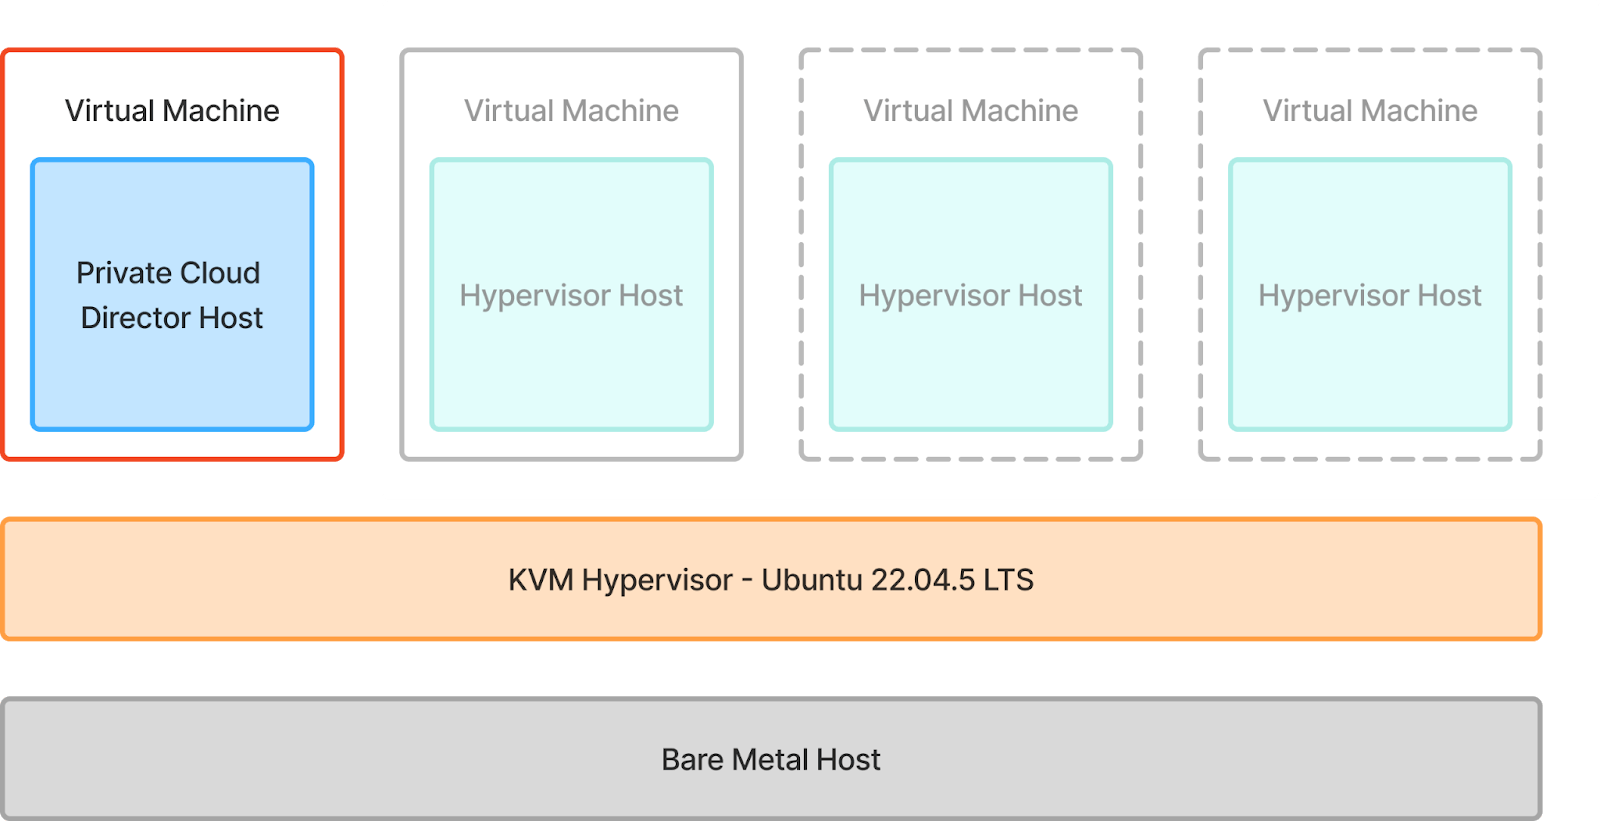
1. Bare-Metal Hypervisor Install: First, we'll install Ubuntu Desktop on our machine (highlighted in red in the diagram below). This will allow us to use the KVM hypervisor to spin up virtual machines that we will use to deploy Community Edition and our hypervisor host into.
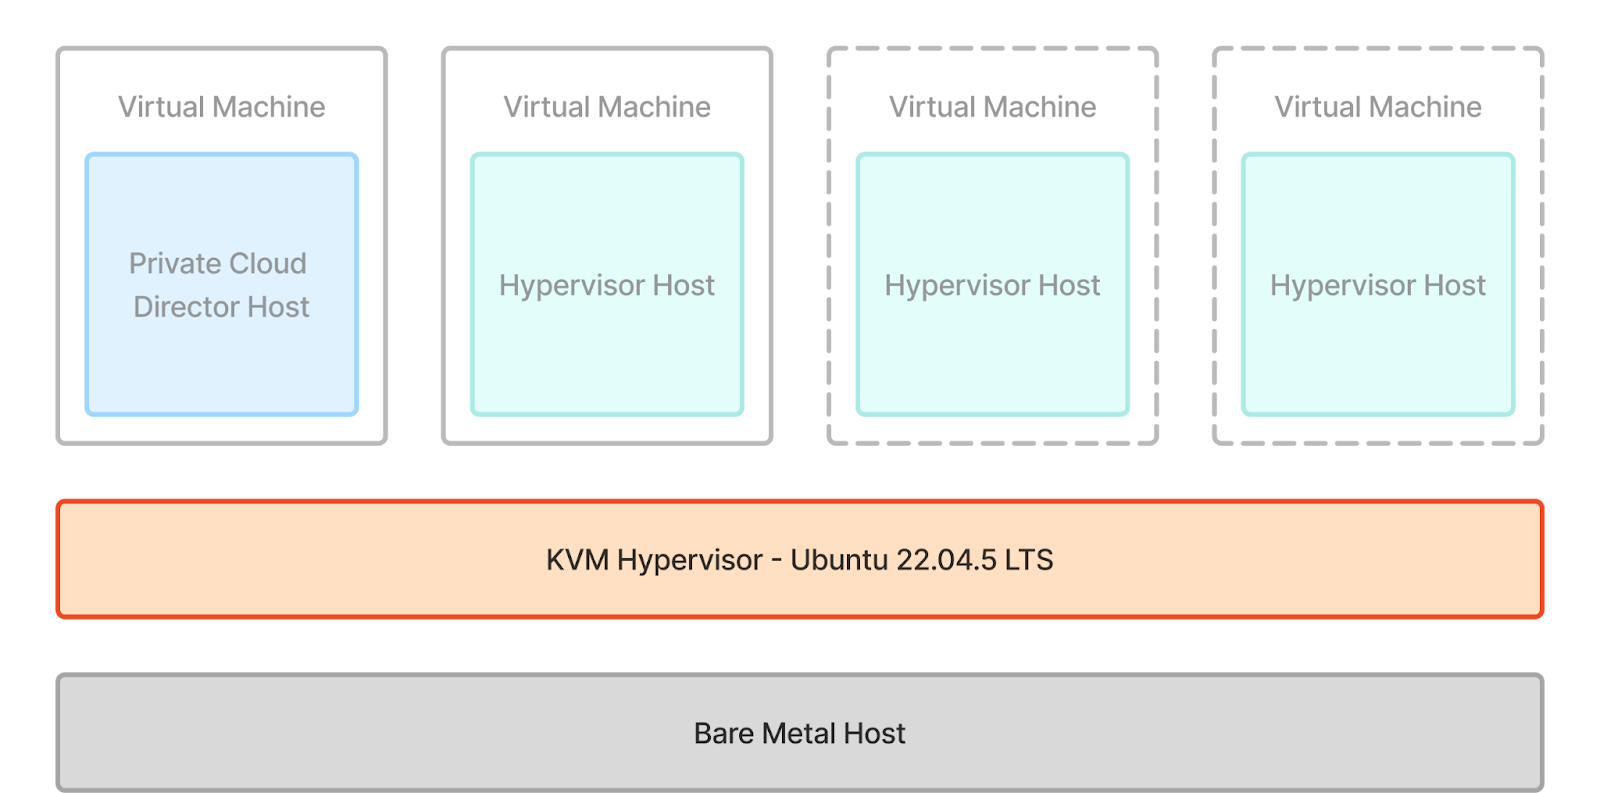
2. Private Cloud Director Community Edition Install: We will then install Community Edition into the VM highlighted in red.
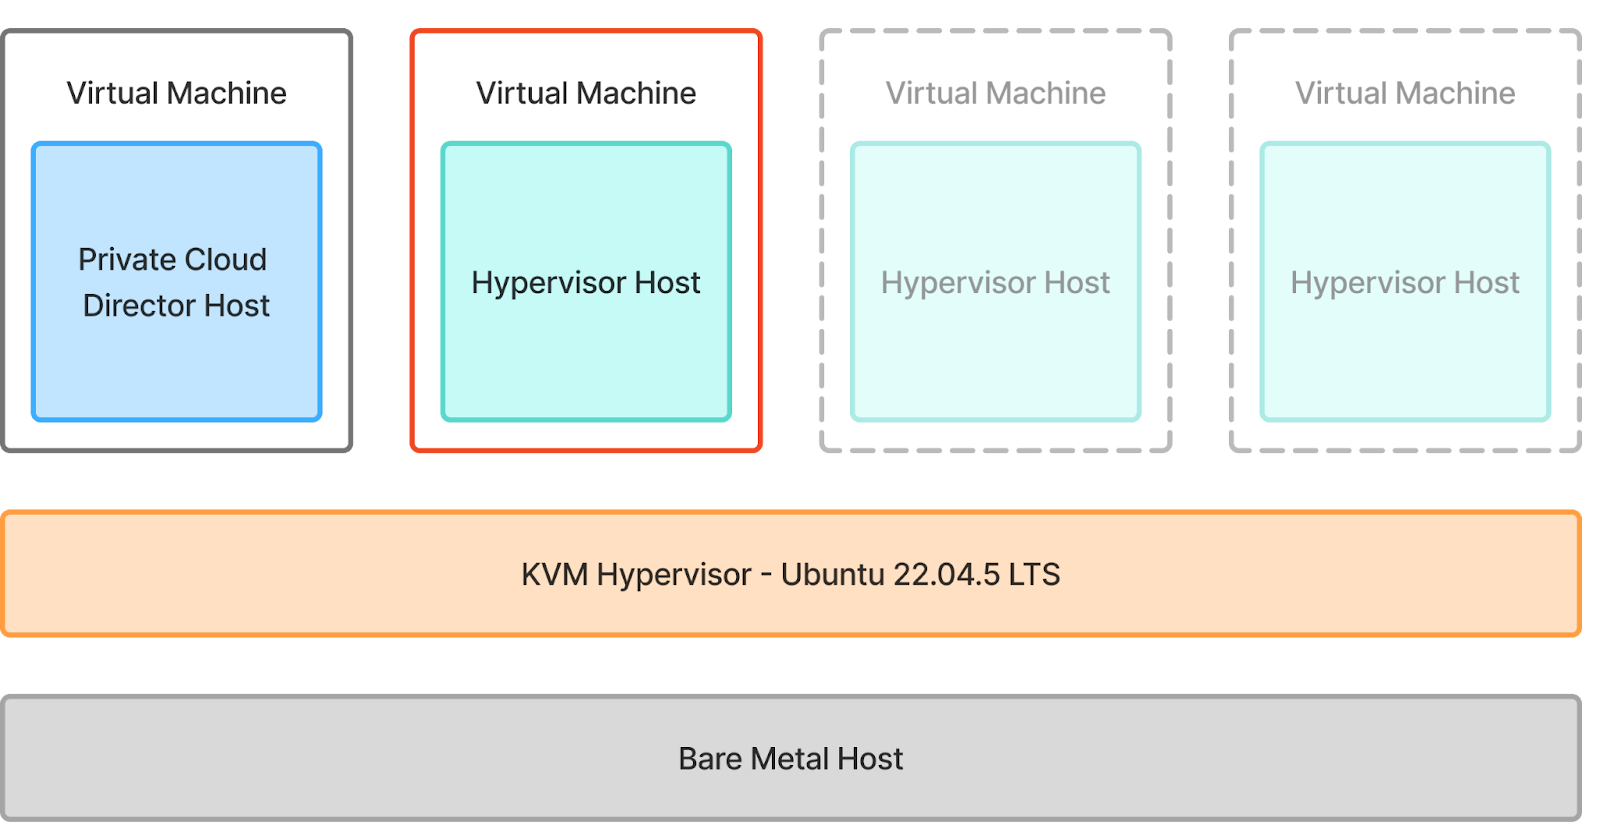
3. Hypervisor Host Onboarding: Finally, we will onboard a hypervisor host that will host the workload virtual machines on it. And yes, we will take full advantage of nested virtualization to make this happen.
This is what everything will look like once we’re done. We will be onboarding a single hypervisor host, but feel free to onboard more (shown in dotted line below) if you have the resources available.
![]()
Let’s get started!
Bare-Metal Hypervisor Install
Install Ubuntu Desktop on the bare metal host. We will use virt-manager GUI to easily manage our virtual machines. Launch virt-manager GUI with the following command.
virt-manager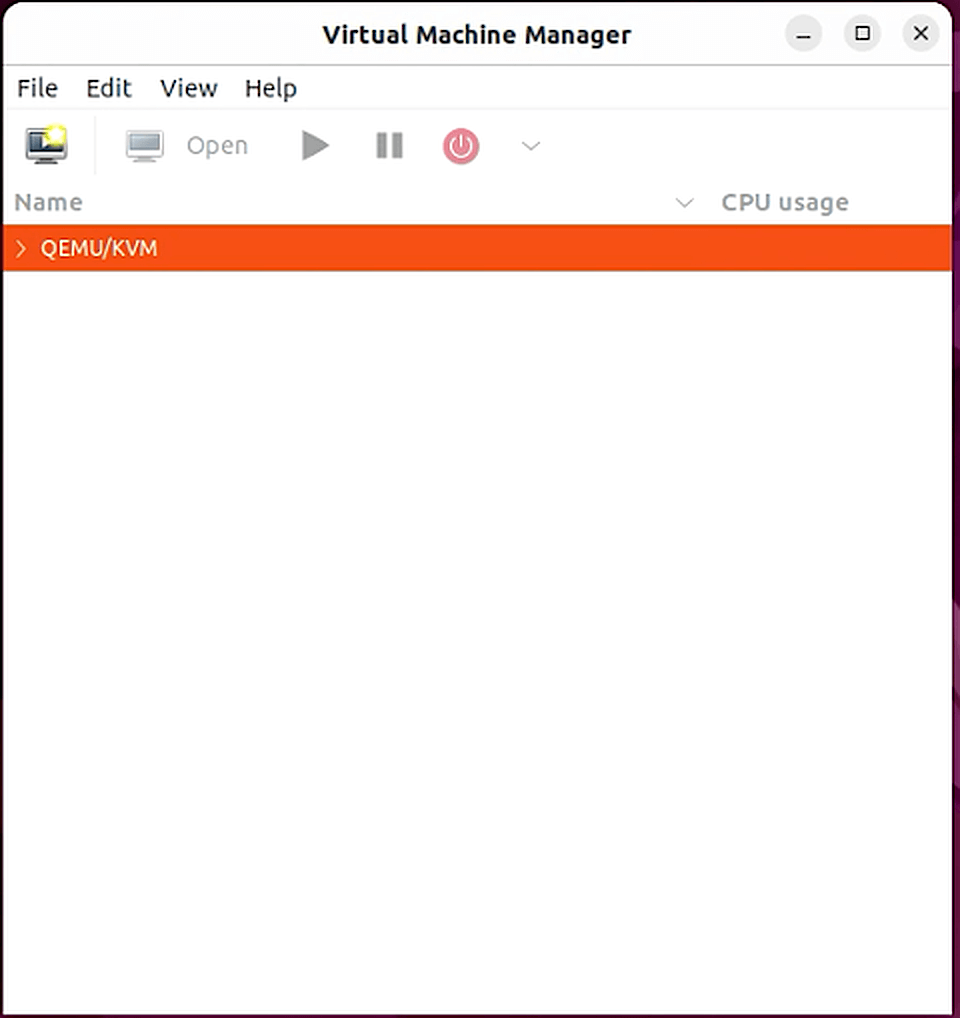
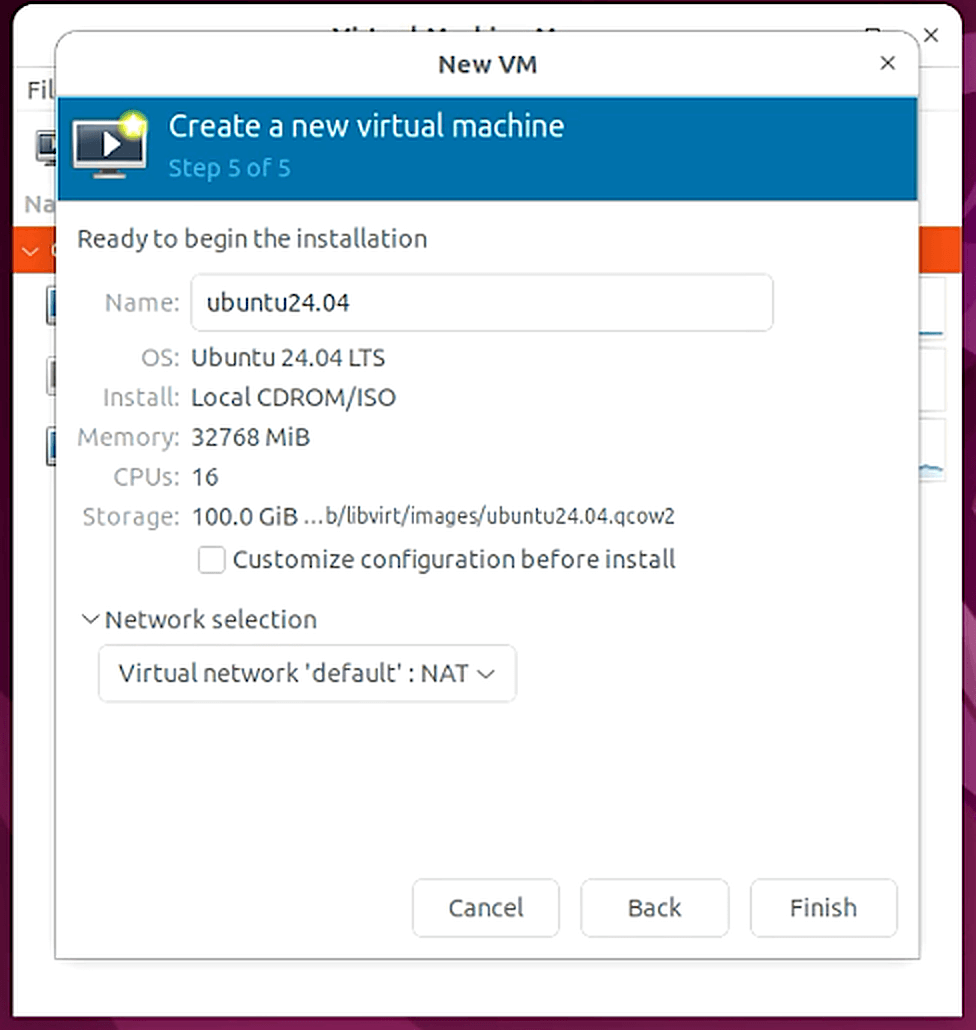
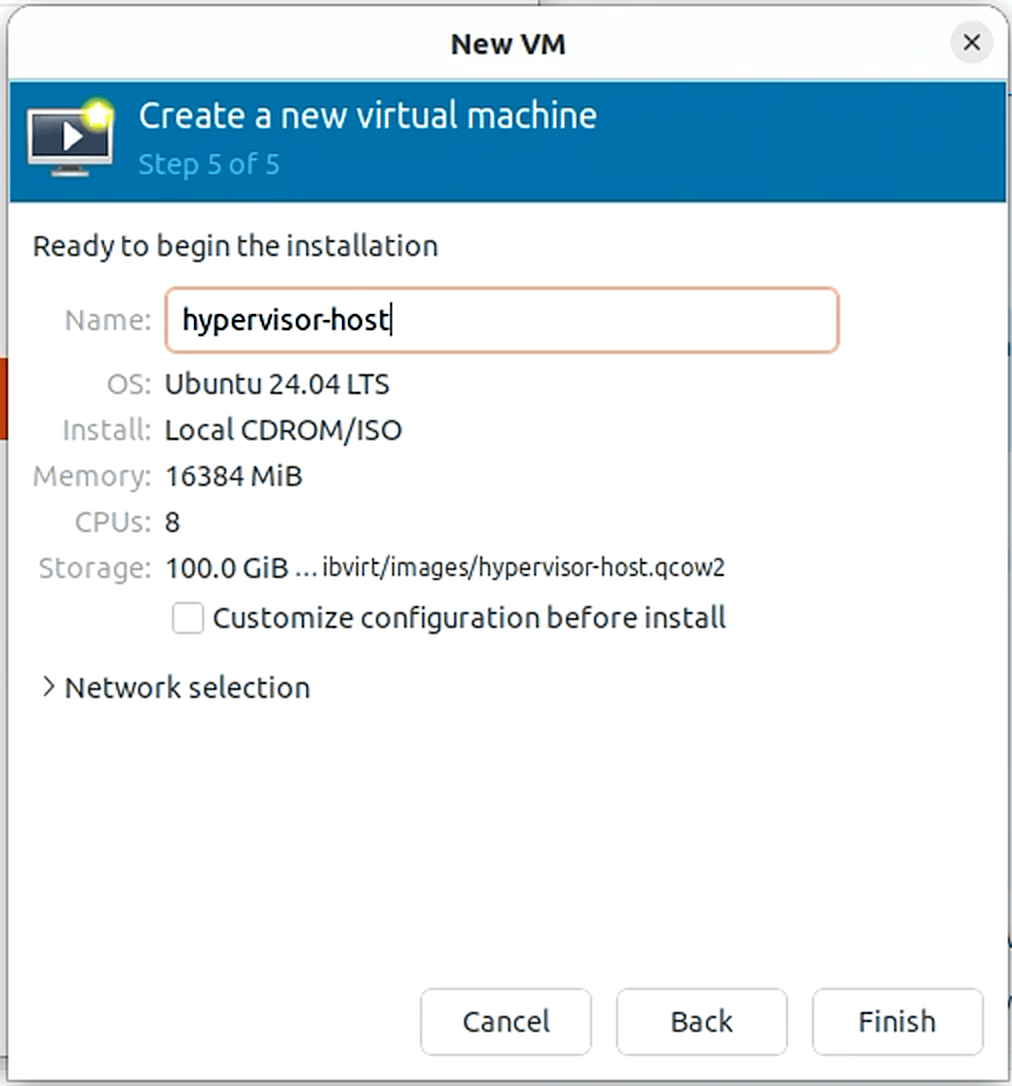
Next, we will create an Ubuntu Server 22.04 virtual machine to host Private Cloud Director CE. Navigate to File > New Virtual Machine.
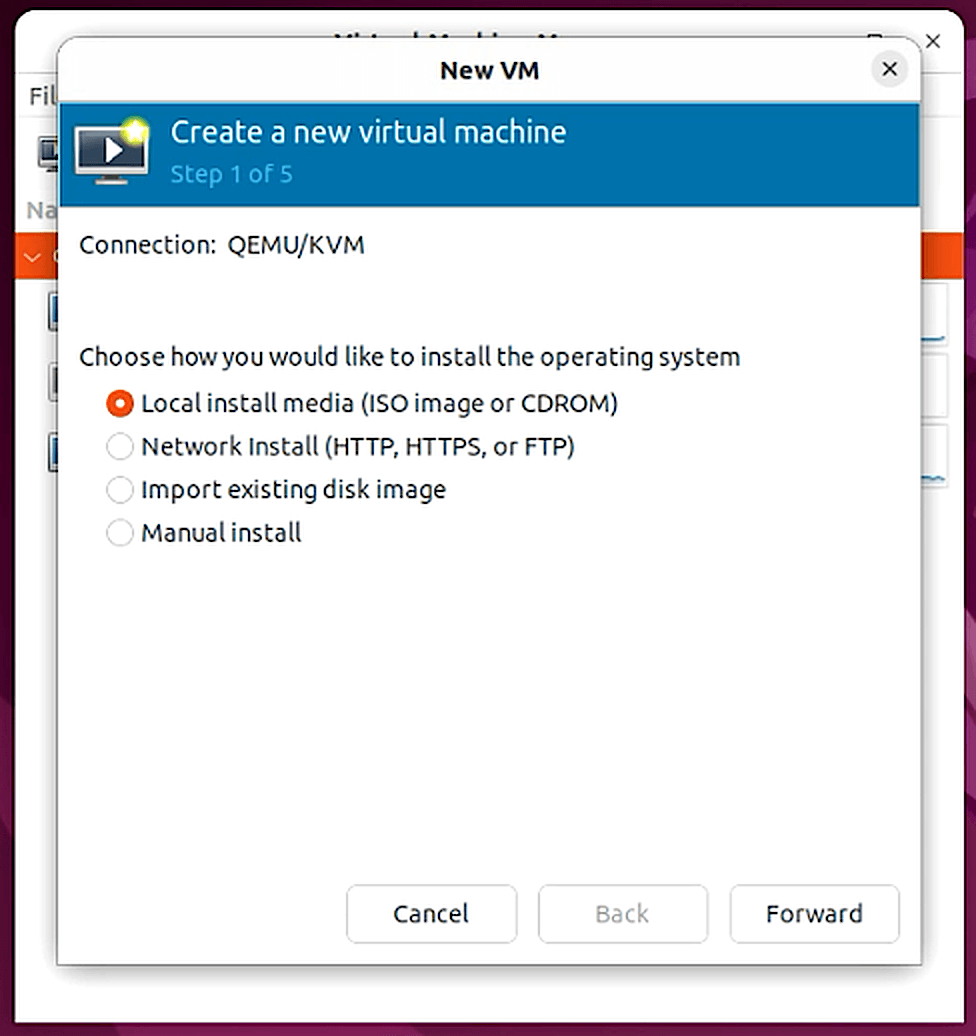
Follow the prompts to create the virtual machine. Ensure that the following resources are assigned to the virtual machine:
- 8 vCPU
- 32 GB RAM
- 100 GB local storage
- The network configuration that we updated above
Launch the VM, and follow the prompts to install Ubuntu Server.

Follow the prompts till you reach the Guided storage configuration screen. For simplicity, uncheck LVM under the storage configuration menu
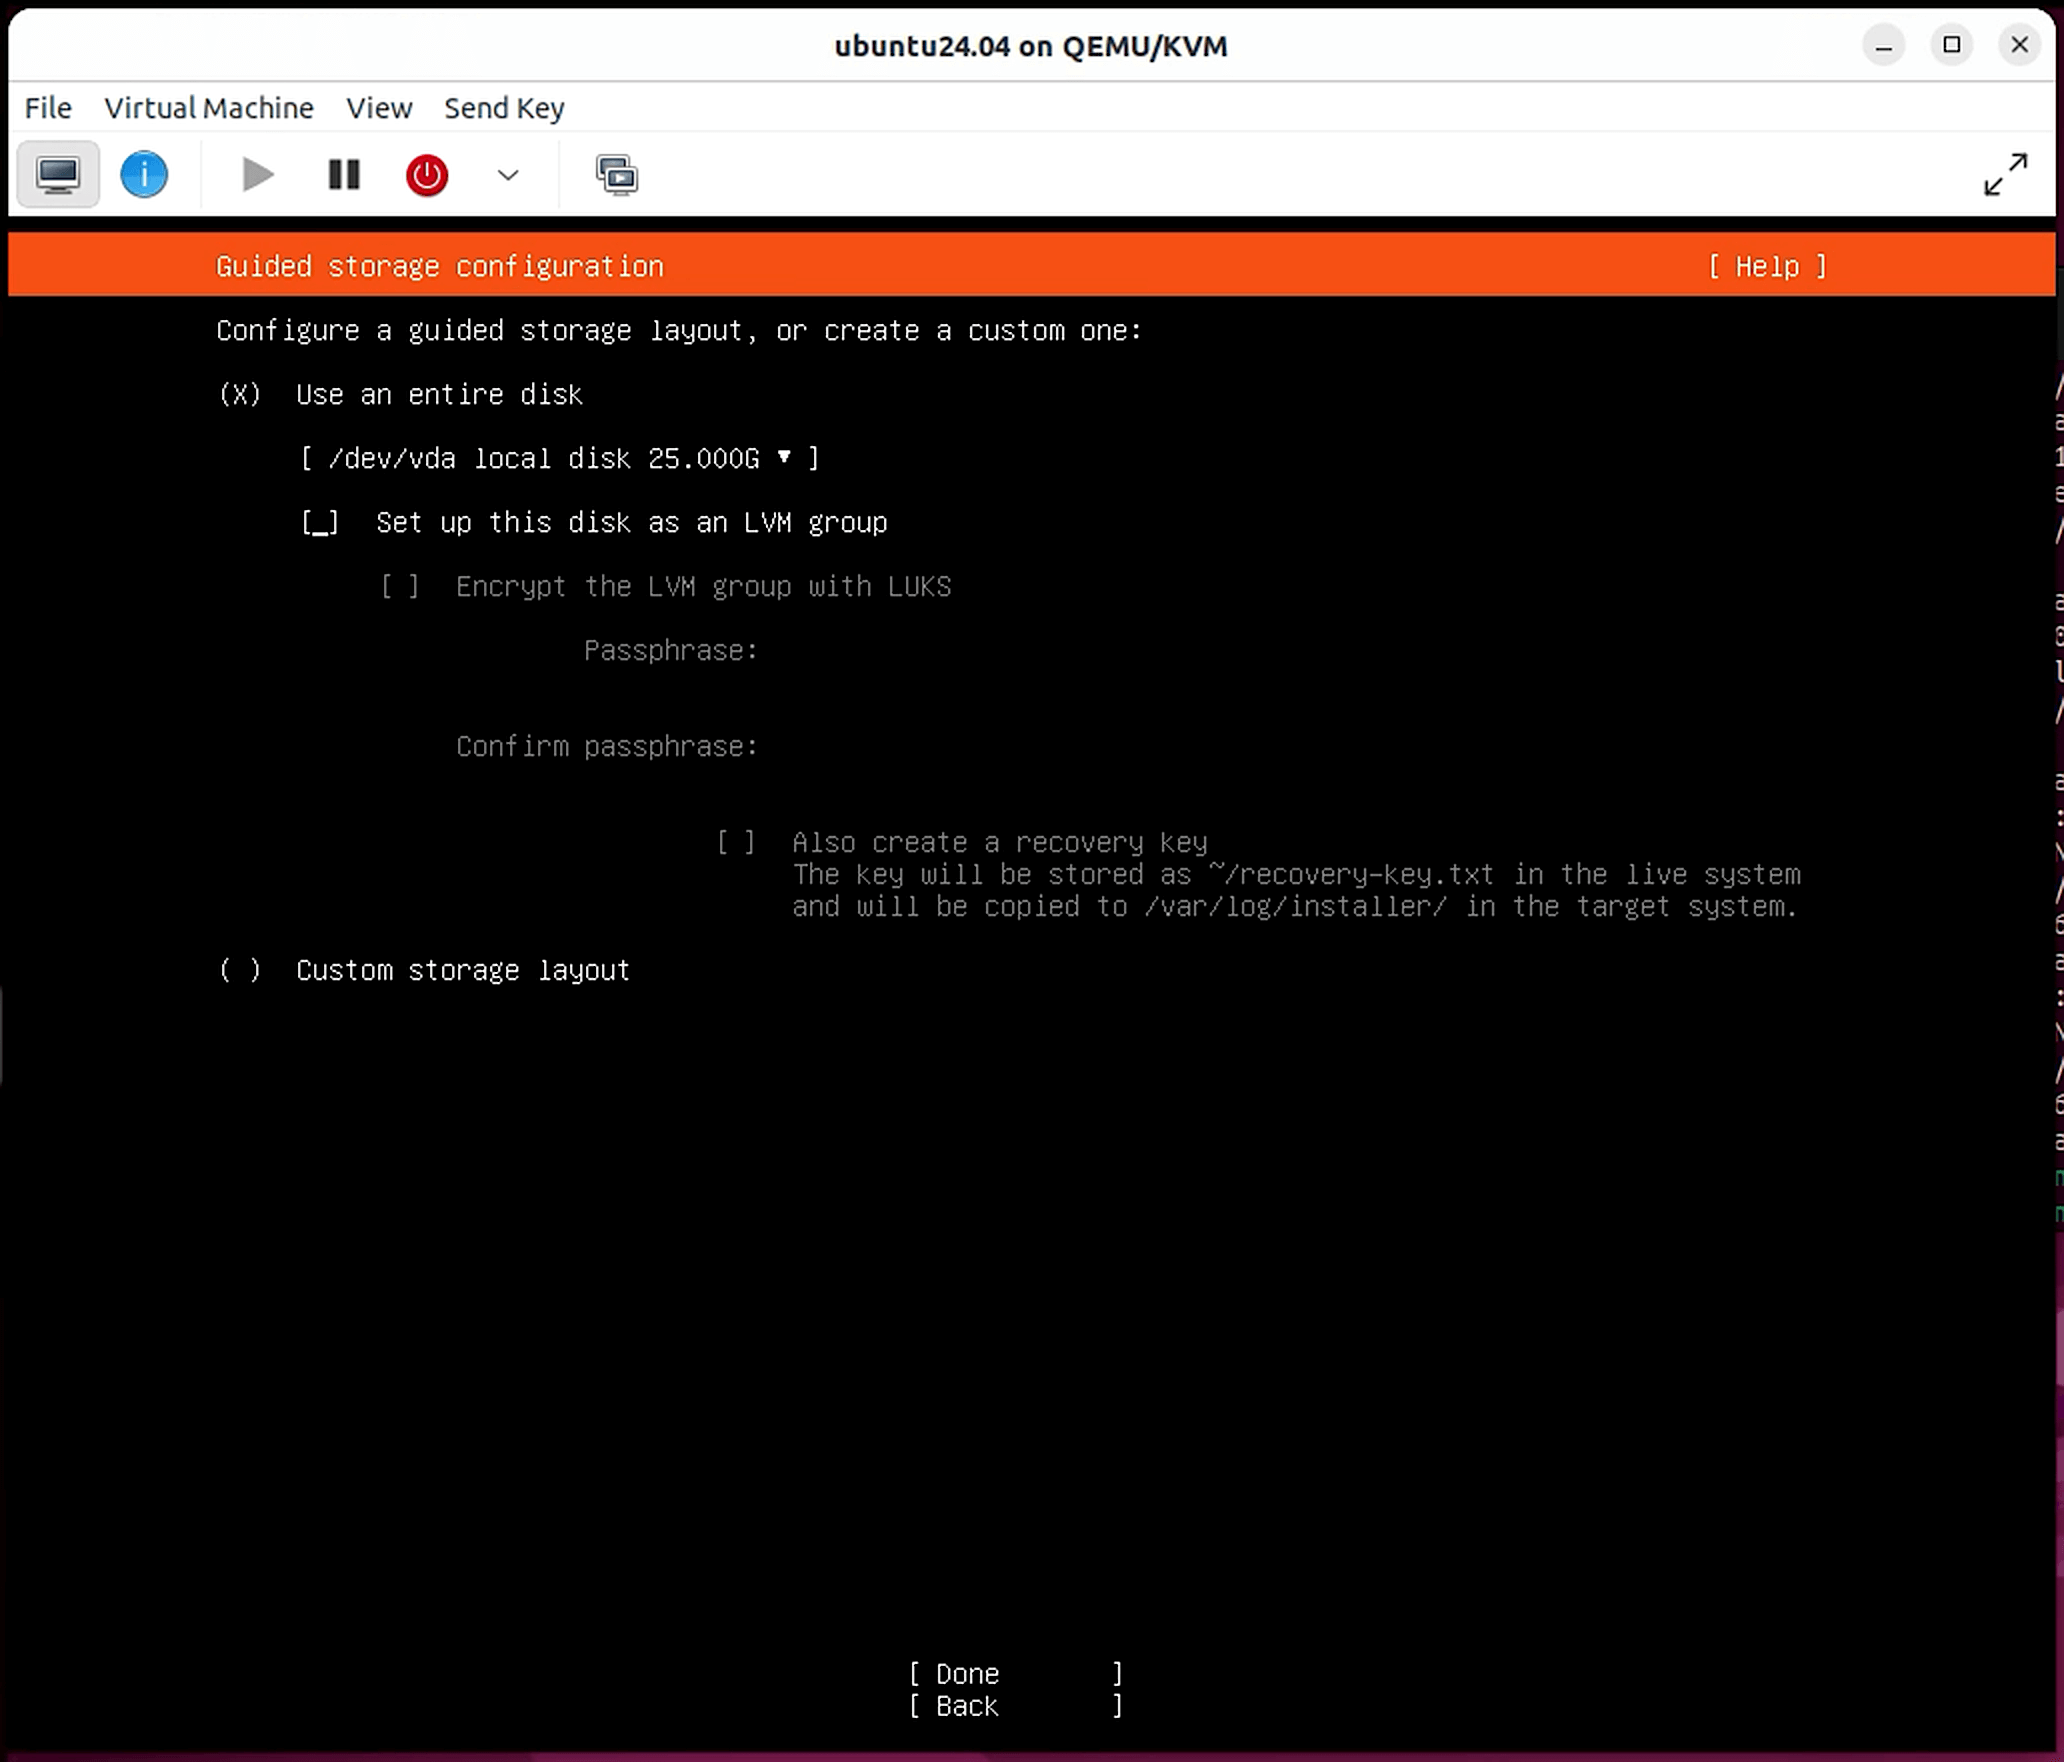
If you choose to enable LVM, ensure that the logical volume is expanded to take up the entire physical partition after installation is complete. Installing CE on a volume with less than 50 GB of space will result in failure, even if the underlying partition is larger.
Below are helpful commands to resize the logical volume.
Command to expand LVM to take up the entire partition:
sudo lvresize -l +100%FREE /dev/mapper/<logical volume name>Example:
sudo lvresize -l +100%FREE /dev/mapper/ubuntu--vg-ubuntu--lvCommand to resize filesystem to match the logical volume:
sudo resize2fs /dev/mapper/<logical volume name>Example:
sudo resize2fs /dev/mapper/ubuntu--vg-ubuntu--lvPrivate Cloud Director Community Edition Install
Now we are ready to deploy Private Cloud Director CE to the virtual machine. Launch the VM that we just created. Run the commands below to switch to root and begin the deployment process.
sudo su -curl -sfL https://go.pcd.run | bashThe final deployment step is long-running and takes around 45 minutes to complete.
root@pcd-host:~ curl -sfL https://go.pcd.run | bashPrivate Cloud Director Community Edition Deployment Started...Finding latest version... DoneDownloading artifacts... DoneConfiguring system settings... DoneInstalling artifacts and dependencies... DoneConfiguring Docker Mirrors... Done SUCCESS Configuration completed INFO Verifying system requirements... ✓ Disk Space ✓ Memory ✓ CPU Count ✓ OS Version ✓ Swap Disabled ✓ IPv6 Support ✓ Kernel and VM Panic Settings ✓ Port Connectivity ✓ Firewalld Service ✓ Default Route Weights Completed Pre-Requisite Checks on local node SUCCESS Cluster created successfullyOnce you get to this point, you can monitor the deployment progress by opening another SSH session with the VM.
kubectl get pods -n pcd-kplane
As long as you don’t see any failures here, it means that the installation is progressing without any hiccups.
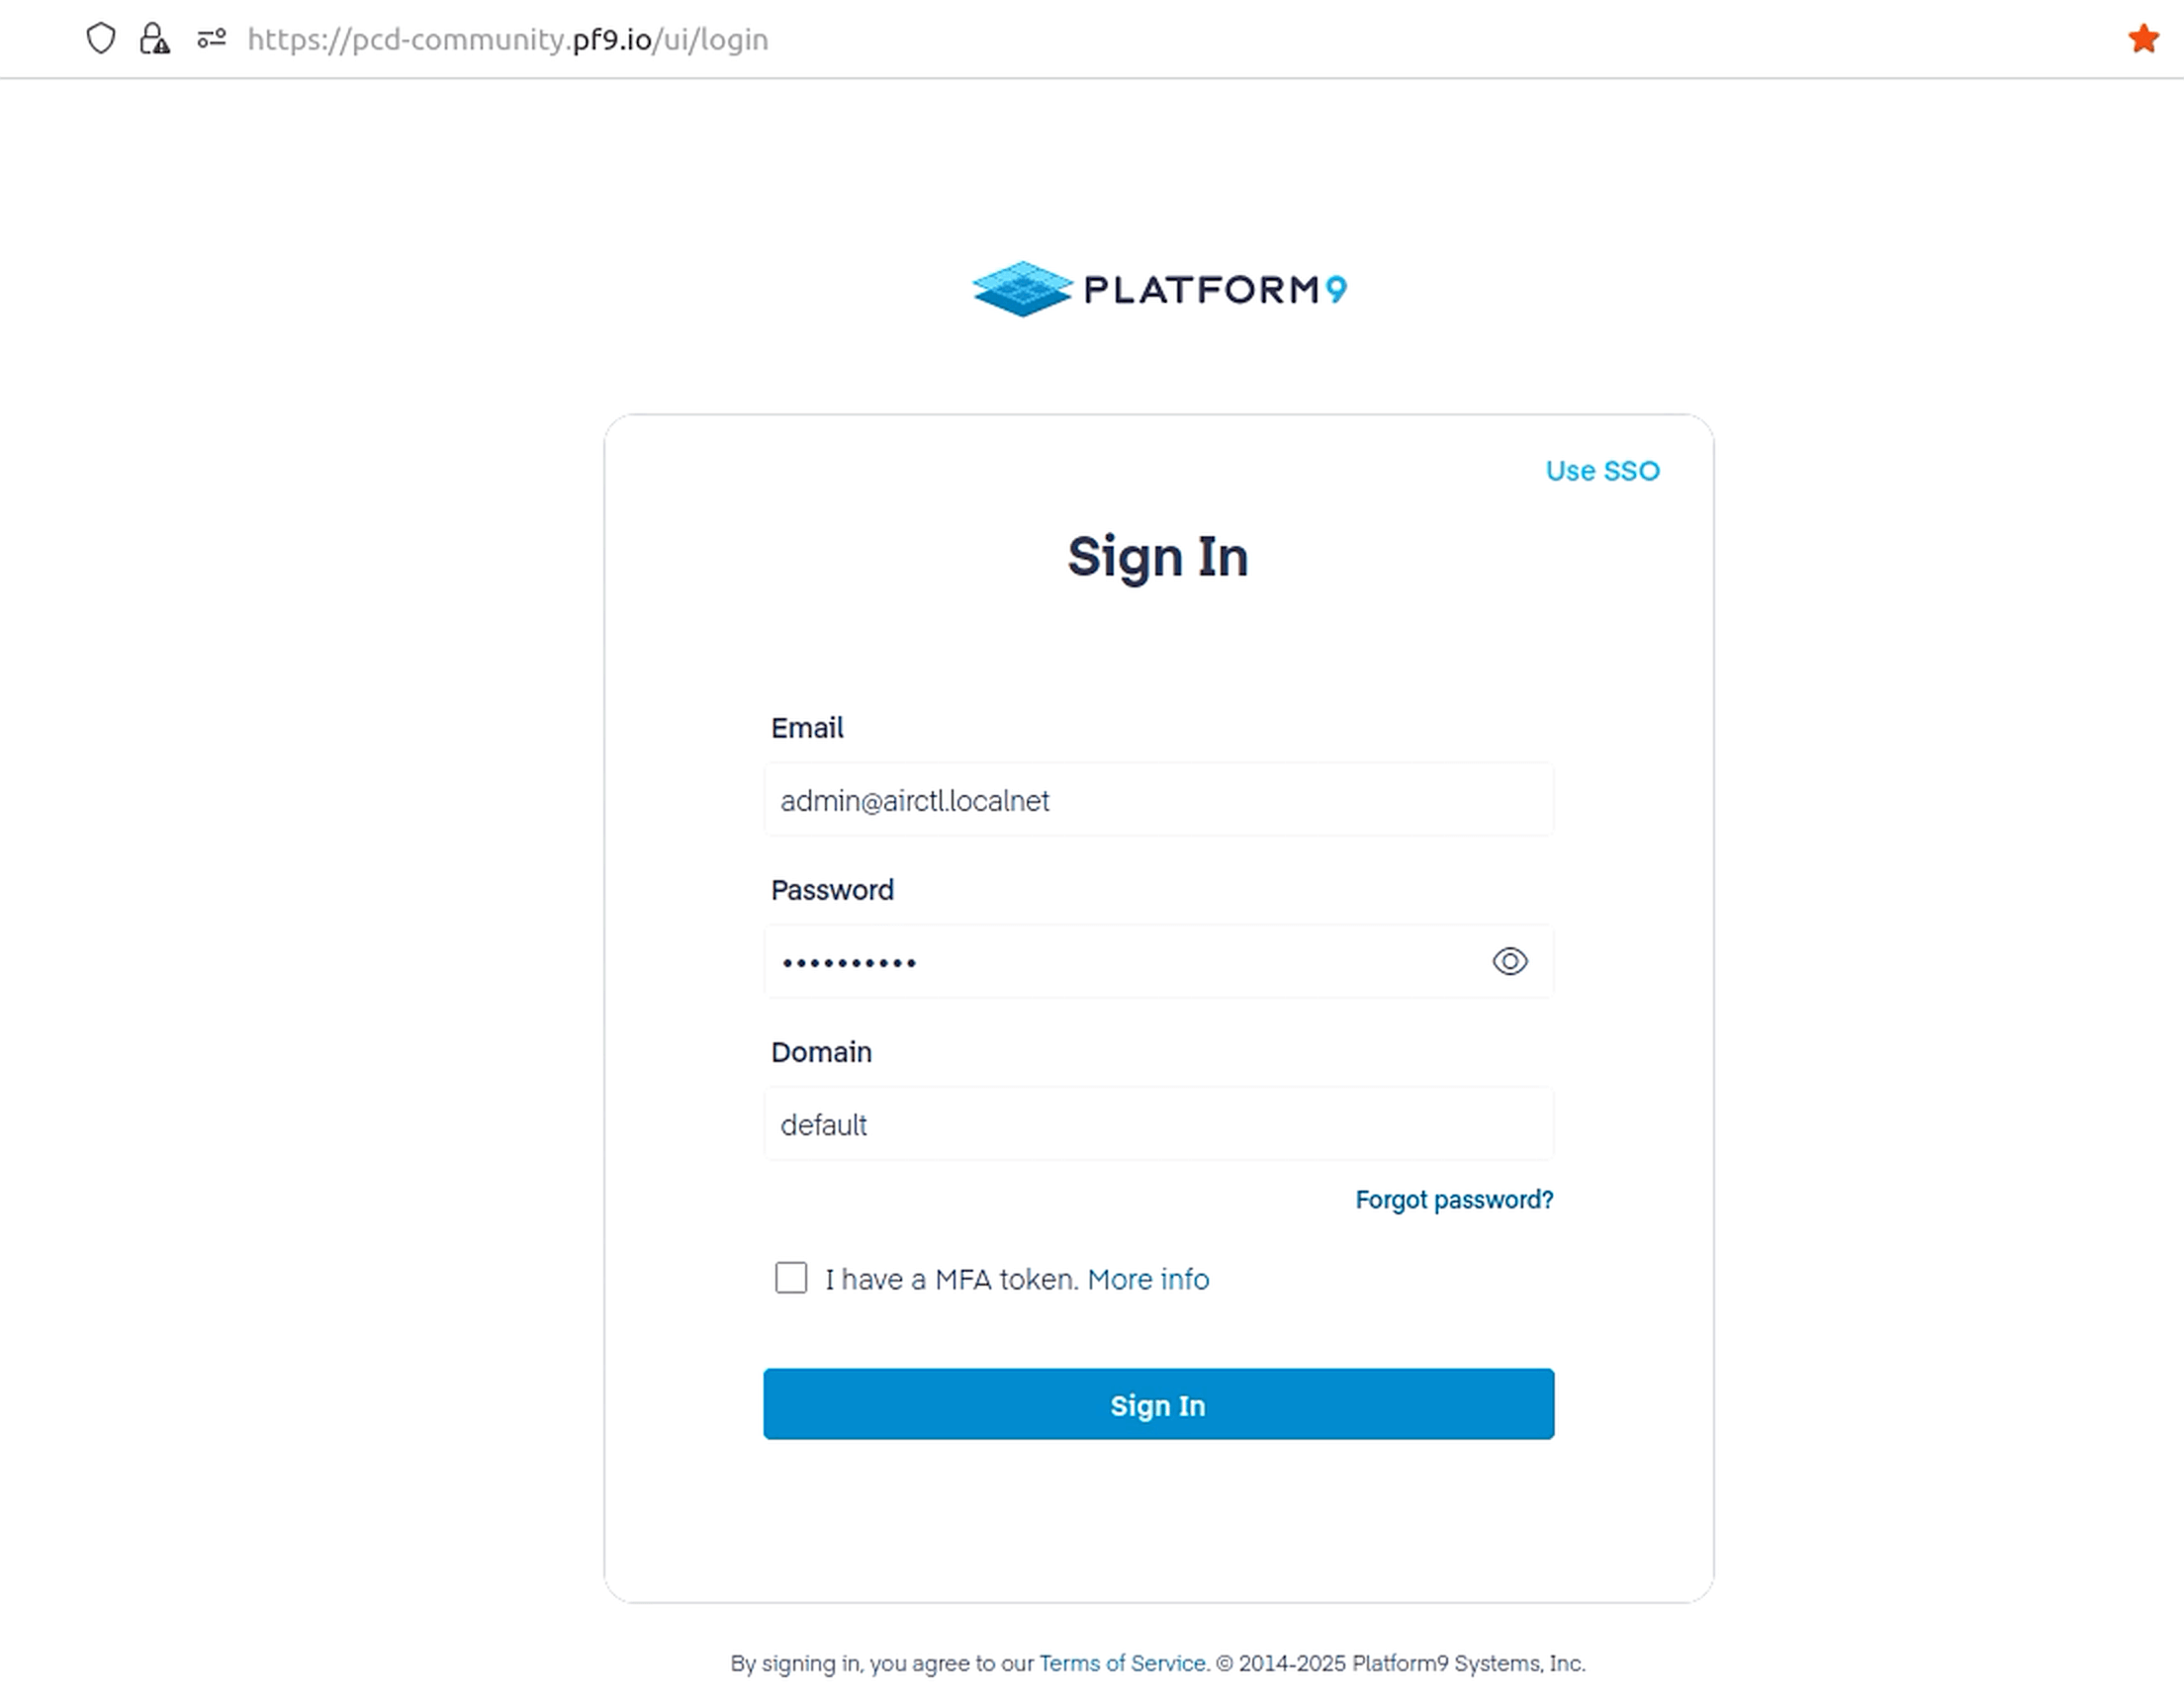
INFO Starting PCD management plane SUCCESS Certificates generated SUCCESS Base infrastructure setup complete SUCCESS pcd-virt deployment now complete SUCCESS Final touches... Private Cloud Director (Community Edition) deployment complete!------------- deployment details ---------------fqdn: pcd.pf9.ioregion: pcddeployment status: readyregion health: ✅ Readyversion: PCD 2025.6-151-------- region service status ----------desired services: 24ready services: 24------------- deployment details ---------------fqdn: pcd-community.pf9.ioregion: pcd-communitydeployment status: readyregion health: ✅ Readyversion: PCD 2025.6-151-------- region service status ----------desired services: 52ready services: 52Login Details:URL: https://pcd-community.pf9.ioemail: admin@airctl.localnetpassword: sYsxERQrkJiUEqxSNote: If internal DNS is unavailable, add the management plane FQDN to /etc/hosts on local machine and then log into the UI using the provided credentials.If you accidentally leave the screen above before copying the login credentials, you can view the credentials again by running the following command: airctl get-creds --config /opt/pf9/airctl/conf/airctl-config.yaml
Once the deployment completes, you will be presented with the Private Cloud Director FQDN and login credentials.
Next, we will add DNS entries to our Ubuntu Desktop environment so we can access the Private Cloud Director UI from here. Replace 172.16.122.183 with the IP address of the VM that we just deployed PCD into. This entry allows the DNS to direct requests to the correct IP address when attempting to reach pcd-community.pf9.io or pcd.pf9.io.
echo "172.16.122.183 pcd-community.pf9.io" | sudo tee -a /etc/hostsecho "172.16.122.183 pcd.pf9.io" | sudo tee -a /etc/hostsFrom the Ubuntu Desktop environment, navigate to pcd-community.pf9.io in a web browser. If everything has gone well, you will see the Private Cloud Director login screen.
Leave the Domain as default, choose "Use local credentials" at the top right, and login with the credentials provided when the Community Edition install completed.

Hypervisor Host Onboarding
Now we will create a new VM that will serve as our hypervisor host to our workload VMs. Similar to how we created the CE VM, create another Ubuntu Server VM with the following resources:
- 8 CPUs
- 16GB RAM
- 100GB local storage
Back in the UI, navigate to Infrastructure > Cluster Blueprint. Fill out the required fields as shown below and hit Save Blueprint.
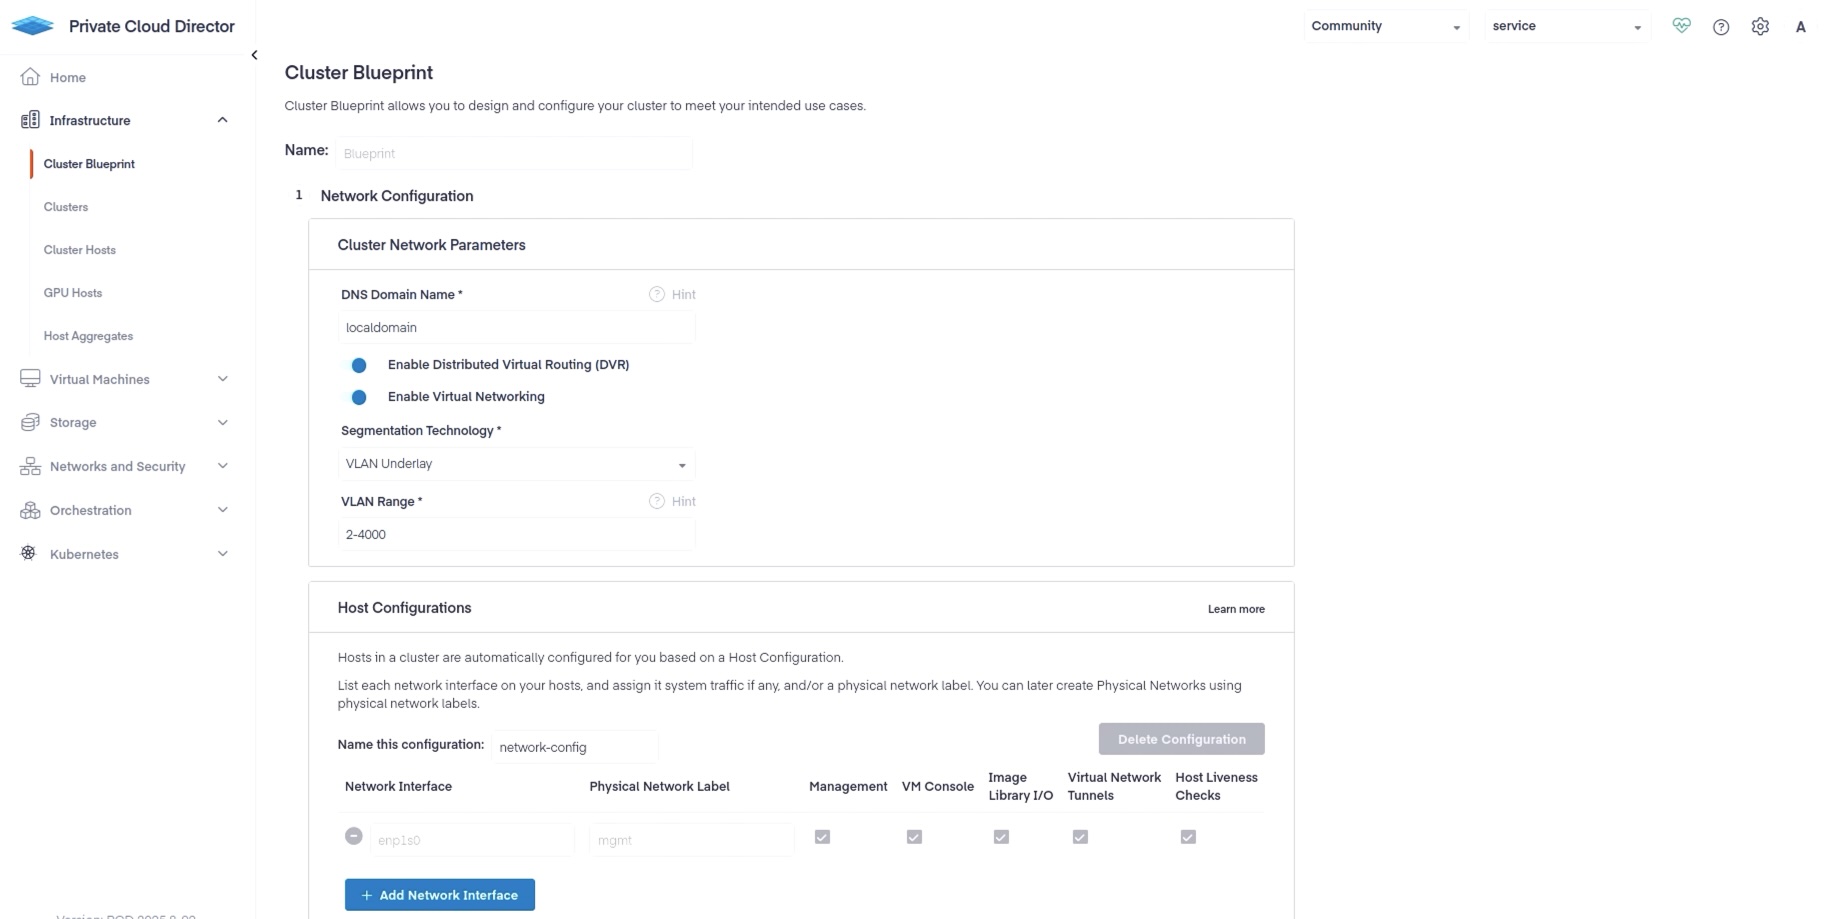
The Network Interface refers to the name of the Ethernet network interface on the hypervisor host. You can view the network interfaces on your hypervisor host by running the following command.
ip link show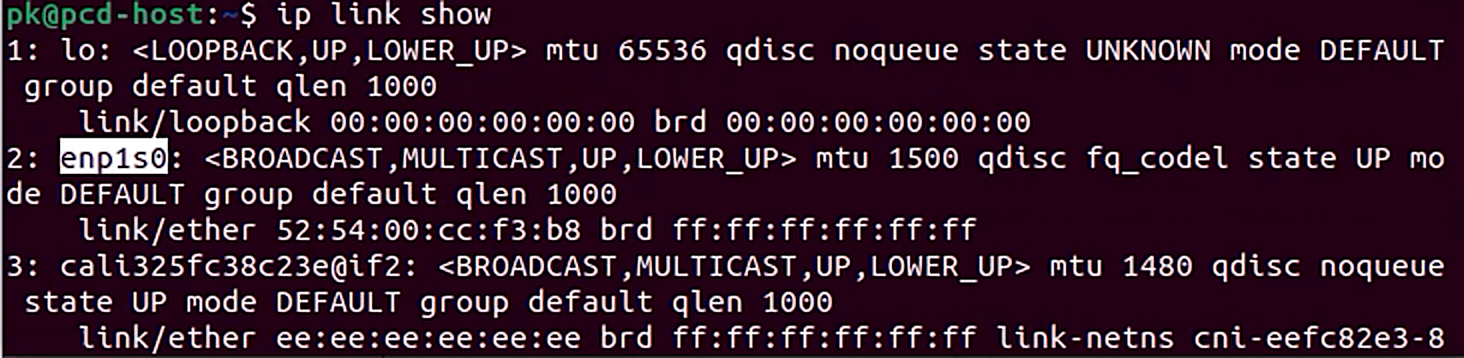
Now we will onboard the new hypervisor host onto PCD. Navigate to Infrastructure > Cluster Hosts > Add New Hosts button on the top right.
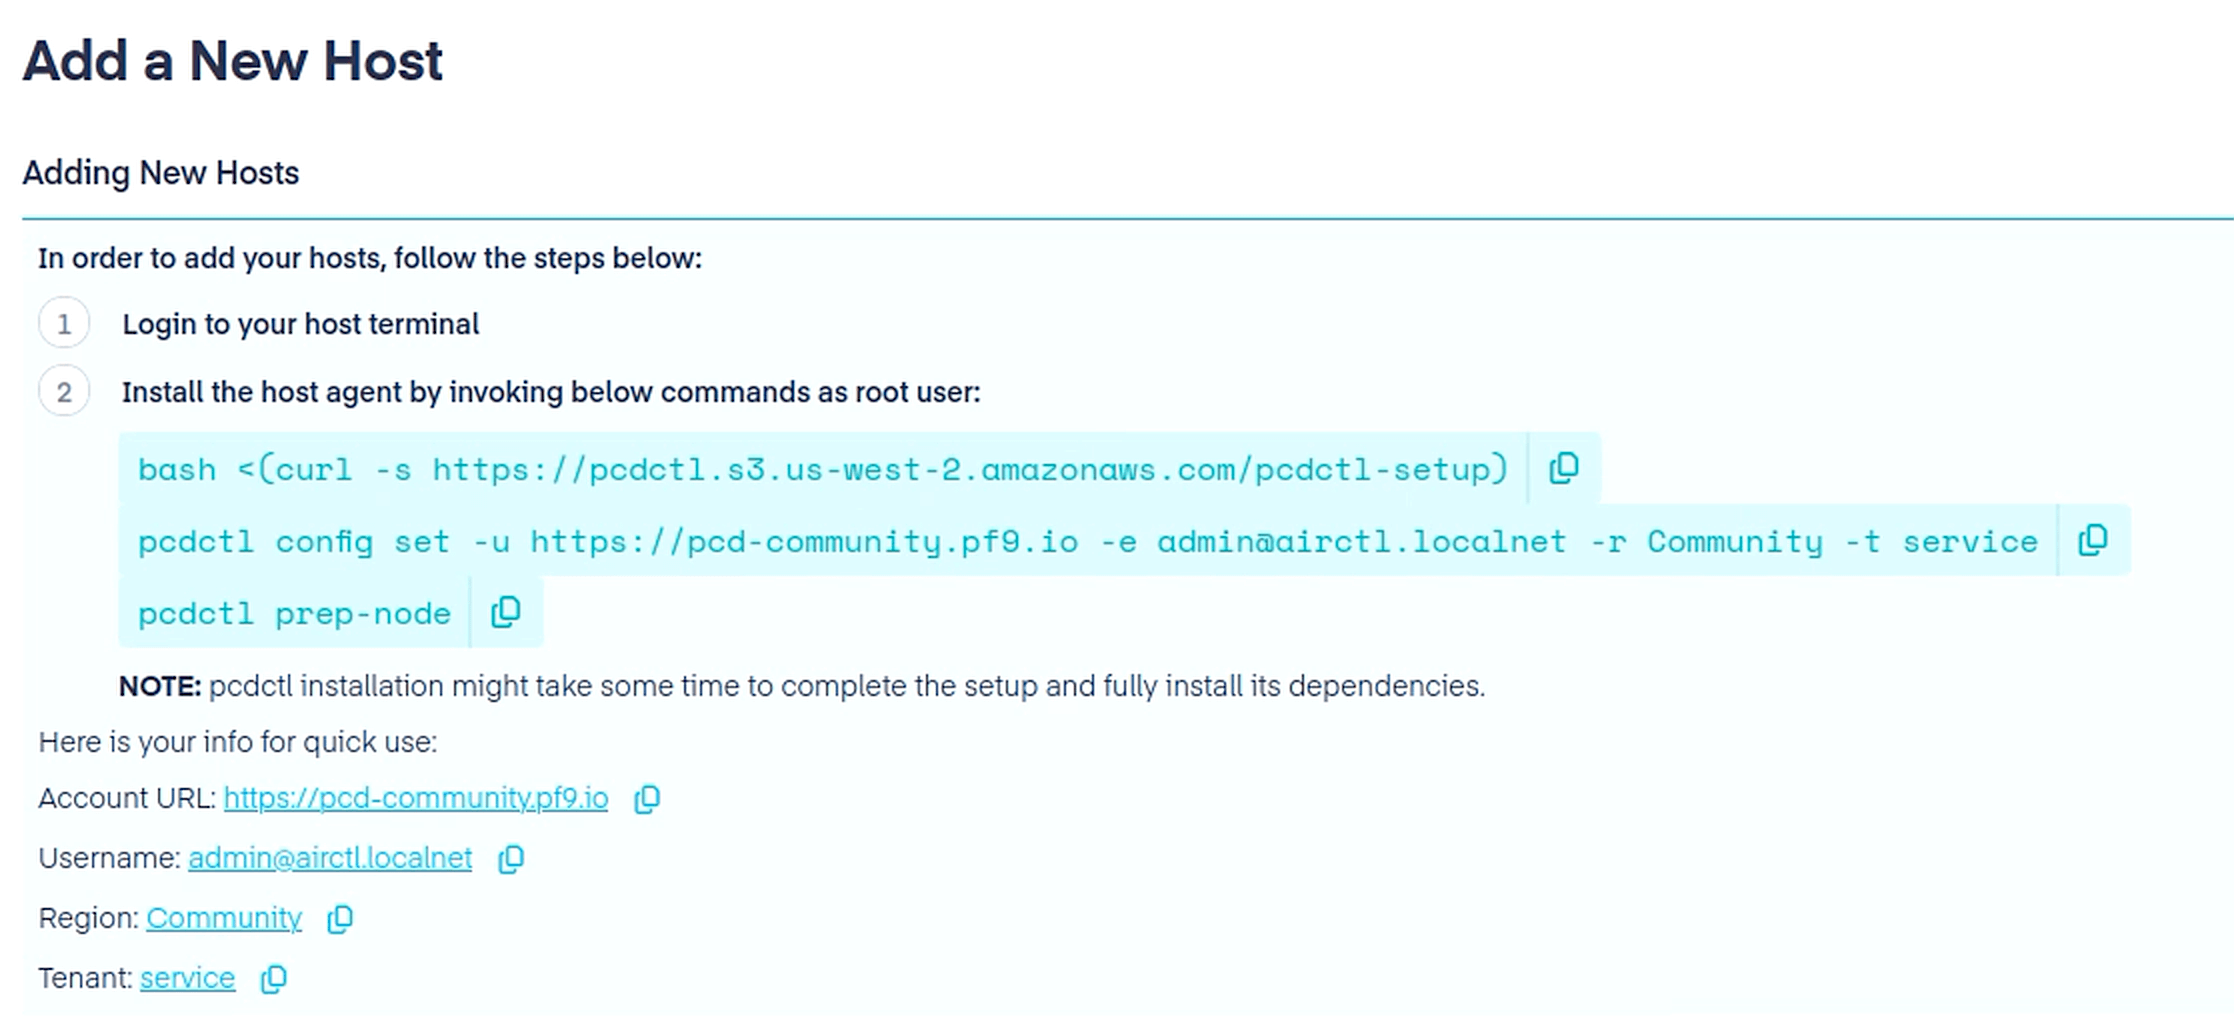
Before running the steps displayed, connect to the hypervisor host VM that we just created and add DNS entries like we previously did for our Ubuntu Desktop environment.

Proceed to execute commands from the UI in your hypervisor host VM to onboard this host to PCD.
bash <(curl -s https://pcdctl.s3.us-west-2.amazonaws.com/pcdctl-setup)
For the second command, skip prompts for Proxy URL and MFA Token by hitting enter. Enter Account URL, Username, Region, and Tenant as shown on the UI. Enter your password when prompted.
pcdctl config set -u https://pcd-community.pf9.io -e admin@airctl.localnet -r Community -t service
Finally run the third command.
pcdctl prep-node
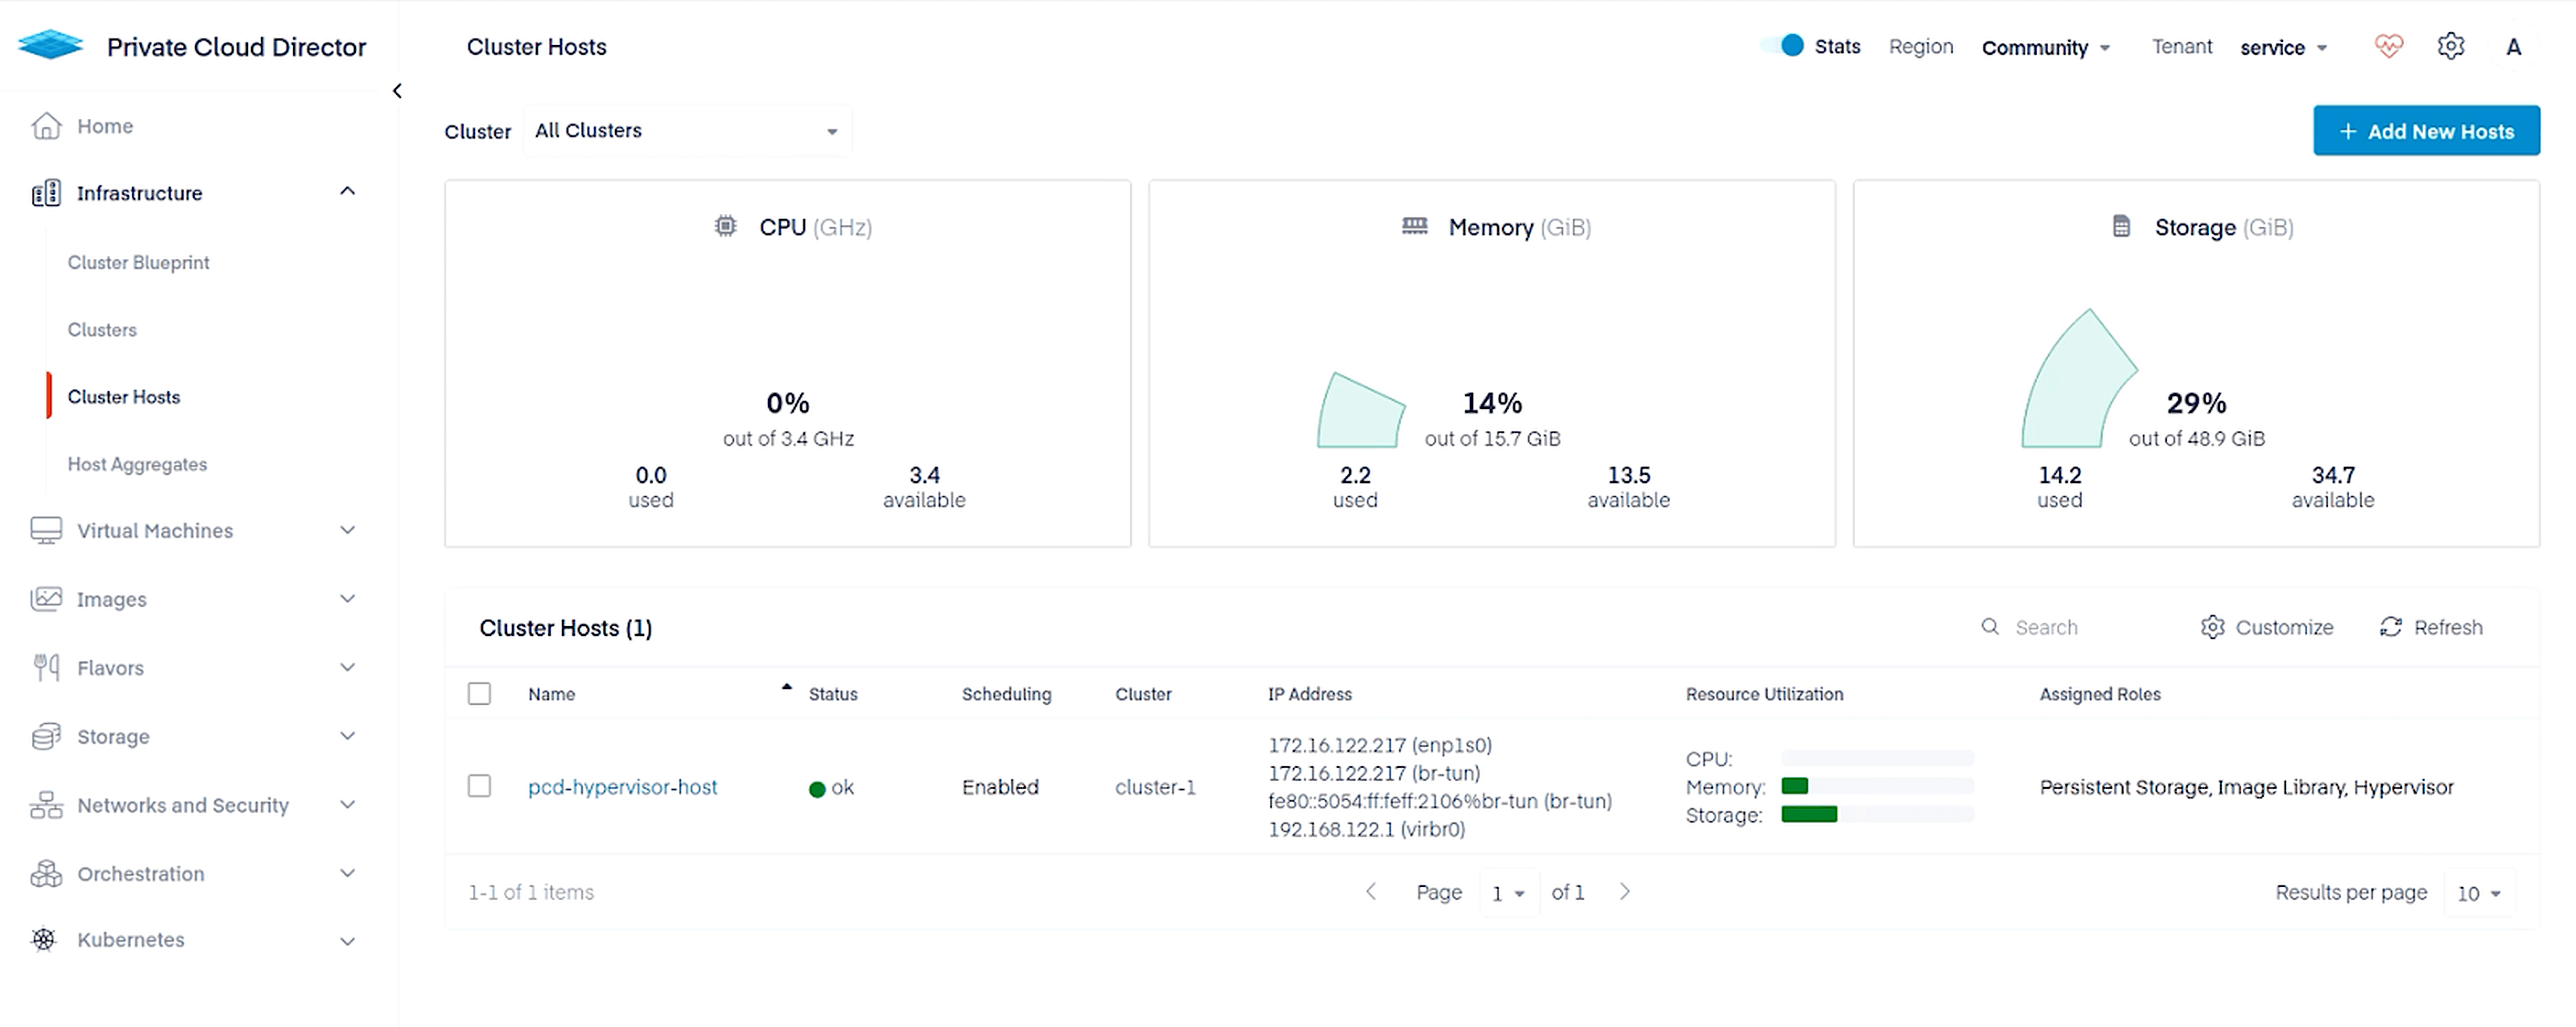
Once the host provisioning process completes, you will see the host in the UI under Infrastructure > Cluster Hosts.
Creating a Virtual Machine with Persistent Storage
We will now create persistent storage that can be used by VMs. We will create a Network File System (NFS) share in the Ubuntu Desktop environment that will be made available to PCD VMs.
Install dependencies with the following command:
sudo apt install nfs-kernel-serverCreate the directory to be shared and update permissions.
sudo mkdir -p /srv/nfs/sharedsudo chmod 777 /srv/nfs/sharedUpdate config file with NFS share configuration.
sudo nano /etc/exportsUpdate the contents of the file to the following.
/srv/nfs/shared *(rw,no_subtree_check)The asterisk allows connections from any IP address. This isn’t ideal for any real-world scenarios, but we do this here for the sake of simplicity. rw allows read-write access.
Restart the NFS server and check status.
sudo systemctl restart nfs-kernel-serversudo systemctl status nfs-kernel-server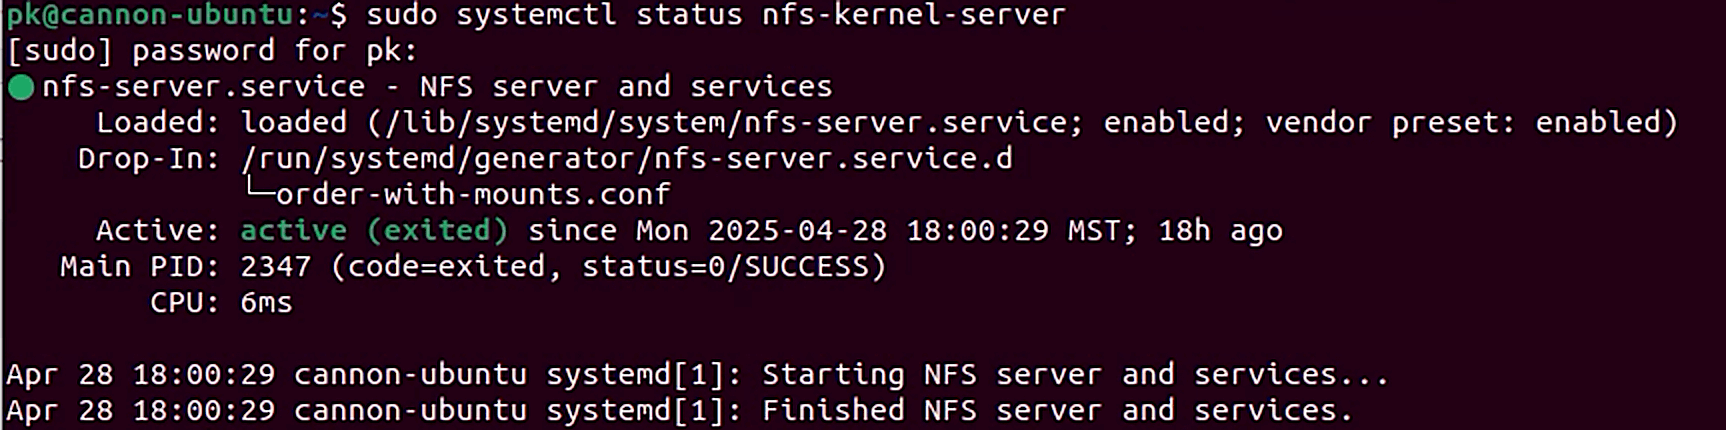
We are now ready to connect to this NFS path from Private Cloud Director. Navigate to Infrastructure > Cluster Blueprint. Under Storage Volume Types, type in a name for the Volume Type and click Add Configuration.
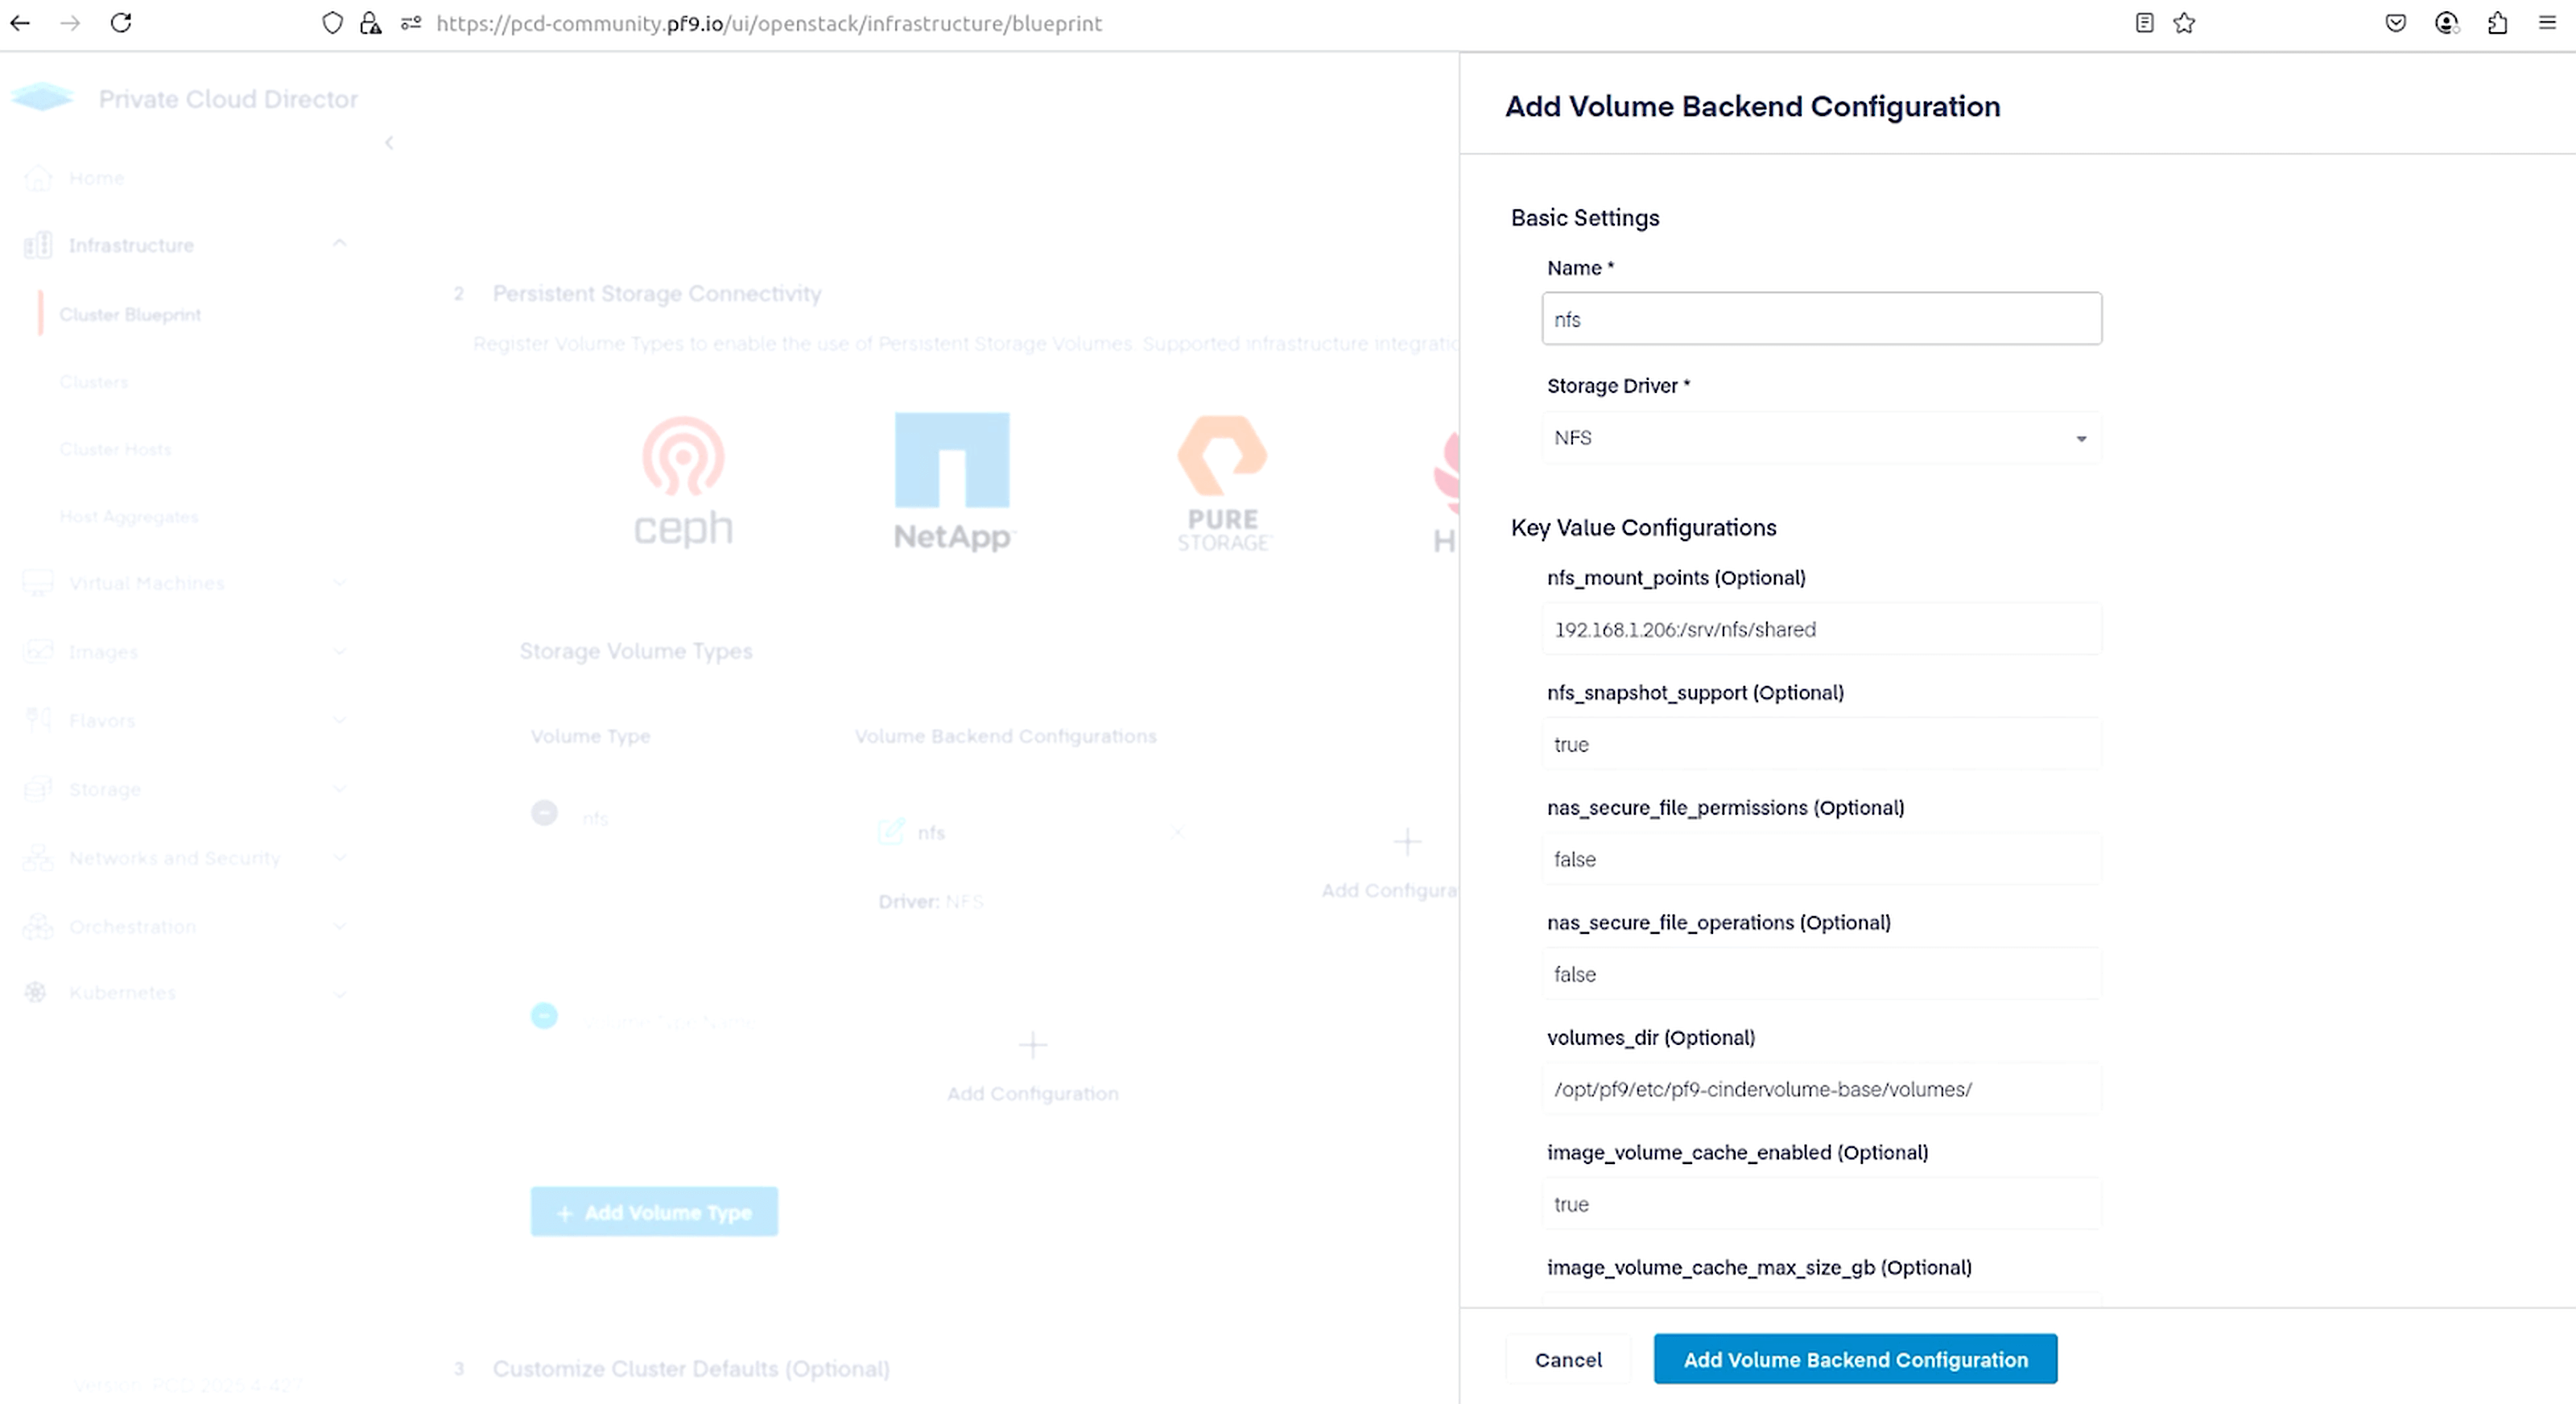
Name your volume configuration, select NFS as the Storage Driver, and use the following as the nfs_mount_point. Replace 192.168.1.206 with the IP address of your Ubuntu Desktop that we used to create the NFS share.
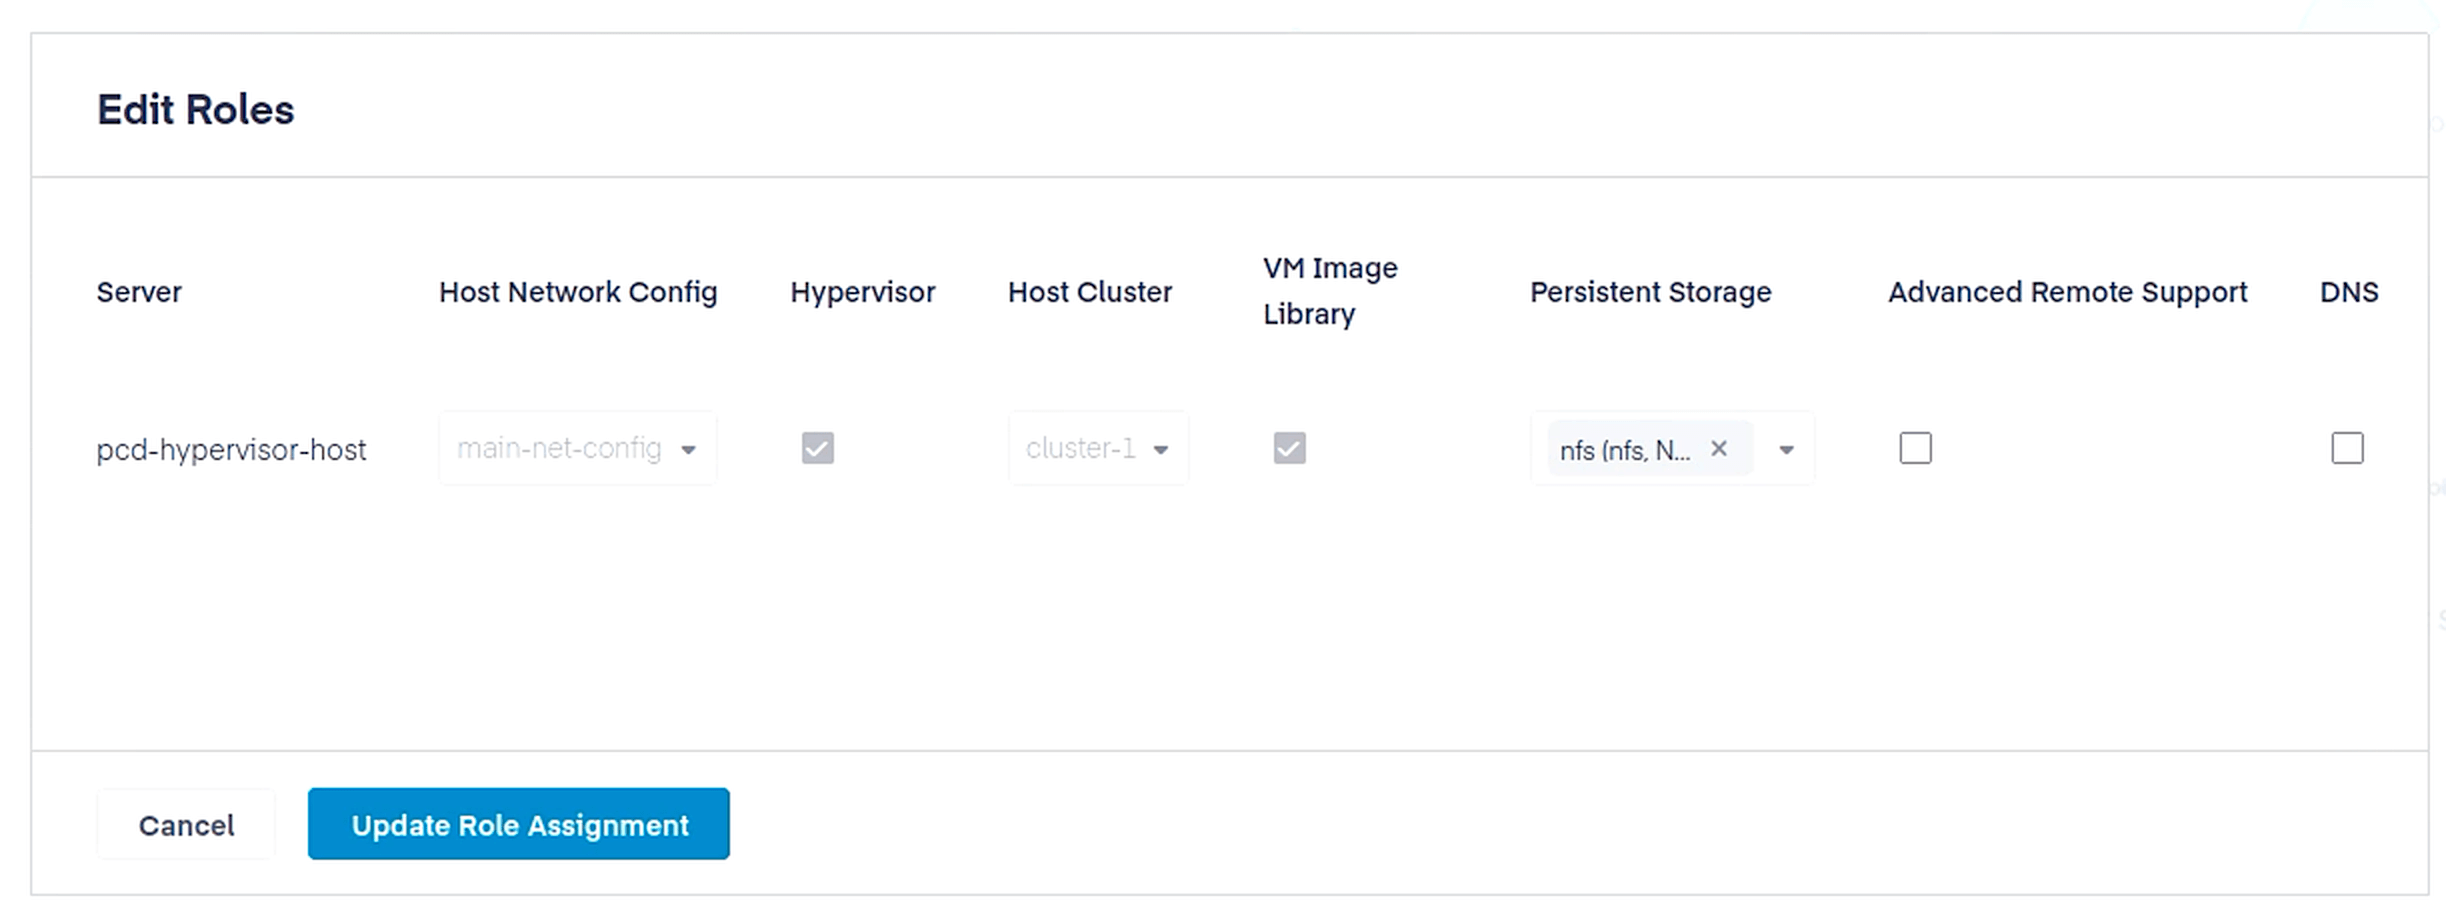
192.168.1.206:/srv/nfs/sharedFinally, navigate to Infrastructure > Cluster Hosts, select the host we onboarded a few steps ago, and click Edit Roles. Assign the Hypervisor role to the host by checking the box in the Hypervisor column. Under persistent storage select the NFS configuration we created. Click Update Role Assignment.
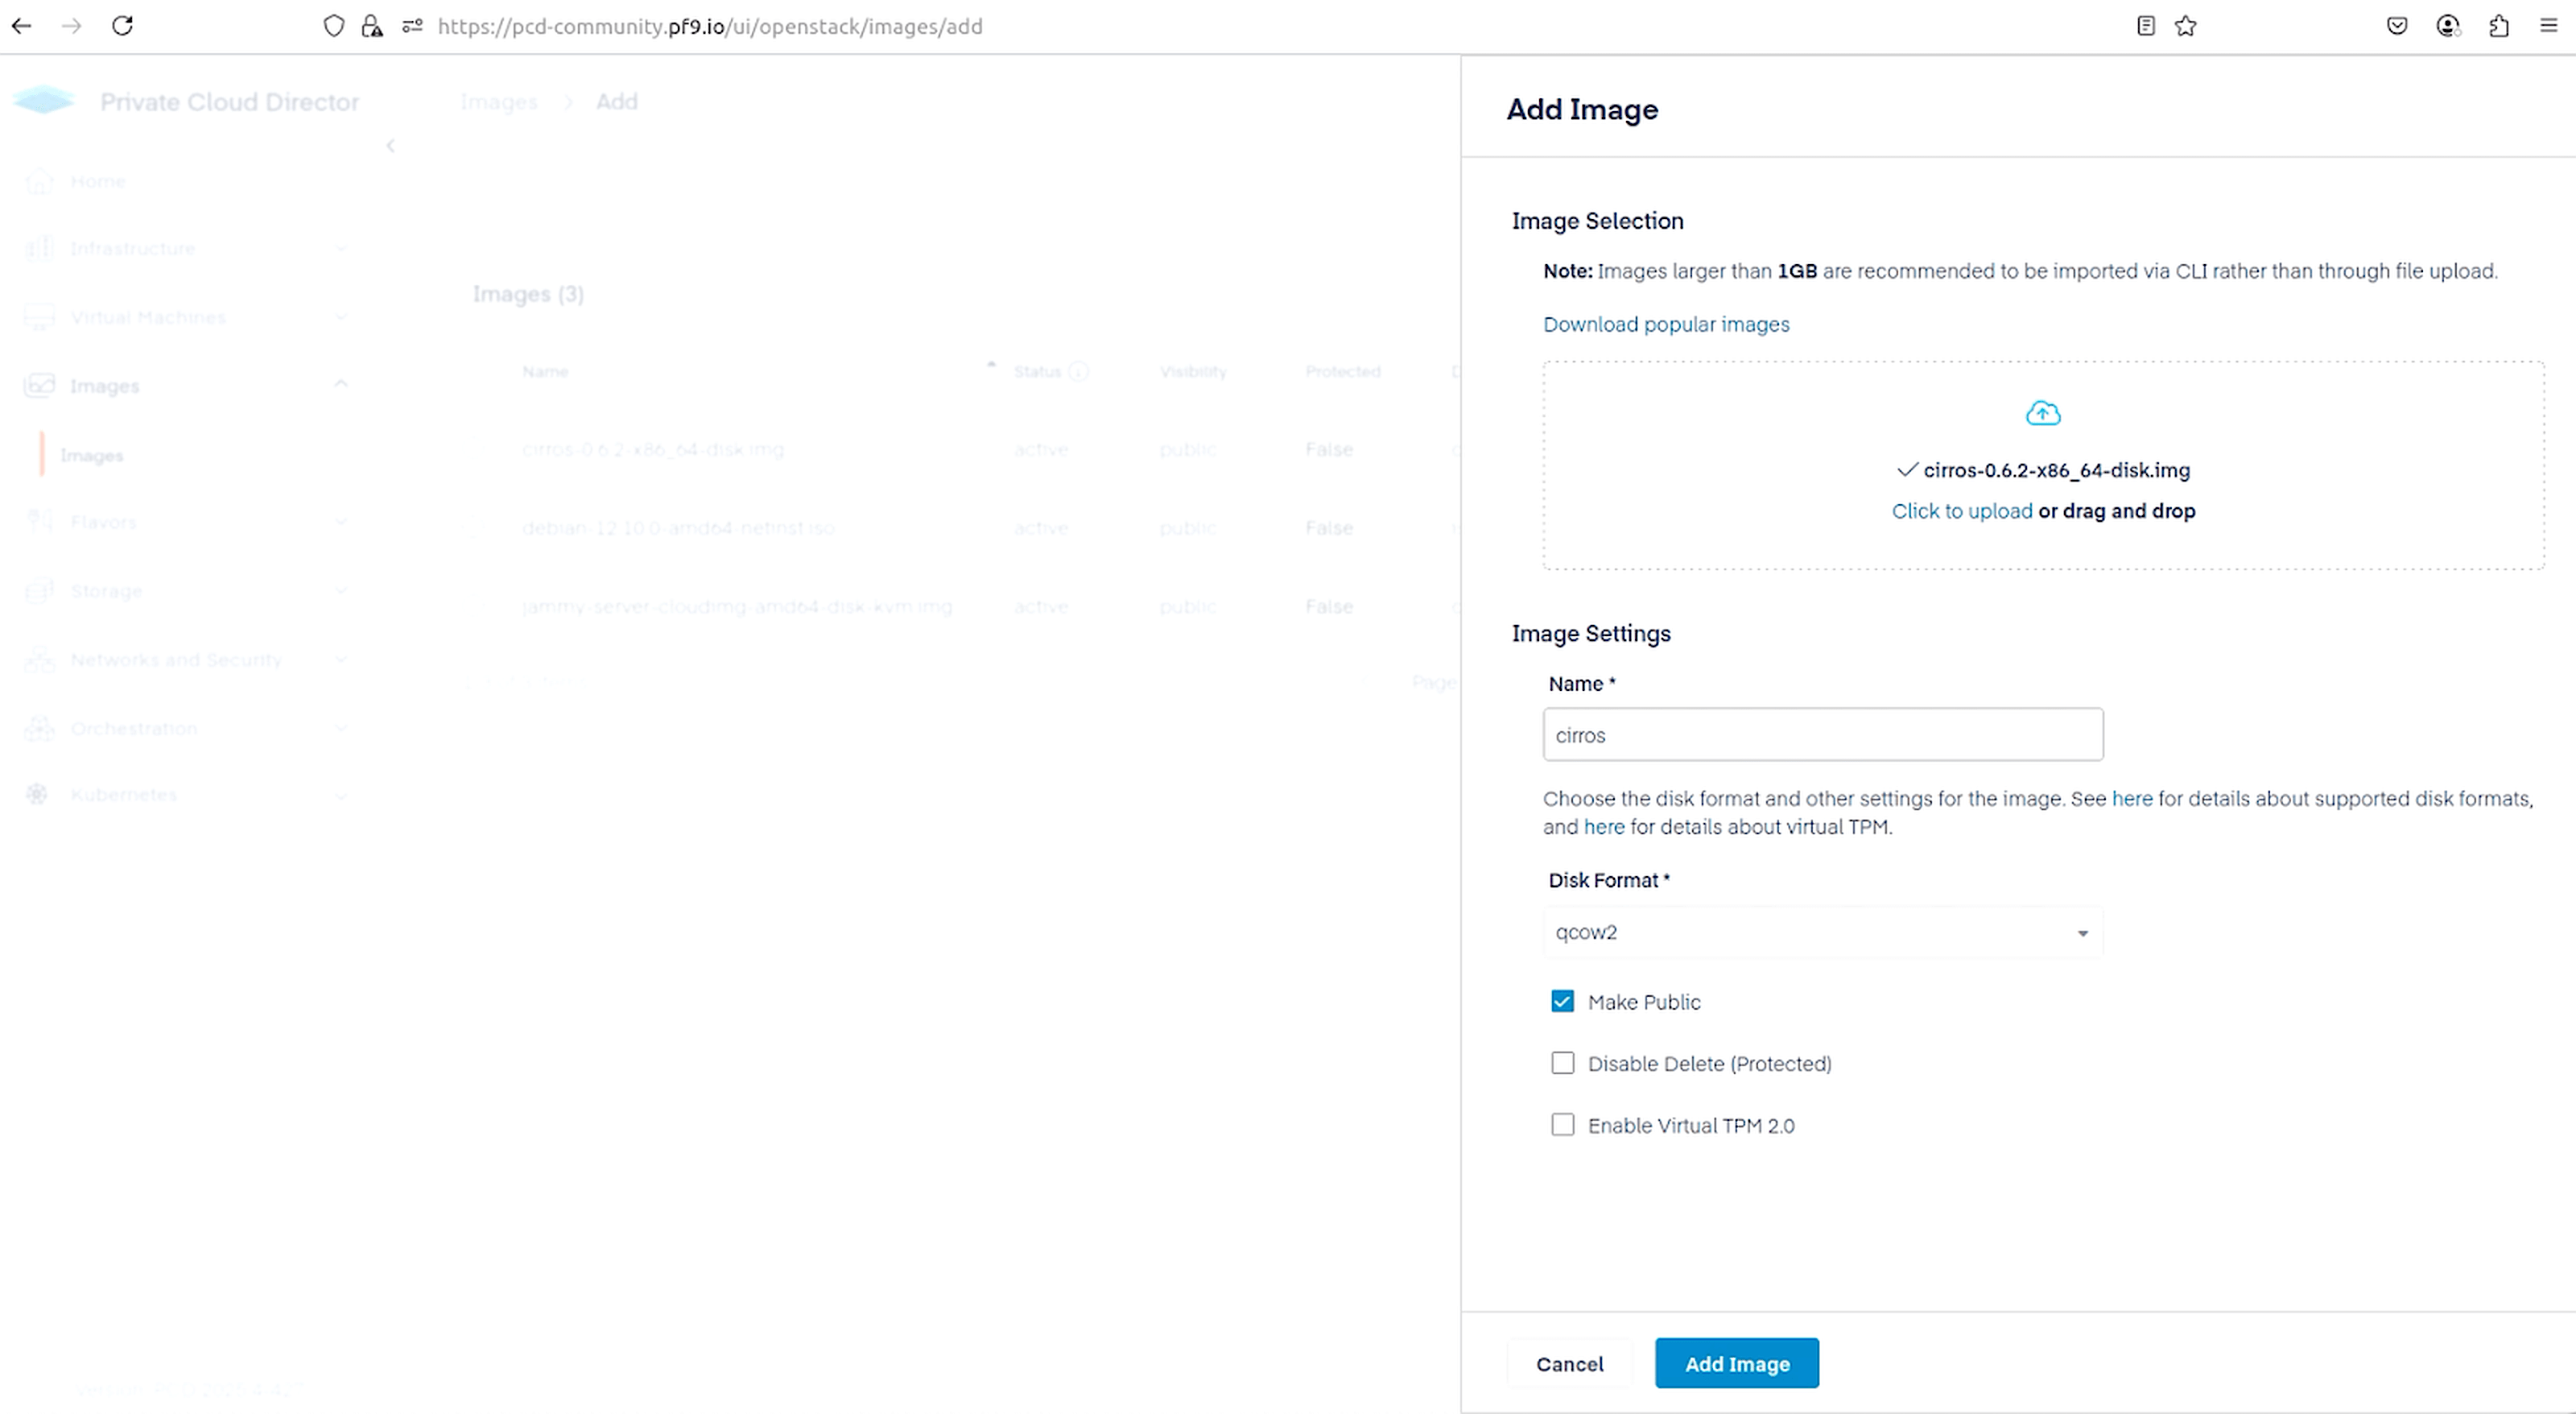
It’s time to spin up a VM on our hypervisor host. First, we upload an image that will be used to create the VM. I am using CirrOS for its small footprint. Navigate to Images > Images and click on the Add Image button in the top right. Select the CirrOS image, make the selections as shown below, and click Add Image.
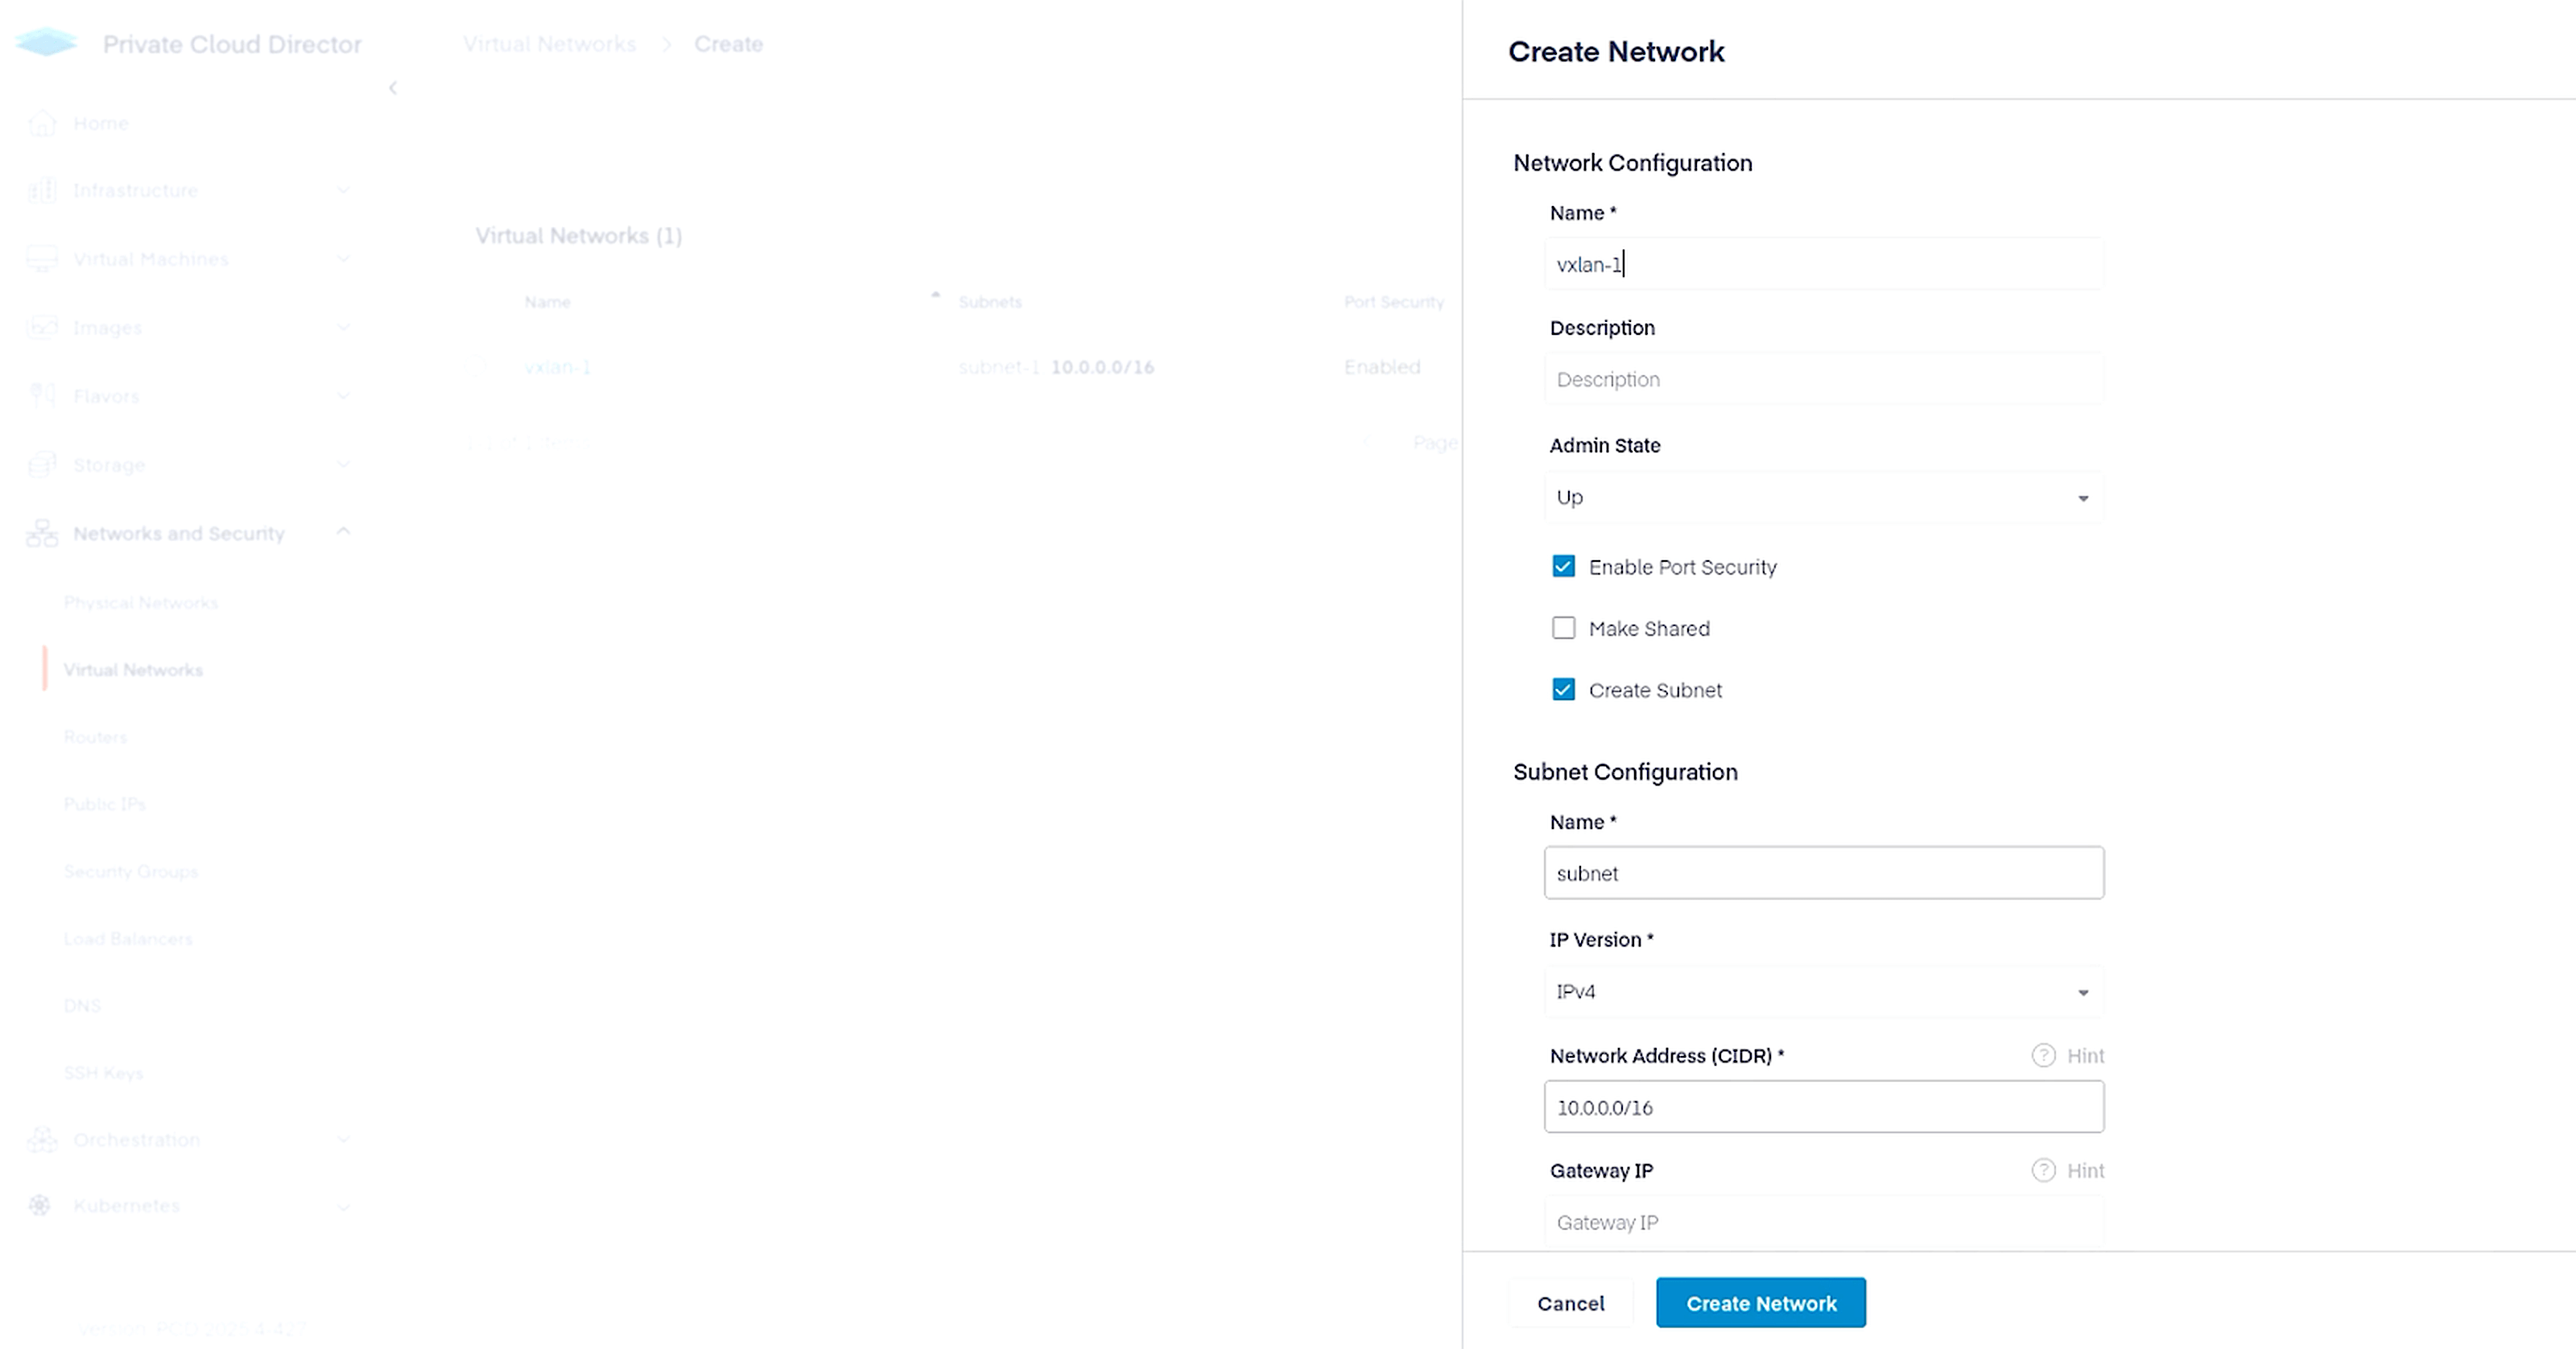
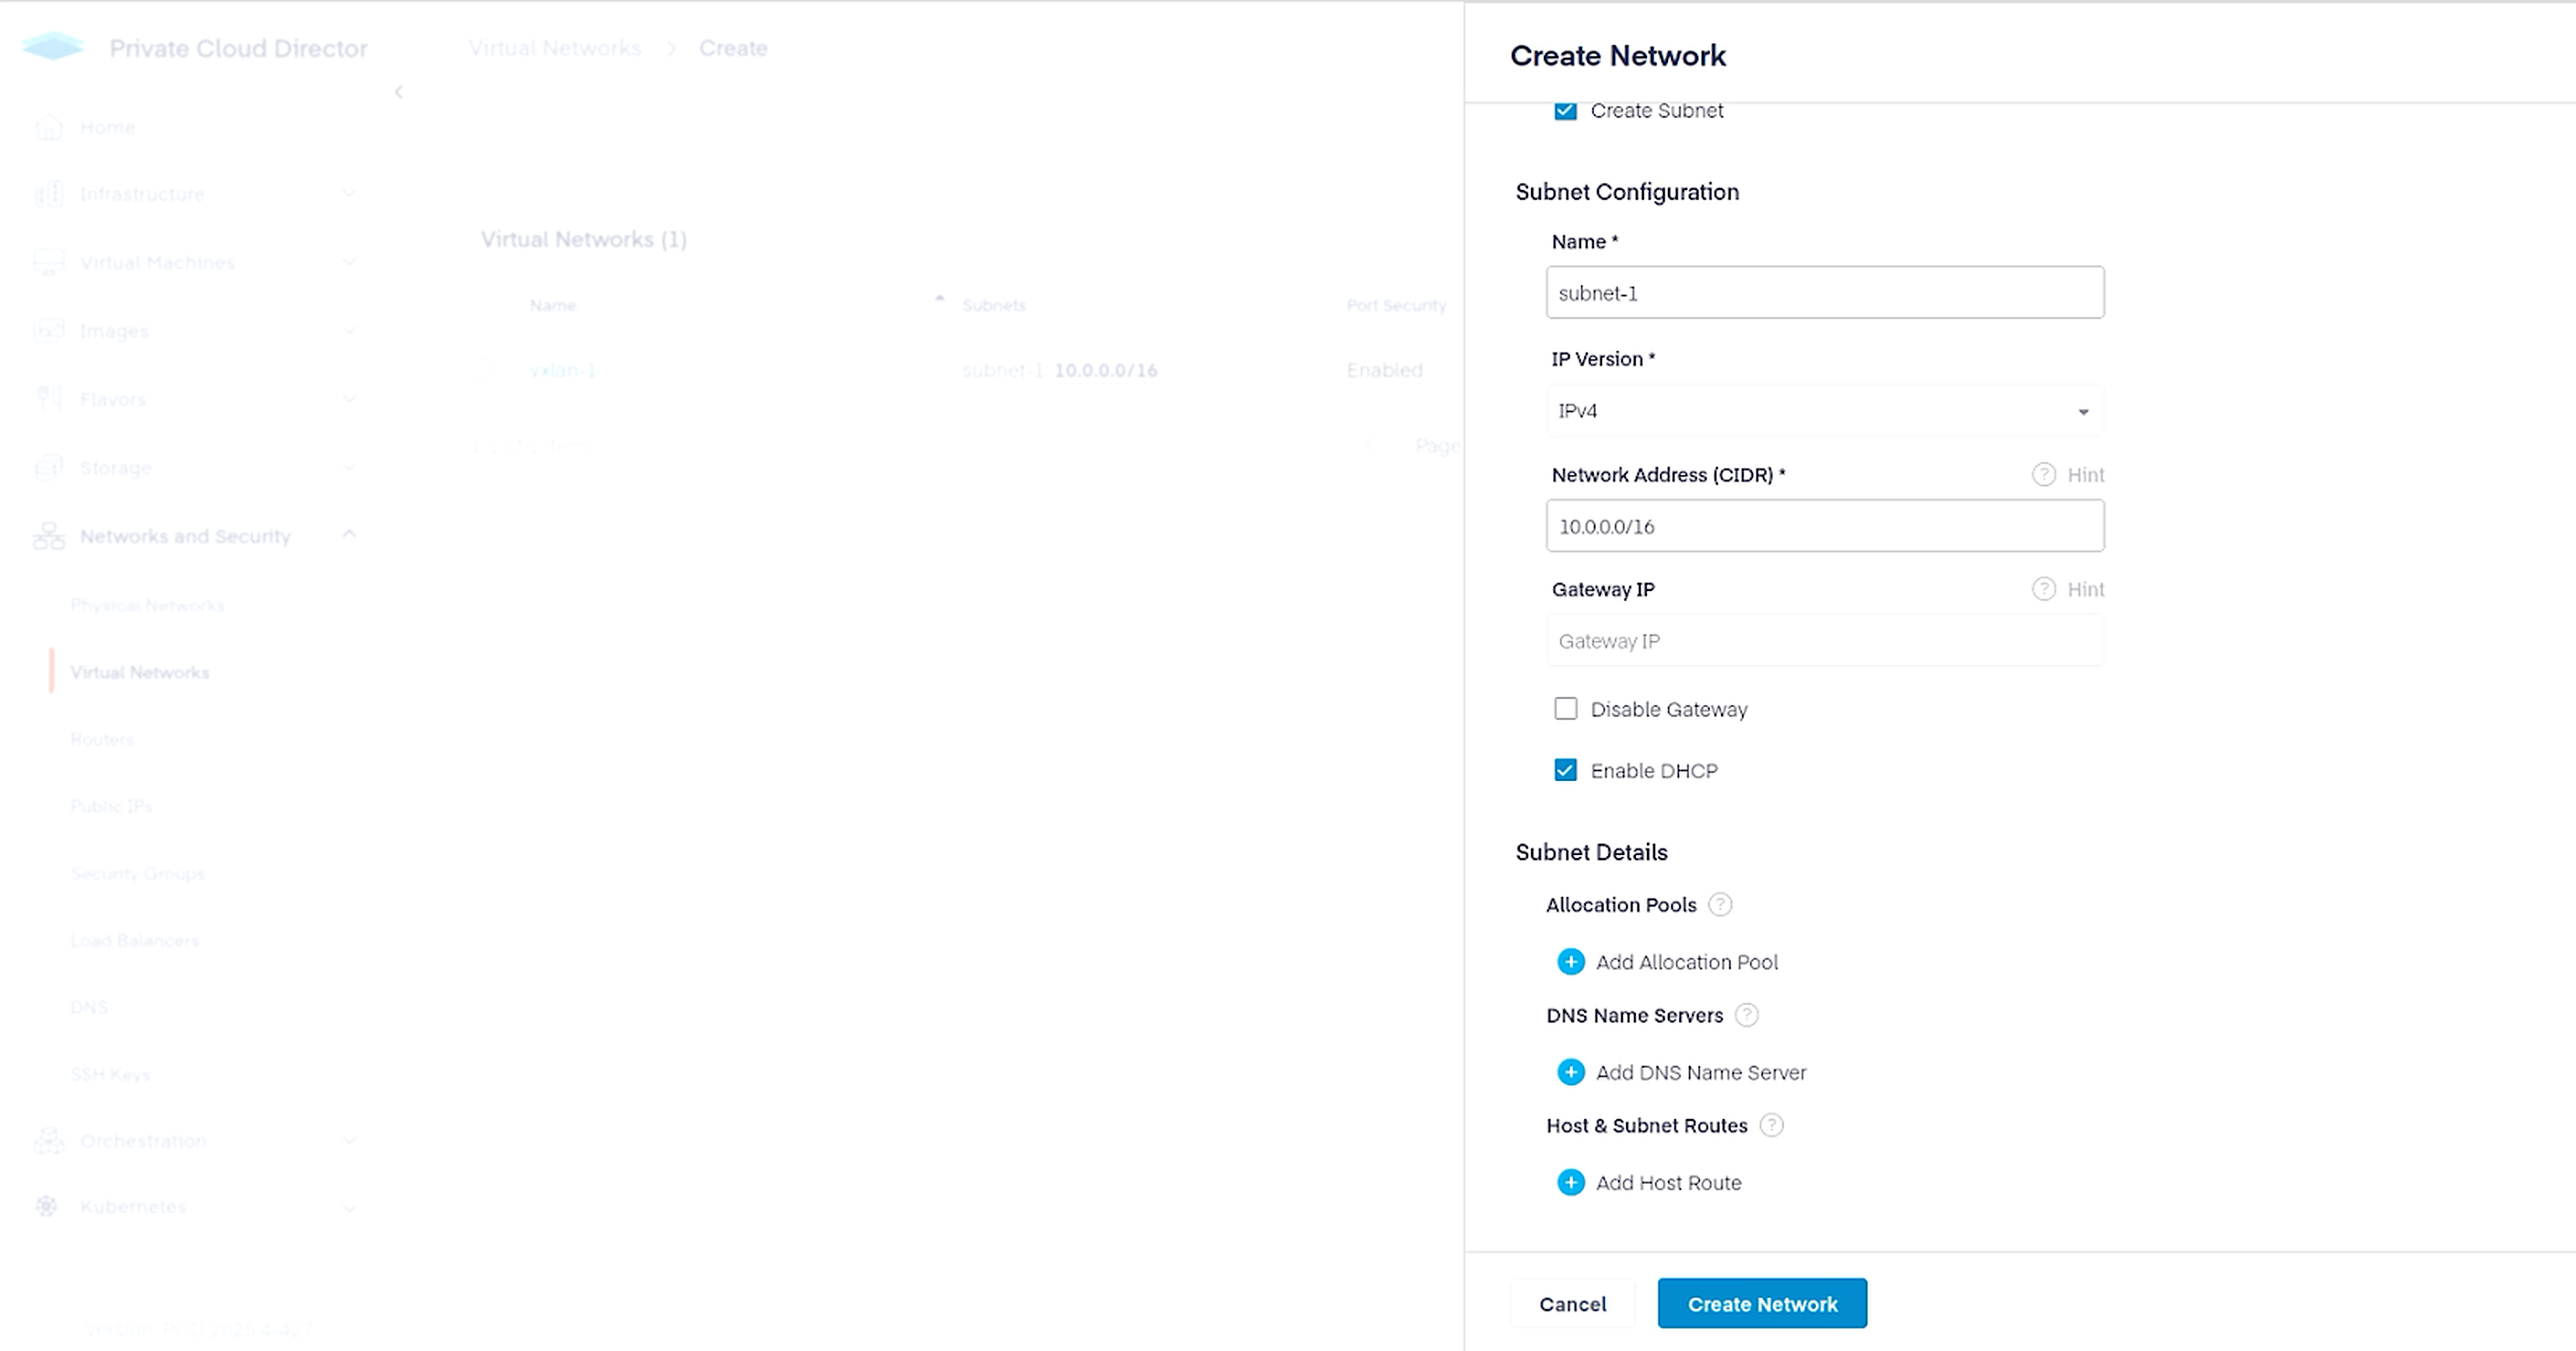
Next, create a virtual network that we will attach to our VM. Navigate to Networks and Security > Virtual Networks and click on Create Network button on the top right. Configure the virtual network as follows.
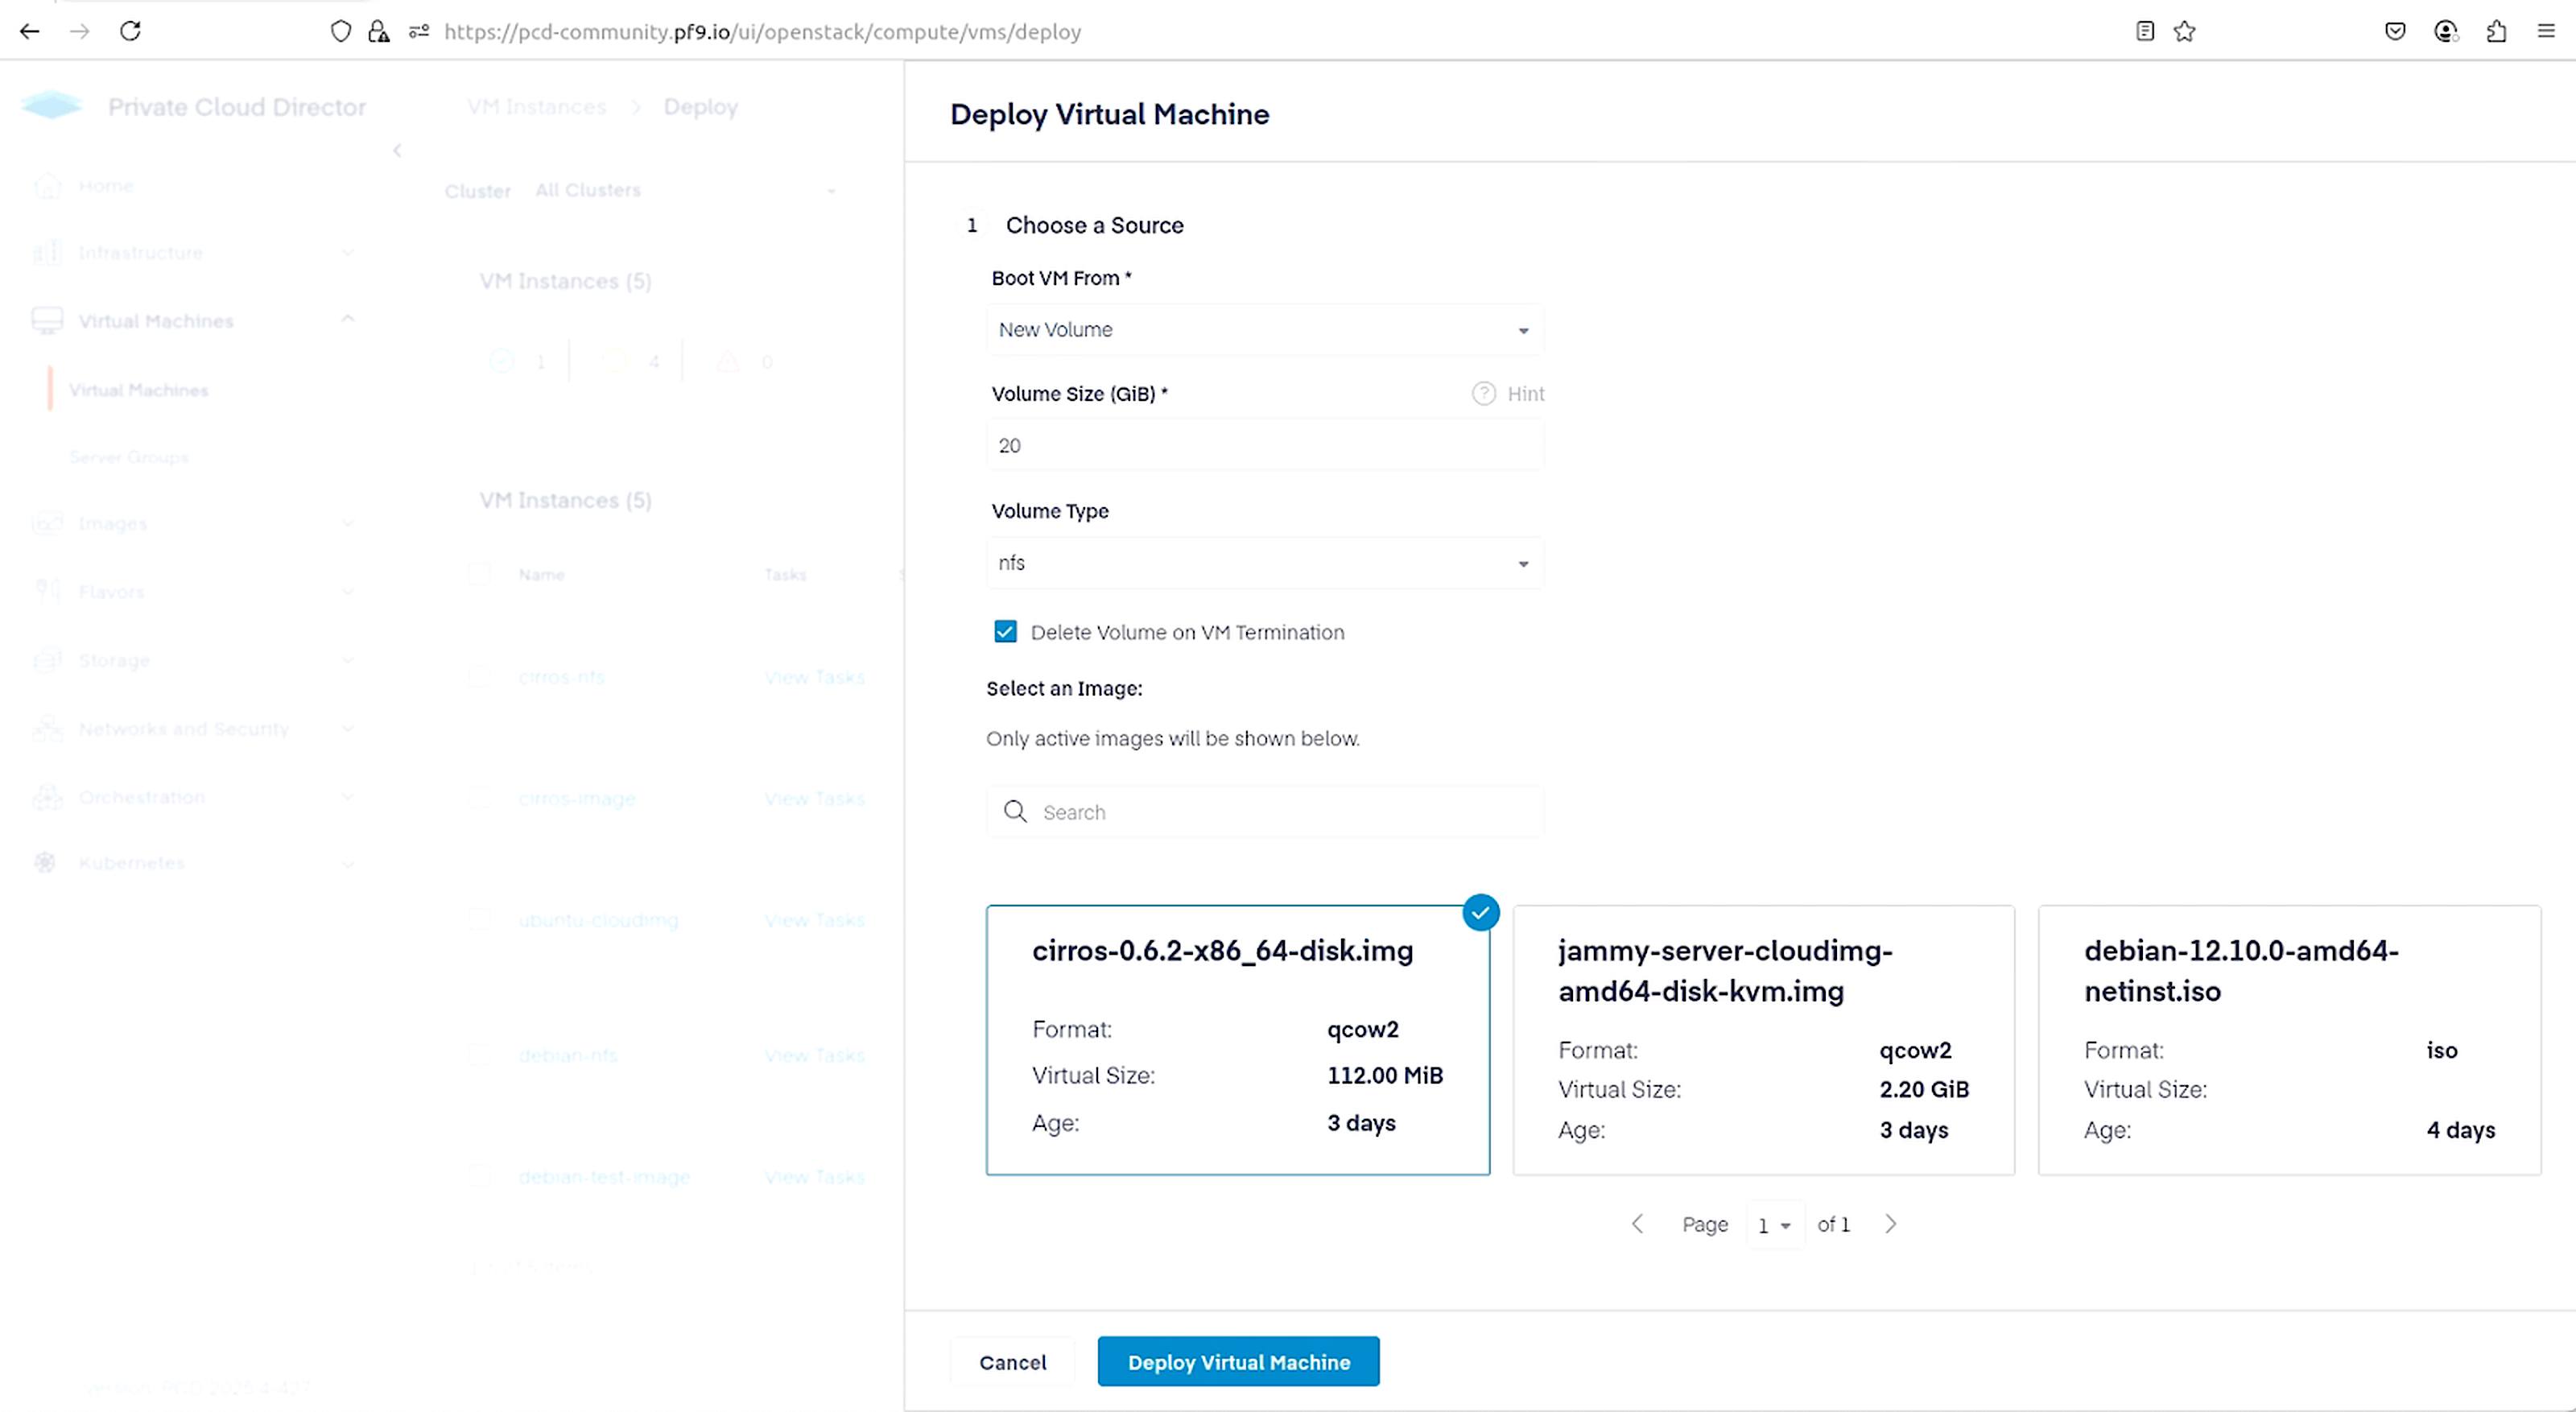
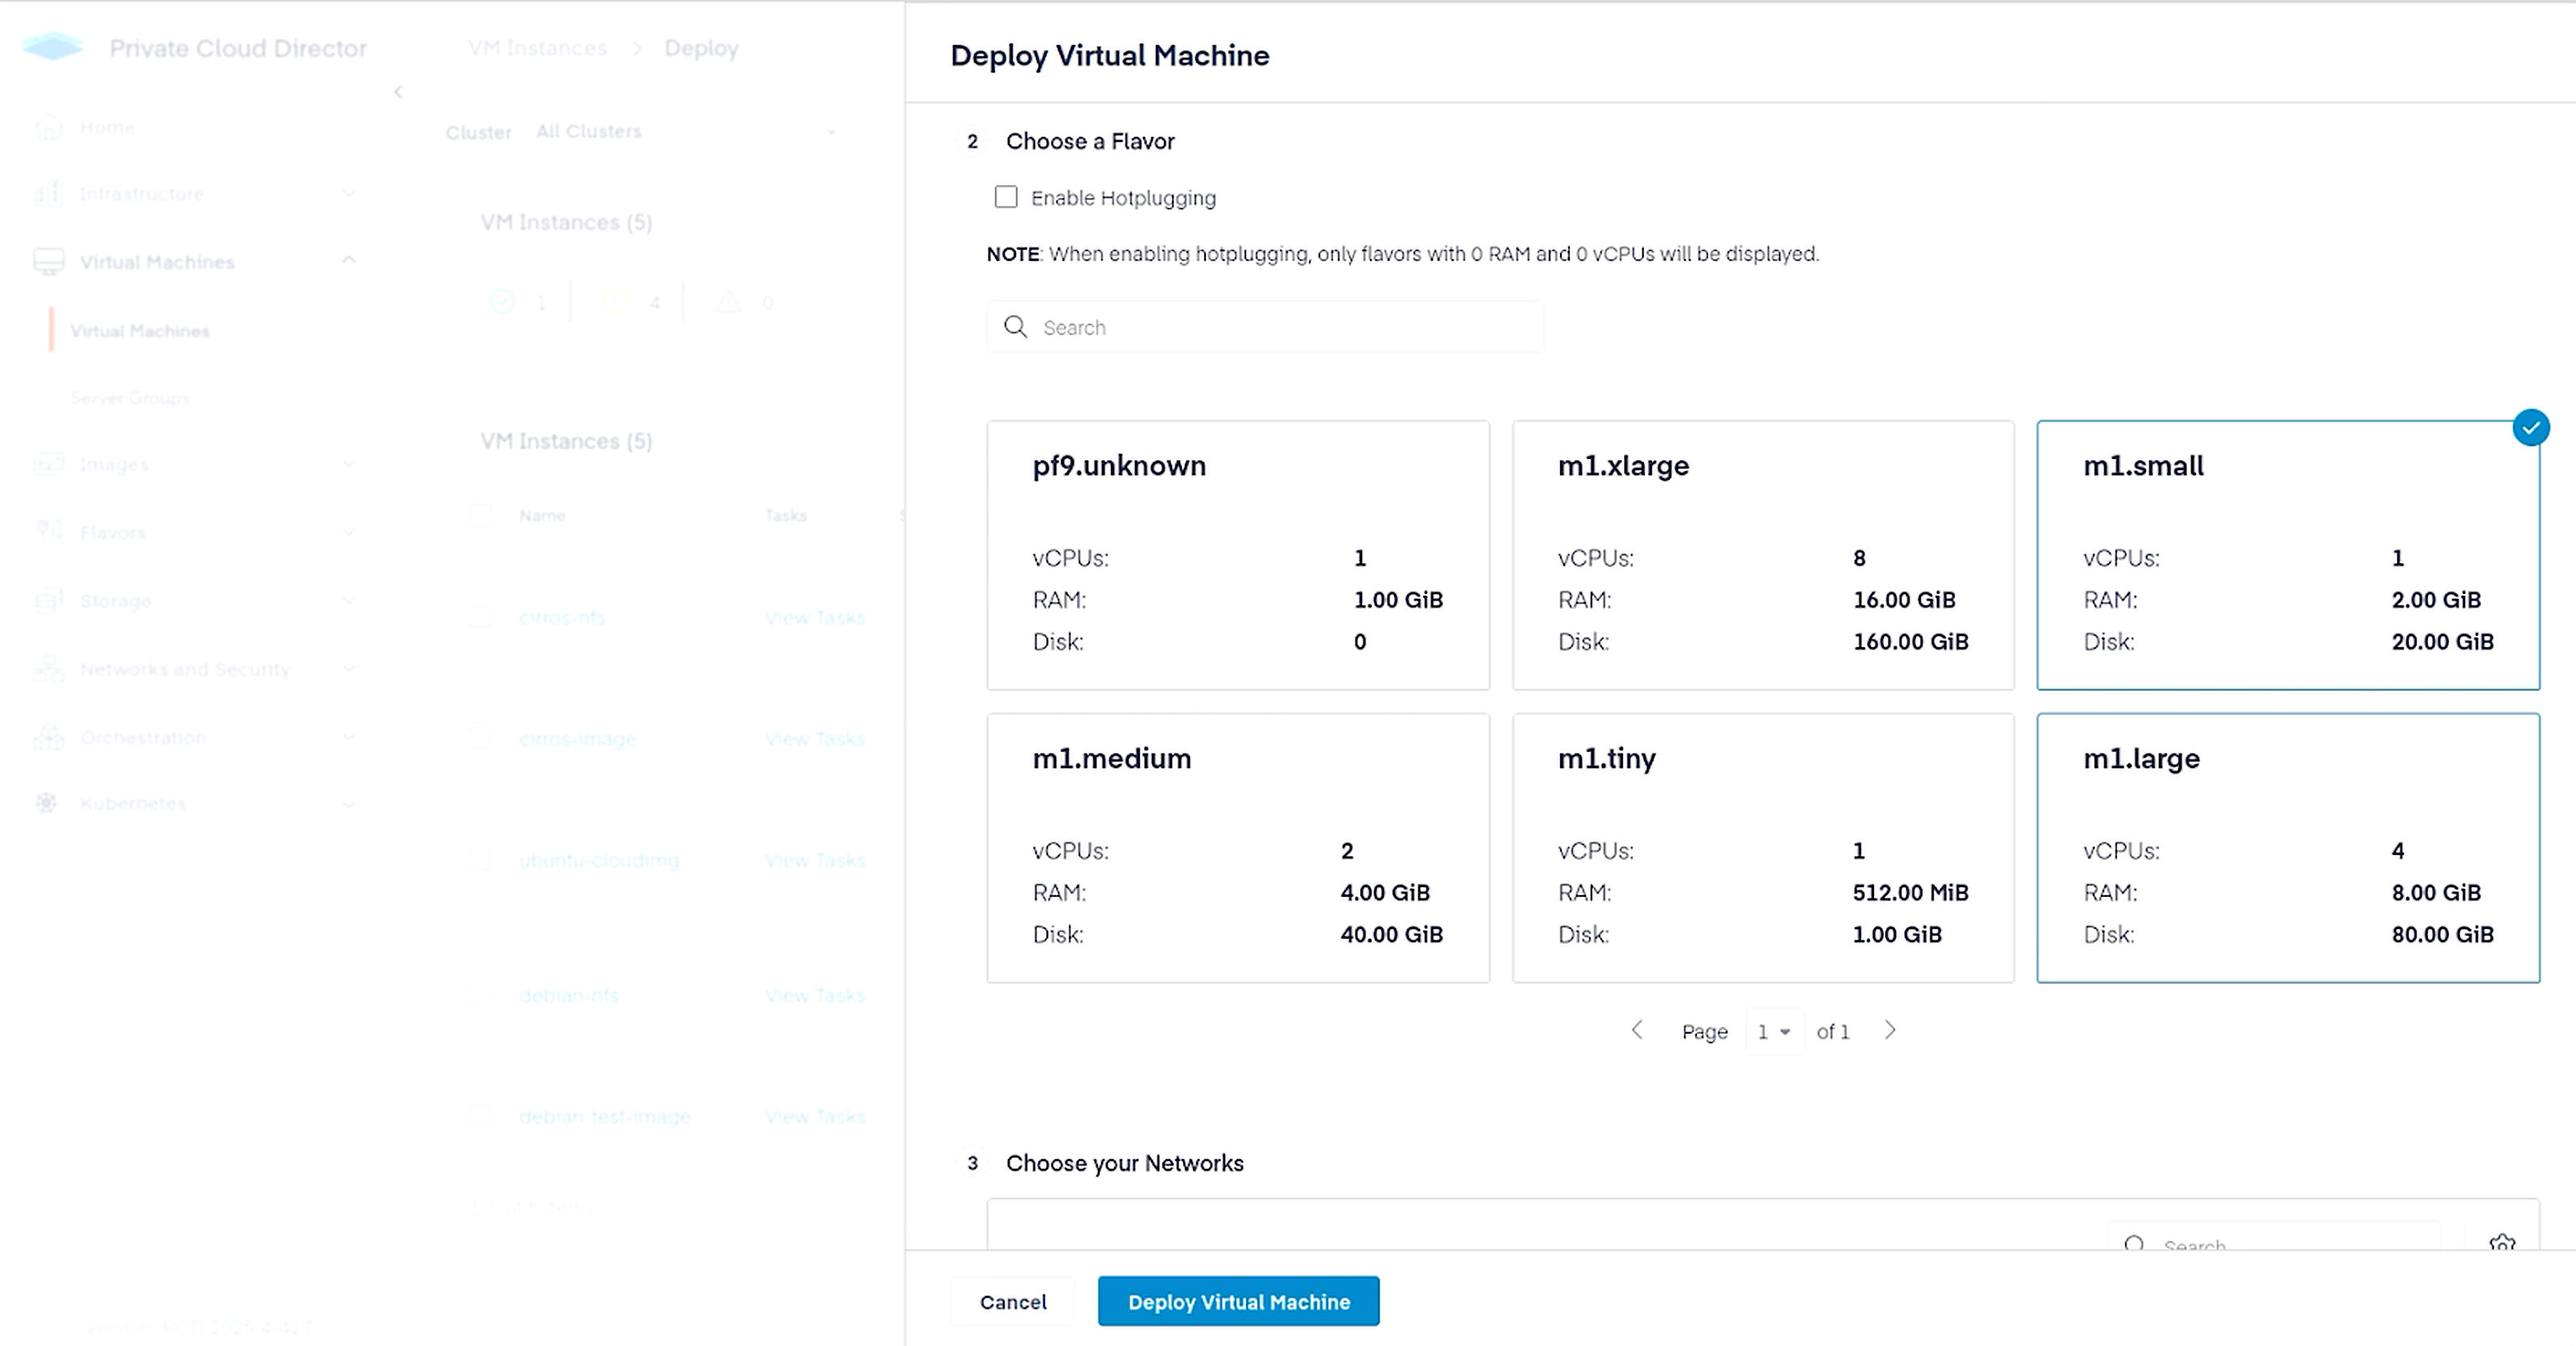
Finally, navigate to Virtual Machines > Virtual Machines and click the Deploy New VM button in the top right corner. Since we want to create this VM with persistent storage, make selections as shown below to use NFS.


You should now see the VM in your Virtual Machines tab.
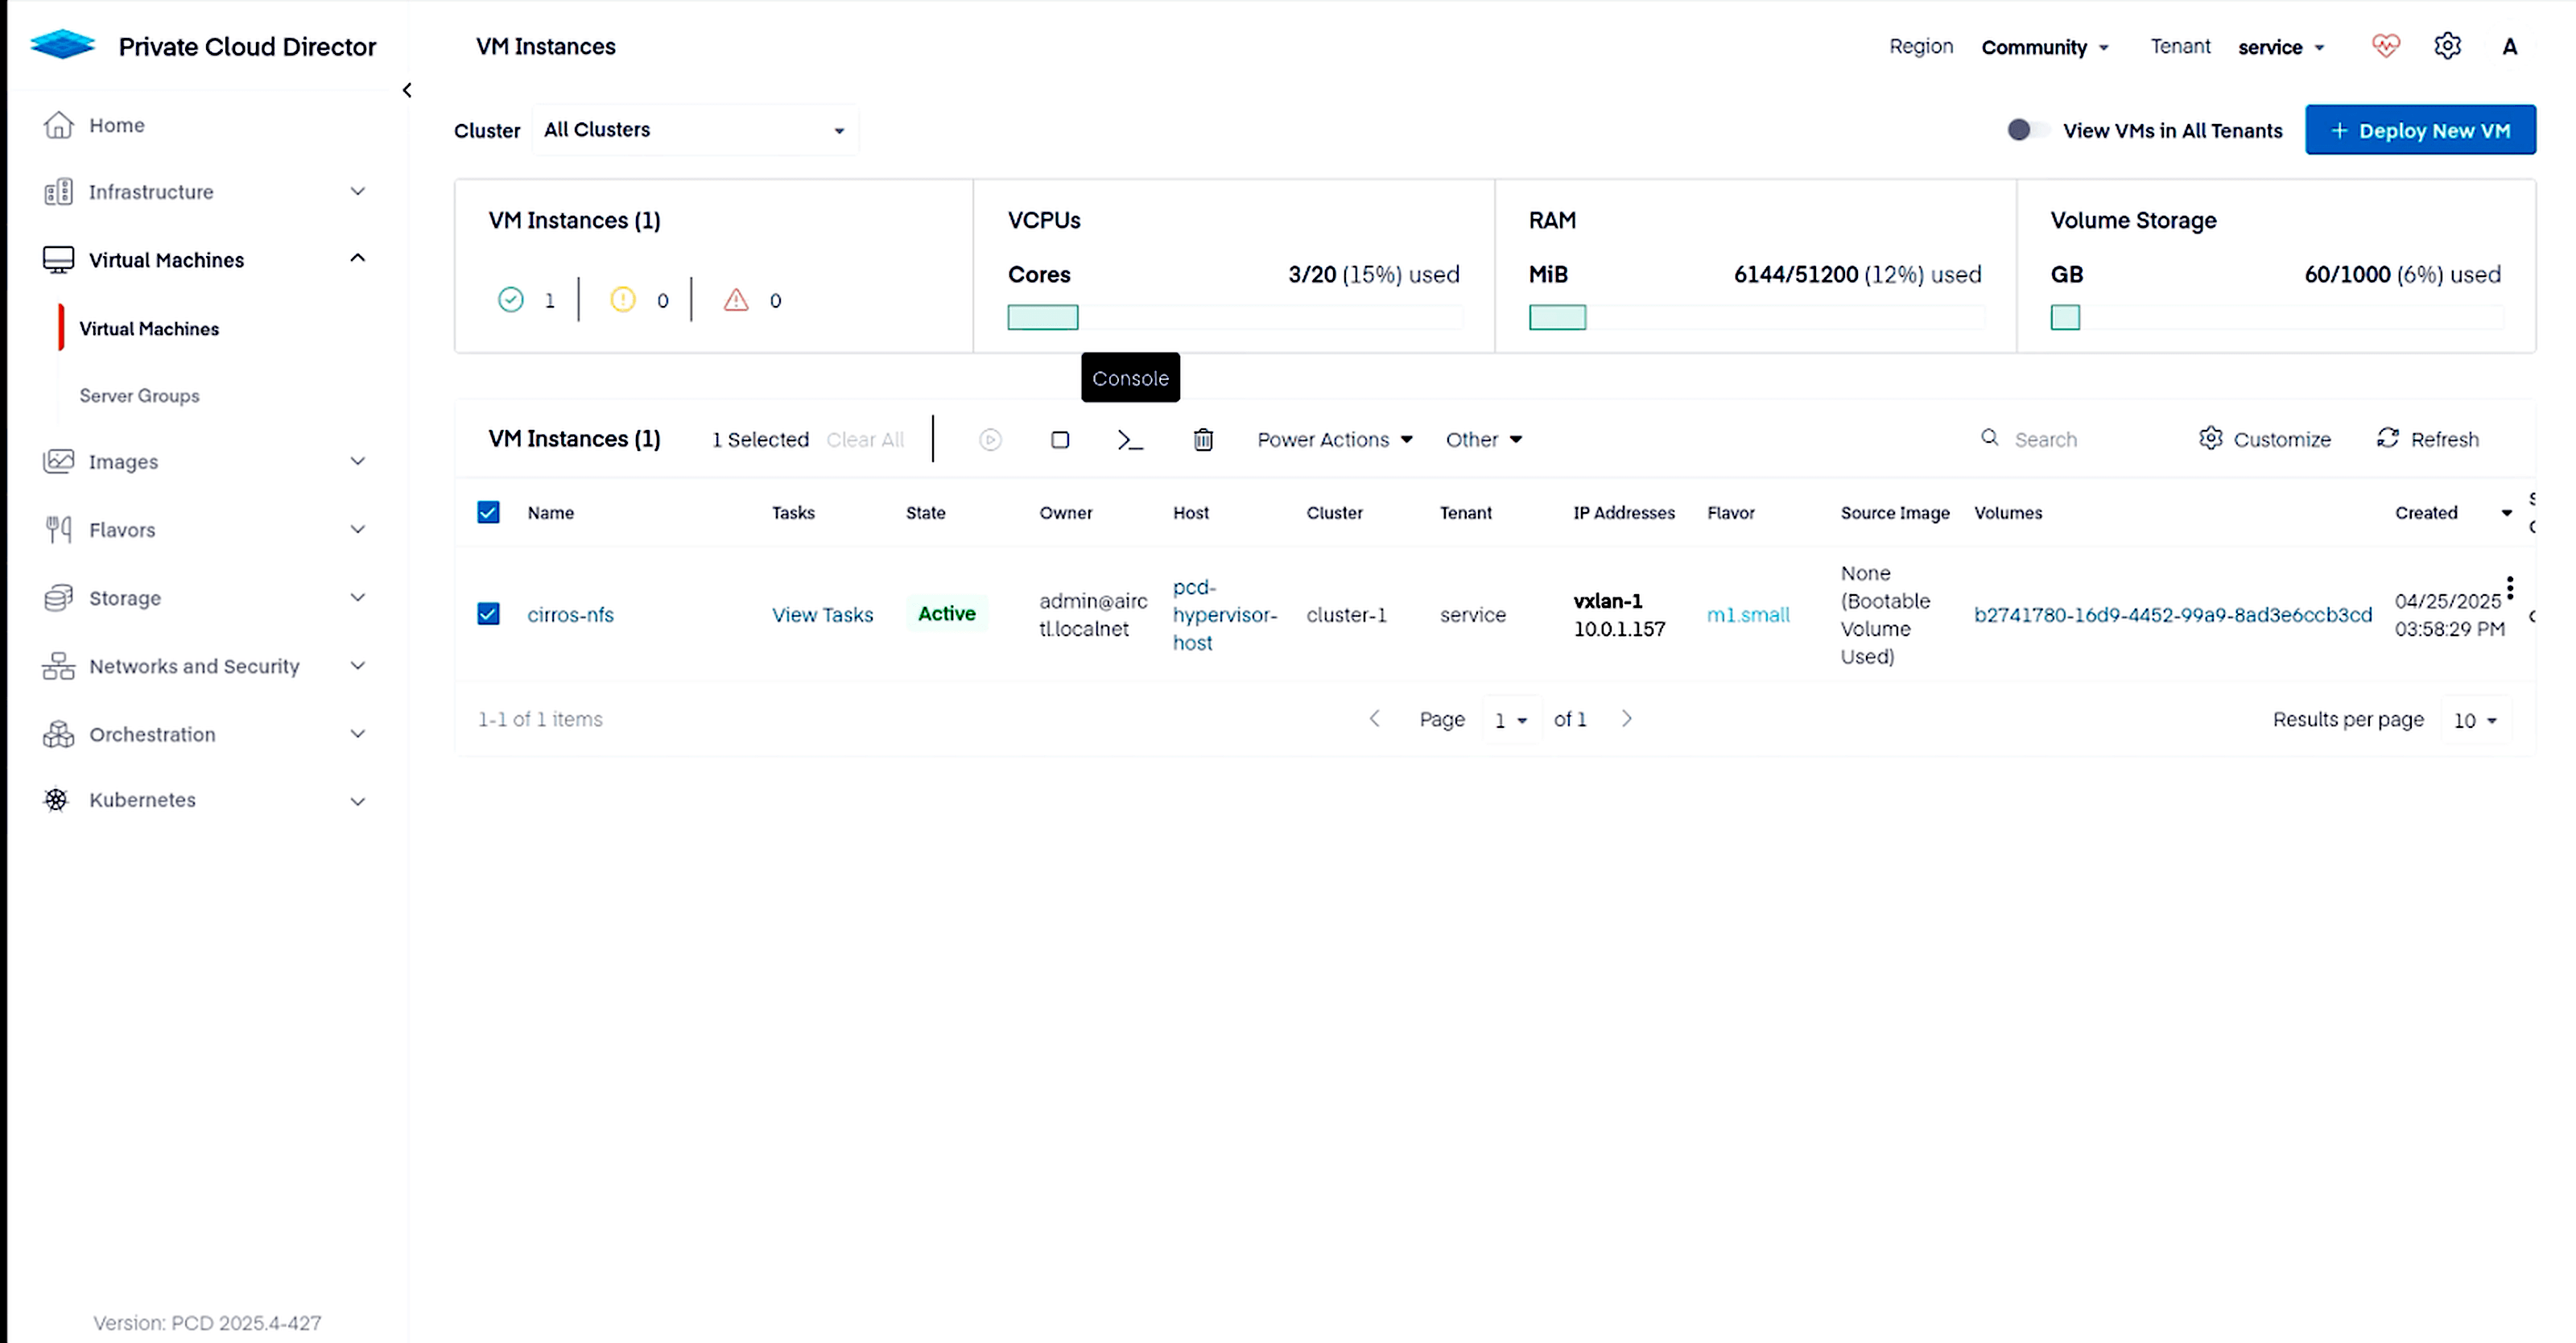
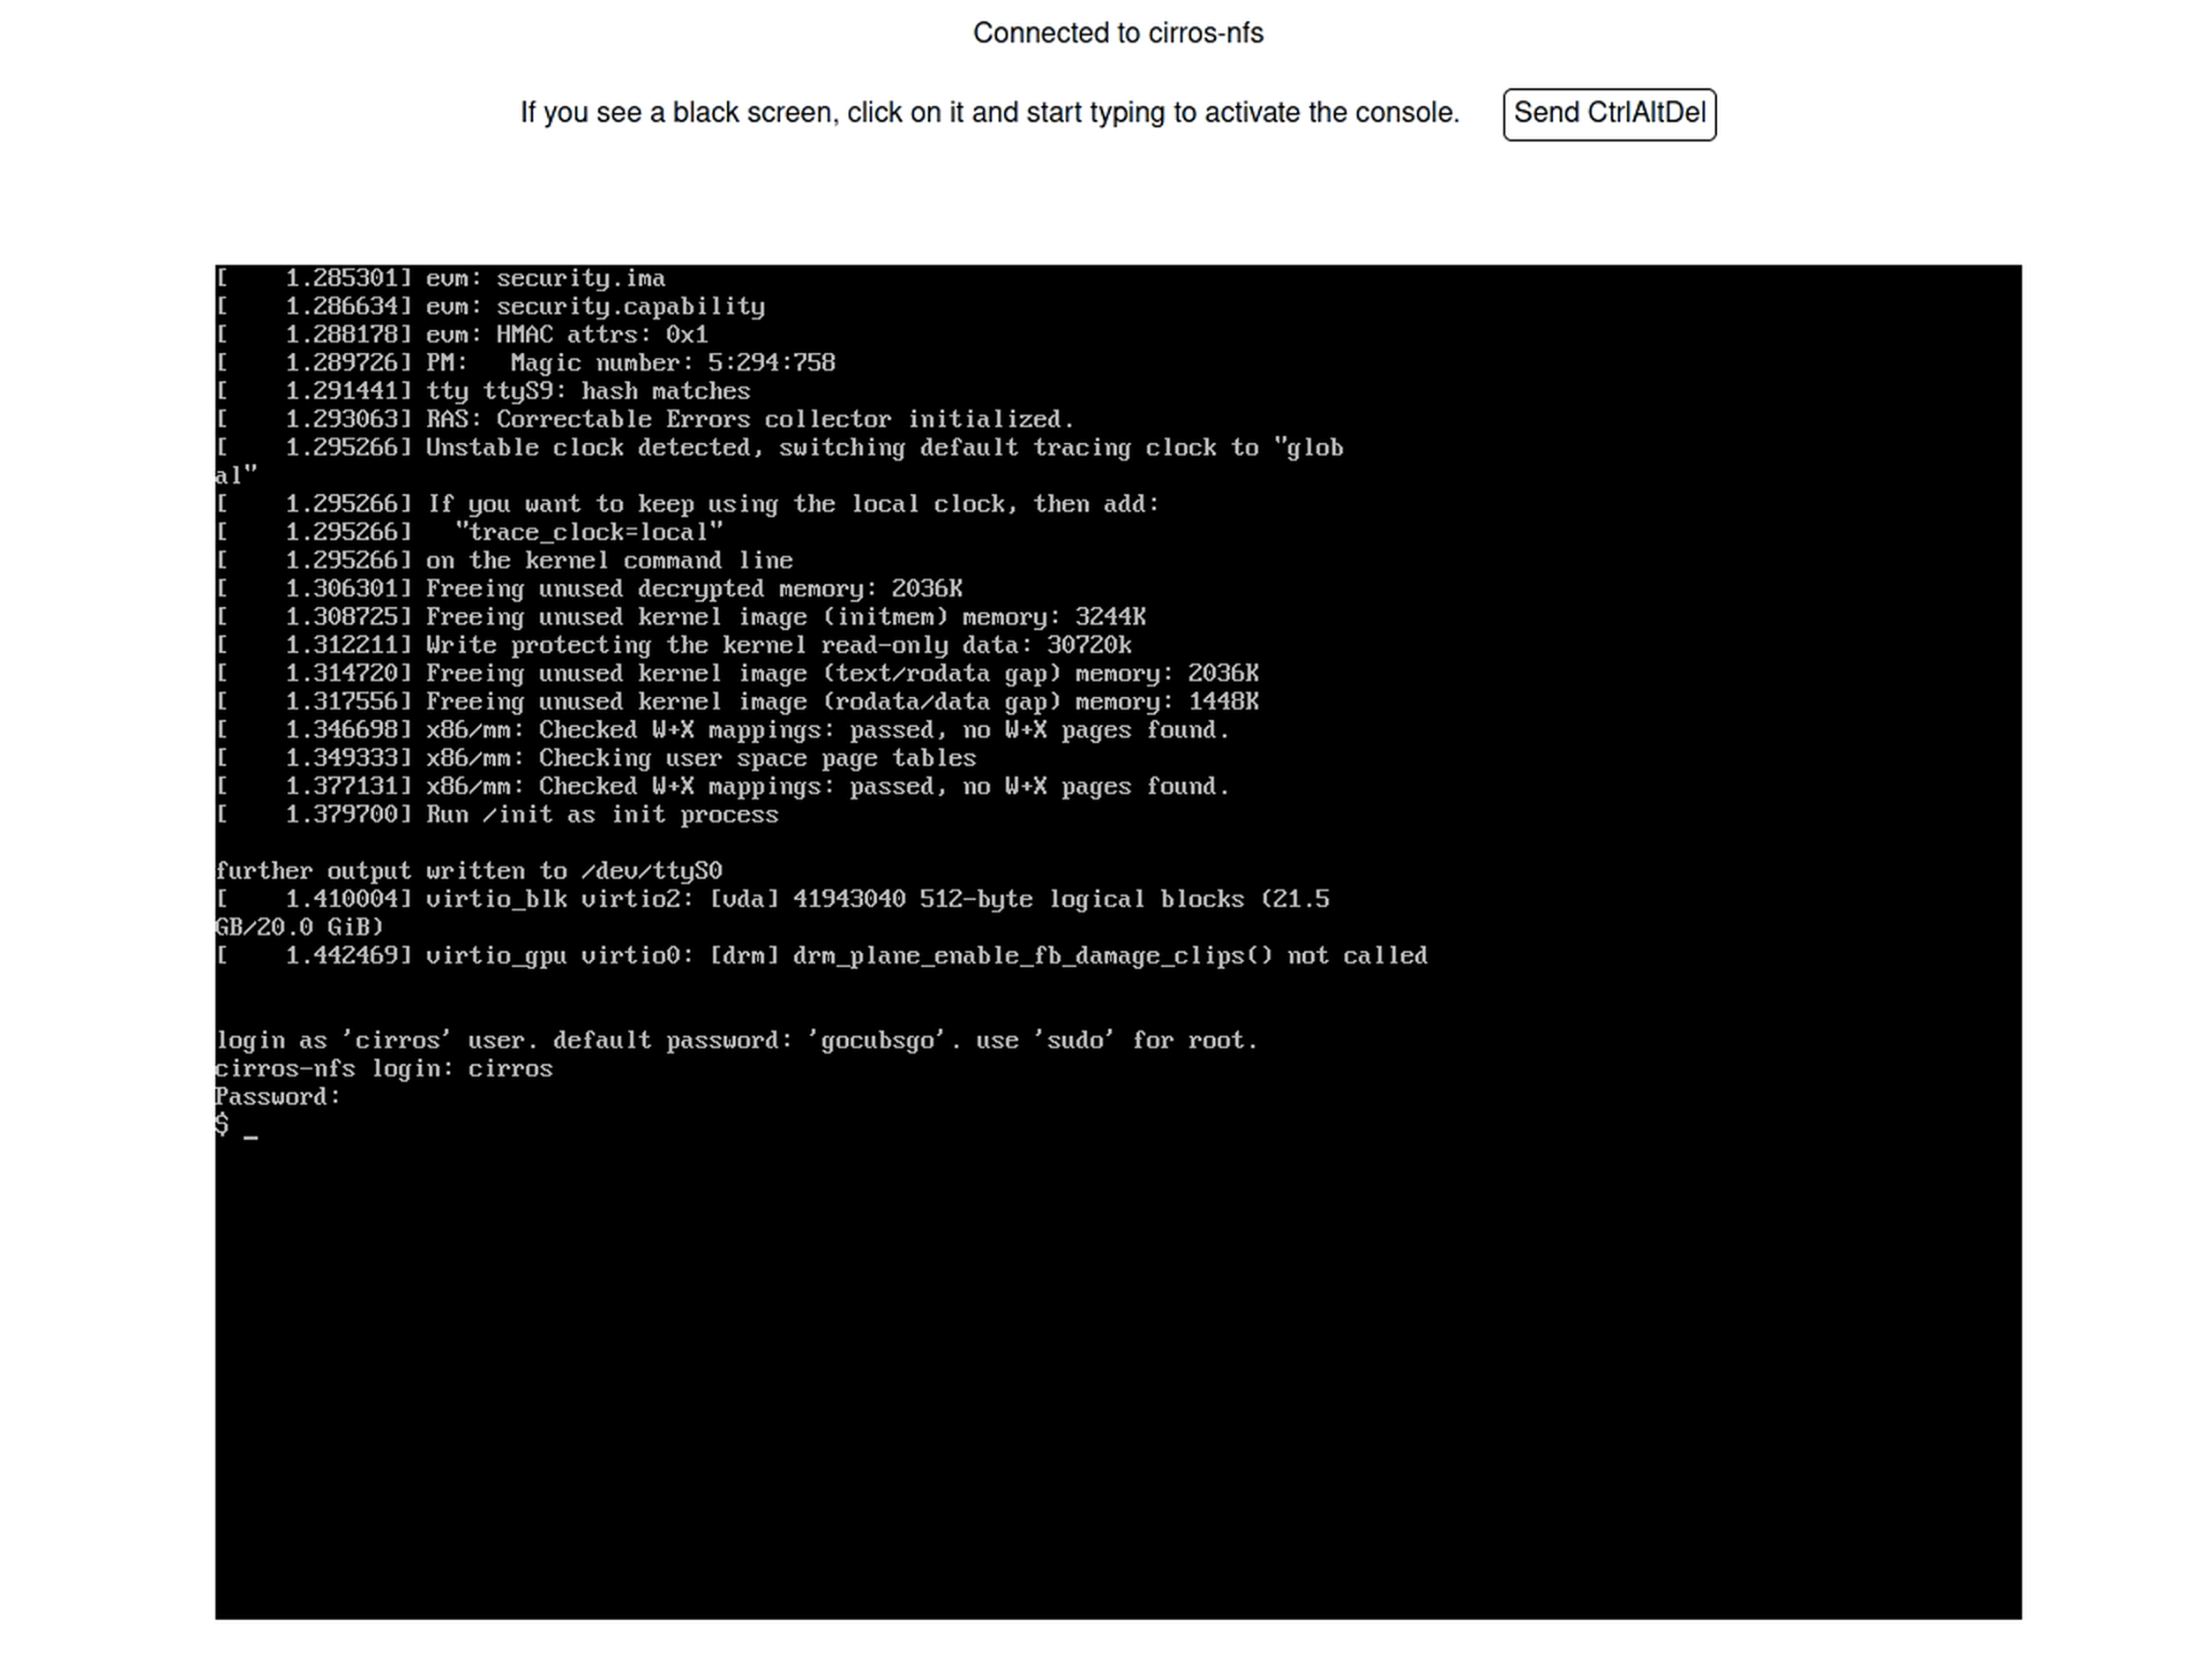
Select the VM and click on the Console button to launch into the VM.
Congratulations on making it to the end! We started with a bare metal Ubuntu installation and deployed a VM in an enterprise-grade workload management solution. Please give Private Cloud Director Community Edition a spin and let us know how things go.
Head over to our subreddit and join the community!