Set up Okta for SSO
Set up Single Sign-On (SSO) integration between Okta and Private Cloud Director (PCD). You will configure an Okta SAML 2.0 application and connect it to your PCD deployment for seamless user authentication.
Only 5 active applications are allowed in Okta. Deactivate unused applications before creating new integrations.
Step 1: Create Okta SAML application
This step guides you through creating a new SAML 2.0 application integration in Okta.
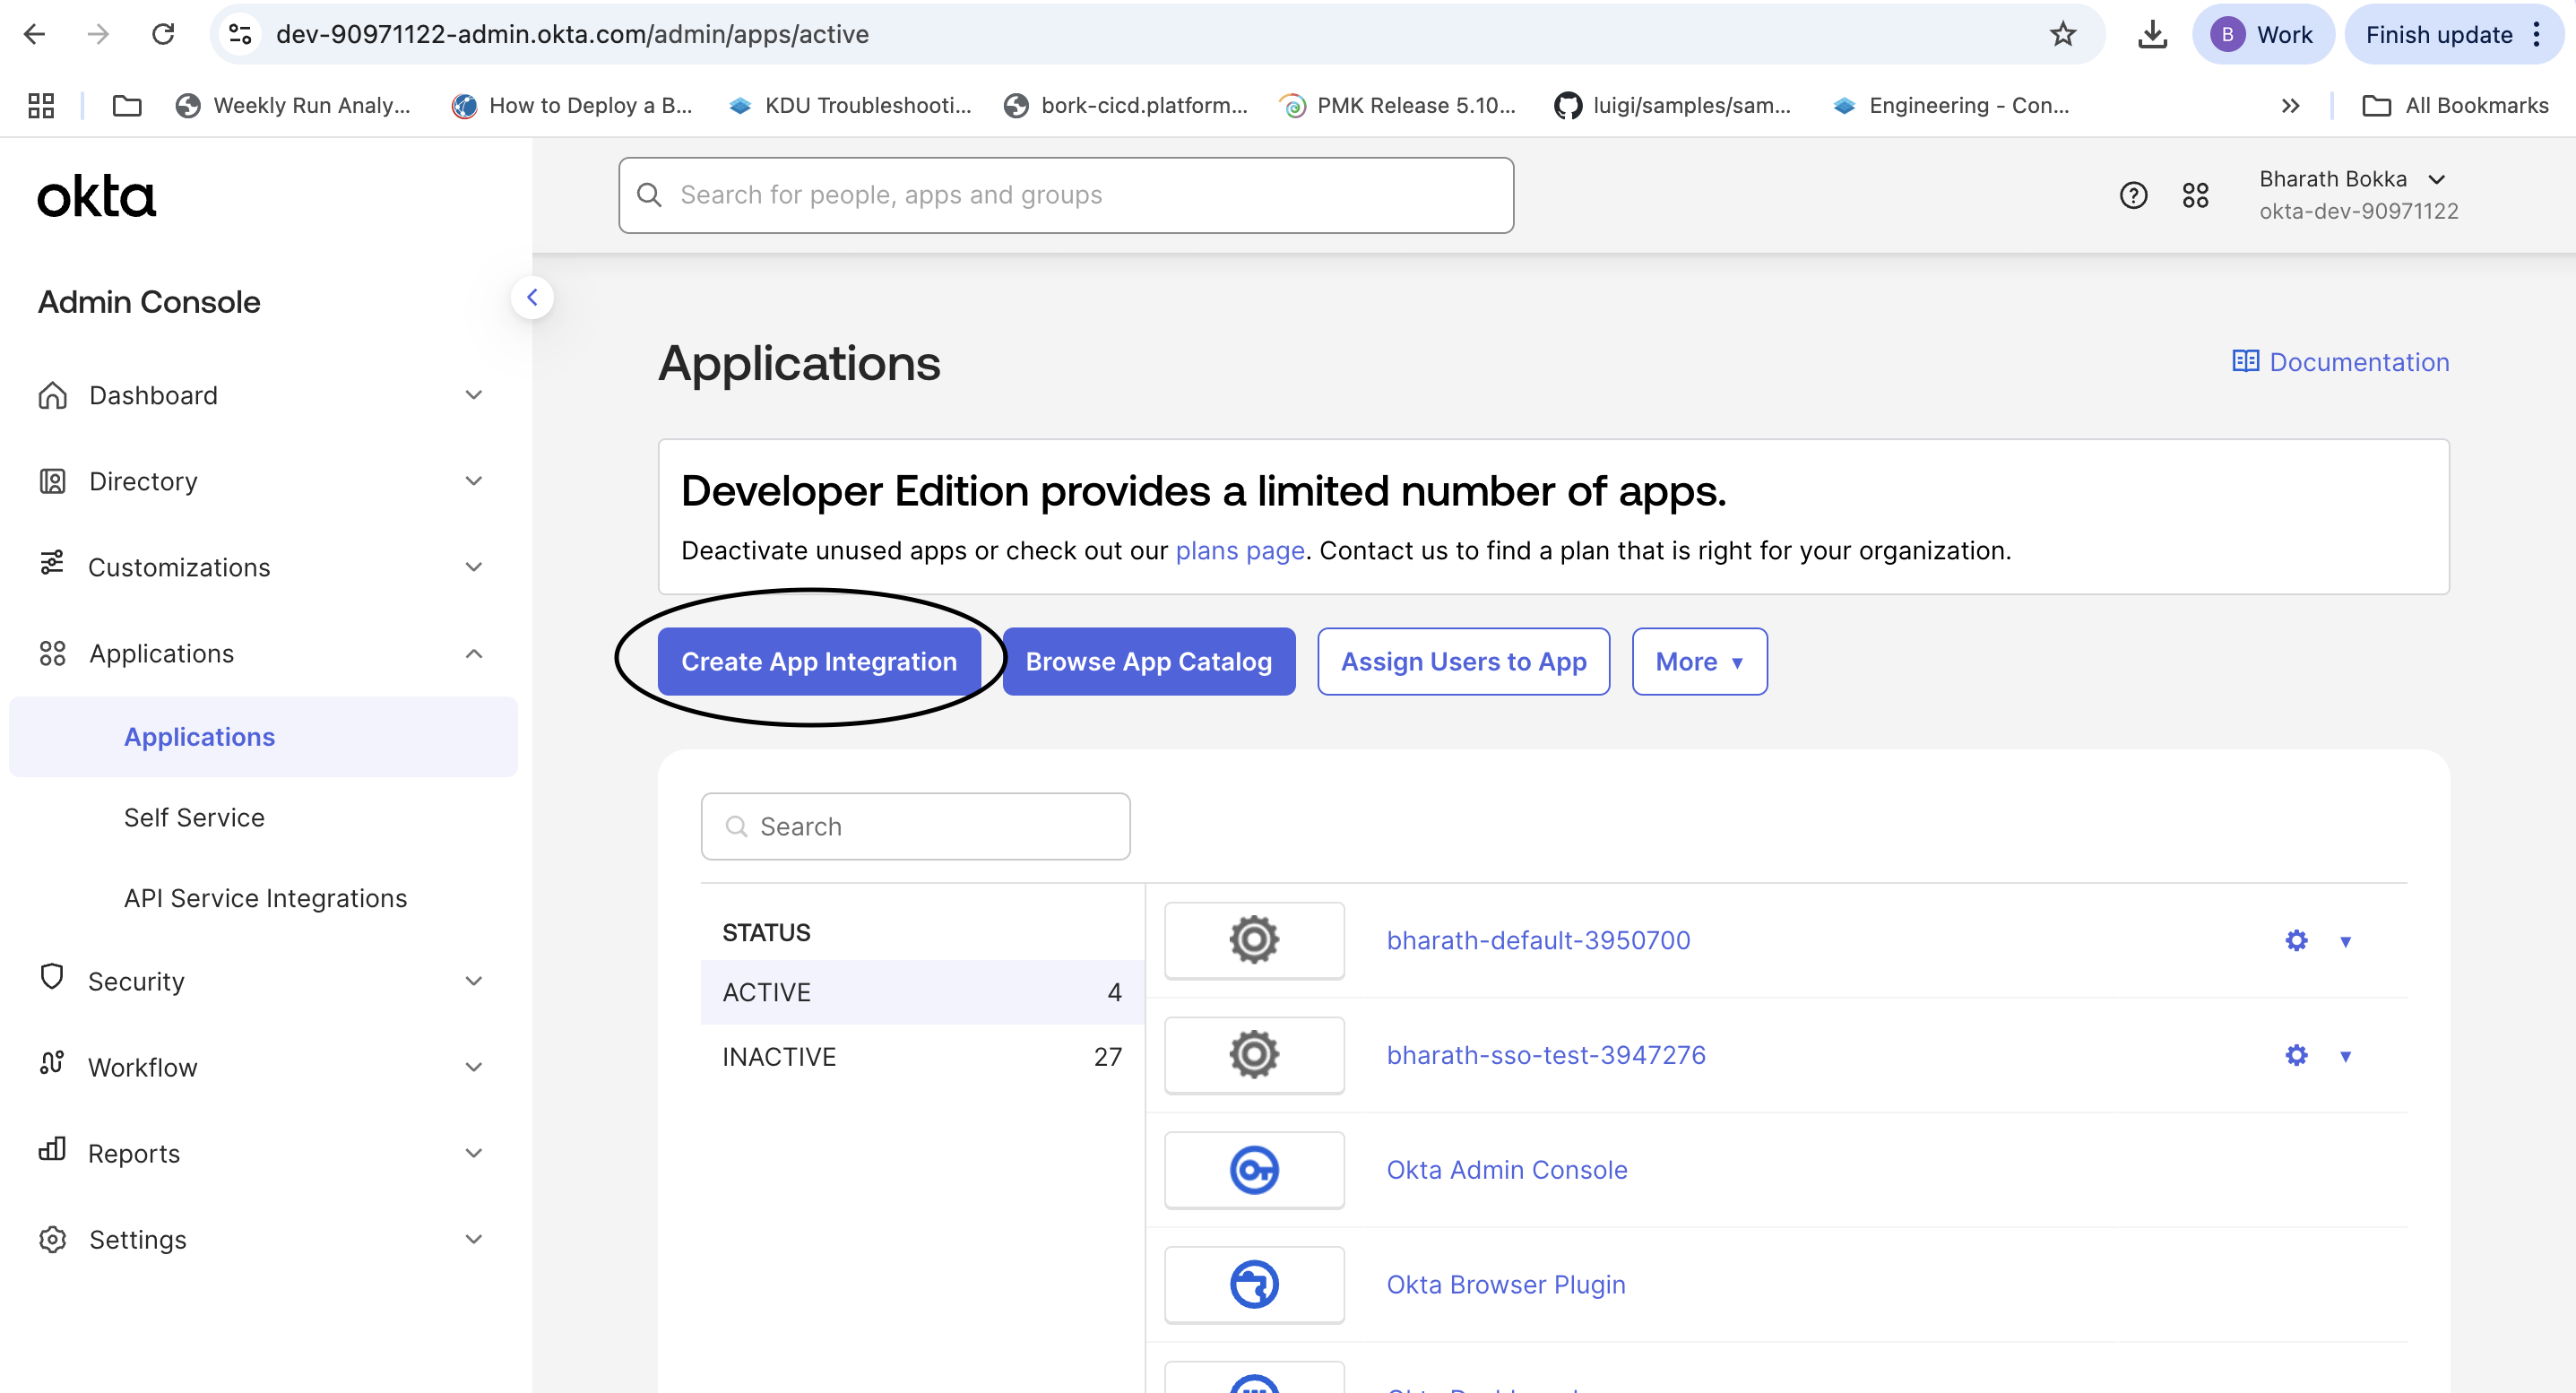
- Log in to your Okta server and navigate to Applications. Verify you have fewer than 5 active applications. If needed, deactivate unused applications.
- Select Create App Integration.
- Select SAML 2.0 as the sign-on method.
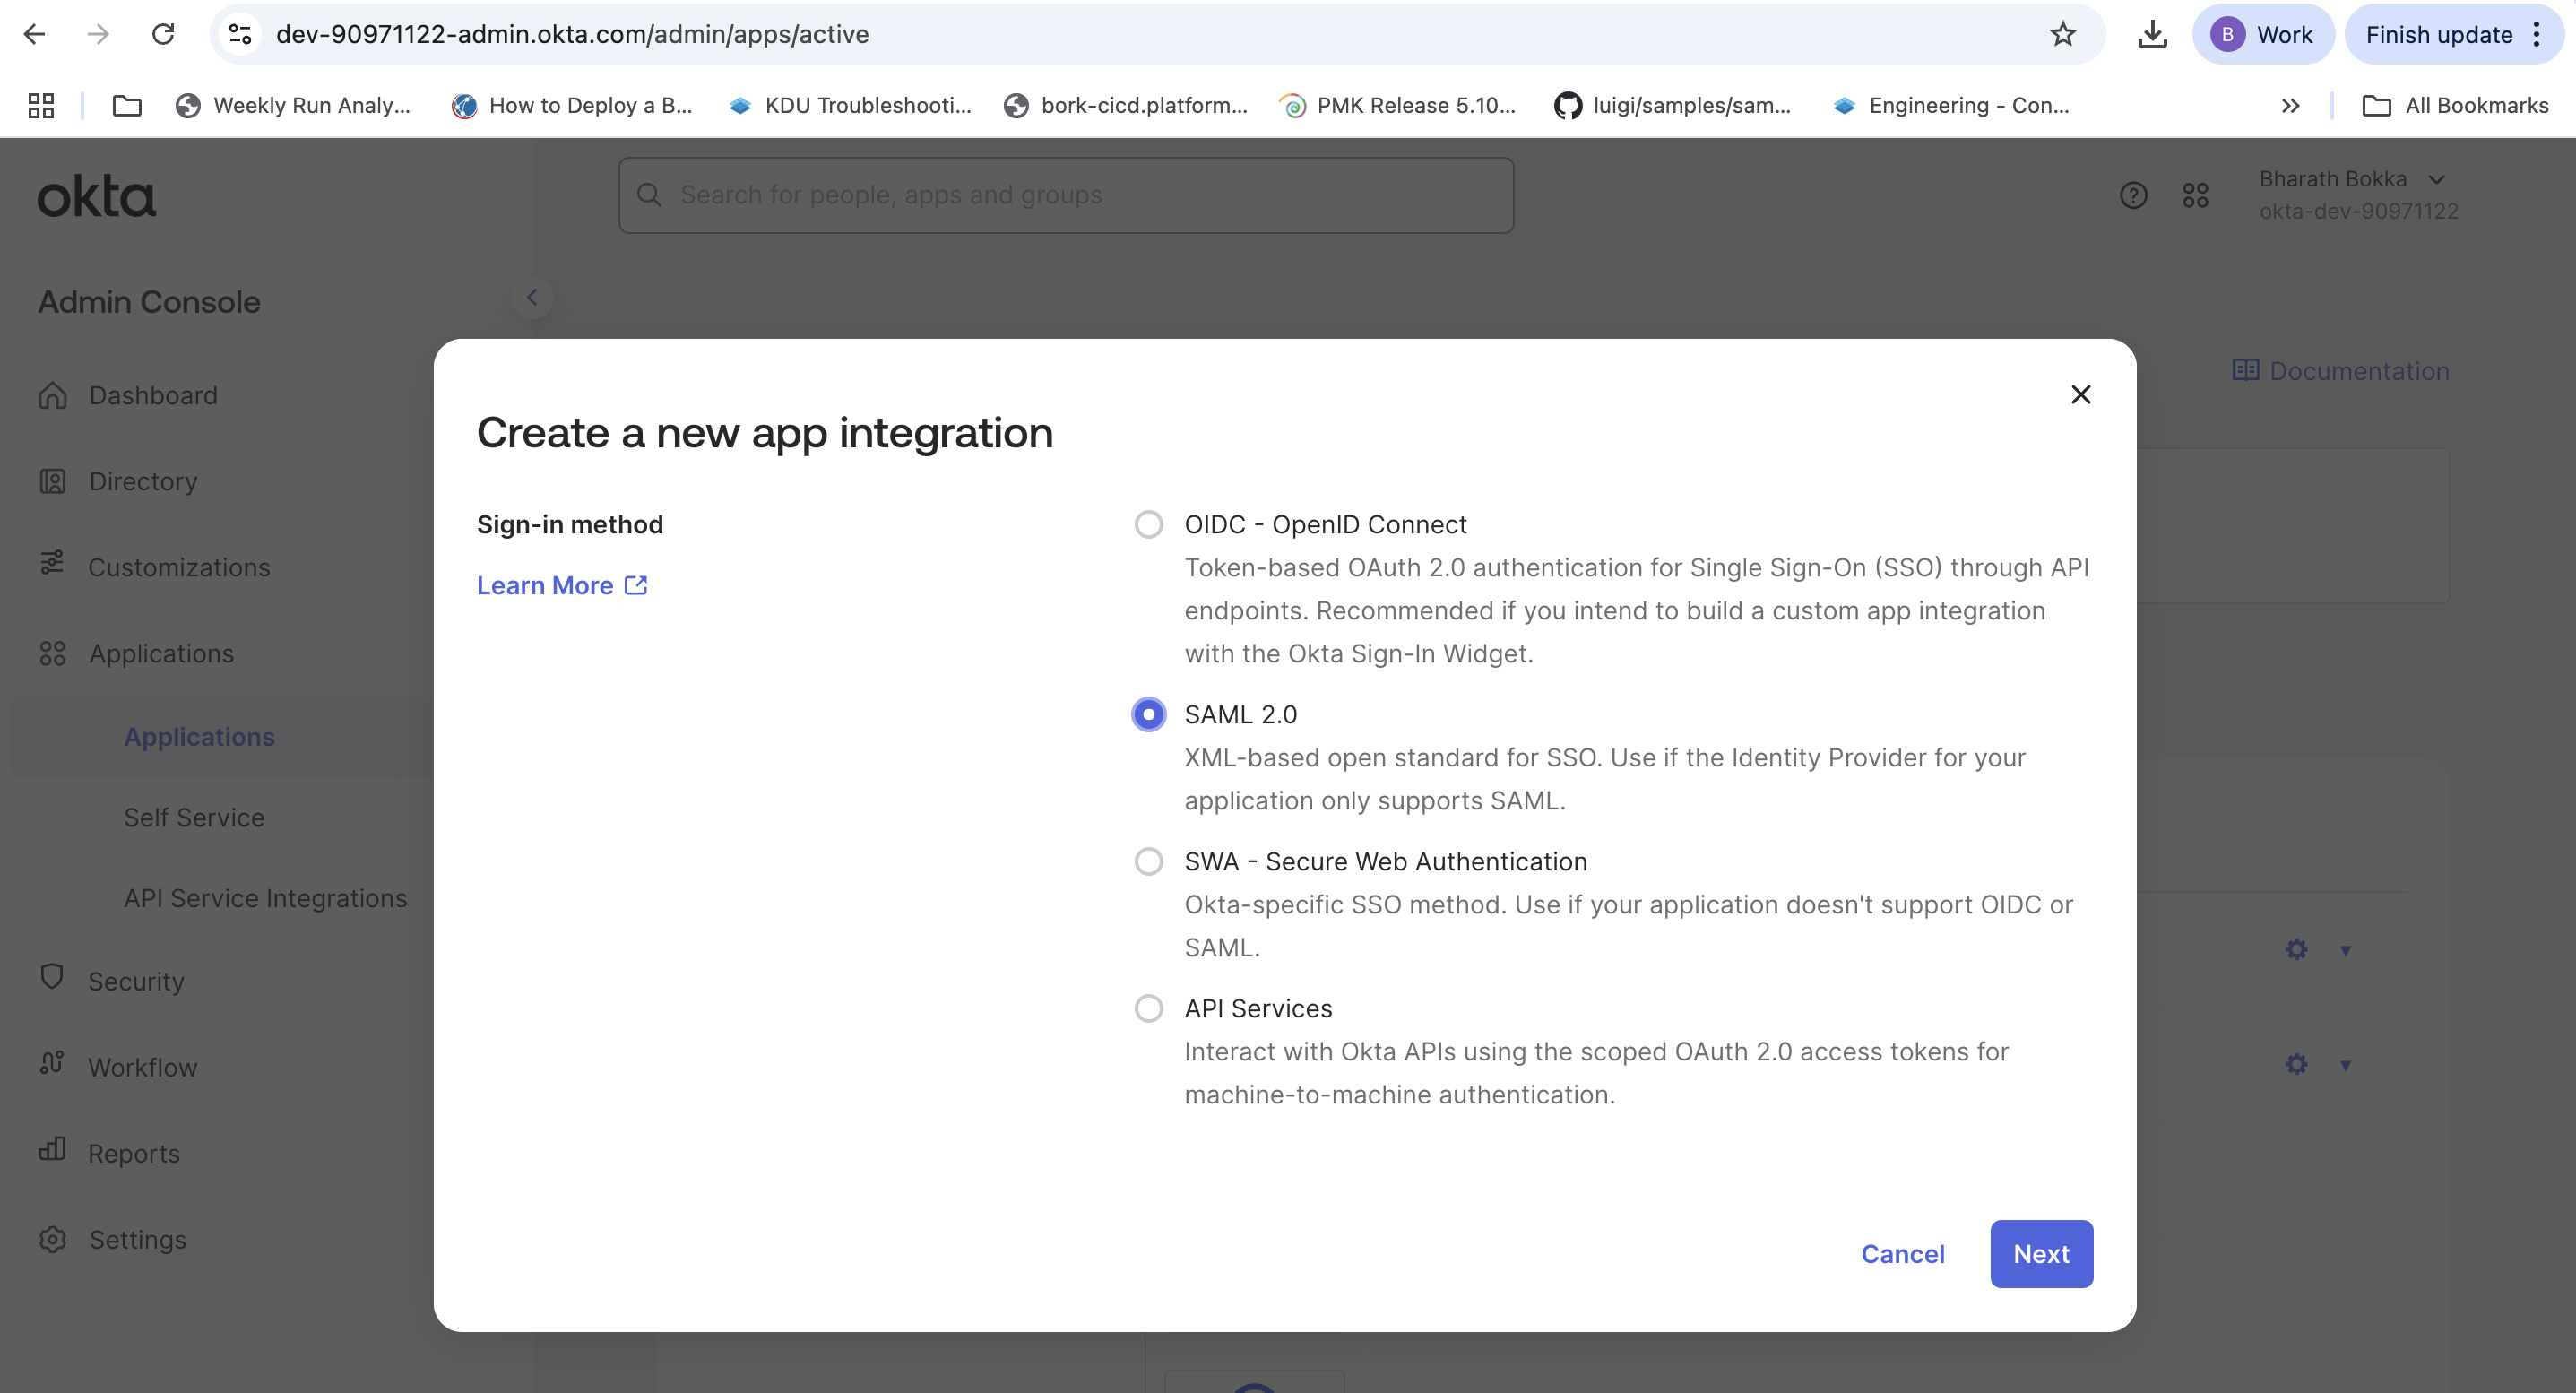
- Select Next to proceed to the general settings.
Step 2: Configure SAML settings
Configure the basic SAML integration settings for your PCD deployment.
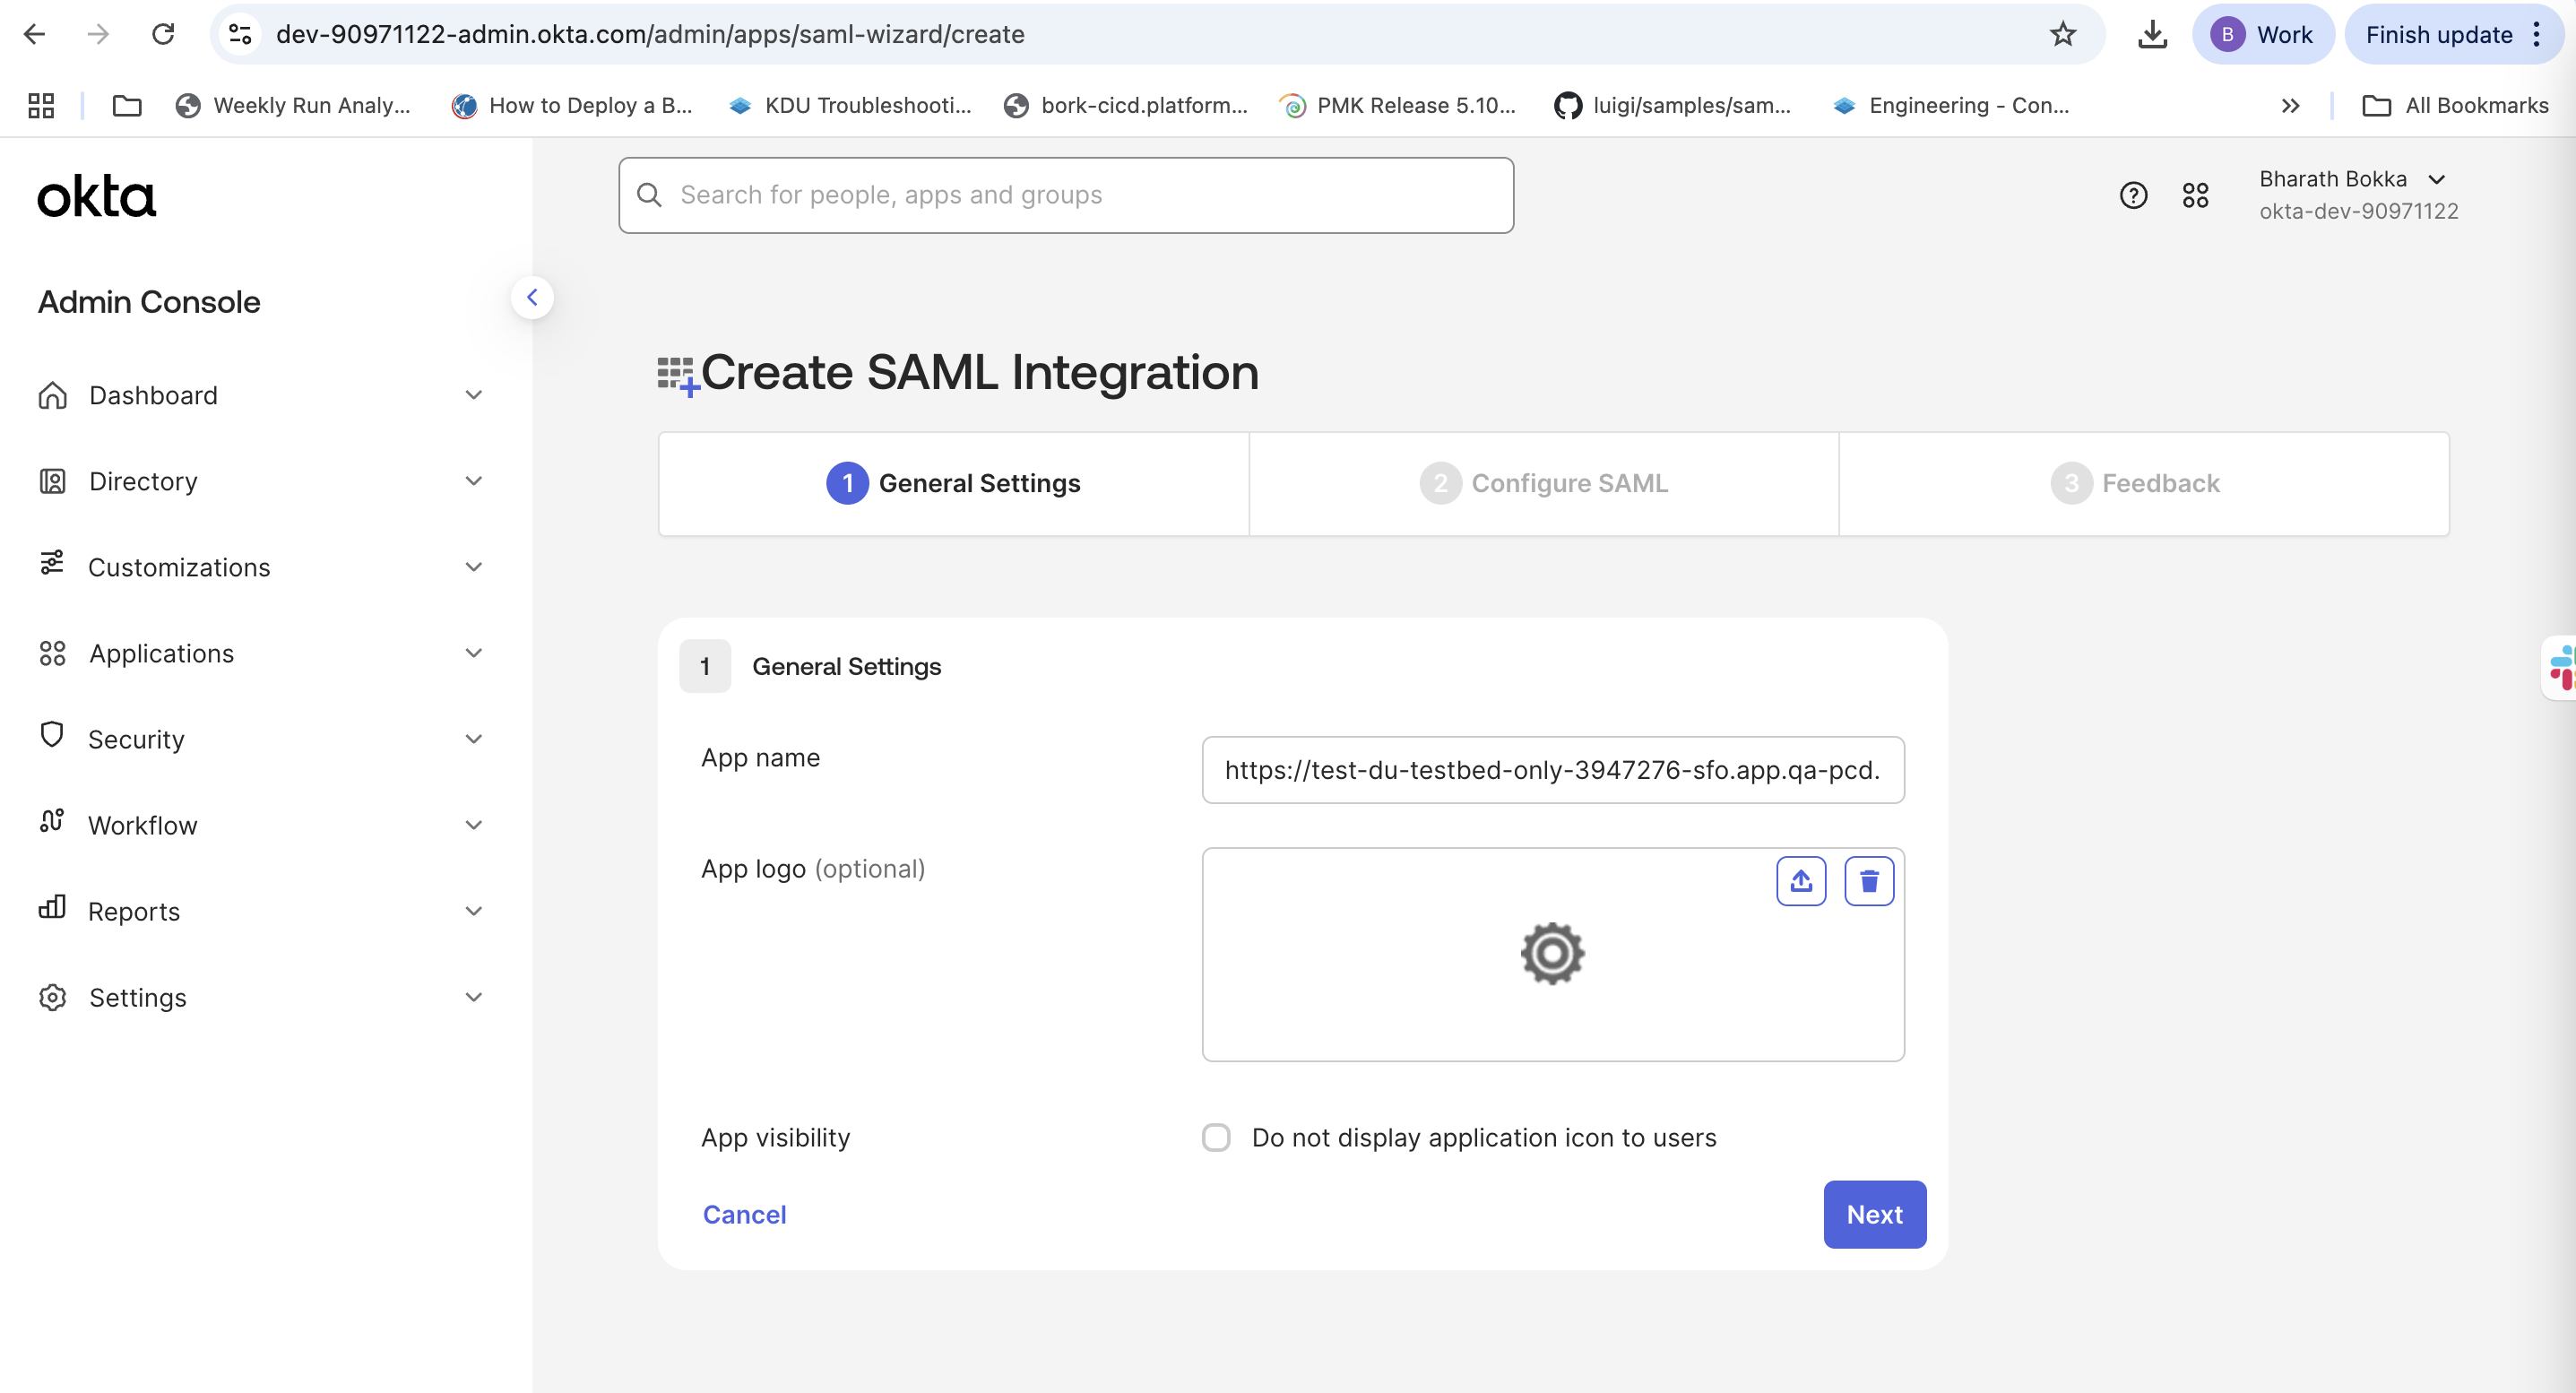
- On General Settings, enter a descriptive application name.
- Select Next to proceed to SAML configuration.
- In Configure SAML, enter the following required information:
Replace <FQDN>with your PCD environment without any regions. Use IDP1 for the default domain, or substitute your specific domain name for <DOMAIN_NAME> .
| Field | Description |
|---|---|
| Single sign-on URL | https://<FQDN>/sso/<DOMAIN_NAME>/Shibboleth.sso/SAML2/POST
Example: https://test-du-testbed-only-3950700.app.qa-pcd.platform9.com/sso/IDP1/Shibboleth.sso/SAML2/POST |
| Use this for Recipient URL and Destination URL | Select this checkbox |
| Audience URI (SP Entity ID) | https://<FQDN>/keystone
Example: https://test-du-testbed-only-3950700.app.qa-pcd.platform9.com/keystone |
| Default RelayState | Leave blank |
| Name ID format | EmailAddress |
| Application Username | Okta Username |
| Update application username on | Create and update |
Step 3: Set up attribute statements
Add attribute statements to pass user information from Okta to PCD .
- Optionally, you can choose to update the Attribute Statements by adding the following mappings.
| Name | Name Format | Value |
|---|---|---|
| FirstName | Unspecified | user.firstName |
| LastName | Unspecified | user.lastName |
| Unspecified | user.email |
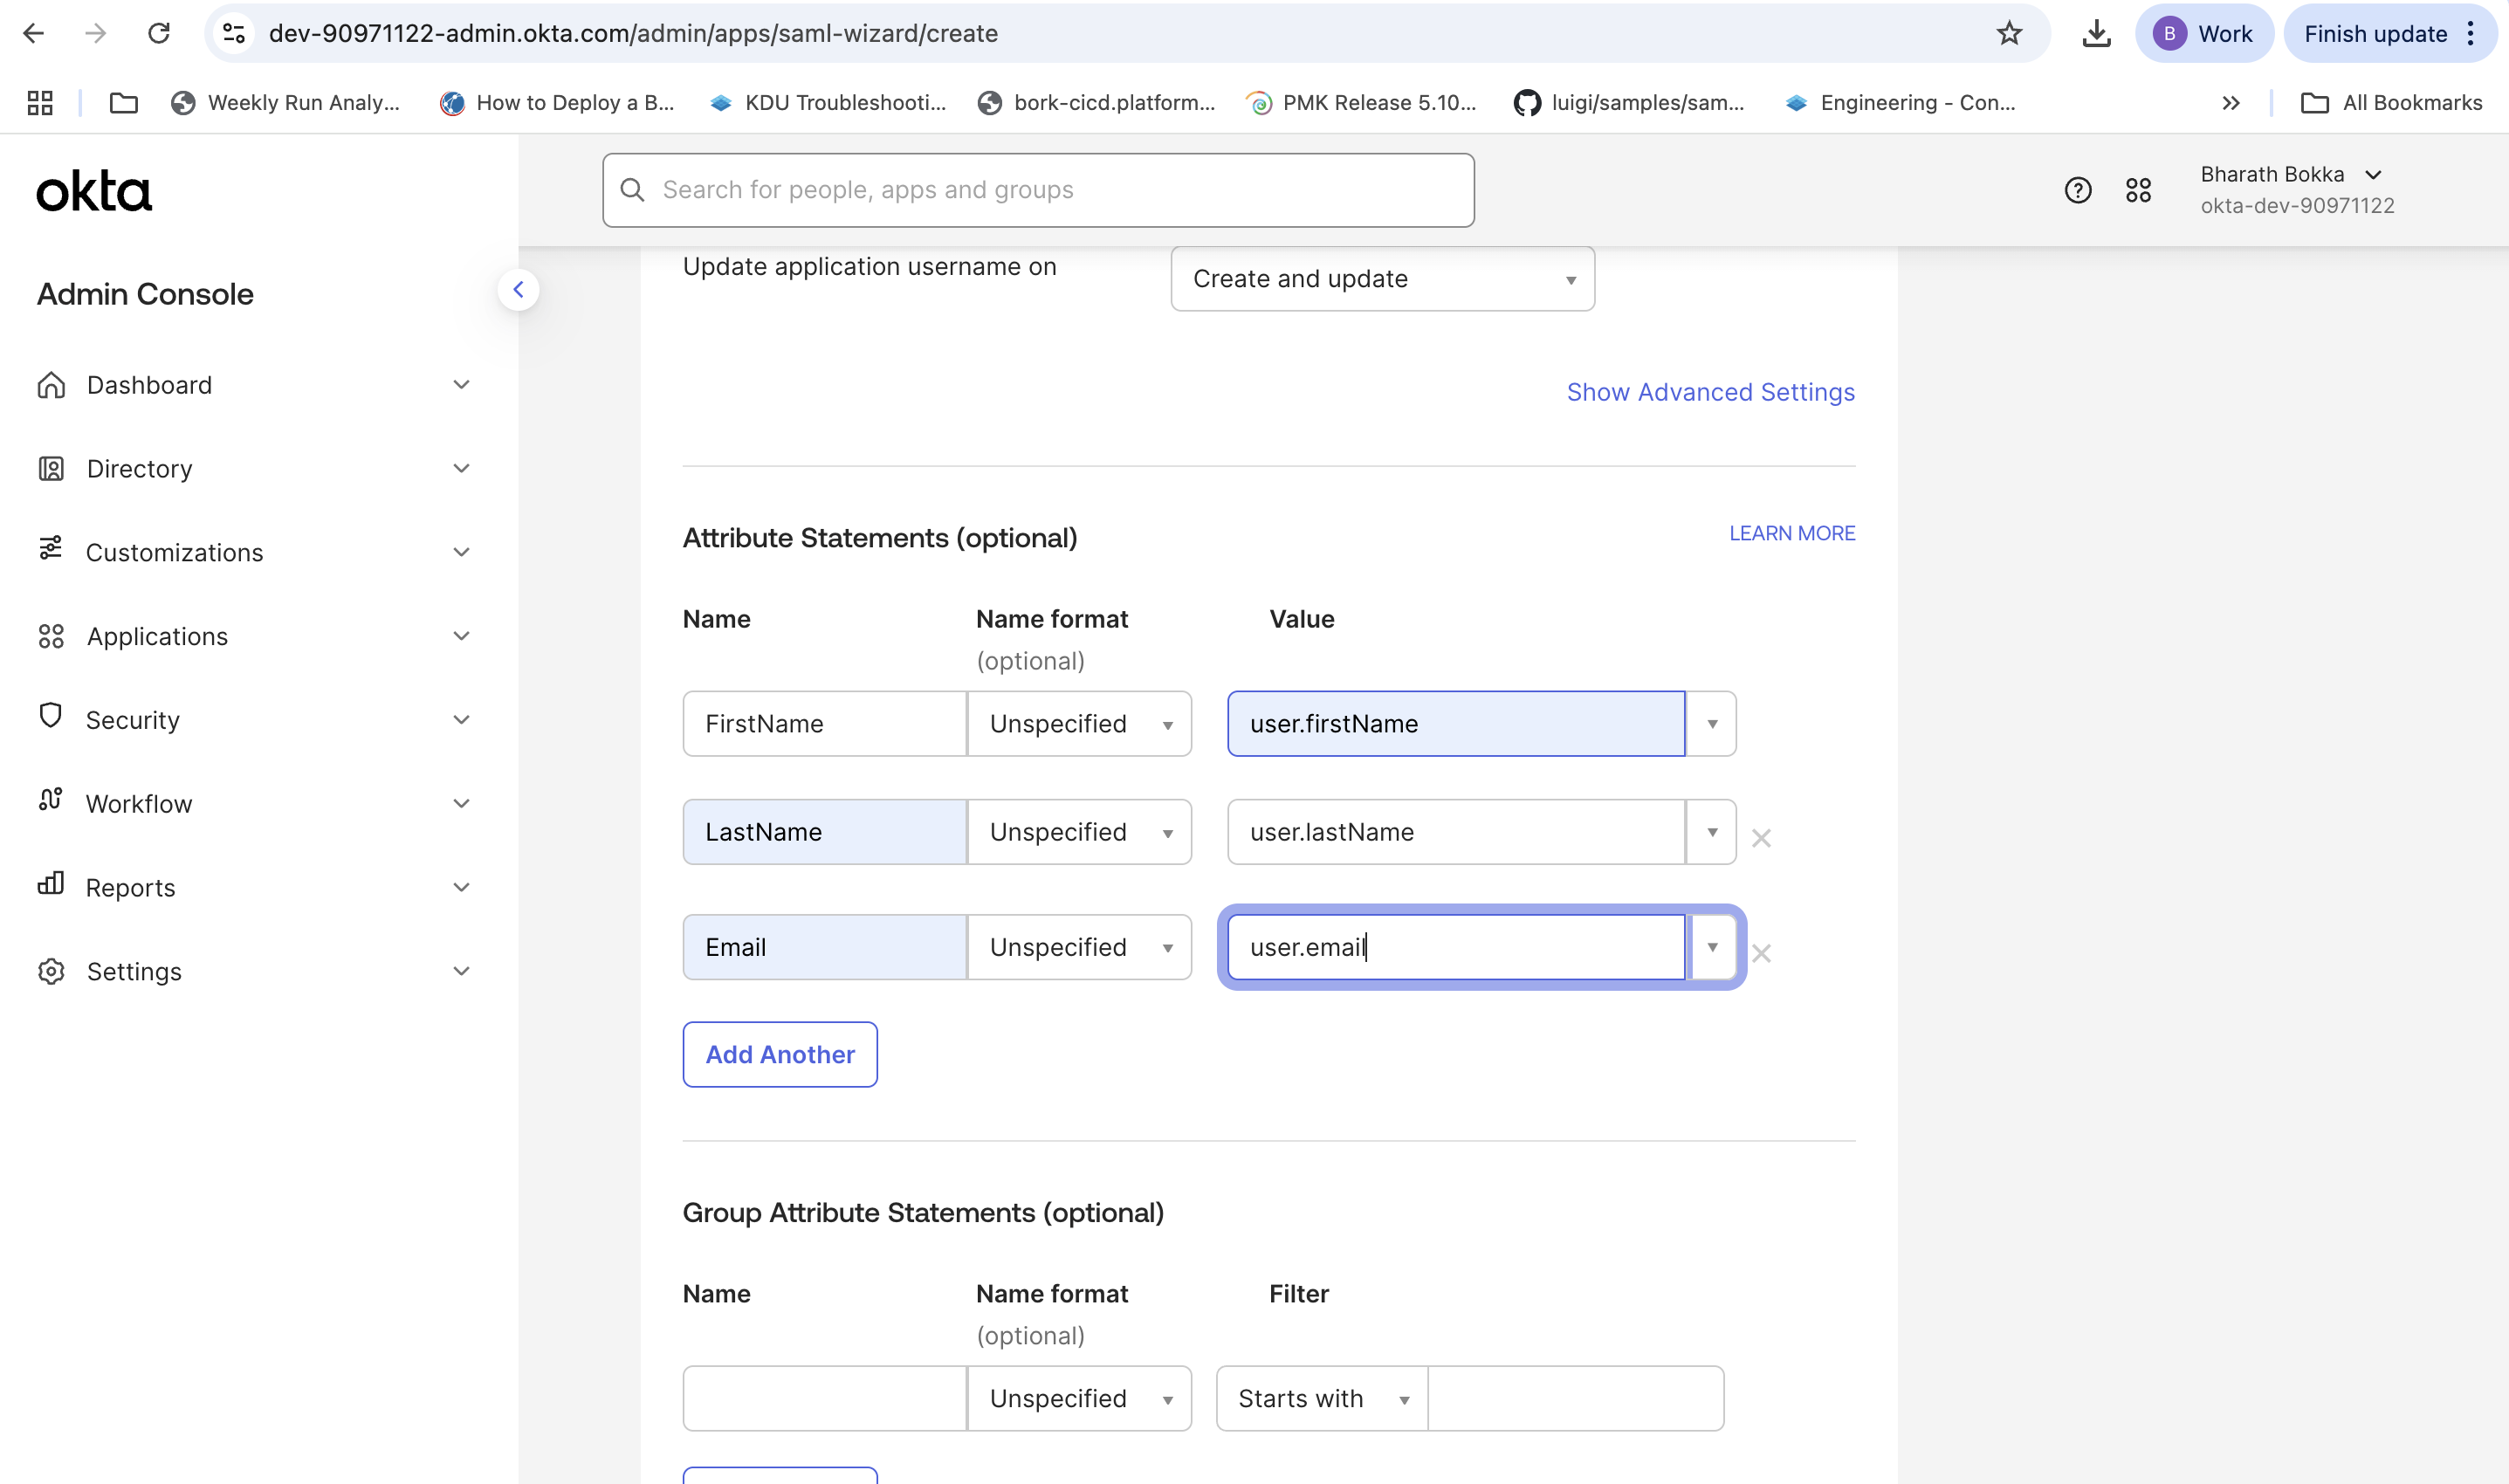
- Select Next to continue.
- In Feedback, select Finish to complete the application setup.
You will be redirected to the application Sign On Settings, which displays the Issuer and Metadata URL needed for PCD configuration.

Step 4: Assign users to the application
Grant users access to the SAML application in Okta.
- Navigate to the Assignments tab in your application.
- Select Assign, then select Assign to People.
- Select the users to give access to PCD through SSO.
- Choose Assign to complete the user assignment.
The Okta configuration is now complete.
Step 5: Configure SSO in PCD
Connect your PCD deployment to the Okta SAML application.
- Log in to your PCD deployment using the DU FQDN for your target region.
- Navigate to Settings > Enterprise SSO.
- Select Enable SSO.
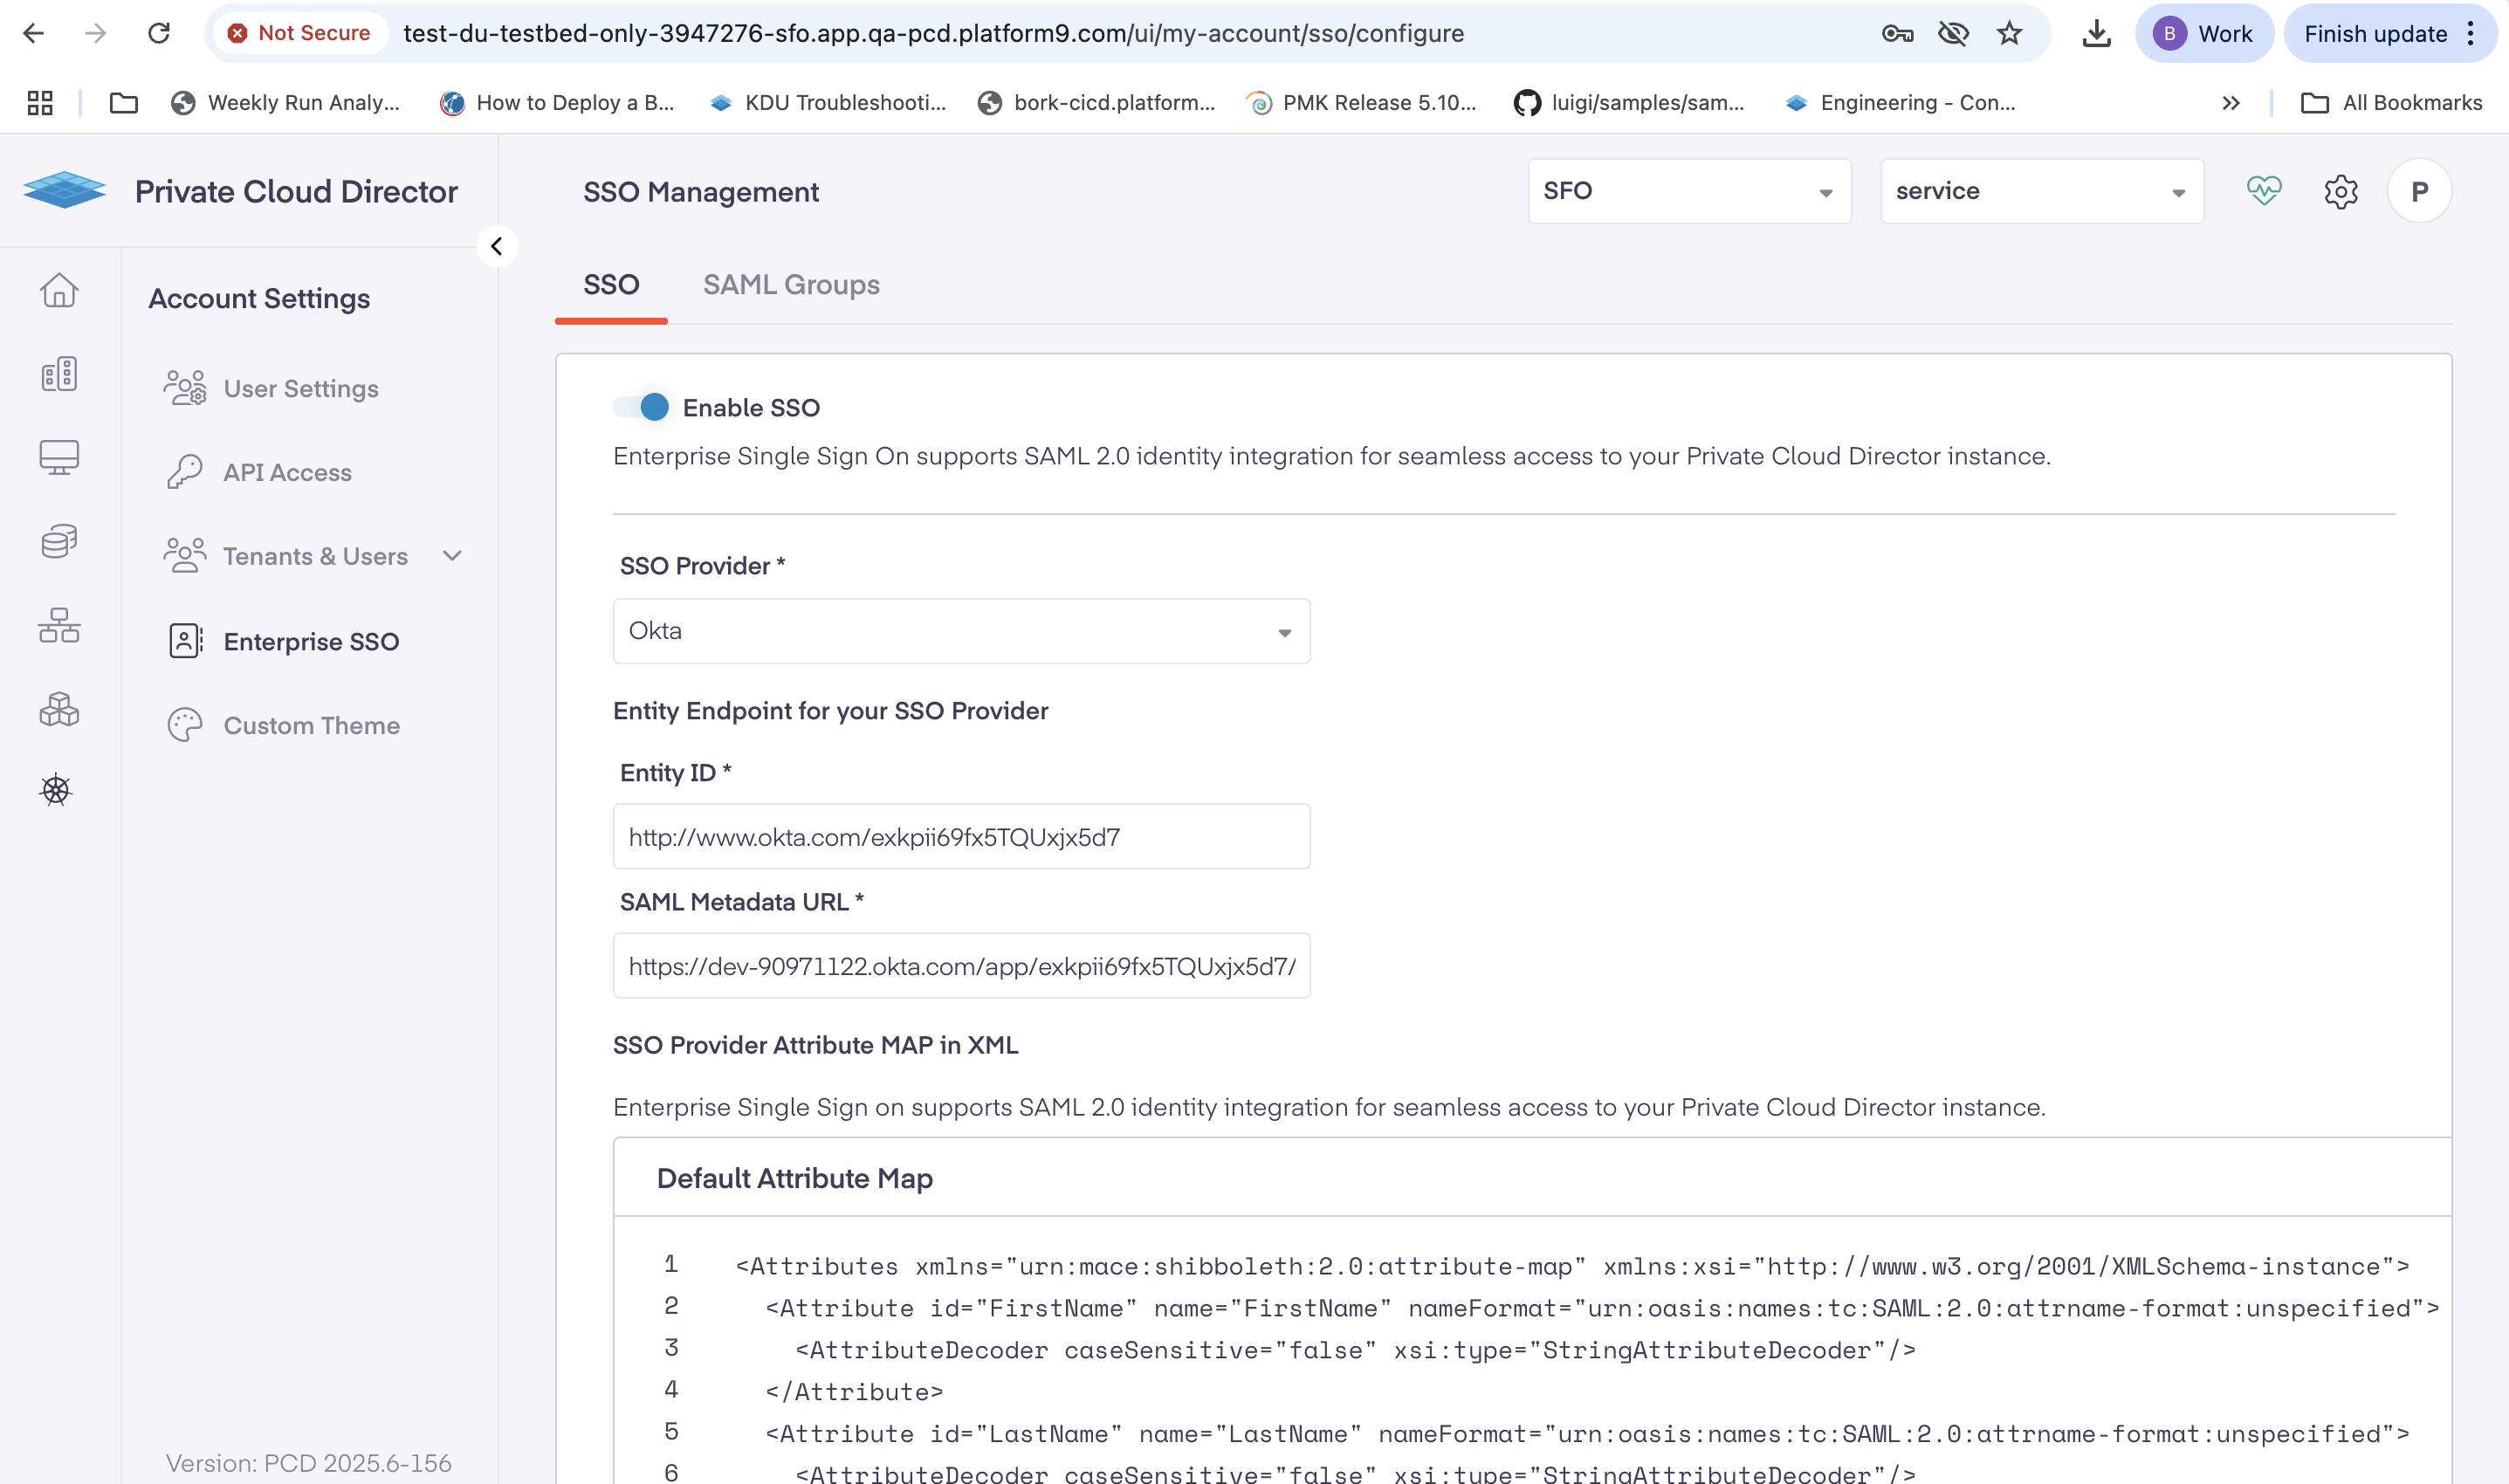
- Select Okta as your SSO Provider.
- Copy the Issuer from your Okta application Sign On and paste it in the Entity ID field.
- Copy the Metadata URL from your Okta application Sign On tab and paste it in the SAML Metadata URL field.
- Add the following XML configuration in the SSO Provider Attribute MAP field:
<Attributes xmlns="urn:mace:shibboleth:2.0:attribute-map" xmlns:xsi="http://www.w3.org/2001/XMLSchema-instance"> <Attribute id="FirstName" name="FirstName" nameFormat="urn:oasis:names:tc:SAML:2.0:attrname-format:unspecified"> <AttributeDecoder caseSensitive="false" xsi:type="StringAttributeDecoder"/> </Attribute> <Attribute id="LastName" name="LastName" nameFormat="urn:oasis:names:tc:SAML:2.0:attrname-format:unspecified"> <AttributeDecoder caseSensitive="false" xsi:type="StringAttributeDecoder"/> </Attribute> <Attribute id="Email" name="Email" nameFormat="urn:oasis:names:tc:SAML:2.0:attrname-format:unspecified"> <AttributeDecoder caseSensitive="false" xsi:type="StringAttributeDecoder"/> </Attribute> <Attribute id="UserName" name="UserName" nameFormat="urn:oasis:names:tc:SAML:2.0:attrname-format:unspecified"> <AttributeDecoder caseSensitive="false" xsi:type="StringAttributeDecoder"/> </Attribute> <Attribute id="department" name="department" nameFormat="urn:oasis:names:tc:SAML:2.0:attrname-format:unspecified"> <AttributeDecoder caseSensitive="false" xsi:type="StringAttributeDecoder"/> </Attribute> <Attribute id="division" name="division" nameFormat="urn:oasis:names:tc:SAML:2.0:attrname-format:unspecified"> <AttributeDecoder caseSensitive="false" xsi:type="StringAttributeDecoder"/> </Attribute> <Attribute id="locale" name="locale" nameFormat="urn:oasis:names:tc:SAML:2.0:attrname-format:unspecified"> <AttributeDecoder caseSensitive="false" xsi:type="StringAttributeDecoder"/> </Attribute> <Attribute id="organization" name="organization" nameFormat="urn:oasis:names:tc:SAML:2.0:attrname-format:unspecified"> <AttributeDecoder caseSensitive="false" xsi:type="StringAttributeDecoder"/> </Attribute> <Attribute id="preferredLanguage" name="preferredLanguage" nameFormat="urn:oasis:names:tc:SAML:2.0:attrname-format:unspecified"> <AttributeDecoder caseSensitive="false" xsi:type="StringAttributeDecoder"/> </Attribute> <Attribute id="userType" name="userType" nameFormat="urn:oasis:names:tc:SAML:2.0:attrname-format:unspecified"> <AttributeDecoder caseSensitive="false" xsi:type="StringAttributeDecoder"/> </Attribute> <Attribute id="custom1" name="custom1" nameFormat="urn:oasis:names:tc:SAML:2.0:attrname-format:unspecified"> <AttributeDecoder caseSensitive="false" xsi:type="StringAttributeDecoder"/> </Attribute> <Attribute id="custom2" name="custom2" nameFormat="urn:oasis:names:tc:SAML:2.0:attrname-format:unspecified"> <AttributeDecoder caseSensitive="false" xsi:type="StringAttributeDecoder"/> </Attribute> <Attribute id="custom3" name="custom3" nameFormat="urn:oasis:names:tc:SAML:2.0:attrname-format:unspecified"> <AttributeDecoder caseSensitive="false" xsi:type="StringAttributeDecoder"/> </Attribute> <Attribute id="custom4" name="custom4" nameFormat="urn:oasis:names:tc:SAML:2.0:attrname-format:unspecified"> <AttributeDecoder caseSensitive="false" xsi:type="StringAttributeDecoder"/> </Attribute> <Attribute id="custom5" name="custom5" nameFormat="urn:oasis:names:tc:SAML:2.0:attrname-format:unspecified"> <AttributeDecoder caseSensitive="false" xsi:type="StringAttributeDecoder"/> </Attribute></Attributes>- Select Save to create the configuration.
You will see a confirmation message as SSO configuration saved.
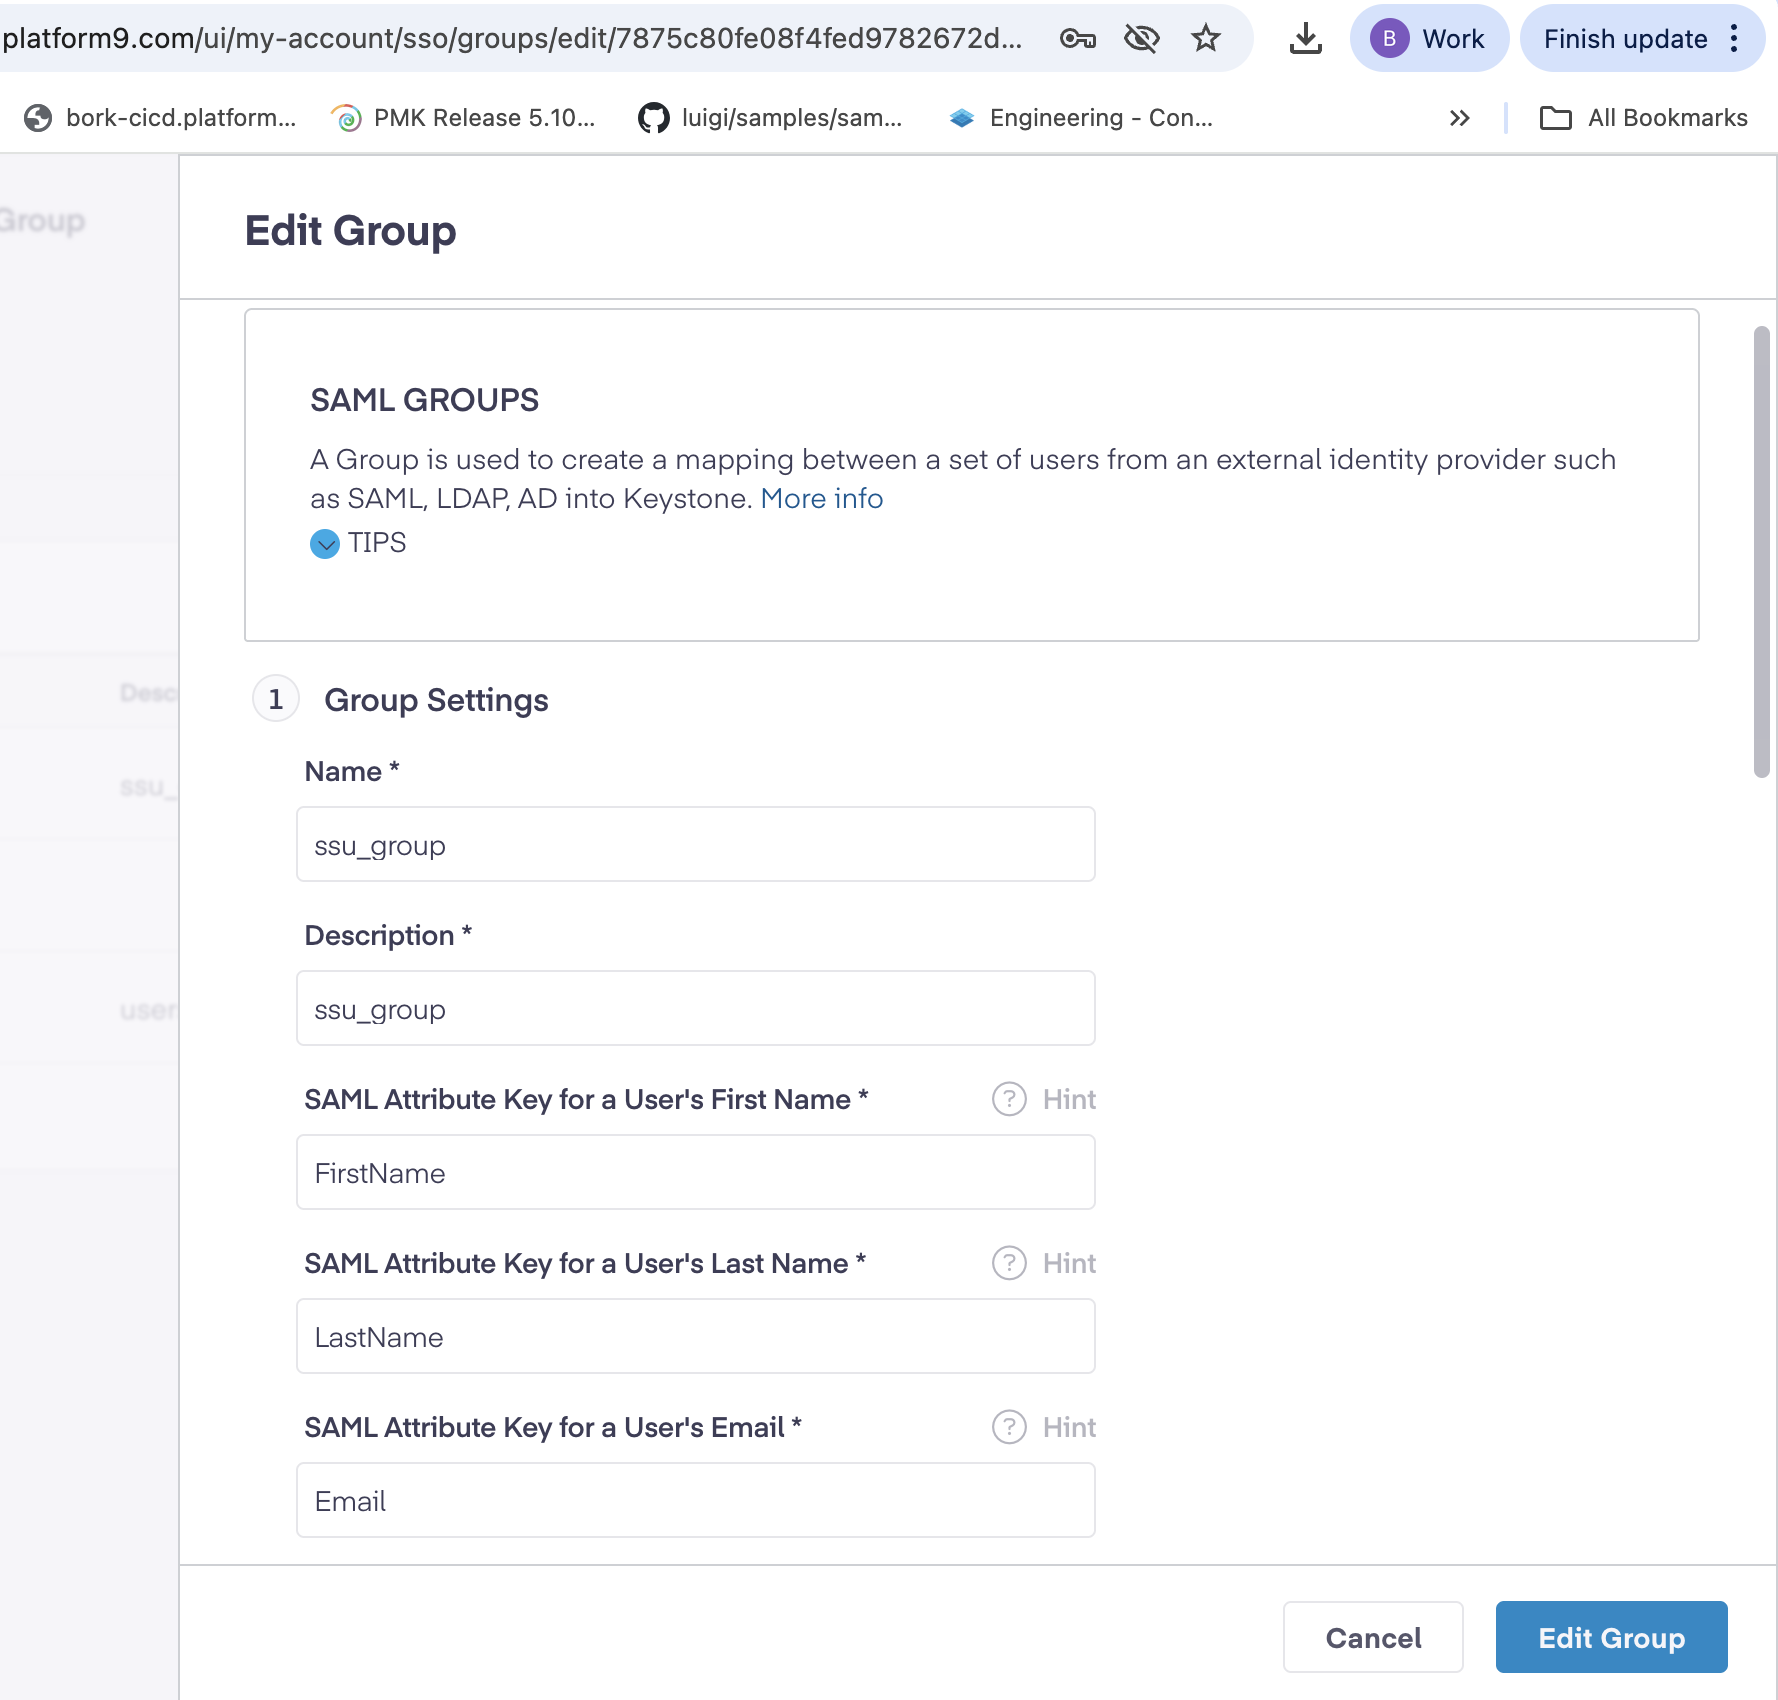
Step 6: Create SAML groups and mappings
Set up SAML groups to manage user permissions and role assignments in PCD.
- Create a new SAML group with the following settings:
| Field | Value |
|---|---|
| Name | Enter a descriptive group name |
| Description | Provide a clear description |
| SAML Attribute Key for User's First Name | FirstName |
| SAML Attribute Key for User's Last Name | LastName |
| SAML Attribute Key for User's Email |
- Add a group mapping with these configurations.
| Field | Value |
|---|---|
| SAML Group Attribute | Email |
| Criteria | Any one of |
| SAML Group Values | Enter email addresses that match user assignments in your Okta application
(for example: name@platform9.com, nonadmin@platform9.com) |
- Assign roles and tenants from Tenants & Roles, by configuring the following.
| Role | Description |
|---|---|
| Admin | Full administrative access |
| SSU (Self-Service User) | Limited self-service access |
| ReadOnly | View-only access |
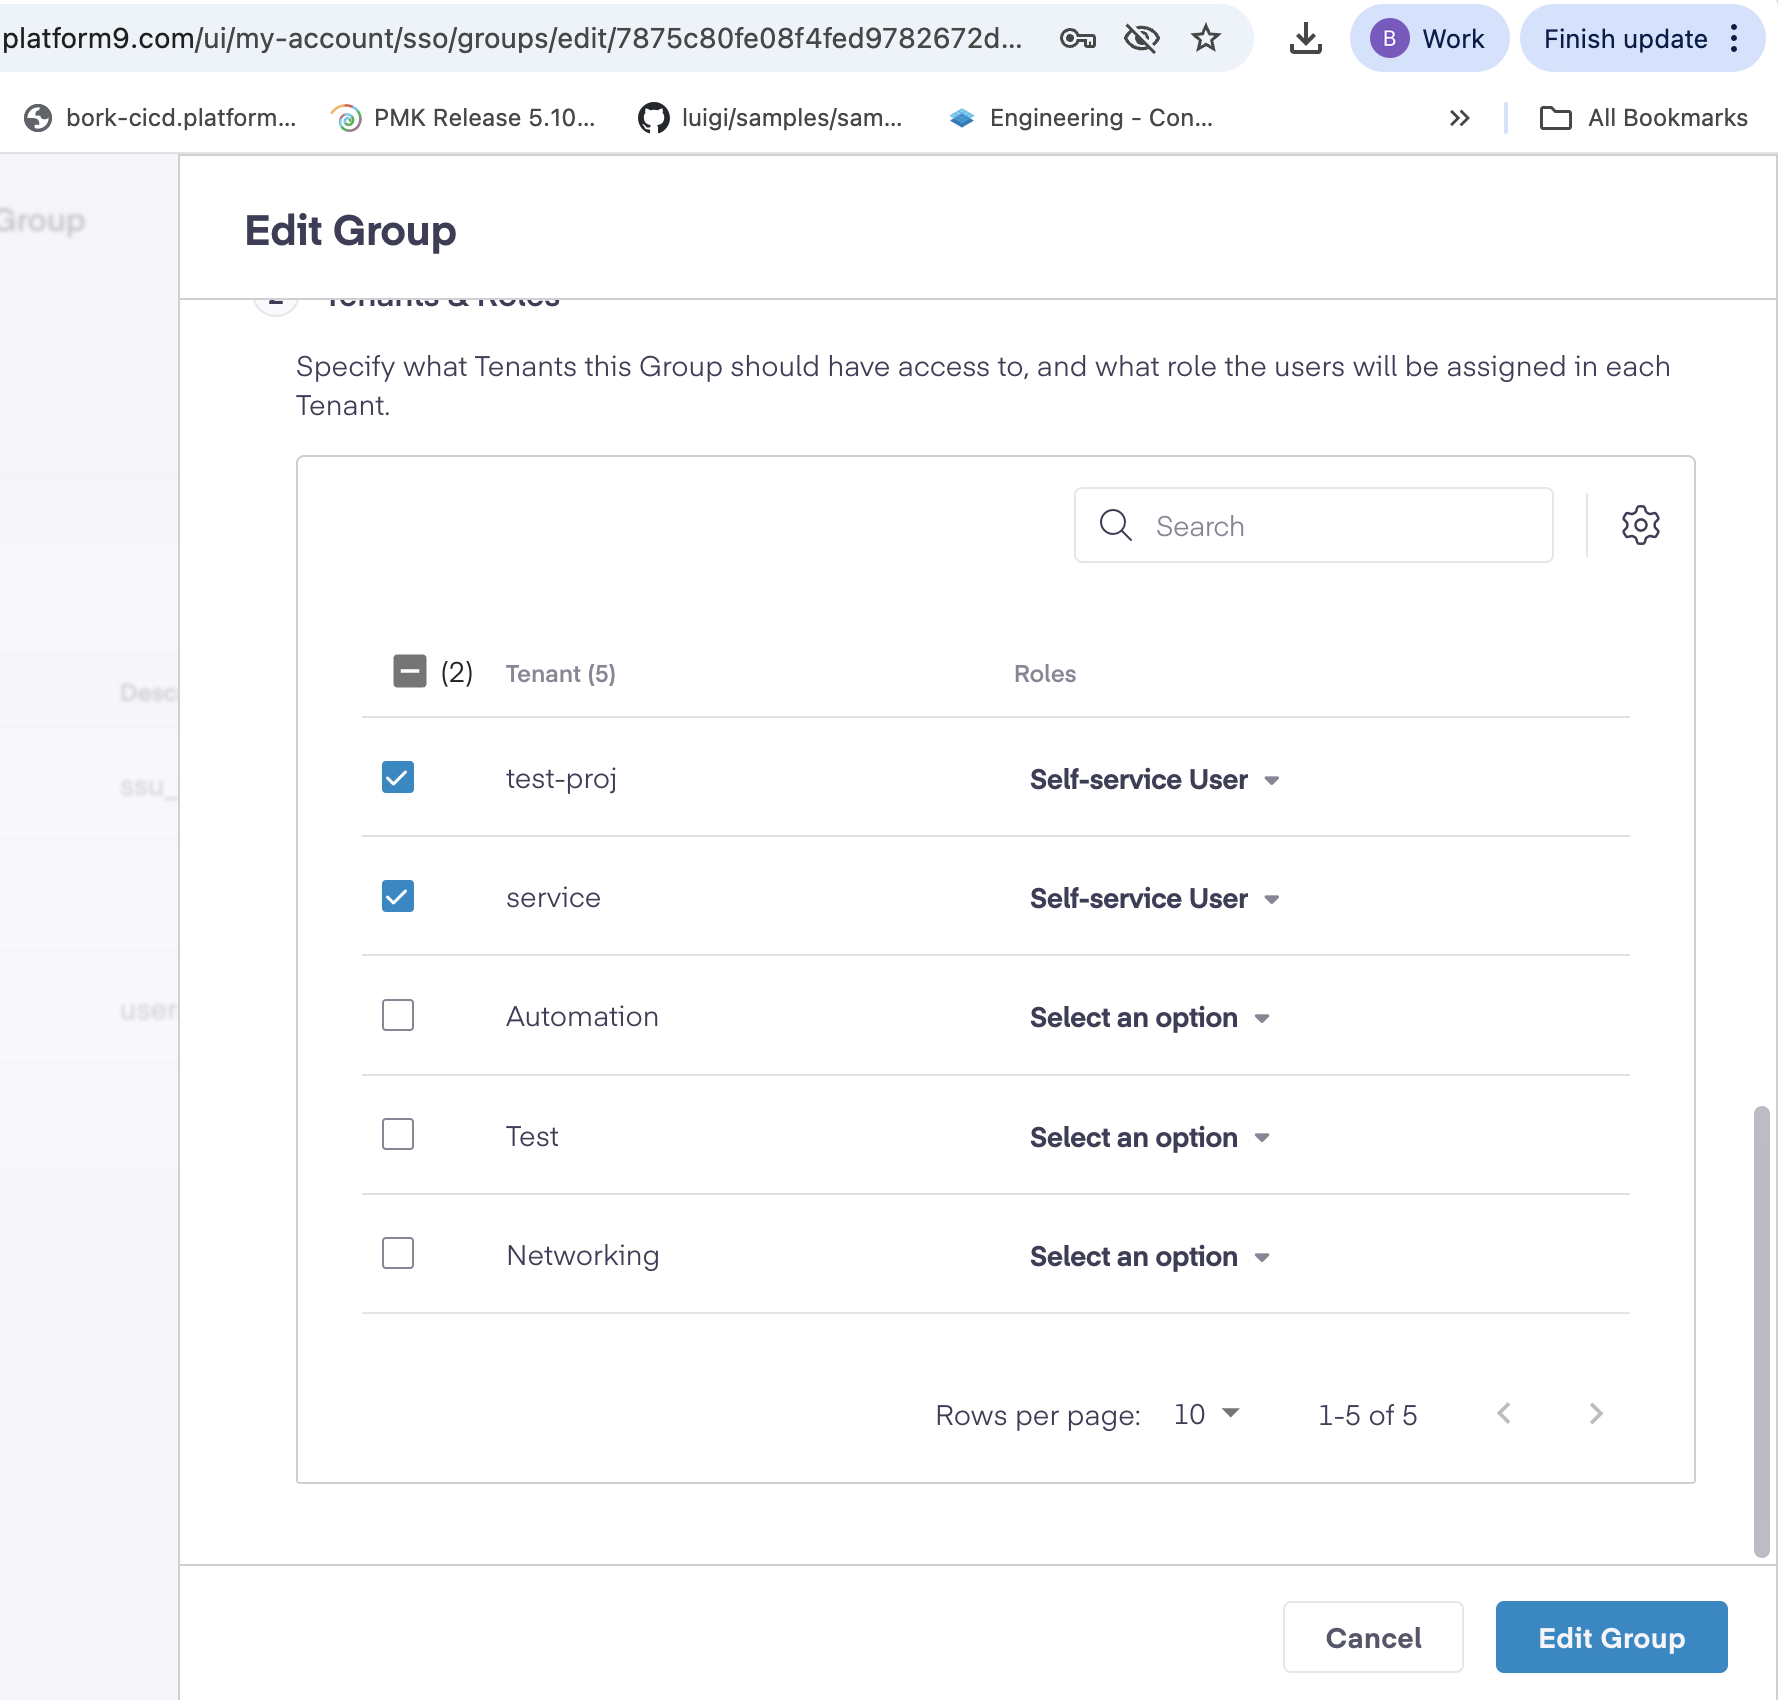
- Select Add group to complete the SAML group setup.
Step 7: Verify the SSO integration
Verify if your Okta SSO integration works correctly.
- Log out of your current PCD session.
- Navigate to your PCD environment URL to initiate a new login.
- The system redirects you to Okta for authentication.
- Enter your Okta credentials and complete any required multi-factor authentication (MFA).
Upon successful authentication, Okta redirects you back to PCD with the appropriate user permissions.
You have now successfully configured Okta SSO for PCD. Users can now access PCD using their Okta credentials with seamless single sign-on authentication.