Configuring Neutron Networking Options for Linux-KVM
This tutorial describes how to configure OpenStack Neutron networking options for Platform9 Managed OpenStack for Linux-KVM.
Please also refer to:
- General Neutron Concepts Tutorial for some background knowledge.
- Pre-requisites and Hardware Requirements
Network Configuration
Neutron can be configured in two modes – Distributed Virtual Routing (L3-DVR) or the legacy mode. The mode that you choose to use depends on your specific use case. Each has its own pros and cons.
Step 1: Setup Network Options Using the Network Config Page
The first step in Neutron configuration in Platform9 is configuration of networking options you would like Neutron to use and expose.
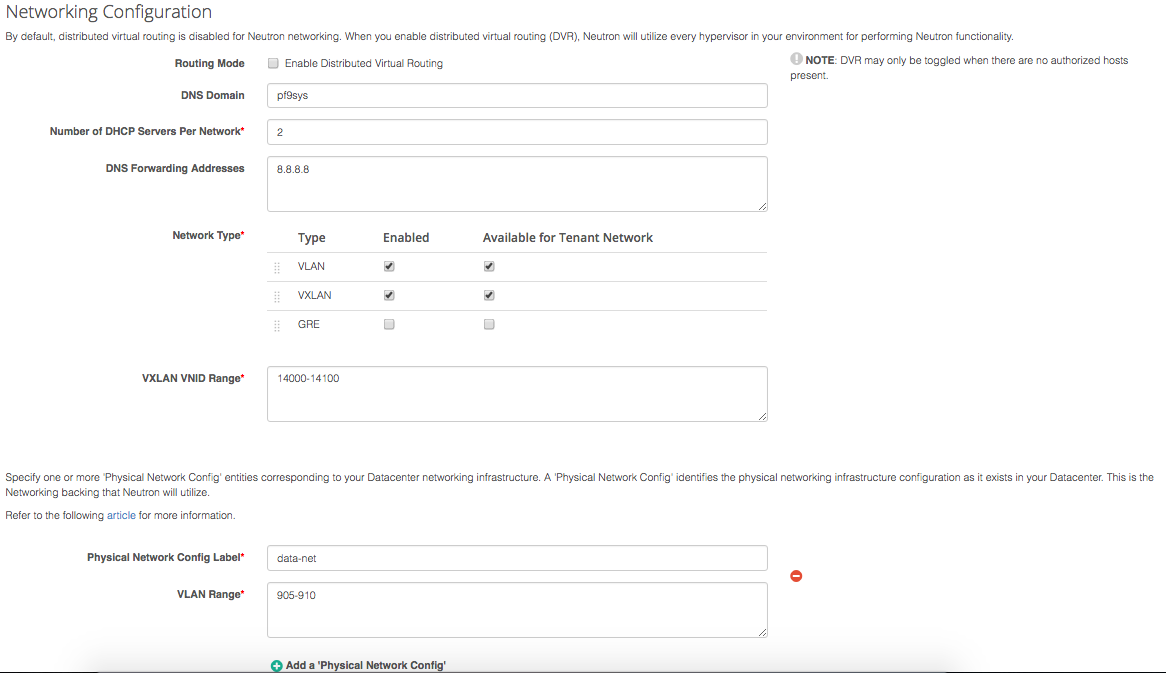
Routing Mode: Checking this will enable DVR mode. In DVR, each hypervisor is L3-capable. Both east-west traffic and north-south traffic using floating IPs are handled directly at the hypervisor. In the legacy mode, both east-west and north-south traffic using floating IPs are handled through one or more dedicated Network Nodes.
If you plan to use DVR, check this box and skip Step 2.
DNS Domain: This configuration option enables DNS resolution across virtual machines (instances) within a given tenant network. The DNS name for a given instance will be formed as <instance name>.<dns domain>. This option must be populated to enable VM DNS.
Number of DHCP Servers per Network: Specifies the number of DHCP servers you want to run in active-active mode per Neutron tenant network. This is useful for redundancy.
Note: If the number of authorized hosts that are made “DHCP capable” are lower than the number of DHCP servers per network specified, the number of DHCP servers per network will be equal to the number of available hosts that are DHCP capable.
DNS Forwarding Addresses: These are a list of DNS forwarding resolvers that will be used when a DNS query cannot be resolved within Neutron (For example, VM within a tenant tries resolving a hostname outside the tenant network; say www.google.com).
Network Type: Choose the type of networks you would like Neutron to support as well as the type of networks you would like Neutron to provide to self-service users for creating tenant networks (isolated networks). Drag and arrange to specify the order in which the networks are chosen upon tenant network creation.
Neutron leverages physical infrastructure configuration for VLAN-based tenant networks as well as using IP connectivity for overlay networks such as VXLAN and GRE. Select the type of configuration you would like to choose.
Depending on the type of network you choose, you will need to specify additional information. Tunneling-based networks – VXLAN and GRE – require a VNID (Identifier) range to be specified while VLAN-based networks require you specify VLAN ranges on specific physical network config. See below.
(VLAN-Specific Configuration) Create One or More Physical Network Configs
A ‘physical network config’ identifies the physical networking infrastructure configuration as it exists in your data center. This is the networking backing that Neutron will utilize. A ‘physical network config’ consists of:
- A unique label (eg phys-net1), that allows Neutron to identify the network from here on.
- A description of your networking topology, by specifying for each hypervisor, what network interface maps to this physical network config.
Your can define one or more ‘physical network configs’ in OpenStack, allowing you to make Neutron aware of multiple networks. These are created as part of assigning Neutron network node role to a physical server.
As shown in the screenshot above, for each physical network config, you need to define a unique label for the specific physical network, and specify a range of VLAN IDs corresponding to this physical network. You would want to specify a range of VLAN IDs when you are using VLAN-based networking, and you’d like Neutron to use a specific subrange of VLAN IDs corresponding to this physical network.
Step 2: (Non DVR Mode) Assigning Networking Role to A Physical Server / Network Node
Once you have configured the network config and added a server to your Platform9 controller, the next step is configuring a server node with ‘networking’ role to one of your physical servers, similar to configuration of Glance image catalog, Cinder block storage, etc. Assigning ‘networking’ role to a server results in Platform9 deploying the necessary OpenStack Neutron services on that node.
Note: We recommend designating a server to act as dedicated ‘network node’ that is not otherwise used to run virtual machines, even though Platform9 will not prevent assigning both hypervisor role and networking role to the same server. This node is utilized for deploying OpenStack default routing components, DHCP server(s) for tenant networks, etc. We recommend creating a dedicated network node if:
- You plan to run more than 50 virtual machines in your Platform9 setup, and/or
- You plan to deploy more than 10 networks
- You plan to use OpenStack default implementation of Neutron, i.e., not leverage a third-party vendor for Neutron implementation
The servers that are assigned the networking role are responsible for L3 routing – east-west, north-south – DHCP, and DNS services. It is recommended to have more than one network node for redundancy purposes.
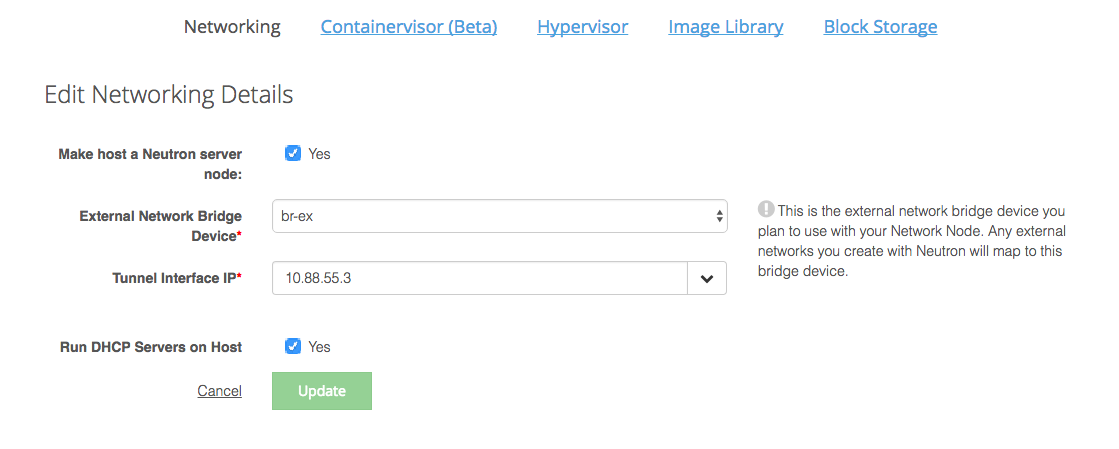
Run DHCP Servers on Host: Check this box if you would like to make this server DHCP capable. It is recommended to make all network nodes DHCP capable.
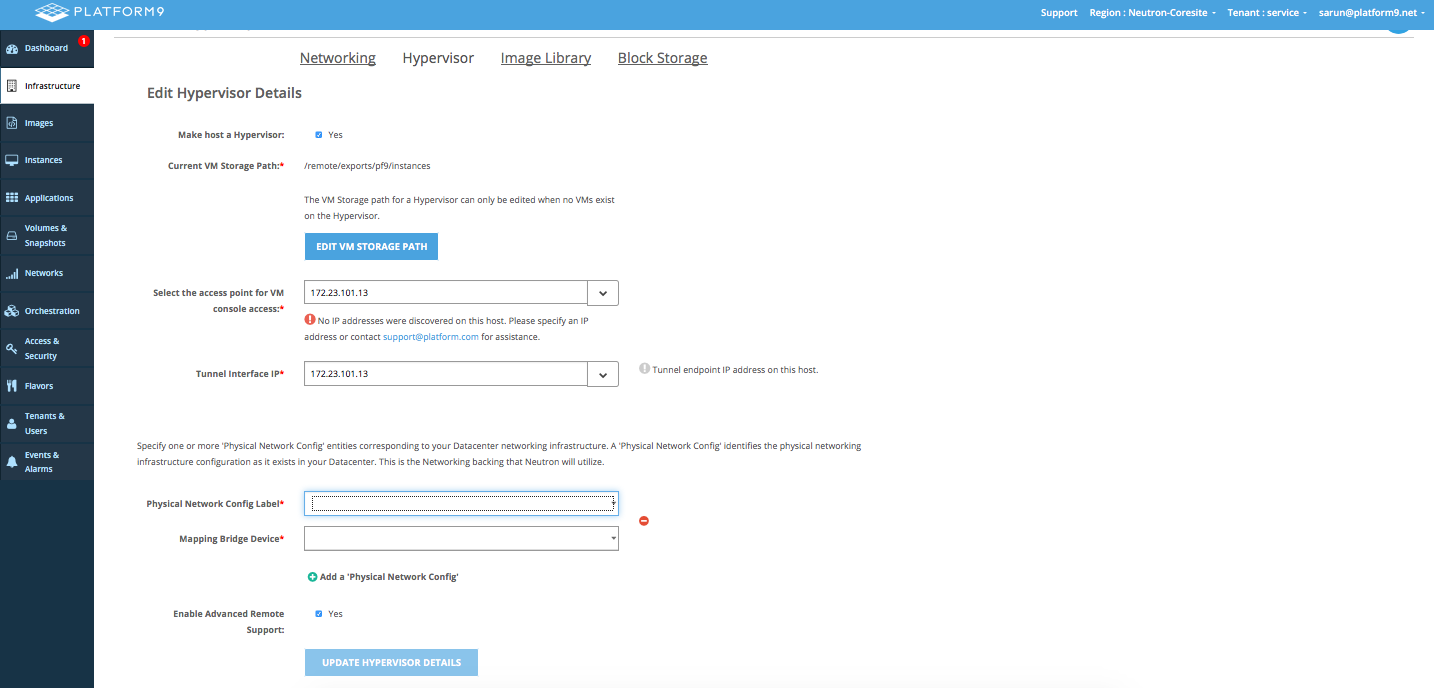
Step 3: Networking configuration during hypervisor authorization
For tunneling-based network support i.e. if you choose VXLAN or GRE in step 1, the only configuration change that you would need to make on both the Network Node (in case of legacy mode) and the Hypervisors is to select the tunnel endpoint that you would use for data traffic. If you choose a combination of VLAN and one of the tunneling protocols, along with the tunnel endpoint, you will need to also specify the physical network label along with the corresponding bridge to be used for VLAN based data traffic.
To complete the network topology specification for Neutron, for each physical network interface on each hypervisor, you need to specify what ‘physical network config’ it maps to by supplying the unique ‘physical network config’ label that you defined above.
In case of DVR, you will need to specify whether you want to make this server DHCP capable or not.
The mapping bridge device is the one your created as part of handling Neutron Prerequisites for Linux/KVM.
At this point, your Neutron networking configuration in Platform9 is complete. You are now ready to start using Neutron in Platform9.