Introduction
Platform9 is committed to enabling top tier 5G operators and software providers to take advantage of Kubernetes and open source software as they transition to cloud native architectures. In this blog we will explore the details on deploying free5gc (version 3.0.4) on top of Platform9 Managed Kubernetes.
What is Free5GC?
Free5GC is an open-source project for 5th generation (5G) mobile core networks. It is the first open-source 5G core network in the world to conform to the 3GPP Release 15 (R15) international standards. Free5GC’s original goal was to provide academics with a platform to test and prototype 5G systems. However, due to free5GC’s completeness and open source code, it also has commercial value, especially for private 5G networks.
Prerequisite
To deploy the free5gc core there are a few prerequisites:
- Kubernetes cluster created by Platform9 Managed Kubernetes. (Or any cluster with the ability to add KubeVirt)
- KubeVirt should be enabled to create Virtual Machines on Ubuntu 18.04 with Linux kernel version 5.0.0-23-generic.
- Gtp5g Kernel module on Ubuntu Virtual Machine.
- SCTP support in Kubernetes Services. (Refer to the Appendix section)
- Kubernetes Cluster backed by Calico CNI or any CNI with the capability to provide static IPs to pods.
Installation
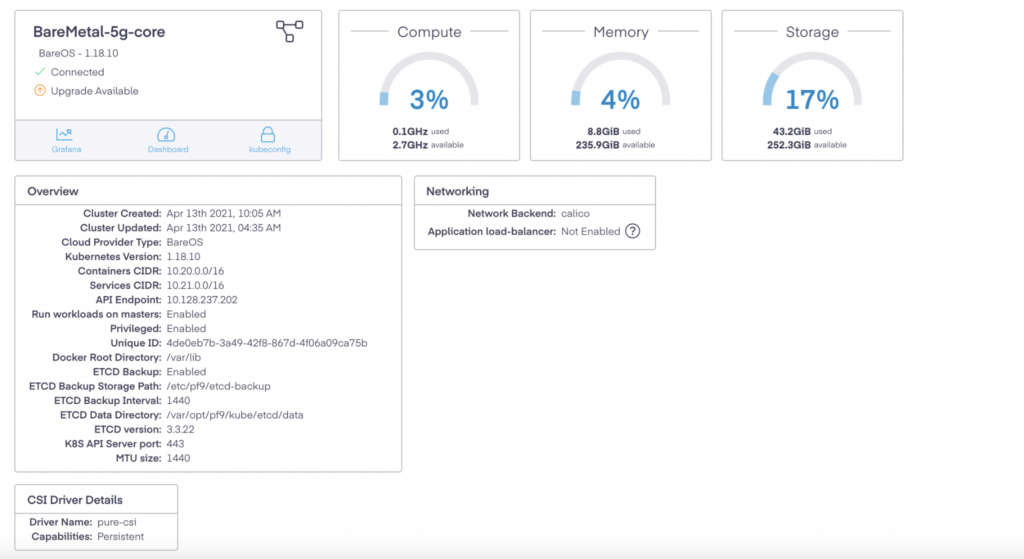
Create a PMK Cluster
The following values were used to create a PMK Cluster:


Diagram
We will be installing 5G components as shown below in the 5G service-based reference architecture diagram.

UPF, which is the data plane, will be installed on a Virtual Machine managed by the PMK Kubevirt solution, and the control plane components are installed on the PMK cluster.
Clone the repo
Clone the repository for 5gcore, then cd into the 5gcore directory. The directory includes the required Kubernetes manifest files.
git clone https://github.com/platform9/5gcore.git
cd 5gcore
Create the namespace
Create a namespace called free5gc:
$ kubectl create ns free5gc
namespace/free5gc  created
Change the static IP for SMF and AMF
For this demo we require Static IPs for SMF and AMF. This can be achieved with Calico annotations.
Edit the Static IP addresses in the free5gc-amf.yaml and free5gc-smf.yaml files.
apiVersion: apps/v1
kind: Deployment
metadata:
  name: free5gc-smf-deployment
spec:
  selector:
    matchLabels:
      app: free5gc-smf
  replicas: 1
  template:
    metadata:
      labels:
        app: free5gc-smf
      annotations:
         cni.projectcalico.org/ipAddrs: "[\"10.20.0.115\"]"
    spec:
      containers:
      - name: myapp-container
…
…
…
apiVersion: apps/v1
kind: Deployment
metadata:
name: free5gc-amf-deployment
spec:
selector:
matchLabels:
app: free5gc-amf
replicas: 1
template:
metadata:
labels:
app: free5gc-amf
annotations:
cni.projectcalico.org/ipAddrs: "[\"10.20.0.110\"]"
spec:
containers:
…
…
…In the free5gc-configmap.yaml change the AMF and SMF configurations to point to the same static IPs used above.
amfcfg.conf:
    info:
      version: 1.0.0
      description: AMF initial local configuration

    configuration:
      amfName: AMF
      ngapIpList:
        - 10.20.0.110
sbi:smfcfg.conf:
    info:
      version: 1.0.0
      description: SMF initial local configuration
…
…
…
      pfcp:
        addr: 10.20.0.115
      userplane_information:
Install the database first
The first component to install is the MongoDB database. Install the database using the following command:
$ kubectl apply -f free5gc-mongodb.yaml -n free5gc
serviceaccount/mongo created
clusterrole.rbac.authorization.k8s.io/pod-service-endpoint-reader created
clusterrolebinding.rbac.authorization.k8s.io/system:serviceaccount:free5gc:mongo created
service/mongodb-svc created
statefulset.apps/free5gc-mongodb created
Verify that the MongoDB pod is up and running:
$ kubectl get pods -n free5gc |grep mongo
free5gc-mongodb-0                          1/1     Running   0          2d23h
Create the configMap
Each control plane has a configuration which is defined in free5gc-configmap.yaml.
Create the configMap using the following command:
$ kubectl apply -f free5gc-configmap.yaml -n free5gc
configmap/free5gc-configmap created
Verify that the ConfigMap has been created:
$ kubectl get cm -n free5gc
NAME                DATA   AGE
free5gc-configmap   12     25s
Install the Network Registry Function (NRF)
The next component to install is NRF. Use the following command to install the NRF:
$ kubectl apply -f free5gc-nrf.yaml -n free5gc
deployment.apps/free5gc-nrf-deployment created
service/free5gc-nrf-service created
Verify that the NRF pod is up and running:
$ kubectl get pods -n free5gc |grep nrf
free5gc-nrf-deployment-6dd4bf6dd7-8wmzg    1/1     Running   0          2d23h
Install UPF in VM on KubeVirt
Once the Virtual Machine is created as described in the prerequisite section, using Kubevirt on Platform9, install UPF on the machine following upf-3.0.4.
$ kubectl get vmi
NAME           AGE     PHASE     IP            NODENAME
ubuntu18-upf   7d21h   Running   10.20.40.28   10.128.237.203
Modify the upfcfg.yaml using the Virtual Machine IP address. A sample upfcfg.yaml is part of the cloned repo.
upfcfg.yaml:
info:
  version: 1.0.0
  description: UPF configuration

configuration:
  # debugLevel: panic|fatal|error|warn|info|debug|trace
  debugLevel: info
  # ReportCaller: true|false
  ReportCaller: false

  pfcp:
    - addr: 10.20.40.28

  gtpu:
    - addr: 10.20.40.28
…
…
Install the rest of the control plane components
We can now install the rest of the control plane components using their corresponding manifest files.
- SMF
- AMF
- UDR
- UDM
- AUSF
- PCF
Check the status of the pods in the free5gc namespace:
$ kubectl get pods -n free5gc
NAME                                       READY   STATUS    RESTARTS   AGE
free5gc-amf-deployment-68878d4889-7xgh6    1/1     Running   0          2d23h
free5gc-ausf-deployment-7f6b76dbdd-wqsc6   1/1     Running   0          2d23h
free5gc-mongodb-0                          1/1     Running   0          2d23h
free5gc-nrf-deployment-6dd4bf6dd7-8wmzg    1/1     Running   0          2d23h
free5gc-nssf-deployment-68f7df5fc4-8dw5h   1/1     Running   0          2d23h
free5gc-pcf-deployment-86564779d4-8kp6q    1/1     Running   0          2d23h
free5gc-smf-deployment-56b44b9f8-jfs5j     1/1     Running   0          2d23h
free5gc-udm-deployment-5c84964ff4-vf75j    1/1     Running   0          2d23h
free5gc-udr-deployment-6786894cc7-7m96t    1/1     Running   0          2d23h
For the SMF and AMF pods you can see that we have static IPs assigned:
$ kubectl get pods -n free5gc  -o wide
free5gc-smf-deployment-56b44b9f8-jfs5j     1/1     Running   0          2d23h   10.20.0.115   10.128.237.203   <none>           <none>
free5gc-amf-deployment-68878d4889-7xgh6    1/1     Running   0          2d23h   10.20.0.110   10.128.237.202   <none>           <none>
Testing the Free5GC Components
Verify that all of the components are up and running and SMF is registered with UPF.
The output below shows the logs from SMF where we can see a PFCP Association Request and Response from UPF:

Run the UE registration test flow from the UPF VM by executing:
go test -v -run TestRegistration -args noinit
This will send a request to AMF and then UE registration will happen.
The same call flow can be seen below with tcpdump:

Observability
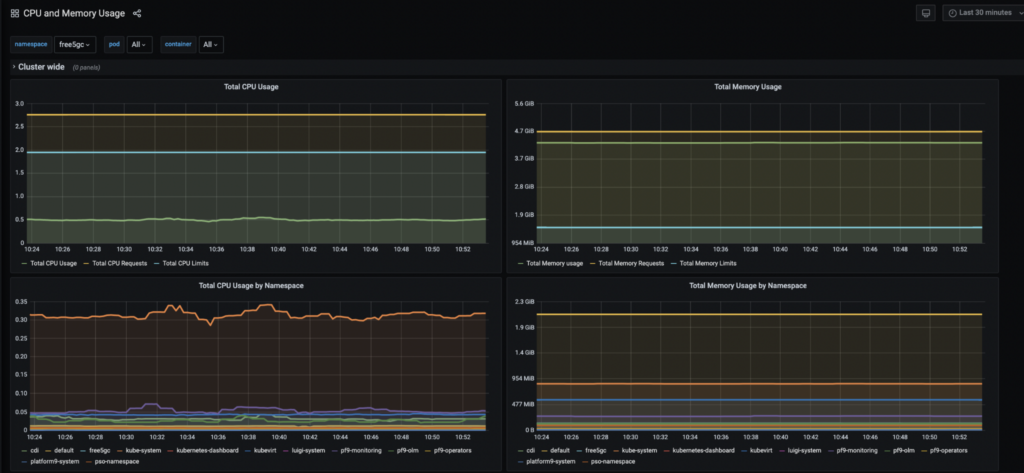
Monitoring is core for any service to be always up and running. With PMK monitoring you can see all of the metrics in one place.
Grafana CPU and Memory Usage Dashboard
Here is an overview of the system as a whole using the Grafana Dashboard:

Grafana Pod wide Dashboard
Here is an overview of the free5gc-amf-deployment at the pod level:

Benefits
Platform Managed Kubernetes provides all the nuts and bolts to run 5G applications. With PMK, telco operators can bring 5G cloud native applications without worrying about Day 1 or Day 2 operations.
PMK allows telco operators to run Kubernetes clusters on-premises or in a public cloud with a single pane of glass management.
Appendix
Enabling SCTP at OS level
If the SCTP protocol is blacklisted we can enable it by removing the sctp.conf file
rm /etc/modprobe.d/sctp.confLoad the SCTP protocol:
modprobe sctpVerify that the SCTP module is enabled:
$ lsmod | grep -i sctp
sctp                  344064  2
libcrc32c              16384  4 btrfs,xfs,raid456,sctp
Enabling SCTP on Platform9 Kubernetes Cluster version < 1.20
- Go to the /opt/pf9/pf9-kube/conf folder
- Edit the master.yaml command section to include “–feature-gates=SCTPSupport=true”
apiVersion: v1
kind: Pod
metadata:
  name: k8s-master
  namespace: kube-system
spec:
  containers:
…
…
  - command:
    - kube-apiserver
    - --allow-privileged=true
    - --anonymous-auth=false
    - --authentication-token-webhook-cache-ttl=0s
….
….
    - --v=2
    - --http2-max-streams-per-connection=1000
    - "--feature-gates=SCTPSupport=true"
- Make the same changes in /etc/pf9/kube.d/master.yaml
apiVersion: v1
kind: Pod
metadata:
  name: k8s-master
  namespace: kube-system
spec:
  containers:
…
…
  - command:
    - kube-apiserver
    - --allow-privileged=true
    - --anonymous-auth=false
    - --authentication-token-webhook-cache-ttl=0s
….
….
    - --v=2
    - --http2-max-streams-per-connection=1000
- "--feature-gates=SCTPSupport=true"- Restart the nodeletd service
Reference
https://kubernetes.io/docs/concepts/services-networking/service/
https://portal.3gpp.org/desktopmodules/Specifications/SpecificationDetails.aspx?specificationId=3144
https://platform9.com/blog/get-up-and-running-with-kubevirt-for-kubernetes-based-vm-management/

