How-To Restore From ETCD Backup on a Multi-Master Cluster
Problem
How-To Restore From ETCD Backup on a Multi-Master Cluster?
Environment
- Platform9 Managed Kubernetes - All Versions
- ETCD
- Docker or Containerd
Procedure
Restoring from the ETCD backup is a complicated process, if not familiar with it we recommend involving Platform9 Support for any assistance before initiating the restore operation.
The highlighted process is for a cluster consisting of 3 Master nodes.
- Access the Master node where you want to perform the restore operation.
docker cp etcd:/usr/local/bin/etcdctl /opt/pf9/pf9-kube/binexport PATH=$PATH:/opt/pf9/pf9-kube/bin- Copy the Snapshot file to the Master node where you will run the restore operation.
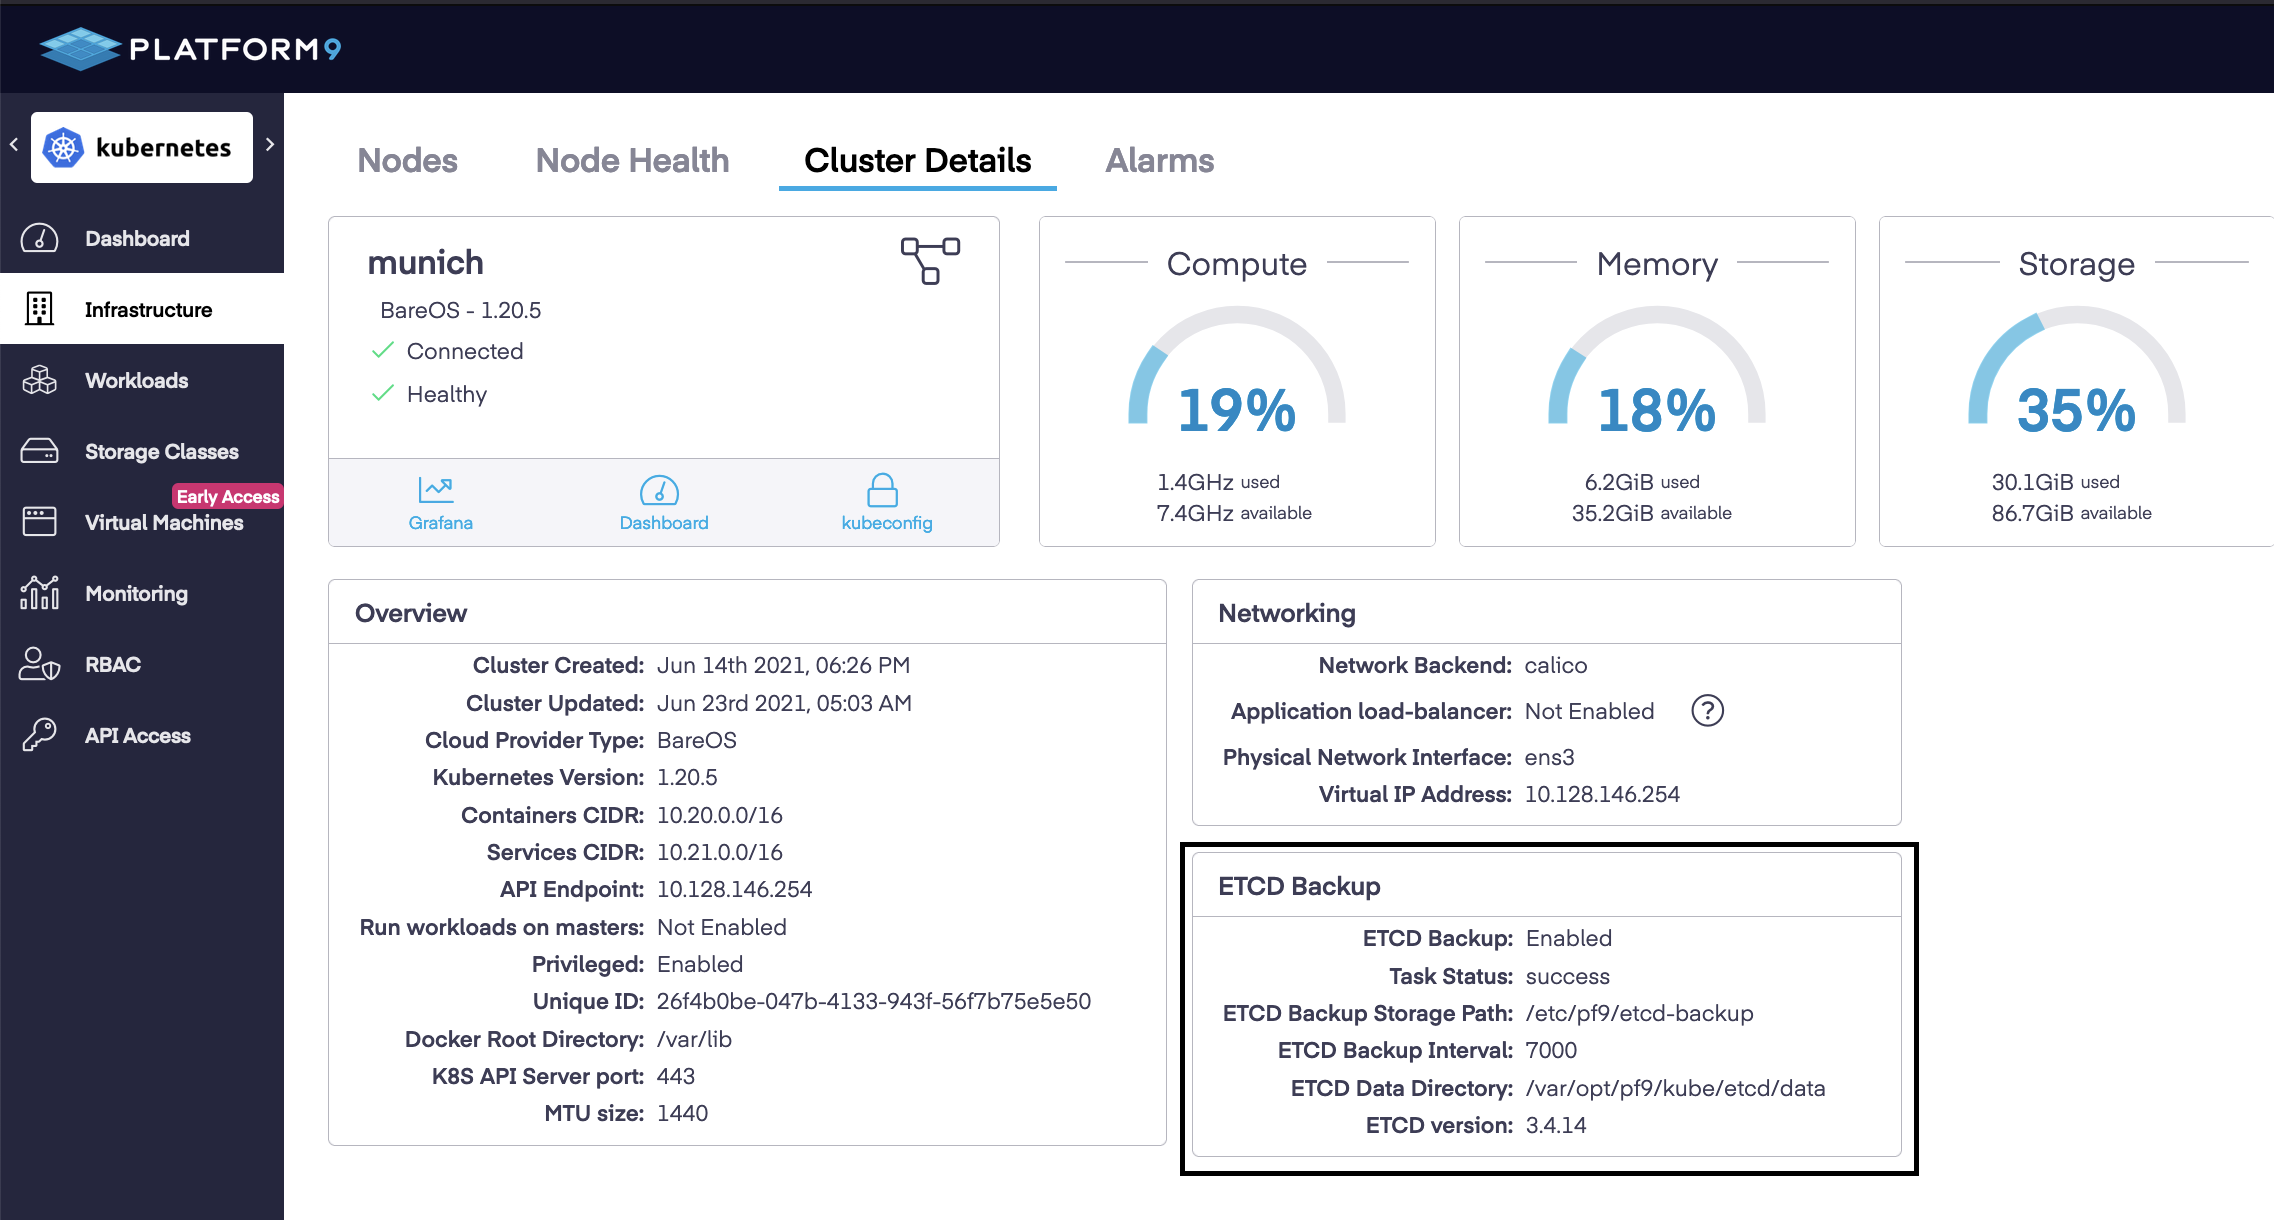
- The ETCD Backup Storage Path and ETCD Backup Interval parameters can be configured at the time of cluster creation and can also be changed later from the Platform9 UI by editing the cluster details. The default path for the backup storage path is /etc/pf9/etcd-backup.
The latest backup file is stored on any one of the attached Master node so you will need to check the configured storage path on all of the master nodes to get the latest snapshot.
Alternative way to identify the Master node on which the latest backup is located is to run the below-mentioned command. It will provide the output of etcd-backup pods with IP of Master nodes on which it saved the etcd snapshot post job completion. Check the configured backup path on the Master node with recent etcd-backup pod in completed state.
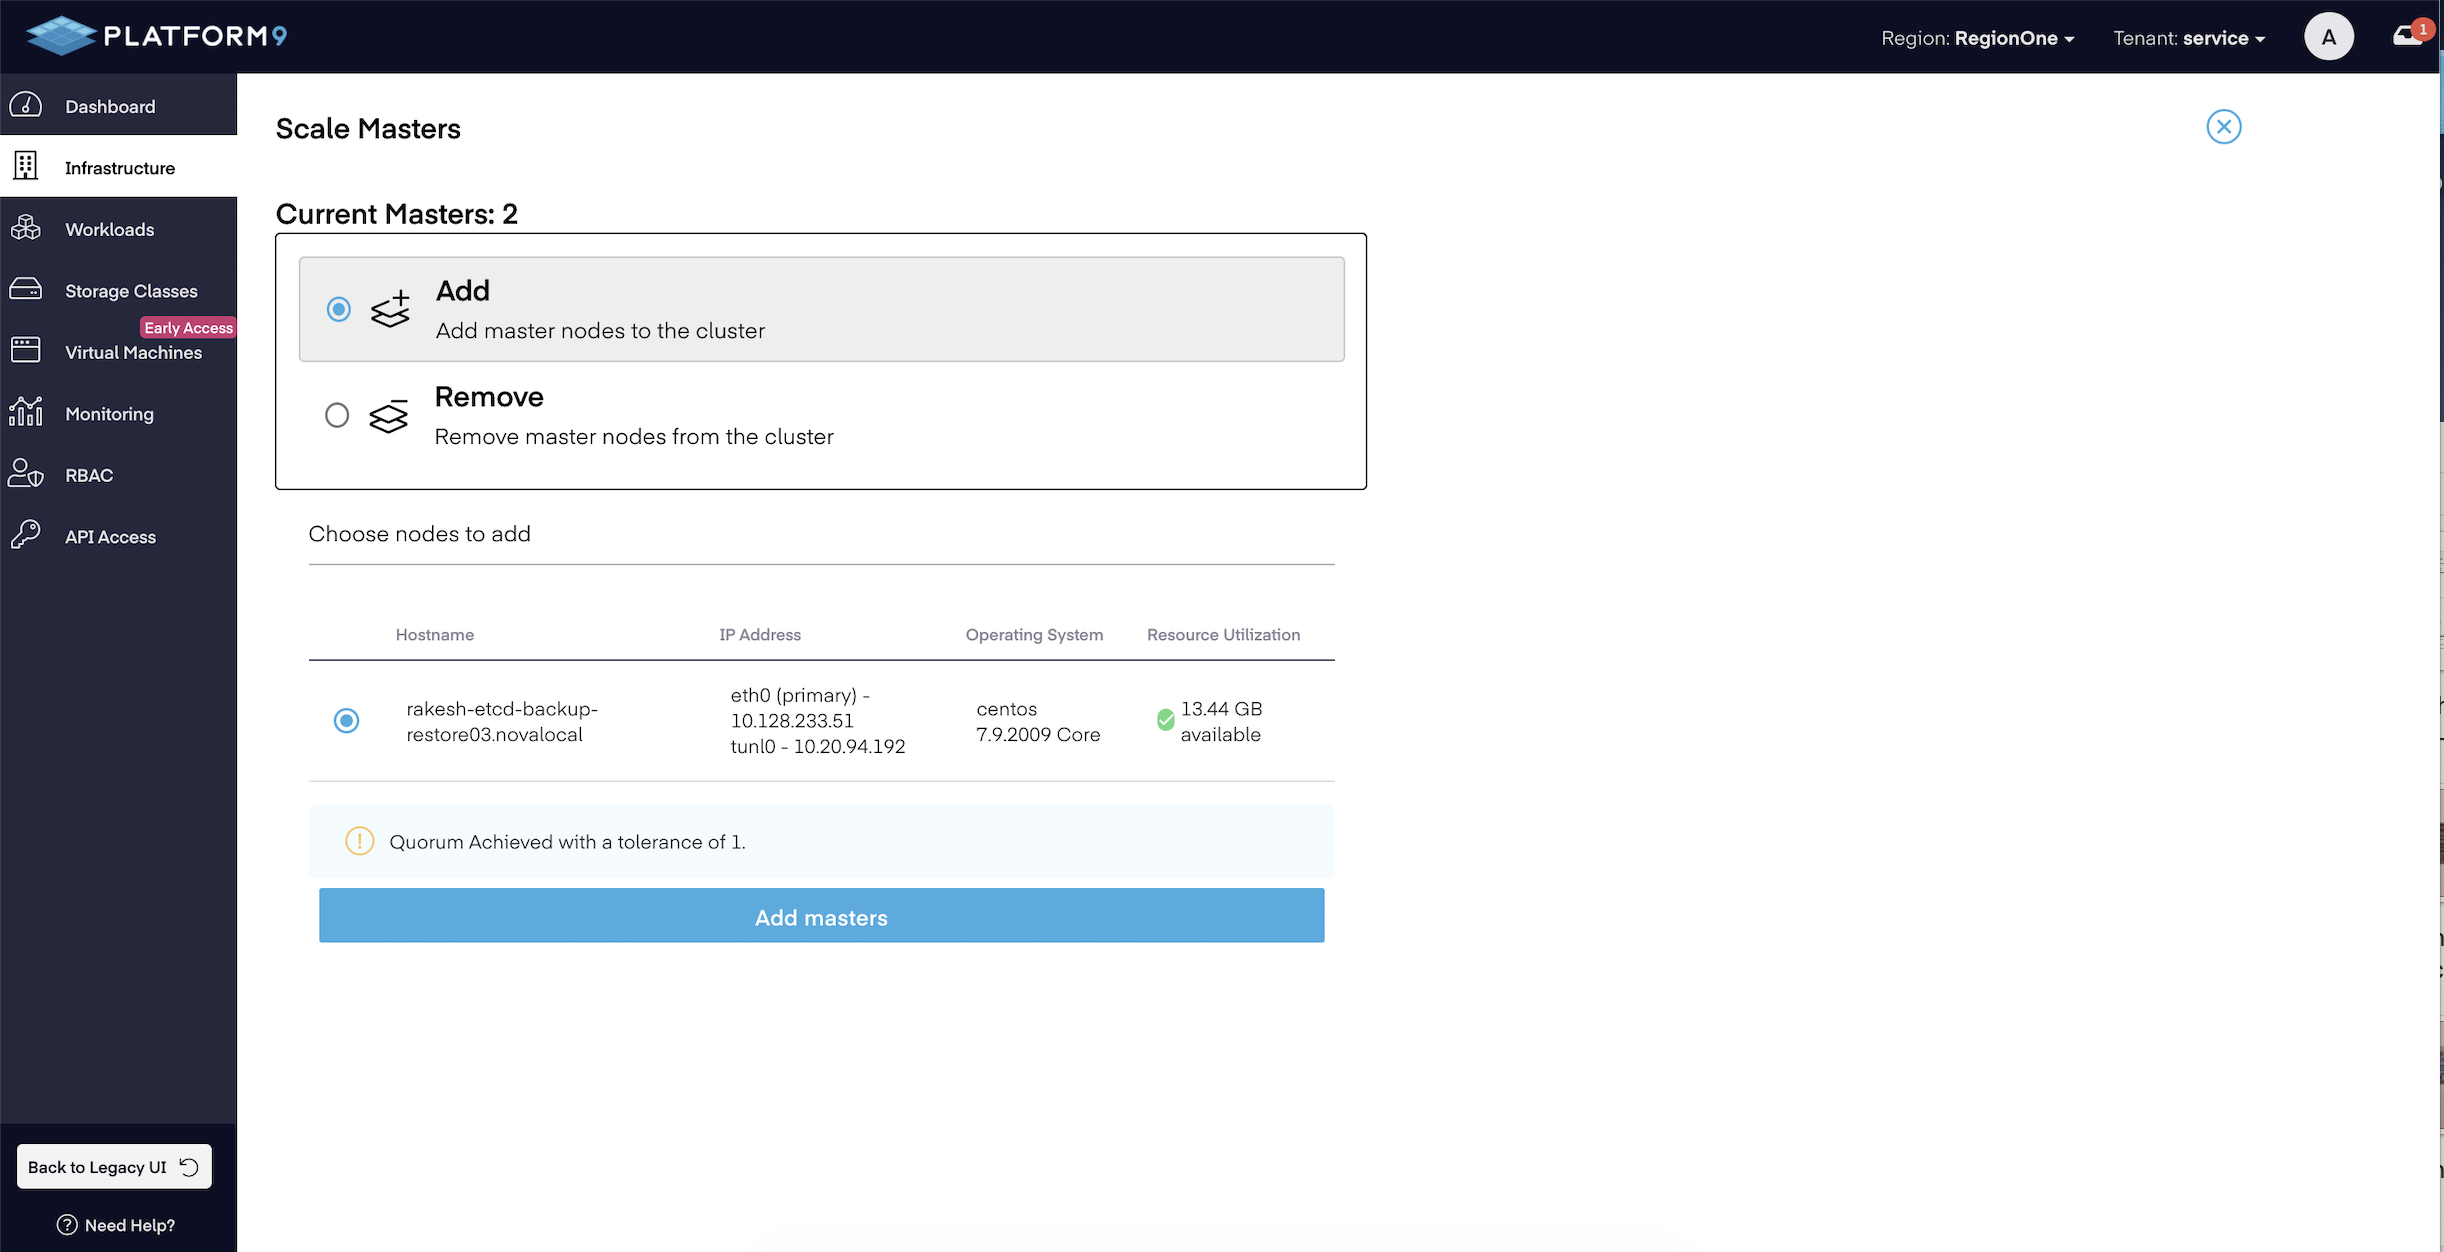
kubectl get pods -n kube-system -o wide | grep -e NODE -e etcd-backup# kubectl get pods -n kube-system -o wide | grep -e NODE -e etcd-backupNAME READY STATUS RESTARTS AGE IP NODE etcd-backup-1624629600-pfnp9 0/2 Completed 0 162m 10.128.146.85 <NODE IP/NAME>etcd-backup-1624633200-w7m9v 0/2 Completed 0 102m 10.128.146.151 <NODE IP/NAME> etcd-backup-1624636800-zptw4 0/2 Completed 0 42m 10.128.146.151 <NODE IP/NAME>- Scale down the total number of Master nodes to 1 by detaching the Master nodes from the cluster using the Platform9 UI. You can perform this action by selecting the cluster in "Infrastructure" tab as shown in below image.
- Verify the etcd member count once the cluster has been scaled to 1 master node. For pf9-kube v1.19 and below, having etcd v3.3.22 run the command on the available master node to get etcd cluster-health.
/opt/pf9/pf9-kube/bin/etcdctl --ca-file /etc/pf9/kube.d/certs/etcdctl/etcd/ca.crt --cert-file /etc/pf9/kube.d/certs/etcdctl/etcd/request.crt --key-file /etc/pf9/kube.d/certs/etcdctl/etcd/request.key cluster-health $ sudo /opt/pf9/pf9-kube/bin/etcdctl --ca-file /etc/pf9/kube.d/certs/etcdctl/etcd/ca.crt --cert-file /etc/pf9/kube.d/certs/etcdctl/etcd/request.crt --key-file /etc/pf9/kube.d/certs/etcdctl/etcd/request.key cluster-healthmember 6b5346ab5f916f46 is healthy: got healthy result from https://10.128.146.228:4001cluster is healthy- For pf9-kube v1.20 and above, having etcd v3.4.14 run the command on the available master node to get etcd member and endpoint information.
etcdctl member listetcdctl endpoint health $ etcdctl member list1f17cc030a5f2ec, started, bc13fd95-73a2-4c92-bd82-d3a4130be195, https://10.128.146.151:2380, https://10.128.146.151:4001, false$ etcdctl endpoint health127.0.0.1:2379 is healthy: successfully committed proposal: took = 4.99963ms- Clear any of the stale Master nodes from kubectl perspective using below command if required.
kubectl delete nodes <node-name># kubectl get nodes | grep -e NAME -e masterNAME STATUS ROLES AGE VERSION10.128.146.228 Ready master 20d v1.18.1010.128.146.239 NotReady master 20d v1.18.1010.128.146.32 NotReady master 20d v1.18.10# kubectl delete nodes 10.128.233.239node "10.128.233.239" deleted# kubectl delete nodes 10.128.233.32node "10.128.233.32" deleted# kubectl get nodes | grep -e NAME -e masterNAME STATUS ROLES AGE VERSION10.128.146.228 Ready master 20d v1.18.10- Stop the PMK stack on the Master node where we will run the restore operation. Below command will stop all the K8s related services on the attached Master node.
sudo /opt/pf9/nodelet/nodeletd phases stop- Move the etcd directory to some other path on the Master node.
mv /var/opt/pf9/kube/etcd/* </desination/path/etcd_dir_backup>- Restore the etcd snapshot by using below-mentioned command.
- NODE_IP - IP of the Attached Node. Same can be found out from the "kubectl get nodes" output.
- NODE UUID- Node_UUID corresponds to the value of host_id found in file /etc/pf9/host_id.conf on the Node.
- </path/to/backupfilename> - File present at defined ETCD Backup Storage Path. Refer to Point 2 for more information.
$ sudo cat /etc/pf9/host_id.conf[hostagent]host_id = dc5623a2-1347-46bc-a046-a6e58fc6382a sudo ETCDCTL_API=3 /opt/pf9/pf9-kube/bin/etcdctl snapshot restore </path/to/backupfilename> --data-dir /var/opt/pf9/kube/etcd/data --initial-advertise-peer-urls="https://<NODE_IP>:2380" --initial-cluster="<NODE_UUID>=https://<NODE_IP>:2380" --name="<NODE_UUID>" $ sudo ETCDCTL_API=3 /opt/pf9/pf9-kube/bin/etcdctl snapshot restore etcd-snapshot-2021-06-30_12\:00\:03_UTC.db --data-dir /var/opt/pf9/kube/etcd/data --initial-advertise-peer-urls="https://10.128.146.228:2380" --initial-cluster="dc5623a2-1347-46bc-a046-a6e58fc6382a=https://10.128.146.228:2380" --name="dc5623a2-1347-46bc-a046-a6e58fc6382a"2021-06-30 12:40:11.892154 I | mvcc: restore compact to 47443502021-06-30 12:40:11.917375 I | etcdserver/membership: added member 507860914f4b1b61 [https://10.128.146.228:2380] to cluster bd4860528e9db4b4- Start the PMK stack on the Master node.
sudo /opt/pf9/nodelet/nodeletd phases start- Verify the etcd member count once the stack is up and running. Note: There should just be one member in the etcd cluster.
- For pf9-kube v1.19 and below, having etcd v3.3.22 run the command on the available master node to get etcd cluster-health.
sudo /opt/pf9/pf9-kube/bin/etcdctl --ca-file /etc/pf9/kube.d/certs/etcdctl/etcd/ca.crt --cert-file /etc/pf9/kube.d/certs/etcdctl/etcd/request.crt --key-file /etc/pf9/kube.d/certs/etcdctl/etcd/request.key cluster-health $ sudo /opt/pf9/pf9-kube/bin/etcdctl --ca-file /etc/pf9/kube.d/certs/etcdctl/etcd/ca.crt --cert-file /etc/pf9/kube.d/certs/etcdctl/etcd/request.crt --key-file /etc/pf9/kube.d/certs/etcdctl/etcd/request.key cluster-healthmember 507860914f4b1b61 is healthy: got healthy result from https://10.128.146.228:4001cluster is healthy- For pf9-kube v1.20 and above, run the command on the available master node to get etcd member and endpoint information.
etcdctl member listetcdctl endpoint health # etcdctl member list1f17cc030a5f2ec, started, bc13fd95-73a2-4c92-bd82-d3a4130be195, https://10.128.146.151:2380, https://10.128.146.151:4001, false# etcdctl endpoint health127.0.0.1:2379 is healthy: successfully committed proposal: took = 5.172283ms- From kubectl perspective, it will show the previously detached master nodes in a NotReady state. They may initially show as "Ready", but eventually they should reflect as "NotReady". To delete the stale master nodes, run the below-mentioned command.
kubectl delete nodes <node-name># kubectl get nodes | grep -e NAME -e masterNAME STATUS ROLES AGE VERSION10.128.146.228 Ready master 20d v1.18.1010.128.146.239 NotReady master 20d v1.18.1010.128.146.32 NotReady master 20d v1.18.10# kubectl delete nodes 10.128.233.239node "10.128.233.239" deleted# kubectl delete nodes 10.128.233.32node "10.128.233.32" deleted# kubectl get nodes | grep -e NAME -e masterNAME STATUS ROLES AGE VERSION10.128.146.228 Ready master 20d v1.18.10- Once the cluster status is in a healthy state you can start the pf9-hostagent service on the master node. This will eventually start the pf9-nodeletd service.
sudo systemctl start pf9-hostagent- Make sure to there is no etcd data directory on nodes that will be used to scale up the master nodes in the cluster.
This is a required if you are planning to use the same Master nodes which we detached from the cluster in step number 3.
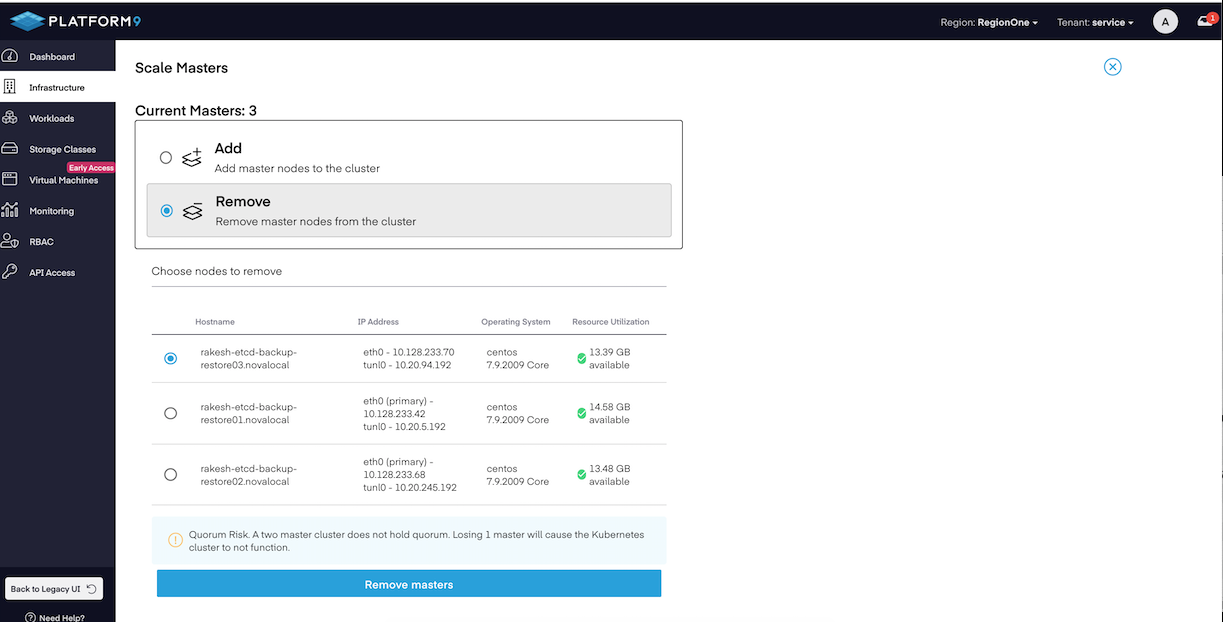
mv /var/opt/pf9/kube/etcd/* </desination/path/etcd_dir_backup>- Scale up the Master nodes from the Platform9 UI. You can perform this action by selecting the cluster in "Infrastructure" tab as shown in below image.