How to deploy a NodePort Ingress Controller on Kubernetes
What is NodePort
A basic form of Kubernetes Ingress can be implemented using the NodePort service type. So what exactly is a NodePort service?
According to the Kubernetes Documentation a NodePort service exposes your Deployment via available ports on your underlying nodes. That way you can access your app at the path <Node_IP>:<Node__Port>.
Prerequisites
- A Kubernetes cluster.
- A Kubectl installation with your Kubernetes cluster from the step above configured as the primary cluster.
- You will also need to ensure that your cluster nodes can receive and transmit traffic on the port you will configure for the NodePort service. If using physical nodes you will have to edit the Firewall rules. In case you are using a Virtual Machines you will need to edit Security Groups for the VMs to enable this. Please refer to your cloud provider's documentation for instructions regarding this.
Step 1 - Deploy the NGINX Ingress Controller
Install nginx ingress via CLI with NodePort:
xxxxxxxxxxkubectl apply -f https://raw.githubusercontent.com/kubernetes/ingress-nginx/controller-v1.1.1/deploy/static/provider/baremetal/deploy.yamlInstalling via the CLI is a great way to get started but if you want to have a little bit more control then we would recommend using the App Catalog. We provide a Platform9 Certified App for both NodePort and LoadBalancer based nginx ingress controllers.
Install nginx ingress via Platform9 Certified Apps Catalog.
The PMK App Catalog can simplify installations and allow you to modify the application using the UI instead of working from the command line. We will walk through an installation using the App Catalog below.
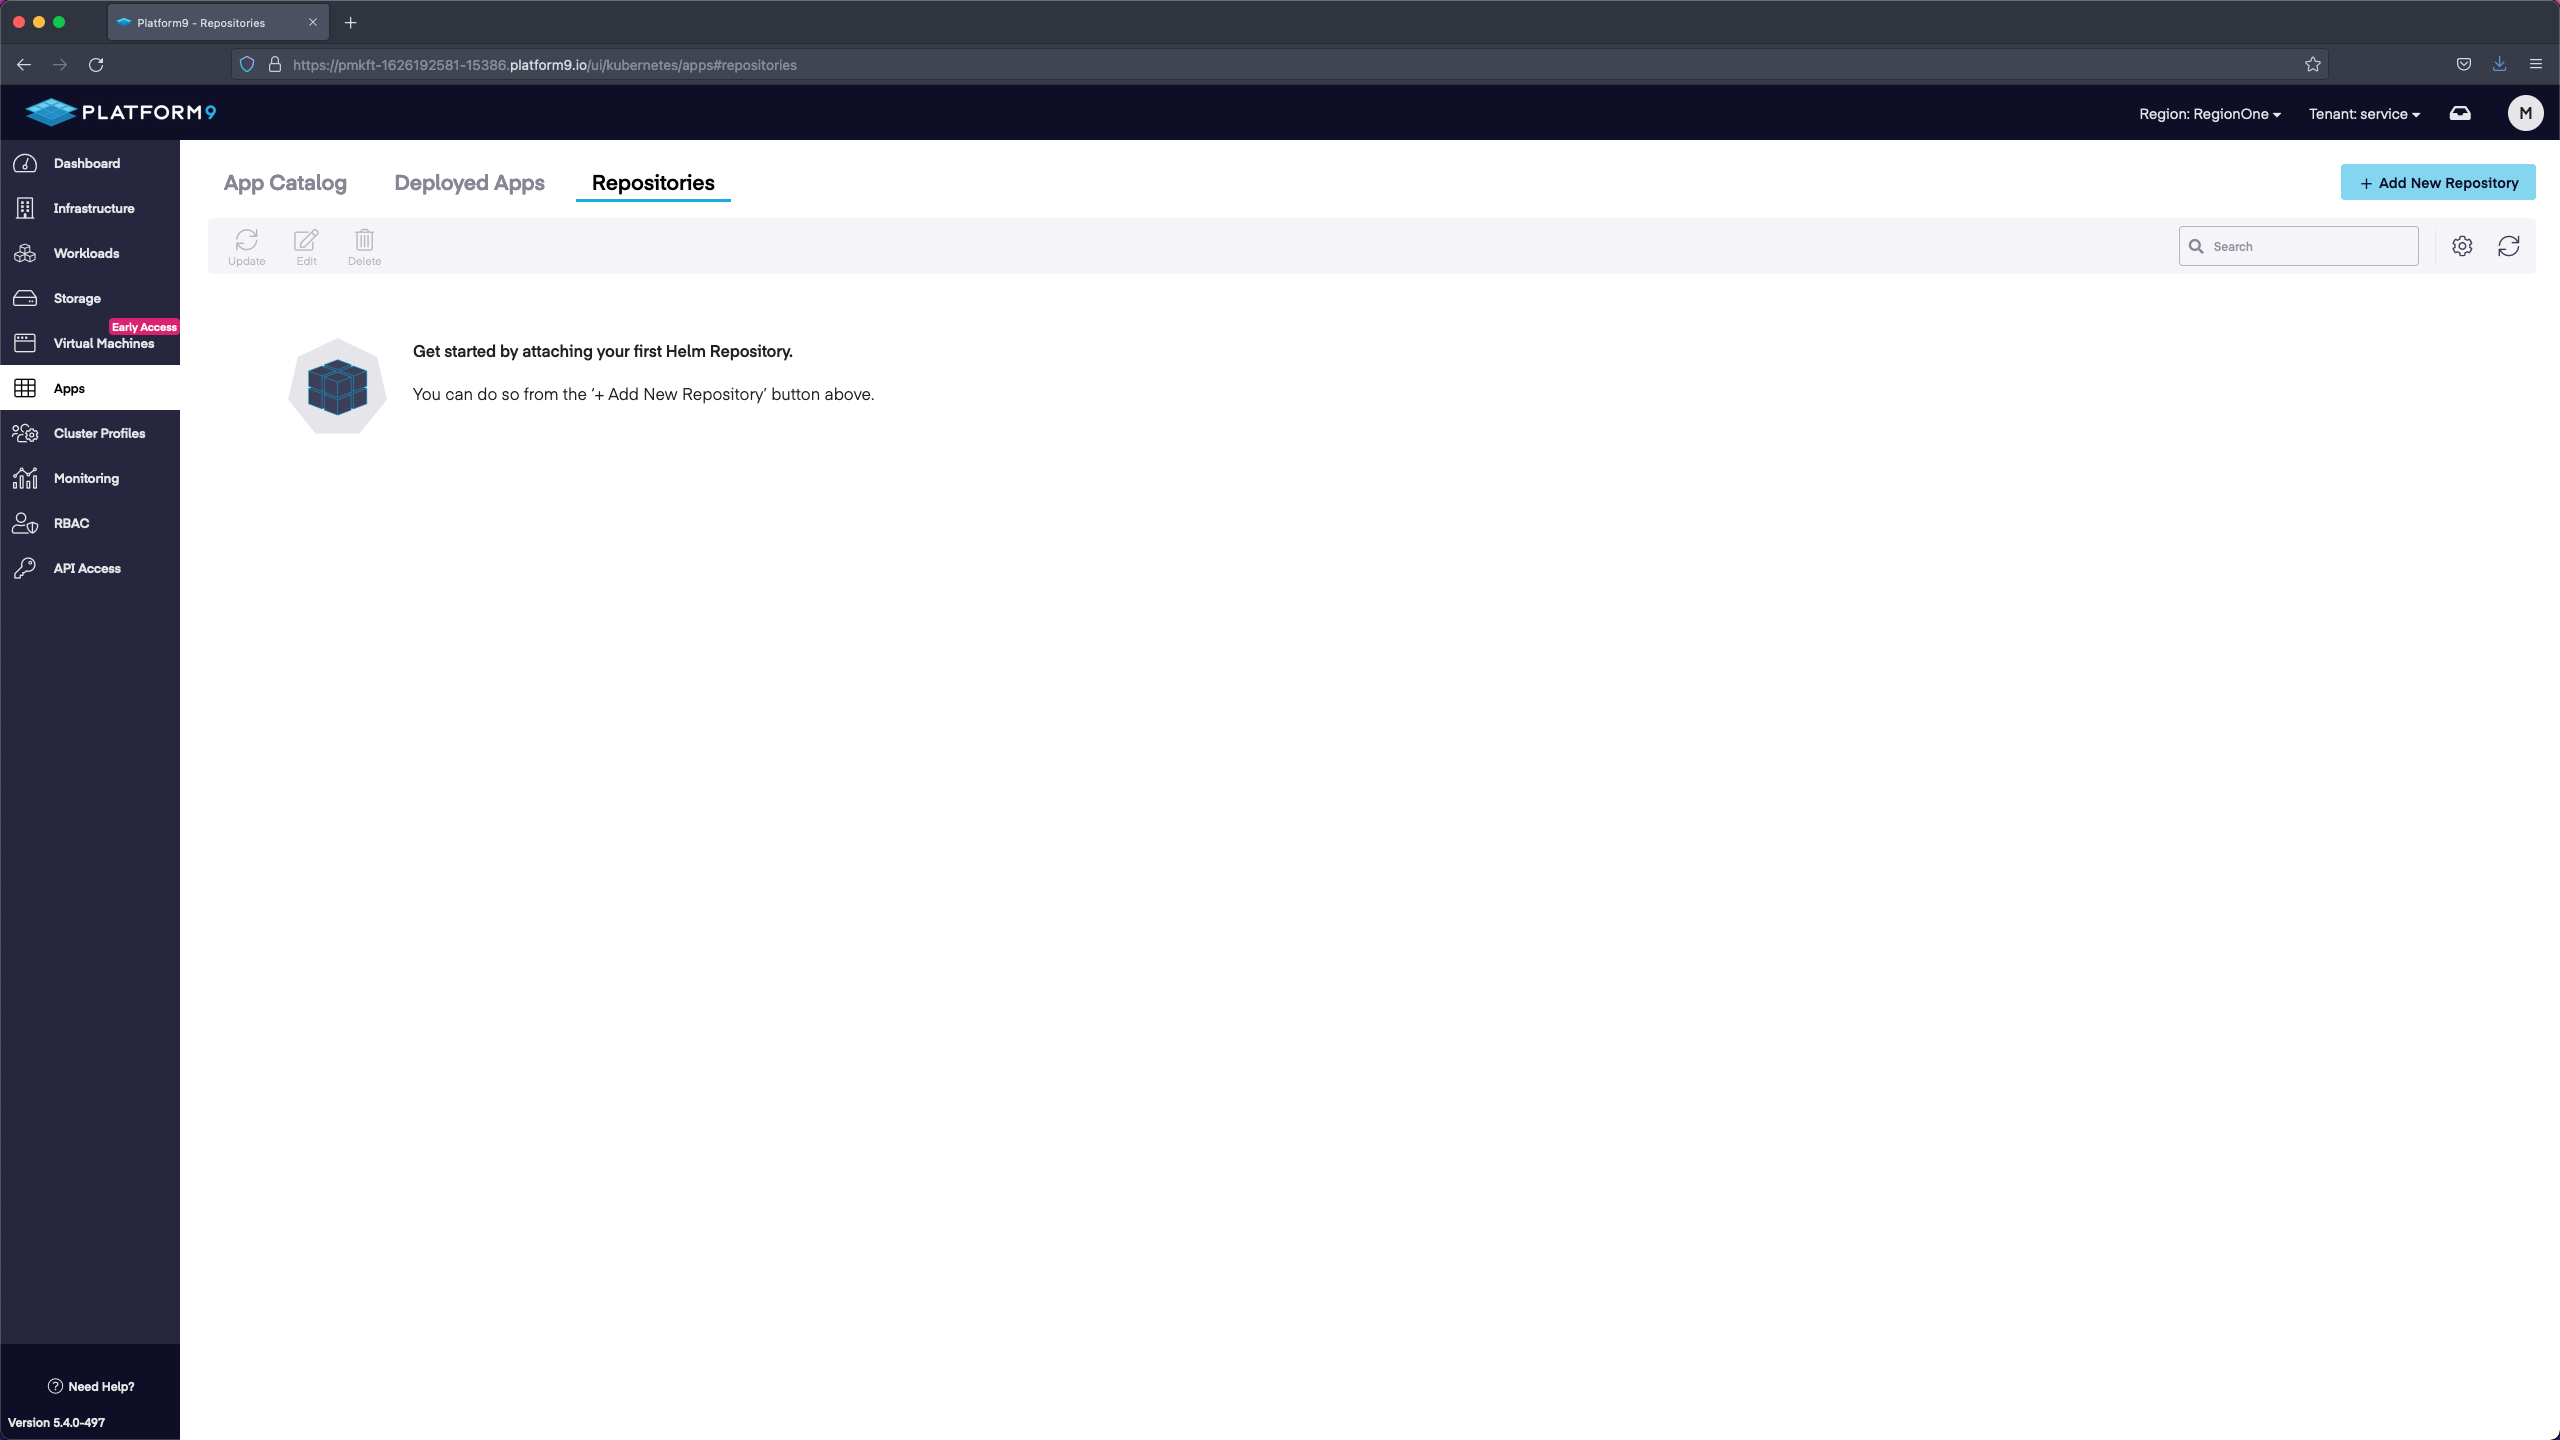
After a successful cluster deployment we will move over to the Apps section in the PMK UI. In this section we need to select + Add New Repository.
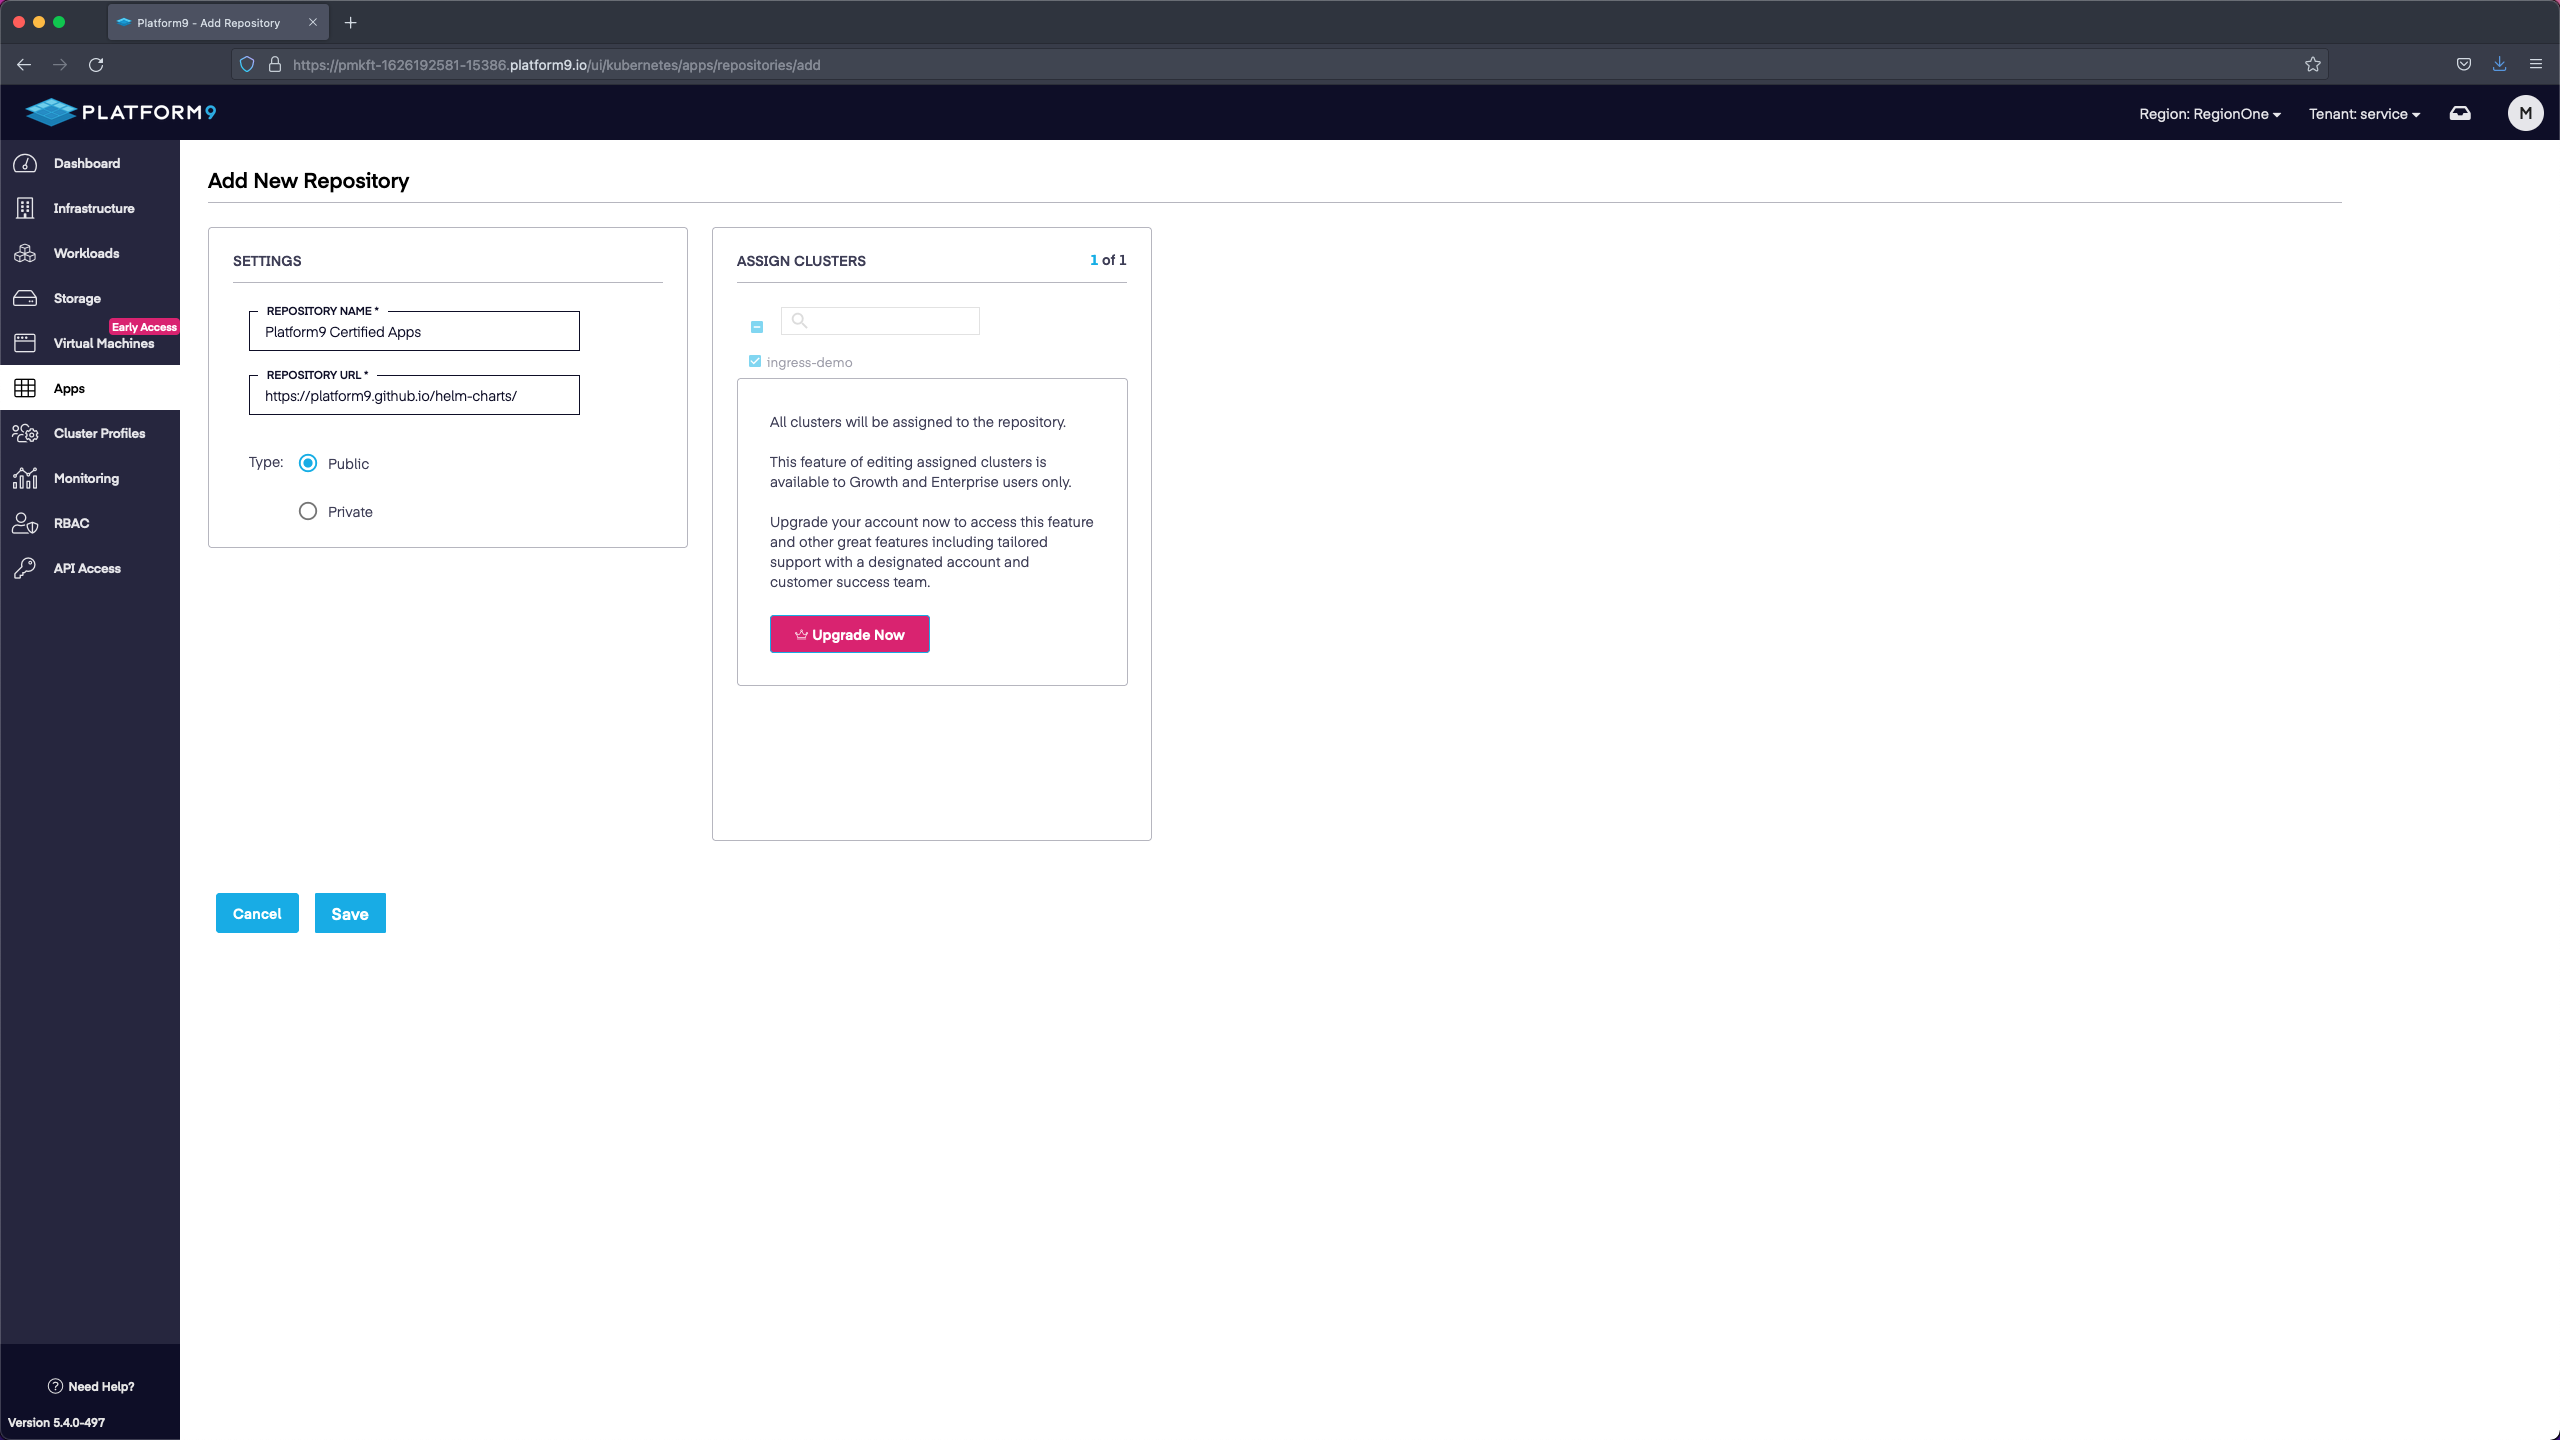
In the Add New Repository section we need to verify that our cluster is selected, name the Repository, and enter in a URL. We will name the Repository Platform9 Certified Apps and then enter in the URL https://platform9.github.io/helm-charts/. Then we will leave the public option selected and save.
After we have added and saved the repository we will end up with a listing of deployable applications. For our demo we are going to use ingress-nginx-no-lb since we will be using a NodePort service instead of a LoadBalancer service. Select deploy in the ingress-nginx-no-lb tile.

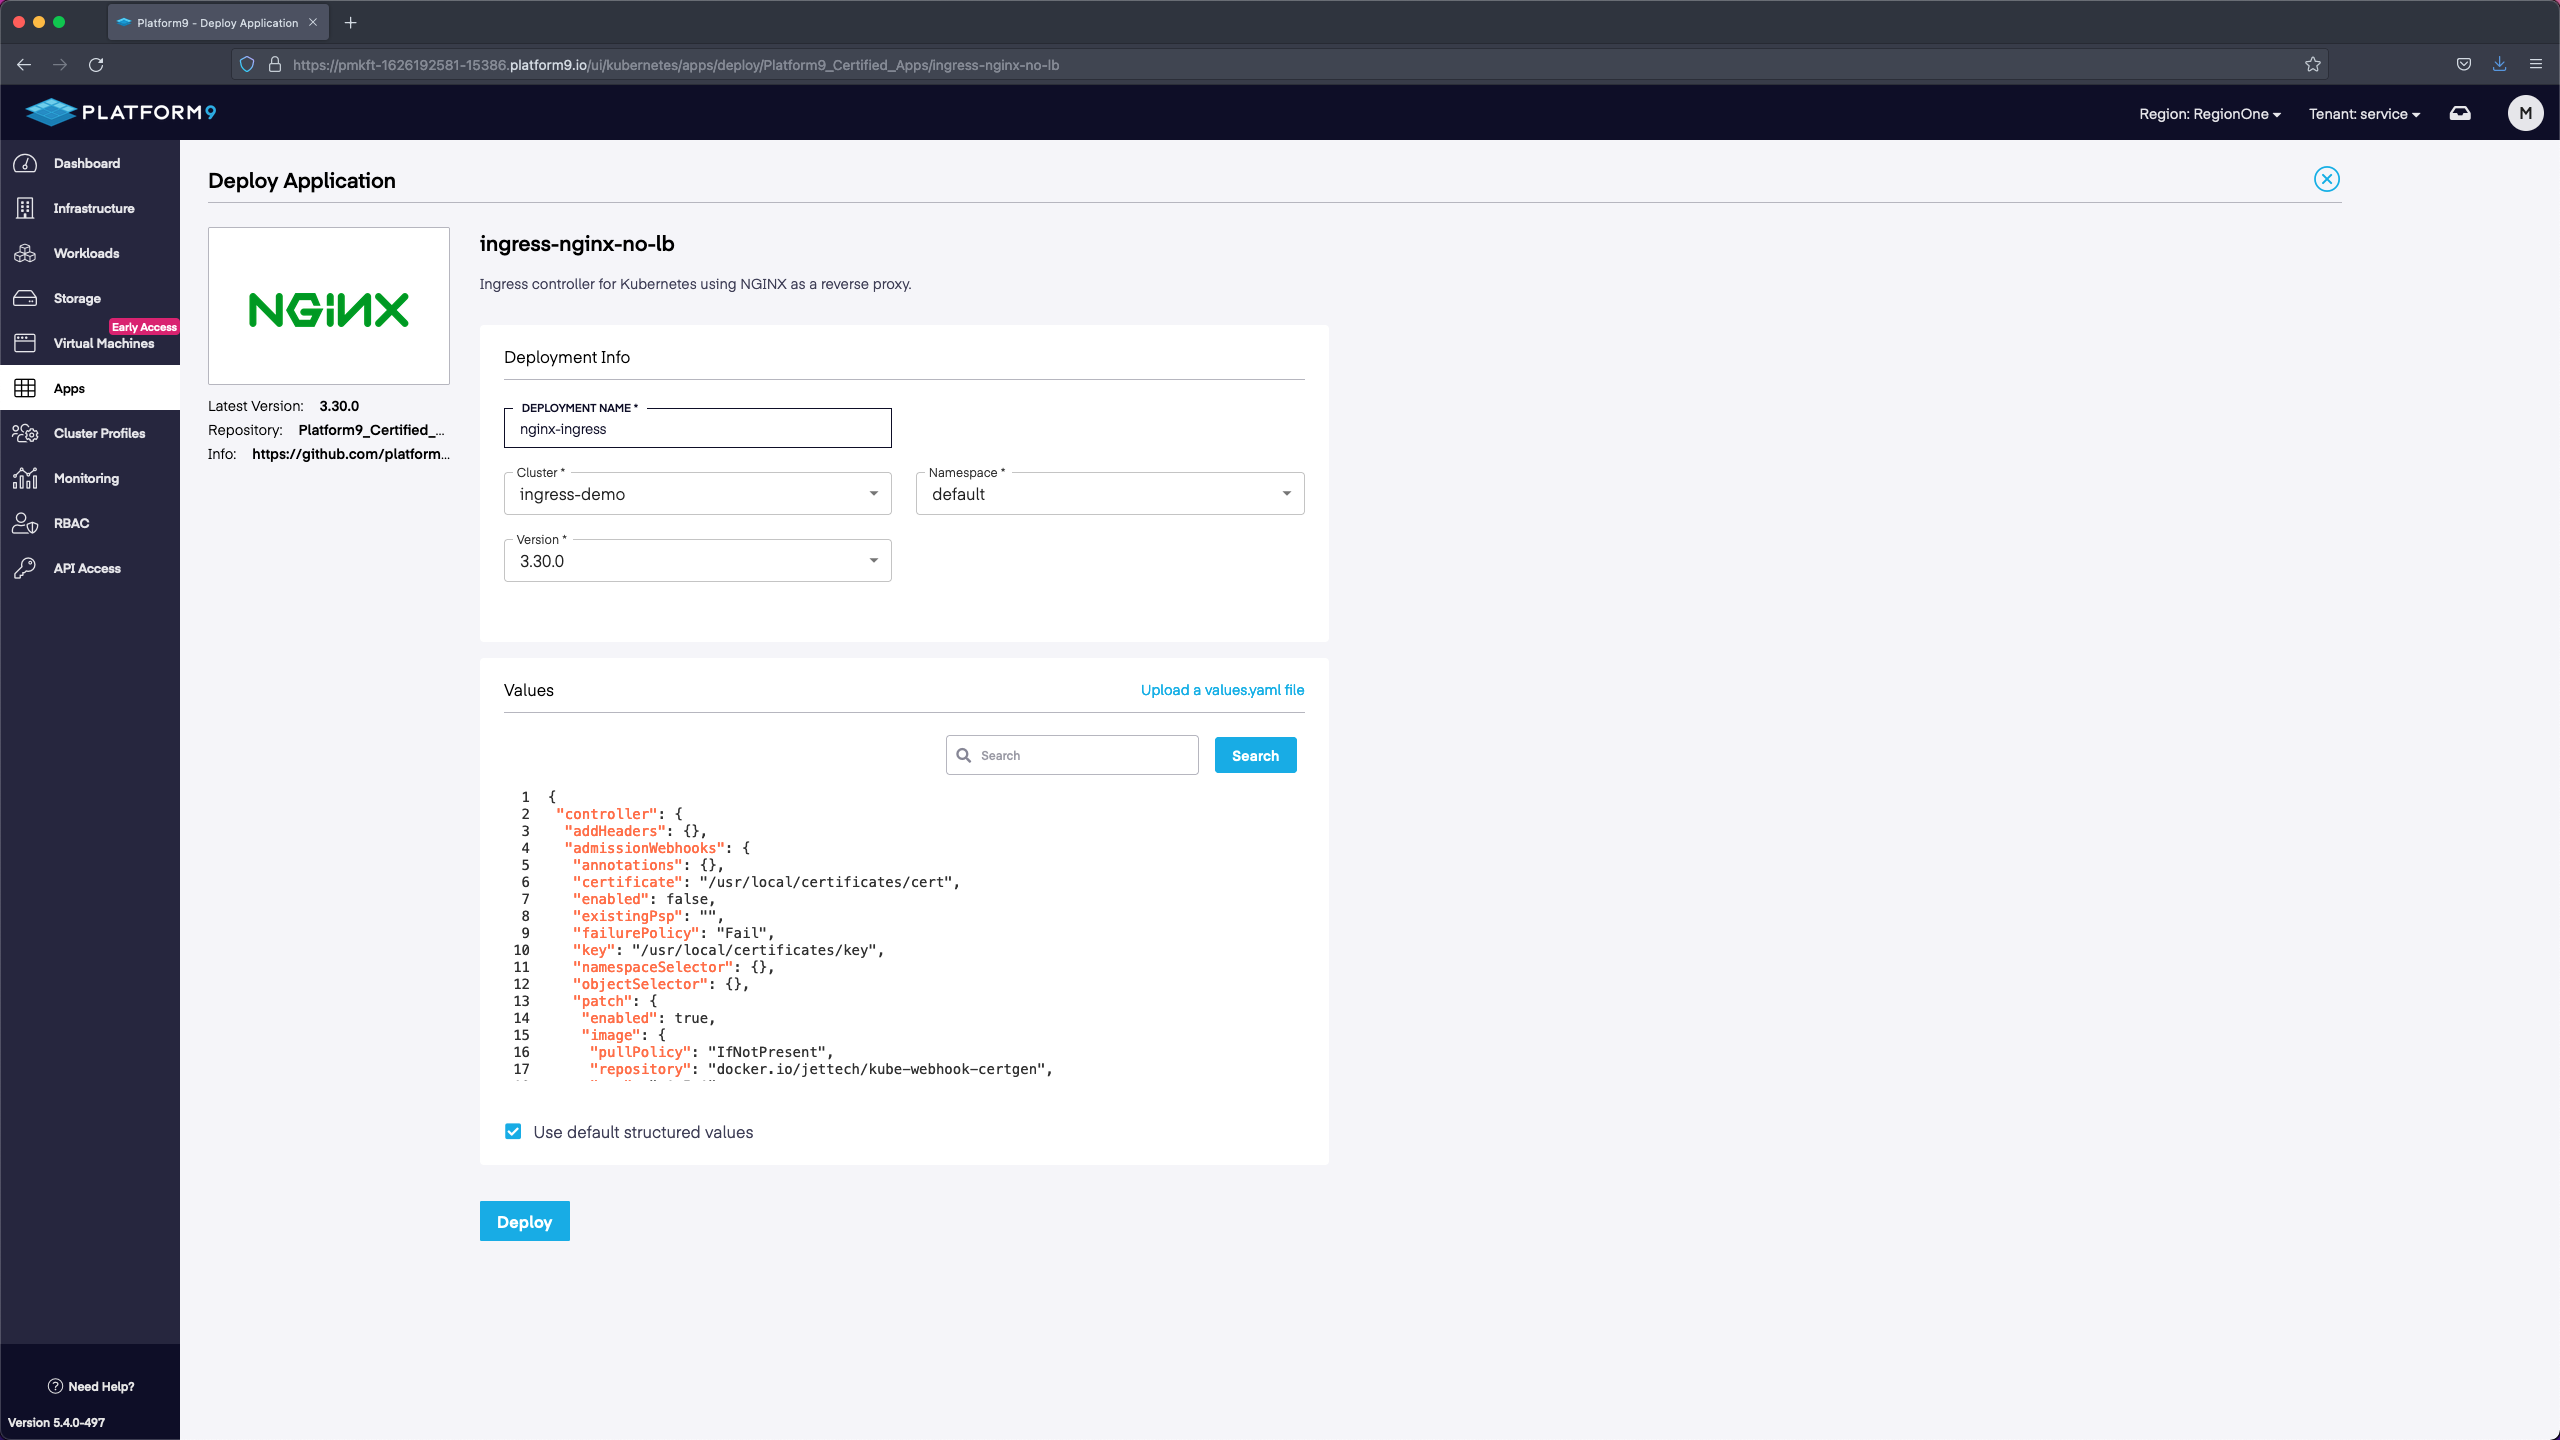
In the Deploy Application page we will fill in the Deployment Name, select our Cluster, select the default namespace, and then select the version. In our demo we name the deployment nginx-ingress, we select the current cluster and the default namespace, and then we leave the version set to default. We will not modify any of the values in the values section. If you wanted to modify the configuration away from the defaults, the values yaml is where you would make updates.
Step 2 - Create a DNS Record
In our example we are using a BareOS cluster with private IP address space. I updated my hosts file to direct traffic to IP address associated with one of the nodes. A NodePort service will assign a high port number that will be used instead of 80 or 443.
First we need to see which ports are associated with our nginx-ingress-ingress-nginx-no-lb-controller service. This is the service created by the App Catalog deployment step we did previously. In this example the port we would use for 80 would be 31469. Our application will be accessible through three different IP addresses with this Port.
For the CLI based install we use a similar command, however we also use the namespace flag to specify the namespace where the service lives. The CLI based port is 30685 in our example.
xxxxxxxxxx$ kubectl get svcNAME TYPE CLUSTER-IP EXTERNAL-IP PORT(S) AGEkubernetes ClusterIP 10.21.0.1 <none> 443/TCP 101mnginx-ingress-ingress-nginx-no-lb-controller NodePort 10.21.105.204 <none> 80:31469/TCP,443:31001/TCP 58mIf we look at the nodes in our cluster we can find the IP addresses associated with each node. For the demo we will pick 192.168.86.74 however you could use any of the worker node IP addresses.
xxxxxxxxxx$ kubectl get nodesNAME STATUS ROLES AGE VERSION192.168.86.71 Ready master 101m v1.21.3192.168.86.72 Ready worker 101m v1.21.3192.168.86.73 Ready worker 101m v1.21.3192.168.86.74 Ready worker 101m v1.21.3Private IP Addresses for Nodes
In our /etc/hosts file we will add a new entry for demo.pf9.io and associated it with 192.168.86.74. Modify the host you are using for this step, unless you are just testing functionality and want to use demo.pf9.io.
xxxxxxxxxx192.168.86.74 demo.pf9.ioPublic IP Addresses for Nodes
If the nodes have Public IP addresses associated with them then we would want to create an A record pointing to one of the node IP addresses. We would also want to ensure that the port is accessible through security group rules or other firewall settings your provider has. We are still going to use high numbered ports to access our application.
Step 3 - Create a deployment, service, and ingress resource
Now that the DNS has been setup we can move on to the deployment, service, and ingress resources.
Deployment
The deployment will display a splash page saying Welcome to Platform9. Create a deployment file and name it pf9-hello-deployment.yaml with the information below.
xxxxxxxxxxapiVersion: apps/v1kind: Deploymentmetadata: name: hello-world labels: app: hello-worldspec: replicas: 1 selector: matchLabels: app: hello-world template: metadata: labels: app: hello-world spec: containers: - name: hello-world image: platform9community/hello-pf9 ports: - containerPort: 8080Create the resource:
xxxxxxxxxxkubectl create -f pf9-hello-deployment.yamlService
Our service is going to direct traffic to the pod on port 8080. The service created will be a ClusterIP, which allows us to Load Balance within the cluster. Create a file named pf9-hello-service.yaml with the information below.
xxxxxxxxxxapiVersion: v1kind: Servicemetadata: name: hello-worldspec: ports: - port: 8080 targetPort: 8080 selector: app: hello-worldCreate the resource:
xxxxxxxxxxkubectl create -f pf9-hello-service.yamlIngress
The ingress resource will route traffic for demo.pf9.io to our service. Our path has been set to "/" which means traffic to our URL without another endpoint will go to the service listed. If we wanted to send traffic for demo.pf9.io/hello to our service then we would update the path section to "/hello". Create a file named pf9-hello-ingress.yaml with the information below.
xxxxxxxxxxapiVersion: networking.k8s.io/v1kind: Ingressmetadata: name: hello-world namespace: default annotations:spec: ingressClassName: nginx rules: - host: "demo.pf9.io" http: paths: - pathType: Prefix path: "/" backend: service: name: hello-world port: number: 8080Create the resource:
xxxxxxxxxxkubectl create -f pf9-hello-ingress.yamlNow we can curl our URL with the correct port (curl demo.pf9.io:31469) and should see the Platform9 splash page.
$ curl demo.pf9.io:31469<!DOCTYPE html><html lang="en"><head> <meta charset="utf-8"/> <meta name="viewport" content="width=device-width, initial-scale=1.0"/> <title>Hello Platform9</title> <link rel="stylesheet" href="/lib/bootstrap/dist/css/bootstrap.min.css" /> <link rel="stylesheet" href="/css/site.css" /> <link id="app-favicon" rel="icon" type="image/png" href="https://res.cloudinary.com/developerhub/image/upload/v1604602597/4501/efrhywrmtw8cp3a81avl.png"></head><body><div class="container"> <main role="main" class="pb-3"> <div class="text-center mt-5"> <h1 class="display-4">Howdy Friend! Welcome to Platform9.</h1> <div><img src="Platform9_Stacked_Logo_2000px.jpg" class="img-fluid" /></div></div> </main></div><footer class="border-top footer text-muted"> <div class="container"> © 2021 - Platform9 </div></footer><script src="/lib/jquery/dist/jquery.min.js"></script><script src="/lib/bootstrap/dist/js/bootstrap.bundle.min.js"></script><script src="/js/site.js?v=BxFAw9RUJ1E4NycpKEjCNDeoSvr4RPHixdBq5wDnkeY"></script></body></html>Conclusion
NodePort can be used with an Ingress Controller. Using NodePort over the LoadBalancer type may be a requirement for certain configurations or architectures. When using cloud based solutions it may be more beneficial to use a LoadBalancer as they will use the standard ports of 80/443.