How to deploy External DNS Service on your Kubernetes Cluster
In this tutorial, we will follow a step-by-step approach to configure ExternalDNS service on a Kubernetes cluster.
Kubernetes contains an internal DNS module that automatically discovers and assigns DNS names to individual containers when instructed. In practice, this works very well. However, we frequently need to expose some or all parts of the Kubernetes cluster to the public. For instance, if a cluster exists inside a public cloud provider such as AWS or Google Cloud Platform, we would like to have a container service that interacts with this cloud provider and changes any A Records to point to the nodes that expose those services.
This is what the ExternalDNS project does. ExternalDNS is a Kubernetes project with the main purpose of automatically creating DNS records for Ingress or Service resources.
In this tutorial, we will be using a Platform9 Managed Kubernetes Free Tier cluster backed by a DigitalOcean Droplet. However, you can use this tutorial to configure external DNS on any other Kubernetes cluster of your choice.
Prerequisites
- A valid Kubernetes cluster. You can create one quickly for free using Platform9 Managed Kubernetes. Signup for a Free PMK Account Here and create your Kubernetes cluster using PMK. You can also use this guide on any other Kubernetes cluster you may have.
- A Kubectl installation with your Kubernetes cluster from the step above configured as the primary cluster.
- A spare domain name to test the ExternalDNS. You can use a domain registrar of your choice to obtain a domain name or use one of the free domain name providers like Namecheap.
Now you are ready to deploy the ExternalDNS service on your Kubernetes cluster.
Step 1 - Domain Name and API Keys
To test the ExternalDNS, we need to assign a domain name. As Digital Ocean does not act as a DNS registrar, you need to assign the nameservers of the domain registrar to point to the following entries:
After that, go to the Networking tab of your DigitalOcean Dashboard and add the domain name there:
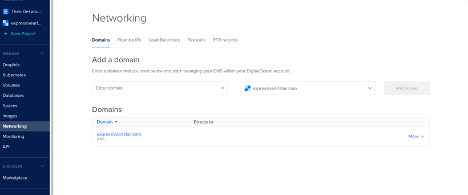
Do not assign any droplet there, as we will let the ExternalDNS handle that.
Next, we need to create a Personal Access Token for the DigitalOcean API. Navigate to the API->Tokens and Keys and create a new API key. Note that token value, as it will be exposed only temporarily in the UI.
Step 2 - Set Up ExternalDNS
Setting up the ExternalDNS is the easy part. We just need to define the manifest that consists of the following services:
- A Service Account for the ExternalDNS deployment.
xxxxxxxxxxapiVersionv1kindServiceAccountmetadatanameexternal-dns</code>- A Cluster Role with required RBAC permissions.
xxxxxxxxxxapiVersionrbac.authorization.k8s.io/v1beta1kindClusterRolemetadatanameexternal-dnsrulesapiGroups""resources"services""endpoints""pods"verbs"get""watch""list"apiGroups"extensions"resources"ingresses"verbs"get""watch""list"apiGroups""resources"nodes"verbs"list"- A Cluster Role binding assigned to the previous Cluster Role and Service Account.
xxxxxxxxxxapiVersionrbac.authorization.k8s.io/v1beta1kindClusterRoleBindingmetadatanameexternal-dns-viewerroleRefapiGrouprbac.authorization.k8s.iokindClusterRolenameexternal-dnssubjectskindServiceAccountnameexternal-dnsnamespacedefault- The ExternalDNS pod deployment, passing as arguments the domain name and DigitalOcean Token value.
xxxxxxxxxxapiVersionapps/v1kindDeploymentmetadatanameexternal-dnsspecreplicas1selectormatchLabelsappexternal-dnsstrategytypeRecreateselectormatchLabelsappexternal-dnstemplatemetadatalabelsappexternal-dnsspecserviceAccountNameexternal-dnscontainersnameexternal-dnsimageregistry.opensource.zalan.do/teapot/external-dnslatestargs--source=service--domain-filter=expressiveartsfair.com--provider=digitaloceanenvnameDO_TOKENvalue"YOUR_DIGITALOCEAN_API_KEY"You can either put all of these manifests in the same file or in separate files. Then apply the configuration:
xxxxxxxxxx$ kubectl apply -f external-dns.ymlserviceaccount/external-dns createdclusterrole.rbac.authorization.k8s.io/external-dns createdclusterrolebinding.rbac.authorization.k8s.io/external-dns-viewer createddeployment.apps/external-dns createdMonitor the deployment status via the Platform9 UI or on the terminal.
When everything is healthy, we can deploy our first service to test the external DNS configuration.
Create a new file named nginx.demo.service.yml with the following contents:
xxxxxxxxxxapiVersionapps/v1kindDeploymentmetadatanamenginxspecreplicas1selectormatchLabelsappnginxtemplatemetadatalabelsappnginxspeccontainersimagenginxnamenginxportscontainerPort80---apiVersionv1kindServicemetadatanamenginxannotationsexternal-dns.alpha.kubernetes.io/hostnamedemo.expressiveartsfair.comspecselectorappnginxtypeNodePortportsprotocolTCPport80nodePort30080The important parts are:
- We used the external- dns.alpha.kubernetes.io/hostname: demo.expressiveartsfair.com annotation passing the custom domain we want to bind
- We used a NodePort type to expose the node IP address to the public.
Now anytime we assign the external DNS annotation in a service, the daemon will monitor that event and use the Digital Ocean API to update the DNS Records. In the following image you can see that the DNS entry was added to point to the Droplet that we exposed to the NodePort service:

Now, you may notice one small thing. Currently we cannot use an external Load Balancer service, as the Platform9 Kubernetes distro is running inside a droplet. Thus, we cannot directly navigate to demo.expressiveartsfair.com as the NodePort is open in a different port (port 30080 as we specified in the configuration).
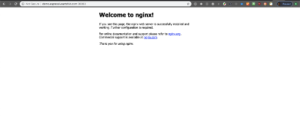
Nonetheless, if we navigate to demo.expressiveartsfair.com:30080, we can see the nginx welcome page as usual:
In order to make this work we have a few options:
- Create the redirect rule.
- We can use an Ingress controller like nginx-ingress-controller to create on-the-fly nginx configurations based on some host rules. This way we can point directly to the backend service host as defined in the definition.
In either case, we have the ExternalDNS service handling and updating all the corresponding DNS records without user intervention.
Cleaning up
Follow the reverse step and destroy all created resources:
xxxxxxxxxx$ kubectl delete -f Nginx-service.yml$ kubectl delete -f external-dns.ymlThen invalidate the DigitalOcean Token you created earlier.