How to Set Up and Run Kafka on Kubernetes
Apache Kafka is a leading open-source distributed streaming platform first developed at LinkedIn. It consists of several APIs such as Producer, Consumer, Connect and Streams. Together, those systems act as high-throughput, low-latency platforms for handling real-time data. This is why Kafka is preferred among several of the top-tier tech companies such as Uber, Zalando and AirBnB.
Quite often, we would like to deploy a fully-fledged Kafka cluster in Kubernetes, just because we have a collection of microservices and we need a resilient message broker in the center. We also want to spread the Kafka instances across nodes, to minimize the impact of a failure.
In this tutorial, we are going to see an example Kafka deployment within Platform9 Free Tier Kubernetes platform, backed up by some DigitalOcean droplets. Let’s get started.
Setting Up the Platform9 Free Tier Cluster
Below are the brief instructions to get you up and running with a working Kubernetes Cluster from Platform9:
Signup with Platform9.
Click the Create Cluster button and inspect the instructions. We need a server to host the Cluster.
Create a few Droplets with at least 3GB RAM and 2 vCPUs. Follow the instructions to install the
pf9clitool and prepping the nodes.Switch to the Platform9 UI and click the refresh button. You should see the new nodes in the list. Designate the first node as master and the rest as workers.
Leave the default values in the next steps. Then create the cluster.
Wait until the cluster becomes healthy. It will take at least 20 minutes.
Click on the API Access tab and select to download the
kubeconfigbutton:
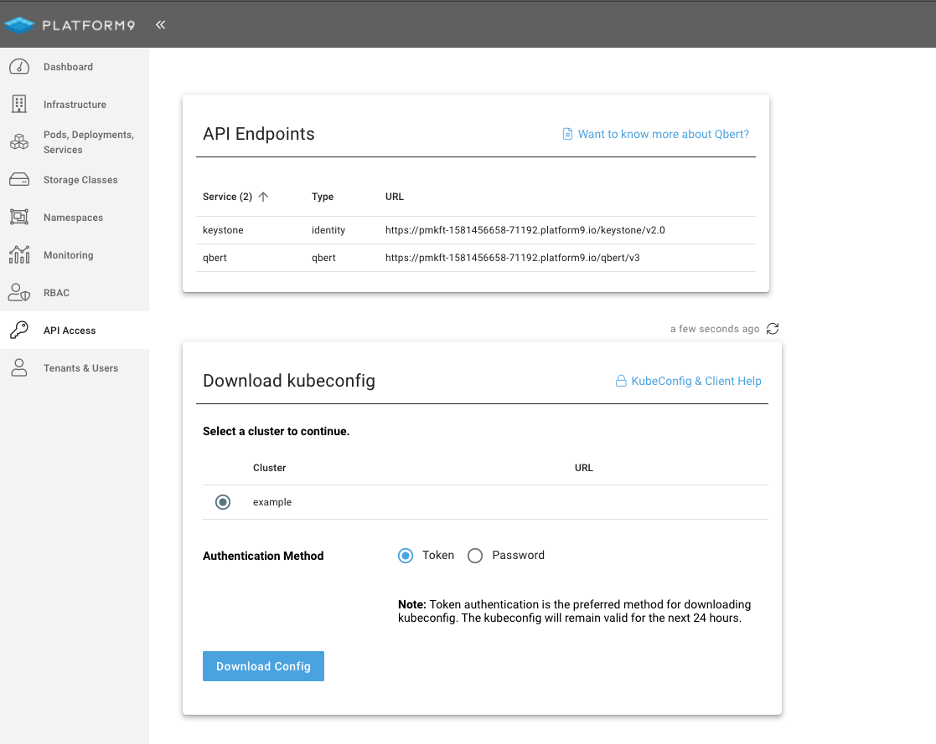
Once downloaded, export the config and test the cluster health:
$ export KUBECONFIG=/Users/itspare/Theo/Projects/platform9/example.yaml $ kubectl cluster-info Kubernetes master is running at https://134.122.106.235 CoreDNS is running at https://134.122.106.235/api/v1/namespaces/kube-system/services/kube-dns:dns/proxy Metrics-server is running at https://134.122.106.235/api/v1/namespaces/kube-system/services/https:metrics-server:/proxyCreating Persistent Volumes
Before we install Helm and the Kafka chart, we need to create some persistent volumes for storing Kafka replication message files.
This step is crucial to be able to enable persistence in our cluster because without that, the topics and messages would disappear after we shutdown any of the servers, as they live in memory.
In our example, we are going to use a local file system, Persistent Volume (PV), and we need one persistent volume for each Kafka instance; so if we plan to deploy three instances, we need three PVs.
Create and apply first the Kafka namespace and the PV specs:
Kafka Namespace
namespace.yml
---apiVersionv1kindNamespacemetadata namekafkaAnd, then:
$ kubectl apply -f namespace.ymlnamespace/kafka createdPV Specs
pv.yml
---apiVersionv1kindPersistentVolumemetadata namekafka-pv-volume labels typelocalspec storageClassNamemanual capacity storage10Gi accessModesReadWriteOnce hostPath path"/mnt/data"---apiVersionv1kindPersistentVolumemetadata namekafka-pv-volume-2 labels typelocalspec storageClassNamemanual capacity storage10Gi accessModesReadWriteOnce hostPath path"/mnt/data"---apiVersionv1kindPersistentVolumemetadata namekafka-pv-volume-3 labels typelocalspec storageClassNamemanual capacity storage10Gi accessModesReadWriteOnce hostPath path"/mnt/data"And, then kubectl apply:
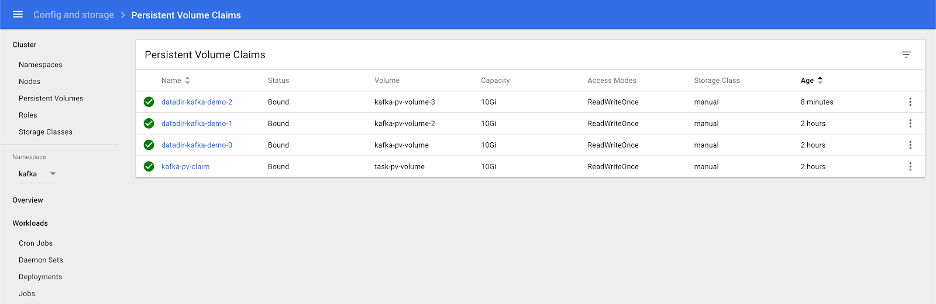
$ kubectl apply -f pv.ymlIf you are using the Kubernetes UI, you should be able to see the PV volumes on standby:

Installing Helm
Helm is a package manager for Kubernetes which is not bundled by default, and is to be installed on your local machine. It may be installed either via a script, as shown below, or, via a package manager, e.g. yum , apt , brew (to name a few), more of which you can find out about here.
$ curl -fsSL -o get_helm.sh https://raw.githubusercontent.com/helm/helm/master/scripts/get-helm-3$ chmod 700 get_helm.sh$ ./get_helm.shDeploying the Helm Chart
In the past, trying to deploy Kafka on Kubernetes was a good exercise. You had to deploy a working Zookeeper Cluster, role bindings, persistent volume claims and apply the correct configuration.
Hopefully for us, with the use of the Kafka Incubator Chart, the whole process is mostly automated (with a few quirks here and there).
We add the Helm chart:
$ helm repo add incubator https://charts.helm.sh/incubatorExport the chart values in a file:
Note: Starting from Helm v3 the release name is now mandatory as part of the command and hence the flag --name is no longer valid.
$ helm install kafka-demo \ --namespace kafka incubator/kafka \ -f values.yml \ --debug --dry-run > chart_values.yamlCarefully inspect the configuration values, particularly around the parts about persistence and about the number of Kafka stateful sets to deploy.
Then install the chart:
$ helm install kafka-demo \ --namespace kafka incubator/kafka \ -f values.yml \ --debugCheck the status of the deployment:
$ helm status kafka-demoLAST DEPLOYED: Sun Apr 19 14:05:15 2020NAMESPACE: kafkaSTATUS: DEPLOYEDRESOURCES:==> v1/ConfigMapNAME DATA AGEkafka-demo-zookeeper 3 5m29s==> v1/Pod(related)NAME READY STATUS RESTARTS AGEkafka-demo-zookeeper-0 1/1 Running 0 5m28skafka-demo-zookeeper-1 1/1 Running 0 4m50skafka-demo-zookeeper-2 1/1 Running 0 4m12skafka-demo-zookeeper-0 1/1 Running 0 5m28skafka-demo-zookeeper-1 1/1 Running 0 4m50skafka-demo-zookeeper-2 1/1 Running 0 4m12s==> v1/ServiceNAME TYPE CLUSTER-IP EXTERNAL-IP PORT(S) AGEkafka-demo ClusterIP 10.21.255.214 9092/TCP 5m29skafka-demo-headless ClusterIP None 9092/TCP 5m29skafka-demo-zookeeper ClusterIP 10.21.13.232 2181/TCP 5m29skafka-demo-zookeeper-headless ClusterIP None 2181/TCP,3888/TCP,2888/TCP 5m29s==> v1/StatefulSetNAME READY AGEkafka-demo 3/3 5m28skafka-demo-zookeeper 3/3 5m28s==> v1beta1/PodDisruptionBudgetNAME MIN AVAILABLE MAX UNAVAILABLE ALLOWED DISRUPTIONS AGEkafka-demo-zookeeper N/A 1 1 5m29sDuring this phase, you may want to navigate to the Kubernetes UI and inspect the dashboard for any issues. Once everything is complete, then the pods and Persistent Volume Claims should be bound and green.
Now we can test the Kafka cluster.
Testing the Kafka Cluster
We are going to deploy a test client that will execute scripts against the Kafka cluster.
Create and apply the following deployment:
testclient.yml
apiVersionv1kindPodmetadata nametestclient namespacekafkaspec containersnamekafka imagesolsson/kafka0.11.0.0 commandsh-c"exec tail -f /dev/null"Then, apply:
$ kubectl apply -f testclientThen, using the testclient, we create the first topic, which we are going to use to post messages:
$ kubectl -n kafka exec -ti testclient -- ./bin/kafka-console-consumer.sh \ --bootstrap-server kafka-demo:9092 \ --topic messages \ --from-beginningHere we need to use the correct hostname for the ZooKeeper cluster and the topic configuration.
Next, verify that the topic exists:
$ helm install --name kafka-demo \ --namespace kafka incubator/kafka \ -f values.yml \ --debugNow, we can create one consumer and one producer instance so that we can send and consume messages.
First create one or two listeners, each on its own shell:
$ helm install --name kafka-demo \ --namespace kafka incubator/kafka \ -f values.yml \ --debugThen create the producer session and type some messages. You will be able to see them propagate to the consumer sessions:
$ kubectl -n kafka exec -ti testclient -- ./bin/kafka-console-producer.sh \ --broker-list kafka-demo:9092 \ --topic messages>Hi>How are you?>Hope you're wellSwitching on each consumer you will see:
HiHow are you?Hope you're wellDestroying the Helm Chart
To clean up our resources, we just destroy the Helm Chart and delete the PVs we created earlier:
$ helm delete kafka-demo --purge$ kubectl delete -f pv.yml -n kafka