How to Build an end to end CI/CD Pipeline using Jenkins on a Kubernetes Cluster
In this tutorial, we will build the infrastructure for a CI/CD pipeline in a Kubernetes environment. A successful merge to the master branch in a GitHub project will trigger a Jenkins pipeline, which can build, test and deploy an updated project into our environment.
The secret to the success of any DevOps initiative is a stable CI/CD pipeline. CI – or Continuous Integration – involves automatically taking newly-merged code and then building, testing, and depositing that code in an artifact repository. CD – Continuous Deployment – involves taking that freshly-deposited artifact and deploying it into a production environment.
In addition to GitHub and Jenkins, we will make use of a private JFrog repository to store the image for our pipeline, and we will deploy everything on a Kubernetes cluster managed by Platform9 Managed Kubernetes Free Tier, however you can run this tutorial on any Kubernetes cluster of your choice.
Anatomy of the Pipeline
CI/CD pipelines can be as straightforward or as complicated as you choose to make them. The objective is an automated process that can take an updated codebase, build it, run a battery of tests, and then deliver the project to the target environment. If the pipeline is successful, the project is then deployed into the environment and monitored.

Jenkins CI/CD Pipeline to Build, Test then Deploy
The testing phase should include the execution of unit tests, integration tests, and performance tests. This phase can also include static code analysis, security scans, and any other tools that your organization uses to validate and secure applications.
Following the testing phase, the application is packaged and delivered to the environment. In our example, we will use this phase to build the Docker container, tag it, and push it to our JFrog Container Registry. Your environment may vary depending on how you package your applications and store them.
Finally, when the pipeline completes successfully, we will automatically deploy the artifact into our environment and monitor it. There are different deployment strategies you can use. Canary, Blue/Green, and Rolling Deployment are some options.
Prerequisites
A valid Kubernetes cluster. You can create one quickly for free using Platform9 Managed Kubernetes. Signup for a Free PMK Account Here and create your Kubernetes cluster using PMK. You can also use this guide on any other Kubernetes cluster you may have. You will need a cluster with at least 2 nodes for this tutorial - a master and a worker node. See the following guides to quickly create such a cluster on your laptop or a virtual machine.
The Kubernetes cluster nodes need to be publicly accessible (to be able to trigger a build from Github)
A Kubectl installation with your Kubernetes cluster from the step above configured as the primary cluster.
Docker installation, preferably on the same machine that has kubectl installed.
Step 1 - Get Jenkins into the Container Registry
We are using the JFrog Container Registry to store our Jenkins image and all of the artifacts we create with our pipeline. You can sign up for the free trial of the JFrog Container Registry here.

Now that we have a container registry, the next step is to create and configure a Jenkins image, and then push it into our registry. By doing this, we will have an image that is configured for our environment and ready to go as soon as we deploy it.
You will need to have Docker installed for this next step, as well as the address and account credentials for your JFrog registry. We will start by taking the latest image of the Jenkins container and configuring it with the standard plugins and an admin user.
Below are three files - a Dockerfile, a text file containing a list of plugins (plugins.txt), and a groovy script (userCreate.groovy) that will automatically configure the first user account.
Copy these three files to a folder on the machine that has docker installed.
FROM jenkins/jenkins:ltsENV JENKINS_USER=admin \ JENKINS_PASSWORD=passwordCOPY userCreate.groovy /usr/share/jenkins/ref/init.groovy.d/# Install Jenkins pluginsCOPY plugins.txt /usr/share/jenkins/plugins.txtRUN /usr/local/bin/install-plugins.sh $(cat /usr/share/jenkins/plugins.txt) && \ mkdir -p /usr/share/jenkins/ref/ && \ echo lts > /usr/share/jenkins/ref/jenkins.install.UpgradeWizard.state && \ echo lts > /usr/share/jenkins/ref/jenkins.install.InstallUtil.lastExecVersionxxxxxxxxxxapache-httpcomponents-client-4-apiauthentication-tokensbouncycastle-apibranch-apibuild-timeoutcommand-launchercredentialscredentials-bindingdisplay-url-apidocker-commonsdocker-workflowdurable-taskfavoriteghprbgitgit-changeloggit-clientgit-servergithubgithub-apigithub-branch-sourcegithub-issuesgithub-oauthgithub-organization-foldergithub-pr-coverage-statusgithub-pullrequestgradlegravatarhandlebarsicon-shimjavadocjquery-detachedjschjunitkerberos-ssokubectlldapmailermapdb-apimetricsmomentjsoauth-credentialsoic-authpipeline-build-steppipeline-github-libpipeline-githubnotify-steppipeline-graph-analysispipeline-input-steppipeline-milestone-steppipeline-model-apipipeline-model-declarative-agentpipeline-model-definitionpipeline-model-extensionspipeline-rest-apipipeline-stage-steppipeline-stage-tags-metadatapipeline-stage-viewpipeline-utility-stepsplain-credentialspubsub-lightrebuildresource-disposerscm-apiscript-securitysse-gatewayssh-agentssh-credentialsssh-slavesstructstimestampertoken-macrourl-auth-ssovariantworkflow-aggregatorworkflow-apiworkflow-basic-stepsworkflow-cpsworkflow-cps-global-libworkflow-durable-task-stepworkflow-jobworkflow-multibranchworkflow-scm-stepworkflow-step-apiworkflow-supportws-cleanupxxxxxxxxxx#!groovyimport jenkins.model.*import hudson.security.*import jenkins.security.s2m.AdminWhitelistRuledef instance = Jenkins.getInstance()def env = System.getenv()def user = env['JENKINS_USER']def pass = env['JENKINS_PASSWORD']if ( user == null || user.equals('') ) { println "Jenkins user variables not set (JENKINS_USER and JENKINS_PASSWORD)."} else { println "Creating user " + user + "..." def hudsonRealm = new HudsonPrivateSecurityRealm(false) hudsonRealm.createAccount(user, pass) instance.setSecurityRealm(hudsonRealm) def strategy = new FullControlOnceLoggedInAuthorizationStrategy() instance.setAuthorizationStrategy(strategy) instance.save() Jenkins.instance.getInjector().getInstance(AdminWhitelistRule.class).setMasterKillSwitch(false) println "User " + user + " was created"}Run the following command from the folder with each of these scripts, to build the Jenkins docker container image, and tag it with jenkins as the name:
xxxxxxxxxx$ docker tag jenkins:lts .It will take a minute or two for the build to complete. Now that we have our container, we are going to push it up to our private JFrog repository. The first step is to log in to our JFrog repository with docker.
Use the following command, replacing <repository_name> with the name of your JFrog repository, with -docker appended for the docker repository. After entering the command, docker will prompt you for your JFrog username and password.
xxxxxxxxxx$ docker login <repository_name>-docker.jfrog.ioOnce we have authenticated to our repository, we can tag the image with the name of our repository and push it up. Again, replace <repository_name> with the name of your repository.
xxxxxxxxxx$ docker tag jenkins:lts <repository_name>-docker.jfrog.io/jenkins:lts$ docker push <repository_name>-docker.jfrog.io/jenkins:ltsOnce you have uploaded the image successfully, you are ready to move on to the next step.
Step 2 - Set Up the Environment
If you are new to Platform9 and need a hand setting up virtual machines or creating a new cluster, the tutorials listed below are invaluable.
I created a Kubernetes cluster named “Pipeline” and added my new nodes to this cluster: one node as a master and the other as a worker.
Once my cluster was running, click on the Kubeconfig icon to download the config for kubectl. Select the Token option, and then download the config. Mine was named Pipeline.yaml. You’ll need this config to connect the Kubernetes Dashboard through Platform9, and on the cluster to use kubectl locally.
On the cluster itself, you’ll need to set an environment variable with the configuration. I downloaded the file to my user’s Downloads folder, and set the variable as shown below:
xxxxxxxxxxapiVersionextensions/v1beta1kindDeploymentmetadata namejenkins-deploymentspec replicas1 template metadata labels appjenkins spec containersnamejenkins image<repository_name>-docker.jfrog.io/jenkinslts portscontainerPort8080 imagePullSecretsnameregcredThe next thing we need to do is add the connection information to our JFrog registry. We’ll store this as a Kubernetes Secret called regcred. The easiest way to set this up is directly on the master instance. You’ll need the address for the registry, your username, and your password. Replace the appropriate text with your information in the following command.
xxxxxxxxxxapiVersionextensions/v1beta1kindDeploymentmetadata namejenkins-deploymentspec replicas1 template metadata labels appjenkins spec containersnamejenkins image<repository_name>-docker.jfrog.io/jenkinslts portscontainerPort8080 imagePullSecretsnameregcredWe’re now ready to deploy our Jenkins pod to our cluster. From the Pods, Deployments, Services tab in my Platform9 dashboard, I selected the Deployments section, and clicked on + Add Deployment. I selected my cluster (Pipeline), the default namespace, and then used the text below as my Resource YAML. You’ll need to update <repository_name> with your repository.
xxxxxxxxxxapiVersionextensions/v1beta1kindDeploymentmetadata namejenkins-deploymentspec replicas1 template metadata labels appjenkins spec containersnamejenkins image<repository_name>-docker.jfrog.io/jenkinslts portscontainerPort8080 imagePullSecretsnameregcredOnce we’ve deployed the pod, we need to expose it to the outside world. From the Pods, Deployments, Services tab in my Platform9 dashboard, I selected the Services section, and clicked on + Add Service. As above, I picked my cluster (Pipeline), the default namespace, and then used the text below as my Resource YAML. You’ll need to update <repository_name> with your repository.
xxxxxxxxxxapiVersionv1kindServicemetadata namejenkins-servicespec selector appjenkins portsprotocolTCP port8080 targetPort8080 typeNodePortOnce Jenkins is deployed and connected as a service, you can connect to the Kubernetes dashboard for the cluster to retrieve the port, which allows access to the server. You’ll need the Kubeconfig for this step as well.
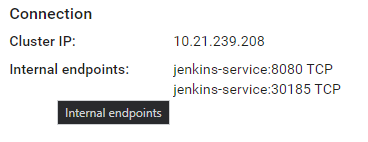
Select jenkins-service in the Services section of the Kubernetes dashboard. Look for the connection information, which will include the local IP address of the cluster, with the exposed port number. The port number is in a range between 30000 and 32767. Mine is shown below. If you’re using cloud-based instances, you may need to open the firewall for this port to allow you to connect. If this were more than a POC, we’d also set up a load balancer, and configure a ‘prettier’ routing solution.

I can now connect to the Jenkins service by combining the public IP address of my master node, and the port number (30315).
Step 3 - Trigger a Build
Navigate to the Jenkins instance in your browser to verify that it is accessible, and to begin setting up the pipeline. Log in with the credentials you specified in the Dockerfile (admin:password) and then click on the link to create new jobs. Enter a name for your project and then select Multibranch Pipeline as the type. Click OK to continue.
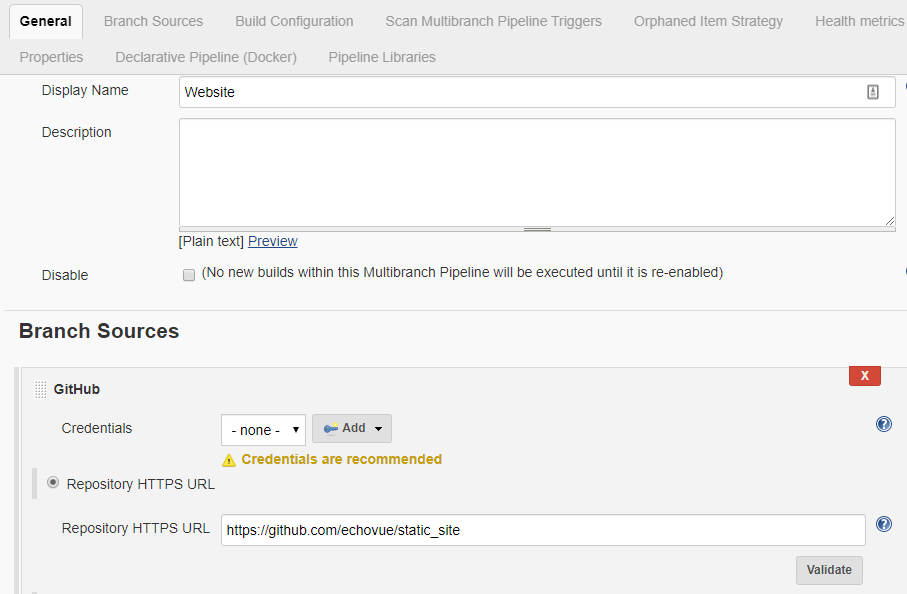
Under the General tab, add a display name, and then under Branch Sources, click on Add source. I’ll be using a simple website project I set up in GitHub, so I selected GitHub and then added the URL for my repository. If you want to check it out, you can view it here.

Finally, ensure that the Build Configuration is by Jenkinsfile, and then under Scan Multibranch Pipeline Triggers, check the Periodically if not otherwise run option. I set mine to a 30-minute interval. If you click on Save at the bottom of the page, it saves the project and begins scanning your repository for changes.
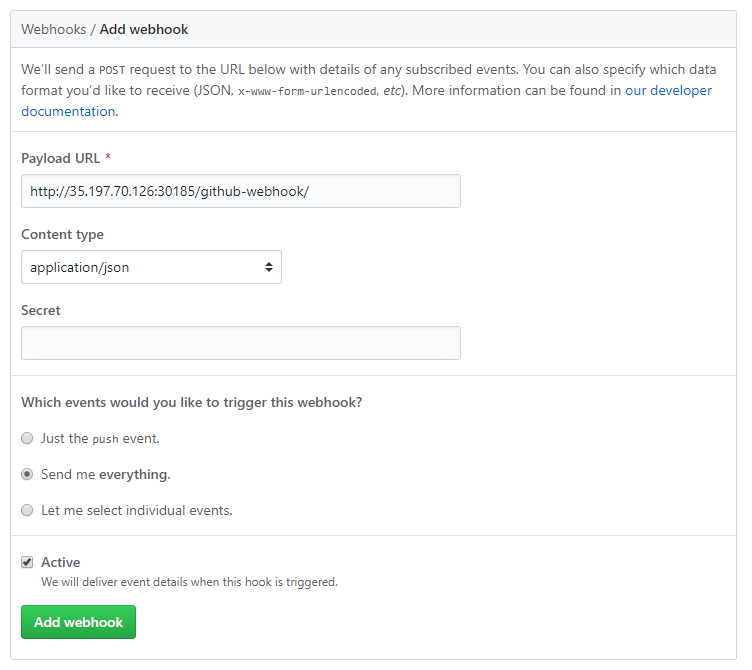
The next step is to create a webhook that will trigger a Jenkins build whenever our project is changed. From your project in GitHub, click on Settings, then Webhooks, and then click the Add webhook button.
The payload URL is the IP address and port number combination we set up in the previous section. Add /github-webhook/ to the end of this URL. I set the Content-Type to application/json, and chose the Send me everything option.

Step 4 - Manage the Pipeline with the Jenkinsfile
Each project manages the configuration for its build pipeline. The default location for the configuration is at the root level of the project in a file named Jenkinsfile. The file specifies how Jenkins should construct the pipeline, and details each step required to build, test, deploy, and monitor the application.
One of the best resources to use when building a new pipeline is the Jenkins website itself. Getting Started with Pipelines explains each of the steps and describes how to build a pipeline that meets your needs.
Next Steps
You should now have a Kubernetes cluster that is now configured to run a full Jenkins pipeline. You should also have a private Docker repository with JFrog that provides a secure place to store your customized Jenkins image, and other images for your cluster. Finally, you have a Jenkins instance that serves as the backbone for your CI/CD process.
For more information and to learn more about each of these products, see the following articles: