Deploying Metal³ Hosts
Create/Add bare metal hosts in bulk
If there are multiple bare metal hosts which have common BMC credentials, you do not need to create bare metal hosts individually. You can create a cronjob using the below yaml file.
This cronjob will create bare metal hosts for each IPMI address in the specified IPMI address range (using IPMI_RANGE_START and IPMI_RANGE_END variables) if IPMI responds on that address and another bare metal host has not already taken this IPMI address. In addition, BMC secrets are created for each bare metal host using the username and password provided in the yaml file.
Note: The cronjob would run periodically and will continue to create bare metal hosts in the event a bare metal host gets deleted.
Environment variables to be customized:
PREFIX: The prefix is used to form a bare metal host object name. Bare metal hosts will be named as (<prefix>_<ipmi-address>).
IPMI_RANGE_START: starting address in the IPMI address range
IPMI_RANGE_END: end address in the IPMI address range
BMC_PORT: common BMC port used for nodes
USERNAME: common username used by bare metal hosts for BMC
PASSWORD: common password used by bare metal hosts for BMC
Cronjob for bare metal host CR creation in bulk.apiVersionbatch/v1kindCronJobmetadata namebmh-cronjob namespacebaremetal-operator-systemspec schedule"15 * * * *" jobTemplate spec template spec containersnamebmh-creater imageplatform9/bmh-bulk-addv0.5.1 imagePullPolicyIfNotPresent envnameIPMI_RANGE_START value<start of IPMI address range to scan>nameIPMI_RANGE_END value<end of IPMI address range to scan>nameBMC_PORT value"6230"nameUSERNAME value"admin"namePASSWORD value"password"namePREFIX value"bmc-node" command"bin/ipmi_address_bulk.sh" restartPolicyOnFailure hostNetworktrue dnsPolicyClusterFirstWithHostNetAdding individual bare metal hosts
If adding a single bare metal host, you can deploy using the the following steps to create bare metal hosts via Kubernetes CLI.
Step1:
SSH to your cluster node.
Step 2:
Apply the following YAML file by modifying the details as per your bare metal host to create a bare metal host object.
apiVersionv1kindSecretmetadata namenode-1-bmc-secrettypeOpaquedata usernameYWRtaW4= passwordcGFzc3dvcmQ=---apiVersionmetal3.io/v1alpha1kindBareMetalHostmetadata namenode-1spec onlinetrue bootMACAddressfa163edca2f1 bootModelegacy bmc addressipmi//172.22.0.1456230 credentialsNamenode-1-bmc-secretStep 3:
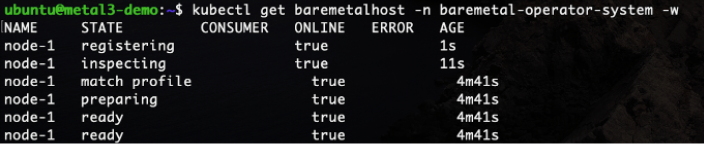
After applying the above YAML run the following command to track the bare metal hosts states. It will take some time to inspect the node.
Command: kubectl get baremetalhost -n baremetal-operator-system -w
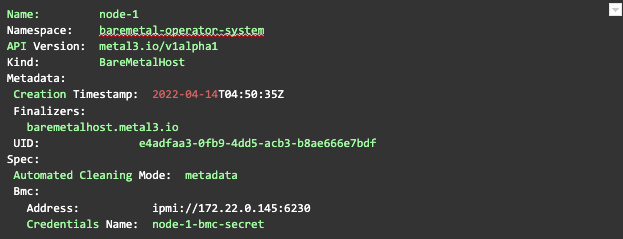
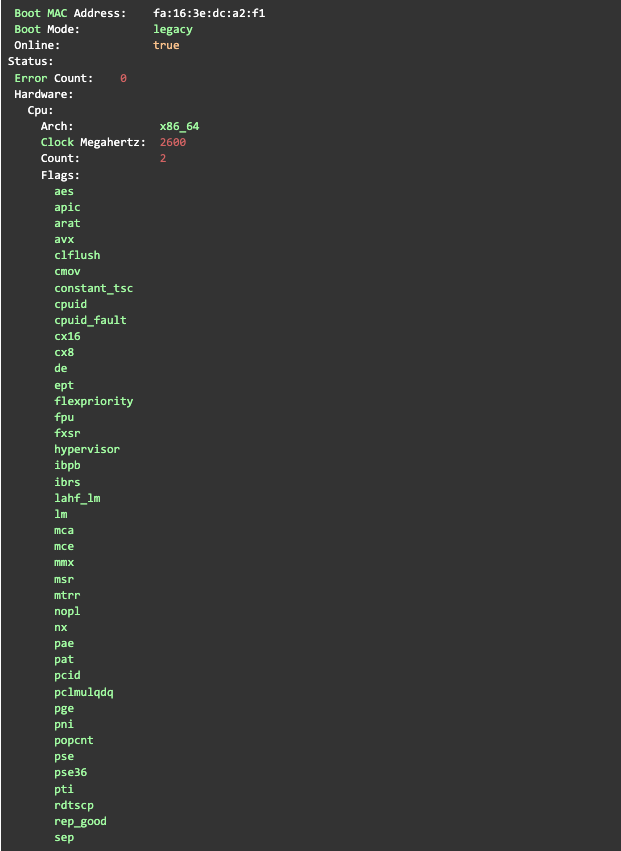
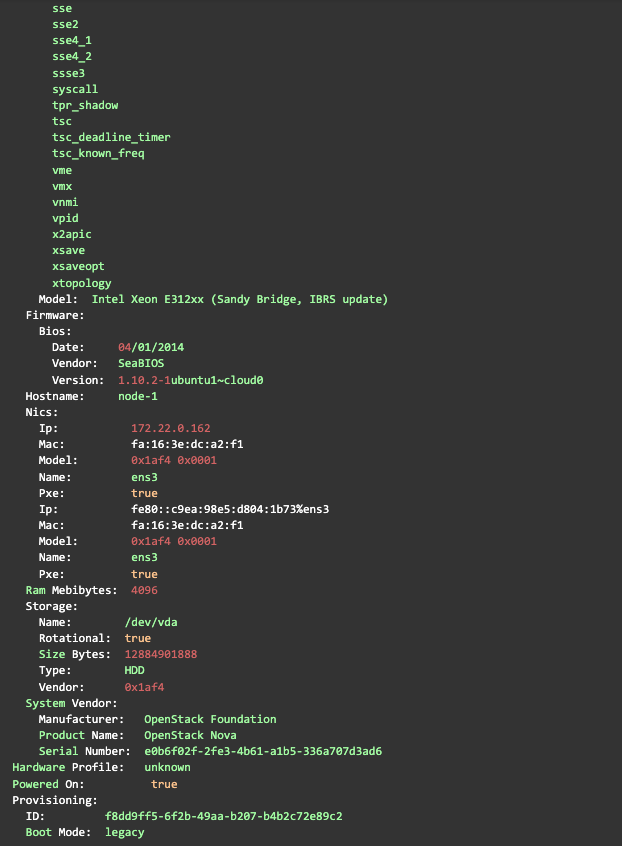
You can also look at the details of a host, including the hardware information gathered by doing pre-deployment introspection
using the following command:
kubectl get baremetalhost -n baremetal-operator-system -o yaml <node-1>Example put from the command above:

Step 4:
In order to provision a bare metal host the must be in the ready state, meaning it’s available for provisioning. To provision, the host add image details to be deployed on the host in the YAML above (step #2) as shown below and apply the file. This example also contains an example on how to create a K8 secret. Note: A status of provisioned indicates that an OS has already been deployed on that bare metal host.
apiVersionv1kindSecretmetadata namenode-1-bmc-secrettypeOpaquedata usernameYWRtaW4= passwordcGFzc3dvcmQ=---apiVersionmetal3.io/v1alpha1kindBareMetalHostmetadata namenode-1spec onlinetrue bootMACAddressfa163edca2f1 bootModelegacy bmc addressipmi//172.22.0.1456230 credentialsNamenode-1-bmc-secret image urlhttps//ironic-images.s3.us-west-1.amazonaws.com/user_images/cirros-0.3.2-ssh-x86_64-disk.img checksum31f6faeebd853303f319cca6446bad63 rootDeviceHints deviceName/dev/vdaStep 5:
Now your node is provisioned and booting with the OS image chosen. Note that STATE of the host has changed to provisioned.
