Application Catalog Overview
PMO Application Catalog enables end users to easily deploy pre-packaged applications. PMO uses the OpenStack Heat orchestration service to manage the application resources.
Administrators can use Heat Orchestration Templates to create application packages and import them into the catalog.
Packages, environments and applications are the key concepts of the Application Catalog.
Packages
A package consists of the following three parts.
- A template for creating application resources
- An application logo
- Application metadata (for example, ownership, author, categories, tags)
Stacks
A Heat stack is a collection of cloud resources such as virtual machine image instances, networks, subnets, security groups, and ports to name a few.
Environments
An environment is a container to deploy an applications. It governs the runtime behavior of a Heat template.
Generally, the environment contains the values that replace the input parameters for the Heat template at runtime.
An environment comprises the following resources to be deployed.
- The application to deploy
- The image from which an instance can be created to run the application
- The SSH key-value pair that can be used to log in and customize the instance
- The flavor that defines the CPU and memory resource allocation for the instance
- The network that the instance uses to communicate with other parts of the app or rest of the PMO cloud
When a Heat template is instantiated through a stack, the values of the resources specified in an environment override the default values for the respective resources specified in the Heat template.
Applications
A application is a deployed package. It will be part of an environment and have an associated Heat stack.
Creating A New Application
Follow the steps given below to create a new application.
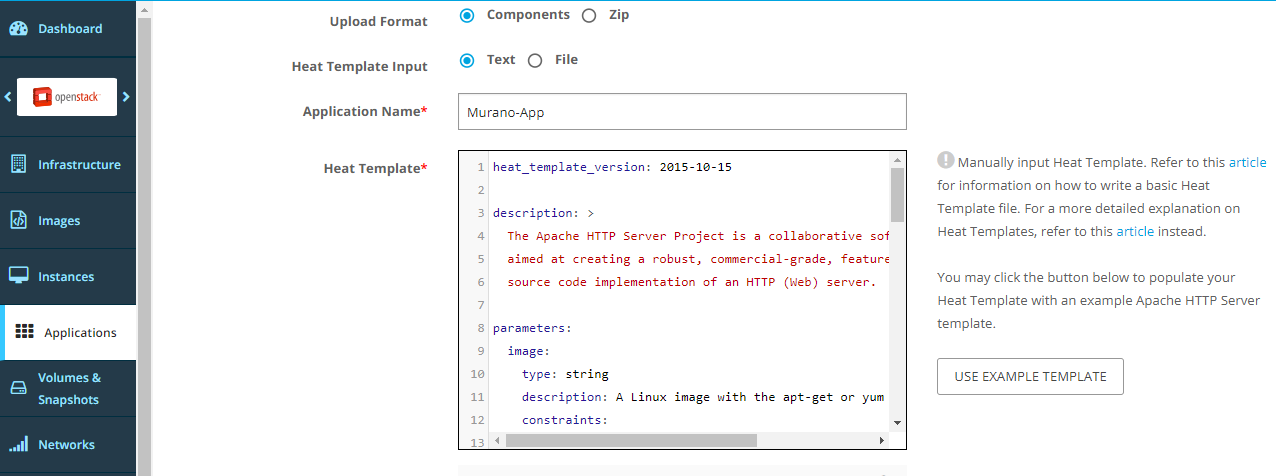
Step 1 - Prepare the application template
The template will start with a version that corresponds to an OpenStack release.
heat_template_version2015-10-15Next comes the application description.
description The Apache HTTP Server Project is a collaborative software development effort aimed at creating a robust, commercial-grade, featureful, and freely-available source code implementation of an HTTP (Web) server.The application may accept parameters that the user will specify when deploying. If a default is specified for a parameter, a placeholder will be shown to the end user when deploying the package from the UI.
Also, in order for the UI to show dropdowns for OpenStack resources (for example, images), a custom constraint can be added. For more details on the template specification, check out the OpenStack documentation
parameters image typestring descriptionA Linux image with the apt-get or yum commands available constraintscustom_constraintglance.image key_name typestring descriptionSSH public key used by the server constraintscustom_constraintnova.keypair flavor typestring descriptionflavor used by the server constraintscustom_constraintnova.flavor network typestring descriptionNetwork used by the server constraintscustom_constraintnova.networkNow we will define the application resources. To keep the template short, the installation script will assume the apt-get command is available on the instance.
resources apache_http_server typeOSNovaServer properties flavor get_paramflavor image get_paramimage key_name get_paramkey_name networksnetwork get_paramnetwork config_drivetrue user_data_formatRAW user_data #!/bin/bash apt-get update apt-get -y install apache2Putting it all together gives us the following template.
heat_template_version2015-10-15description The Apache HTTP Server Project is a collaborative software development effort aimed at creating a robust, commercial-grade, featureful, and freely-available source code implementation of an HTTP (Web) server.parameters image typestring descriptionA Linux image with the apt-get or yum commands available constraintscustom_constraintglance.image key_name typestring descriptionSSH public key used by the server constraintscustom_constraintnova.keypair flavor typestring descriptionflavor used by the server constraintscustom_constraintnova.flavor network typestring descriptionNetwork used by the server constraintscustom_constraintnova.networkresources apache_http_server typeOSNovaServer properties flavor get_paramflavor image get_paramimage key_name get_paramkey_name networksnetwork get_paramnetwork config_drivetrue user_data_formatRAW user_data #!/bin/bash apt-get update apt-get -y install apache2Step 2 - Create and import the application package
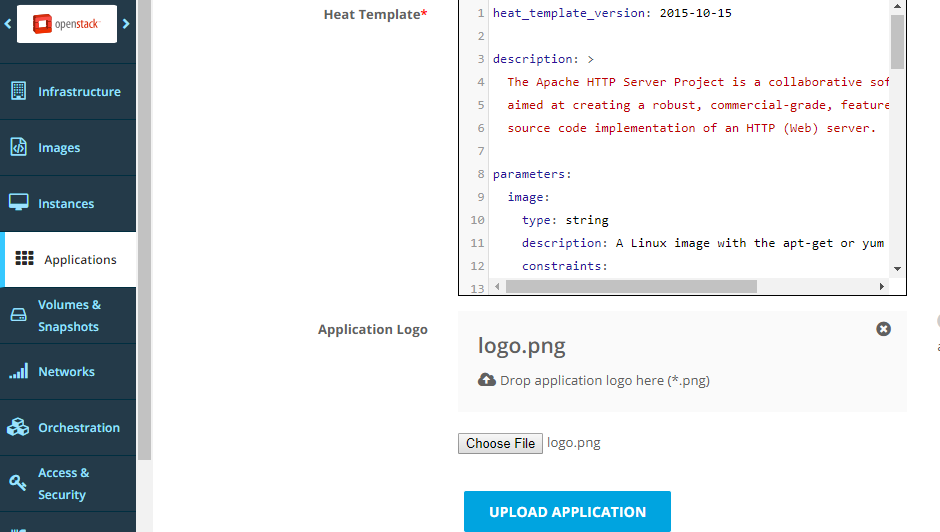
Platform9 provides various ways of importing the package. For this step, we will use the Apache HTTP Server Template and the associated Apache HTTP Server Logo
Option 1 - Direct Input
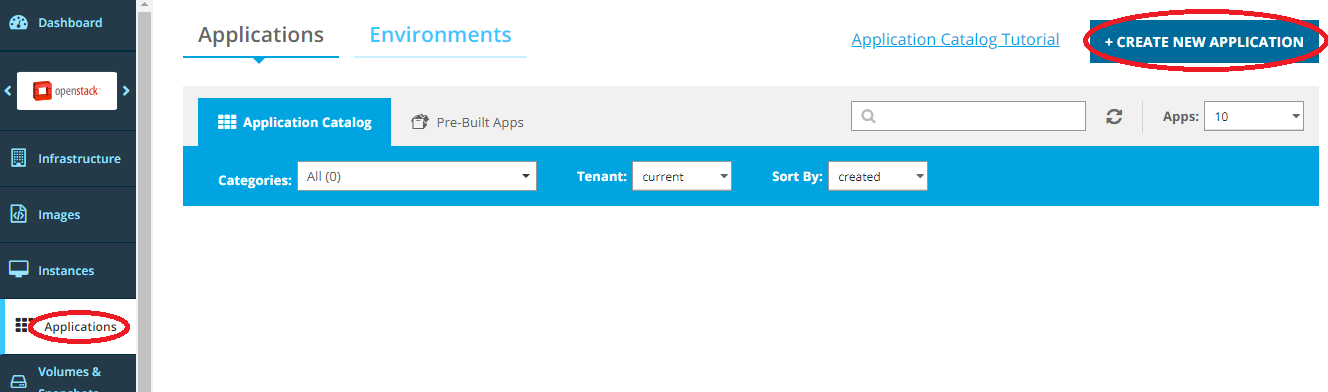
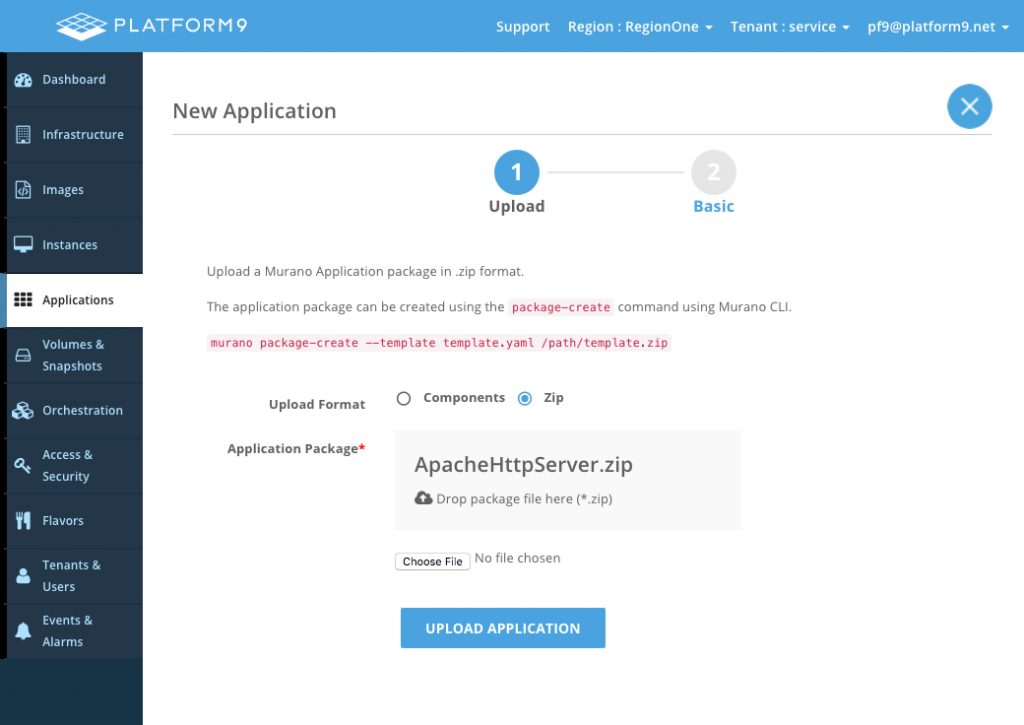
Click Create New Application from the Applications view.

Select the Components option, and the Text option. Enter (or paste) the template contents into the text area.

Optionally, upload a logo. Then, click Upload Application.

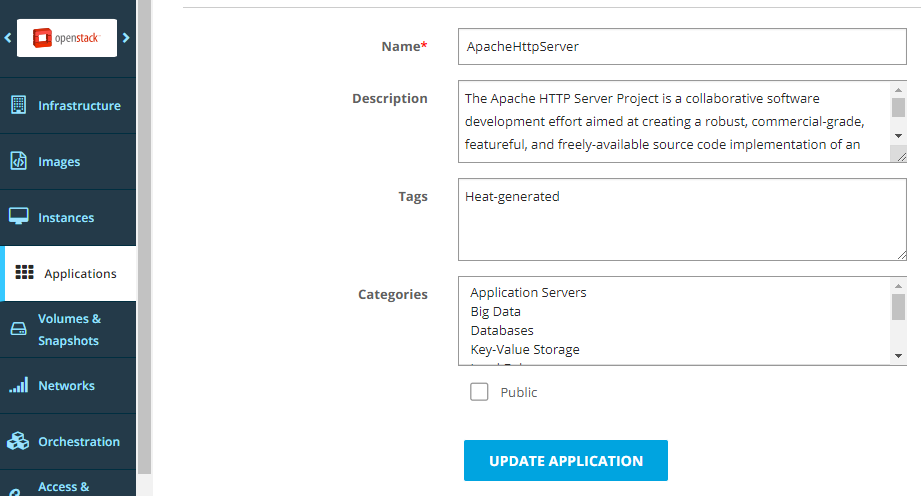
Optionally, edit the application metadata, and click Update Application.

Option 2 - Template Upload
Click Create New Application from the Applications view.

Select the Components option, and the Text option. Upload the template.
Optionally, upload a logo. Then, click Upload Application.
Optionally, edit the metadata and click Update Application.
Option 3 - Zip Upload
To install the Murano CLI, see the support article on Installing the OpenStack Clients
First, create the Zip package using the Murano CLI. The --logo argument is optional.
murano package-create --template ApacheHttpServer.yaml --logo ApacheHttpServer.pngClick Create New Application from the Applications view.
Select the Zip option. Upload the Zip file. Then, click Upload Application.
Optionally, edit the metadata and click Update Application.

Option 4 - CLI
To install the Murano CLI, see the support article on Installing the OpenStack Clients.
First, create the Zip package using the Murano CLI. The --logo argument is optional.
murano package-create --template ApacheHttpServer.yaml --logo ApacheHttpServer.pngThen, upload the Zip package.
murano package-import ApacheHttpServer.zipDeploying An Application From Catalog
Follow the steps given below, to deploy an application from the Murano application catalog.
Option 1 - 1 Click Deploy
Since an application needs to be in an environment, the 1 Click Deploy button can be used to create and environment and add an application to it.
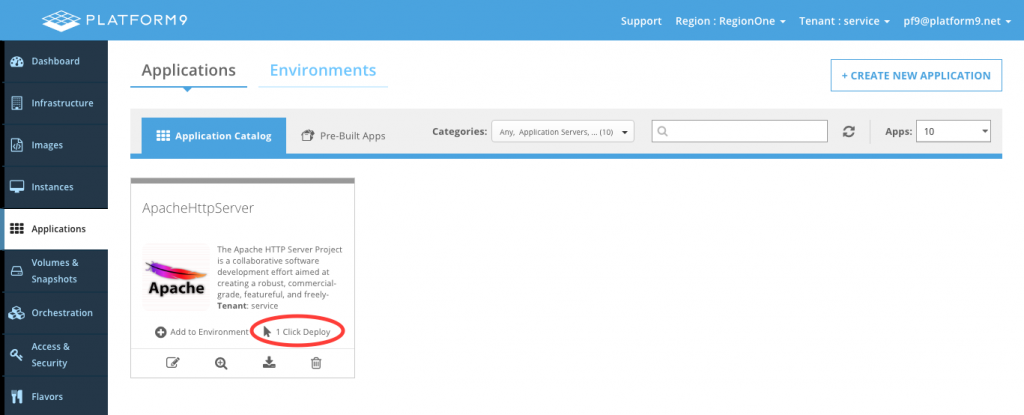
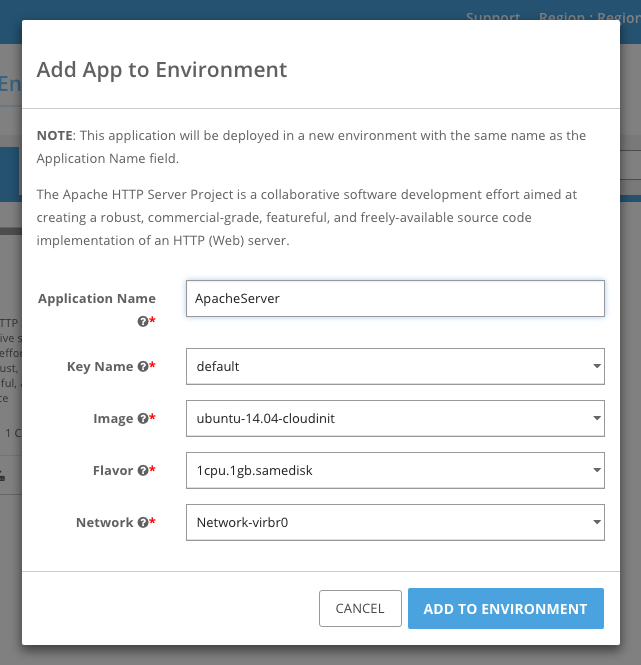
After clicking on 1 Click Deploy, fill out the form and click Add to Environment.

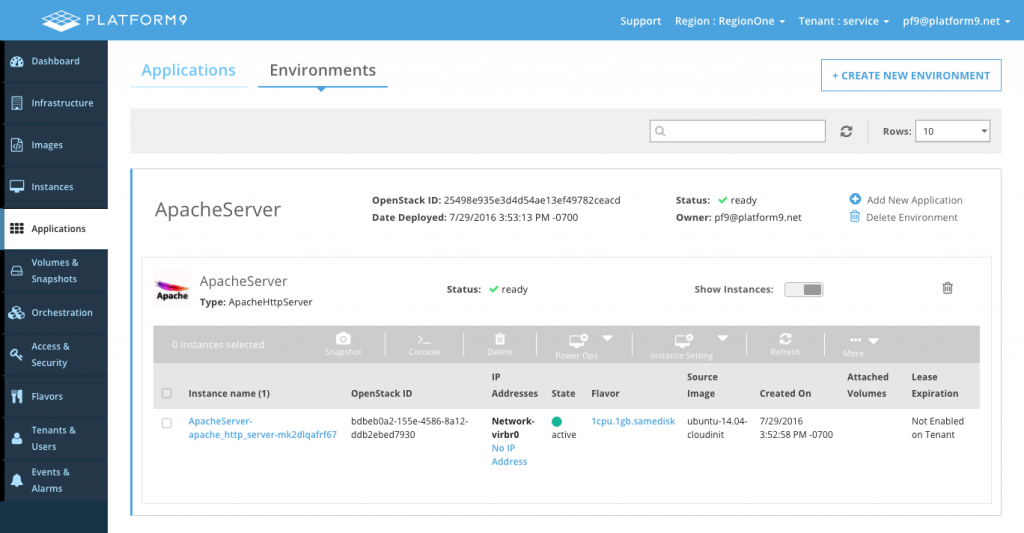
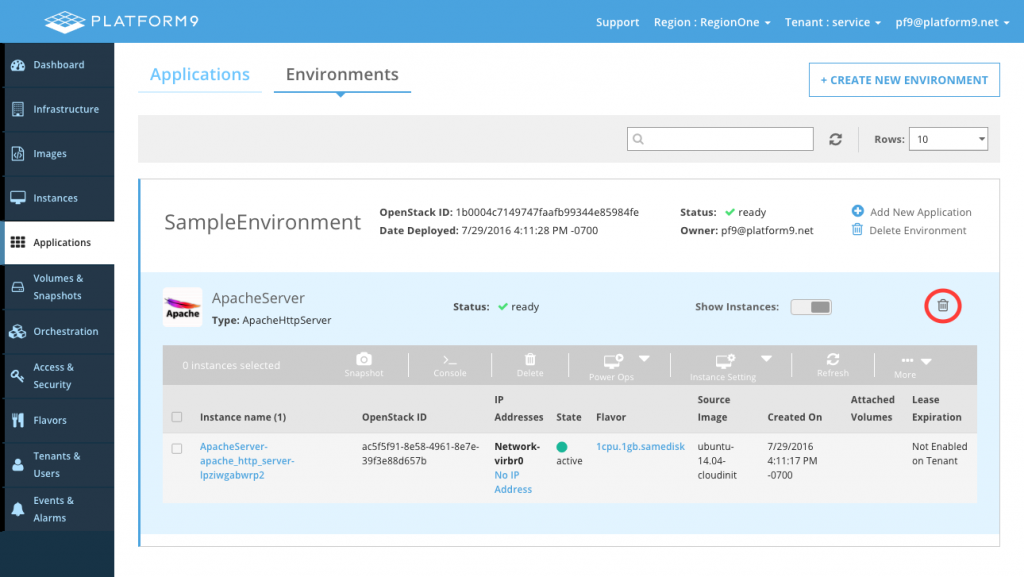
This will create an Environment with the same name as the application. The environment should soon be in the ready state as shown below.
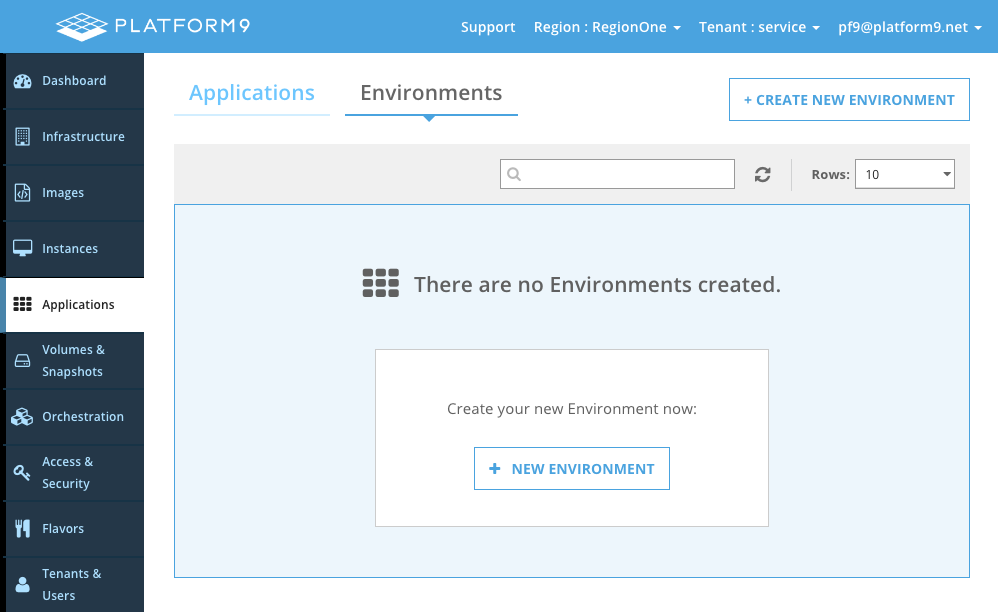
Option 2 - Creating and Modifying an Environment
Standalone environments can also be created, and applications can be added or removed as needed.
To create one, click Create New Environment.
Specify a name and click Create Environment.

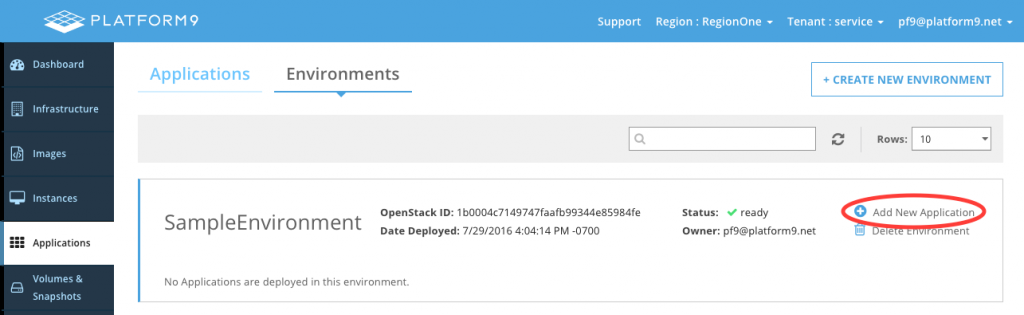
Now we are ready to add applications to the environment. Click Add New Application as shown below.
Select the application to add, and click Next.

After filling out the form, click Add to Environment.
The environment should soon be in the ready state as shown below.

Individual apps can also be removed by clicking on the trash icon on the application as shown below.
Option 3 - CLI
To install the Murano CLI, see the support article on Installing the OpenStack Clients. First, create an environment.
murano environment-create SampleEnvironmentOutput:

Now, create a session for the environment using the environment id from above.
murano environment-session-create d23446e94bf54440b48a97f432982351Output:
In order to add an app to the environment, a JSON patch file that describes changes to the environment will be used. The following template shows the JSON patch structure for adding the application.
[ { "op": "add", "path": "/-", "value": { "?": { "id": "===id1===", "type": "" }, "name": "", "templateParameters": { "flavor": "", "image": "", "key_name": "", "network": "" } } }]List the packages in order to find the package FQN, which is a unique identifier for a package.
murano package-listOutput:

After locating the package to deploy, replace the Package FQN in the JSON patch template. Also, specify an application name and set the templateParameters, which were defined in the Heat template for the package.
[ { "op": "add", "path": "/-", "value": { "?": { "id": "===id1===", "type": "io.murano.apps.generated.Apachehttpserver" }, "name": "ApacheApp", "templateParameters": { "flavor": "1cpu.1gb.samedisk", "image": "ubuntu-14.04-cloudinit", "key_name": "default", "network": "Network-virbr0" } } } ]Assuming the JSON patch file is named apache.json, use the environment and session ids from above to modify the environment.
murano environment-apps-edit --session-id b5714fd874d94679b227f44623938172 d23446e94bf54440b48a97f432982351 apache.jsonTo apply the changes, the environment needs to be deployed.
murano environment-deploy --session-id b5714fd874d94679b227f44623938172 d23446e94bf54440b48a97f432982351The environment should soon be in the ready state.
murano environment-show d23446e94bf54440b48a97f432982351Output:
To verify the stack state, use the generatedHeatStackName property from above.
heat stack-show ApacheApp