SSO using Keycloak
Installing and Configuring SSO Using Keycloak on Platform9 Managed Kubernetes
In this article, we discuss the implementation of SSO using Keycloak on PMK. PMK can be configured to use any SAML2 provider, including KeyCloak as a specific implementation of the SAML2 IdP.
What is Keycloak?
Keycloak is an open-source Identity and Access Management (IAM) solution committed to improving secure access to applications and services. Keycloak authenticates users across a unified environment rather than single applications. Once the user is logged in to Keycloak, it delegates the authenticated validation to all affiliated applications. Keycloak also affords a single-sign-out service that specifies that once users log out of Keycloak, their access is revoked across all applications. Keycloak also authenticates individuals using active OpenID Connect or SAML 2.0 Identity Providers. The document describes how to set up keycloak as an IdP for the platform9 on-premise management plane.
Prerequisites
- Keycloak REALM with a SAML 2.0 Endpoint.
Configuration
Settings within Keycloak
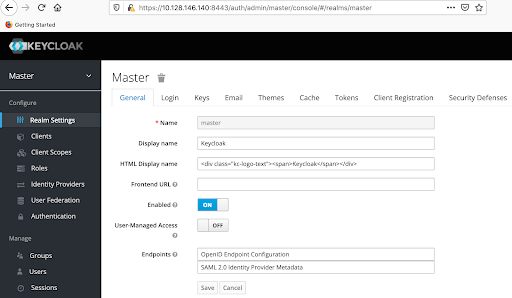
First, log in to the Keycloak UI and choose your realm to create the Platform9 service provider. In this example, we will use a realm named Master. Next, save the SAML 2.0 Identity Provider Metadata in an XML file by clicking on the SAML 2.0 link in the Endpoints section of the Realm Settings. Throughout this document, this XML file will be referenced as metadata.xml. Now, click Realm Settings and choose “SAML 2.0 identity Provider Metadata’ in the Endpoints section. Finally, download the page employing an XML format and save it as metadata.xml.
The following .xml file include a blank line after the comment section. Users can delete this blank line from the metadata.xml file permissions.
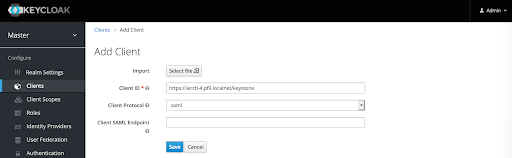
?xml version="1.0" encoding="UTF-8"?><!-- ~ Copyright 2016 Red Hat, Inc. and/or its affiliates ~ and other contributors as indicated by the @author tags. ~ ~ Licensed under the Apache License, Version 2.0 (the "License"); ~ you may not use this file except in compliance with the License. ~ You may obtain a copy of the License at ~ ~ http://www.apache.org/licenses/LICENSE-2.0 ~ ~ Unless required by applicable law or agreed to in writing, software ~ distributed under the License is distributed on an "AS IS" BASIS, ~ WITHOUT WARRANTIES OR CONDITIONS OF ANY KIND, either express or implied. ~ See the License for the specific language governing permissions and ~ limitations under the License. -->Now, in the UI, create a platform9 SAML 2.0 client by clicking on ‘Clients’ followed by clicking on 'Create'

Type the on-premises DU’s keystone URL, e.g. ‘https://airctl-4.pf9.localnet/keystone’, then select SAML from the Client Protocol dropdown and click Save.
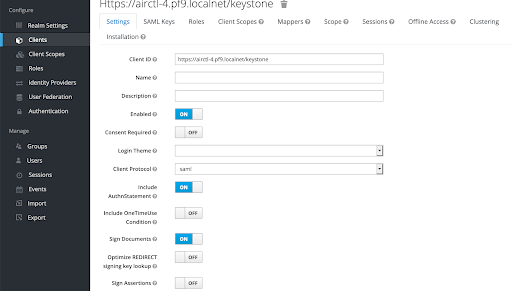
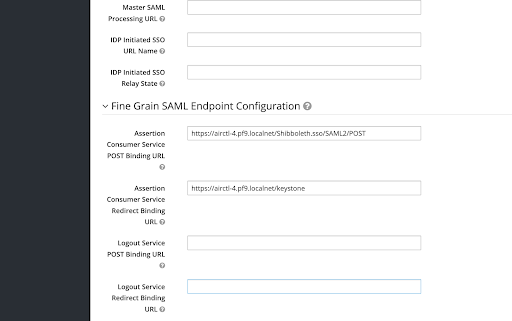
Next, edit the client settings: Click Clients ⇾ https://airctl-4.pf9.localnet/keystone ⇾ Settings and add the following information to the configurations.
Replace the DU name with the name of your own DU (management plane)
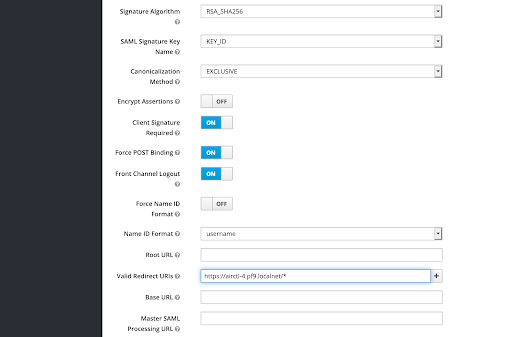
Valid Redirect URIs: https://airctl-4.pf9.localnet/*Assertion Consumer POST Binding URL: https://airctl-4.pf9.localnet/Shibboleth.sso/SAML2/POSTAssertion Consumer Service Redirect Binding URl: https://airctl-4.pf9.localnet/keystoneScreenshots of the Client Settings:
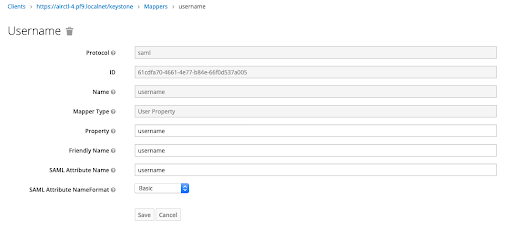
Add mappers
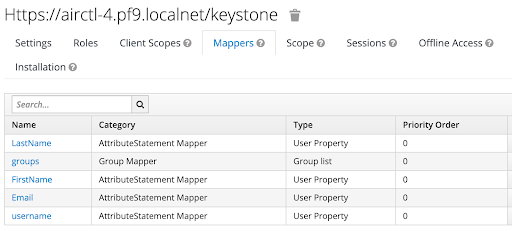
In this section, we create mappers using the FirstName, LastName, Email, and memberOf attributes of the keycloak user.


Finally, create the mappers for the Email and LastName attributes similarly. In the end, the final mappers view will look like below:
Appendix A
User properties in keycloak

Appendix B
Reference: export of the client.
{ "clientId": "https://airctl-4.pf9.localnet/keystone", "baseUrl": "", "surrogateAuthRequired": false, "enabled": true, "alwaysDisplayInConsole": false, "clientAuthenticatorType": "client-secret", "redirectUris": [], "webOrigins": [], "notBefore": 0, "bearerOnly": false, "consentRequired": false, "standardFlowEnabled": true, "implicitFlowEnabled": false, "directAccessGrantsEnabled": false, "serviceAccountsEnabled": false, "publicClient": false, "frontchannelLogout": true, "protocol": "saml", "attributes": {}, "authenticationFlowBindingOverrides": {}, "fullScopeAllowed": true, "nodeReRegistrationTimeout": -1, "protocolMappers": [], "defaultClientScopes": [], "optionalClientScopes": [], "access": {}