Create Single Master Multi-Node Cluster
This document describes creation of a single master, multiple node BareOS cluster using PMK. We recommend reading what is BareOS for an understanding of BareOS and BareOS Cluster Architecture before proceeding with this document.
A single master, multi-node Kubernetes cluster consists of one dedicated master node that is not used to run any workloads, and one or more worker nodes. The master node runs the Kubernetes control plane and the etcd distributed database.
This type of cluster configuration should only be used to run workloads that can tolerate cluster downtime due to the single master node going down. For business critical production workloads that cannot tolerate any downtime, we recommend running them on a multi-master cluster.
Once created, a single master multi-node cluster cannot be scaled to more than one master. However, if a user created a BareOS cluster employing the Multi-Master Cluster workflow, and a Cluster VIP was provided during cluster creation, the cluster can increase the number of masters.
Create BareOS Cluster Using UI
Follow the steps given below to create a BareOS Kubernetes cluster using the PMK UI.
Step 1 – Login to the UI with either your Local Credentials or Single Sign On (Enterprise).
Step 2 – Navigate to the Infrastructure > Clusters tab and click on + Add Cluster.
Step 3 – In the cluster creation wizard, choose the "Signle-Master Cluster" option

Platform9 UI – Infrastructure - Clusters - Deploy
Step 4 - On the Initial Setup page of the wizard, give your cluster a name. Select the Kubernetes version you'd like to deploy the cluster with. (If unsure, select the highest listed numeric version). The remaining properties can be left to their default values.
Step 5 – Follow the instructions to download and configure the PMK CLI for each of the nodes to be onboarded and incorporated as part of the cluster.
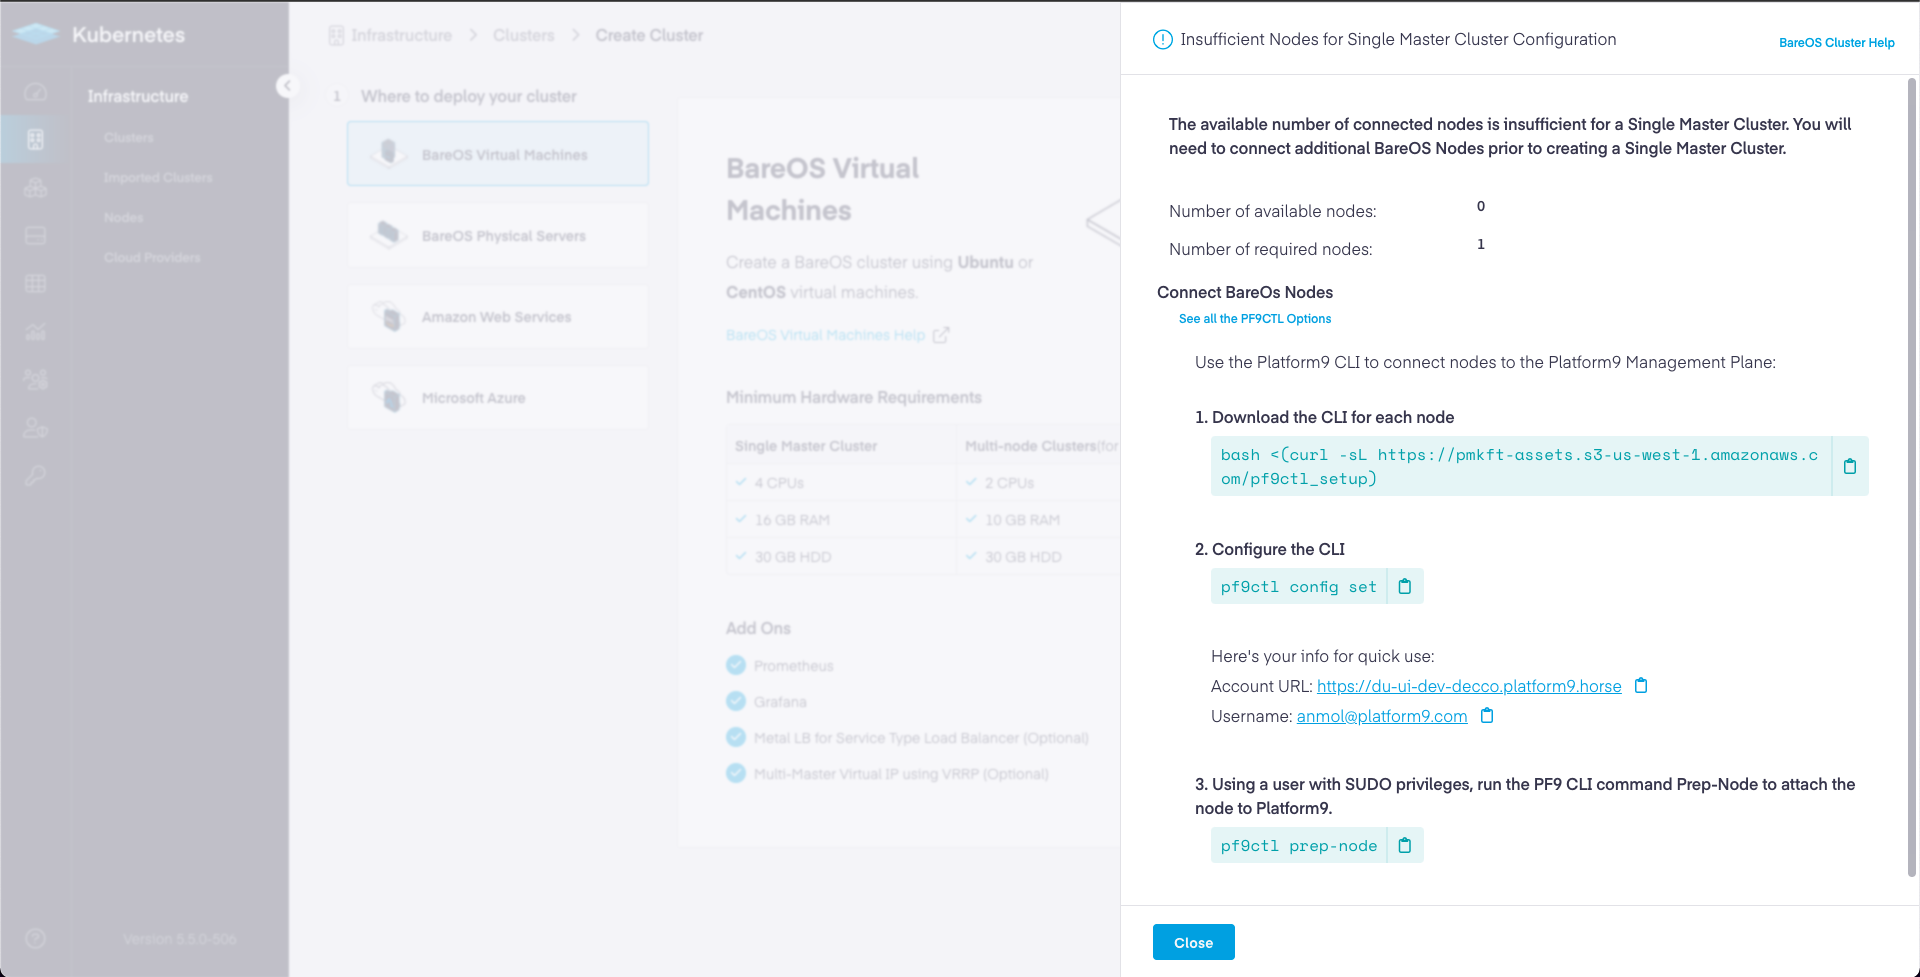
Platform9 UI – Infrastructure - Clusters - Deploy - Multi-Master – Insufficient Nodes
bash <(curl -sL https://pmkft-assets.s3-us-west-1.amazonaws.com/pf9ctl_setup)____ _ _ __ ___| _ \| | __ _| |_ / _| ___ _ __ _ __ ___ / _ \| |_) | |/ _` | __| |_ / _ \| '__| '_ ` _ \ (_) || __/| | (_| | |_| _| (_) | | | | | | | \__, ||_| |_|\__,_|\__|_| \___/|_| |_| |_| |_| /_/Note: SUDO access required to run Platform9 CLI. You might be prompted for your SUDO password.Downloading Platform9 CLI binary...Platform9 CLI binary downloaded.Installing Platform9 CLI...Platform9 CLI installation completed successfully !To start building a Kubernetes cluster execute: pf9ctl helppf9ctl config setPlatform9 Account URL: <Your PMK Account URL>Username: <Your PMK user name>Password: <Your PMK account password>Region [RegionOne]: <leave blank for default>Tenant [service]: <leave blank for default>✓ Stored configuration details SuccesfullyNote: For Enterprise users, specify the current Region and Tenant you are creating your cluster within. (Displayed as a dropdown selectors at top right of your PMK UI nav bar.)
pf9ctl prep-nodeThe prep-node command will perform prerequisites checks on your node. If any checks fail, you will receive an output similar to the following.
✓ Loaded Config Successfully✓ Missing package(s) installed successfully✓ Removal of existing CLI✓ Existing Platform9 Packages Check✓ Required OS Packages Check✓ SudoCheck✓ CPUCheckx DiskCheck - At least 30 GB of total disk space and 15 GB of free space is needed on host. Disk Space found: 2 GBx MemoryCheck - At least 12 GB of memory is needed on host. Total memory found: 4 GB✓ PortCheck✓ Existing Kubernetes Cluster Check✓ Completed Pre-Requisite Checks successfullyOptional pre-requisite check(s) failed. Do you want to continue? (y/n)It is highly recommended that you meet all the optional prerequisites or else you may experience degraded performance among scheduled pods and/or other unforeseen issues.
If you encounter the error: Failure to prepare node, please review the pf9ctl log file for additional context.
Enterprise – Please submit a Support Request with the log attached and our team will review and work with you to onboard the node.
Failed to prepare node. See /root/pf9/log/pf9ctl-20210330.log or use --verbose for logs✓ Loaded Config Successfully✓ Missing package(s) installed successfully✓ Removal of existing CLI✓ Existing Platform9 Packages Check✓ Required OS Packages Check✓ SudoCheck✓ CPUCheck✓ DiskCheck✓ MemoryCheck✓ PortCheck✓ Existing Kubernetes Cluster Check✓ Completed Pre-Requisite Checks successfully✓ Disabled swap and removed swap in fstab✓ Hostagent installed successfully✓ Initialised host successfully✓ Host successfully attached to the Platform9 control-planeTip: If you configure SSH Access among your other nodes, you may also run the prep-node command against those nodes remotely instead of downloading the pf9ctl utility to each, e.g.
pf9ctl cluster prep-node -u testuser -p testpassword -s ~/.ssh/id_rsa -i localhost -i 150.20.7.65 -i 150.20.7.66Step 5 - Once you have prepared all the nodes that will become part of your cluster, return to the PMK UI cluster creation wizard, and Next to proceed to the Master Node page of the wizard.
Step 6 – On the Master Node page of the wizard, you should now see all the nodes that you prepared in the previous step listed in the table. Select one of the nodes to be the master for your cluster. This node will run the Kubernetes control plane along with the etcd database.
Proceed to Next step.
Step 7 - In the Worker Node selection page of the wizard, select one or more nodes as worker nodes for your cluster.
Step 8 - At this point, you can choose to leave all the remaining properties of the wizard to their default values and click Finish and Review to review your cluster creation request before submitting it for creation.
At this point, your cluster is created and ready for use!
Step 9 - Following table describes all the options provided to you in the cluster creation wizard. Use this information to understand the various options provided to you, and to make meaningful changes to them when required.
| Option | Description | |
|---|---|---|
| Cluster Settings | ||
| Kubernetes Version | Select the Kubernetes Version from the list of supported Kubernetes versions. | |
| Application & Container Settings | ||
| Privileged Containers | Select the check box to enable the cluster to run privileged containers. Note that being able to run privileged containers within the cluster is a prerequisite if you wish to enable service type load balancer using MetalLB. By default a container is not allowed to access any devices on the host, but a “privileged” container is given access to all devices on the host. For more information, see Privileged Policy Reference | |
| Make Master nodes Master + Worker | Opt to schedule workloads onto the master nodes, or, deploy only the necessary control plane services and cordon the masters otherwise. | |
| Cluster Add-Ons | ||
| Enable ETCD Backup | Configures automated etcd backups | |
| Deploy MetalLB + Layer2 Mode | MetalLB is a software load balancer that is deployed and managed by Platform9. MetalLB will be automatically attached to the cluster and allow services to be deployed using the LoadBalancer service type. Simplifying the steps required to make applications accessible outside of the cluster. Requirements: MetalLB requires a reserved network address range. MetalLB will manage the IP range to expose Kubernetes services Example: Starting IP 10.128.159.250 – Ending IP 10.128.159.253 | |
| Monitoring | Learn more In Cluster Monitoring | |
| KubeVirt | Learn more auto$ | |
| Network Plugin Operator | Learn more Luigi Networking Quickstart | |
| ETCD Backup Configuration | ||
| Storage Path | Storage path on the master node where etcd backups will be stored Requirement: The storage path specified here must be created and available on all Master Nodes | |
| Backup Interval (Minutes) | Controls how often the backups will be performed (in minutes). | |
| MetalLB Configuration | ||
| Address Range | Address range to be used by MetalLB when allocating to service load balancer instances. Example: Starting IP 10.128.159.250 – Ending IP 10.128.159.253 |
| Field | Value | |
|---|---|---|
| Cluster API FQDN | ||
| API FQDN | The FQDN (DNS Name) that is to be used to access the Kubernetes cluster API server from outside of the cluster. | |
| Cluster Virtual IP Configuration | ||
| Virtual IP Address for Cluster | Required only when creating a multi-master cluster. The reserved IP address or the highly availability floating IP address with which the user accesses the cluster. | |
| Physical Interface for Virtual IP Association | Required only when creating a multi-master cluster The network interface to which the virtual IP gets associated. Ensure that the virtual IP specified above is accessible on this network interface, and that all master nodes use the same interface name for the interface to be associated with the virtual IP. | |
| Cluster Networking Range & HTTP Proxy | ||
| Containers CIDR | The IP range that Kubernetes uses to configure the Pods (Docker containers) deployed by Kubernetes. | |
| Services CIDR | The IP range that Kubernetes uses to configure services deployed by Kubernetes | |
| HTTP Proxy |
| Field | Option | ||
|---|---|---|---|
| Advanced API Configuration | |||
| Default API groups and versions | Select the Default API groups and versions option to enable on the cluster, the default APIs based on the Kubernetes installation in your environment | ||
| All API groups and versions | Select All API groups and versions option to enable on the cluster, all alpha, beta, and GA versions of Kubernetes APIs that have been published till date. | ||
| Custom API groups and versions | Select Custom API groups and versions option to specify one
or more API versions that you wish to enable and/or disable. Enter the
API versions in the text area following the Custom API groups and
versions option.
For example, to enable Kubernetes v1 APIs, enter the expression,api/v1=true.
Similarly, to disable Kubernetes v2 APIs, enter the expression, api/v2=false.
If you want to enable and/or disable multiple versions, you could enter comma-separated expressions, such as, api/v2=false,api/v1=true. |
At this point, your cluster is deployed, and you are ready to start creating your workloads on it.
Create BareOS Cluster Using REST API
For advanced users, you can automate the process of creating a multi-master BareOS Kubernetes cluster by integrating with our PMK (Qbert) REST API.