How to create a PMK Kubernetes Cluster on the IBM Cloud
This article describes how to create a Kubernetes Cluster in the IBM cloud using Platform9 Managed Kubernetes (PMK).
Prerequisites
- A Platform9 account
- An upgraded IBM cloud account (Basic IBM Cloud clients will be required to upgrade the account type to unlock a classic infrastructure deployment.)
- Docker version 1.13.1+
- The latest version of curl (if using Linux)
- On Windows, some functions are not supported unless you are running Windows 10 Pro
To begin, we will deploy the IBM Cloud CLI and then configure it to work with the IBM Cloud account.
Step 1 - Install the IBM Cloud CLI
Download and install the IBM Cloud CLI release from one of the official mirrors located at cloud.ibm.com or GitHub.com for your OS version.
Mac and Linux
To install on Mac or Linux, use the following command to download and install:
xxxxxxxxxxcurl -sL https://raw.githubusercontent.com/IBM-Cloud/ibm-cloud-developer-tools/master/linux-installer/idt-installer | bashWindows
To install on Windows 10, use the following powershell command to download and install:
xxxxxxxxxx[Net.ServicePointManager]::SecurityProtocol = "Tls12, Tls11, Tls, Ssl3"; iex(New-Object Net.WebClient).DownloadString('https://raw.githubusercontent.com/IBM-Cloud/ibm-cloud-developer-tools/master/windows-installer/idt-win-installer.ps1')For DevOps teams requiring automated installations, utilize the installer script directly from this GitHub repo.
Step 2 - Verify CLI Installation
The installation results should look similar to the following output.
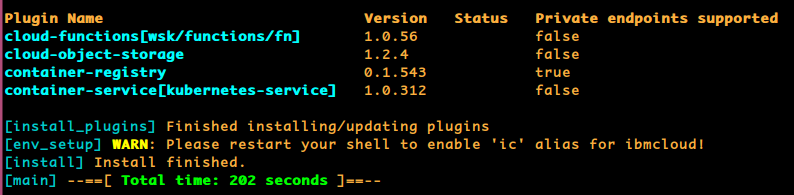
Once the installation completes, running the ibmcloud command will show the version installed.
xxxxxxxxxxibmcloudibmcloud version 2.0.3+c7a1126-2021-08-27T19:17:51+00:00Step 3 - Connect to IBM Cloud
To connect to your IBM Cloud, obtain a temporary password using the “Log in to CLI and API” page and invoke the ibmcloud command.
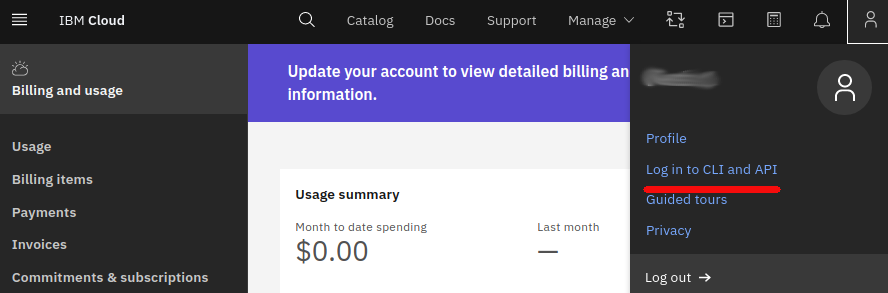
Login to CLI API image
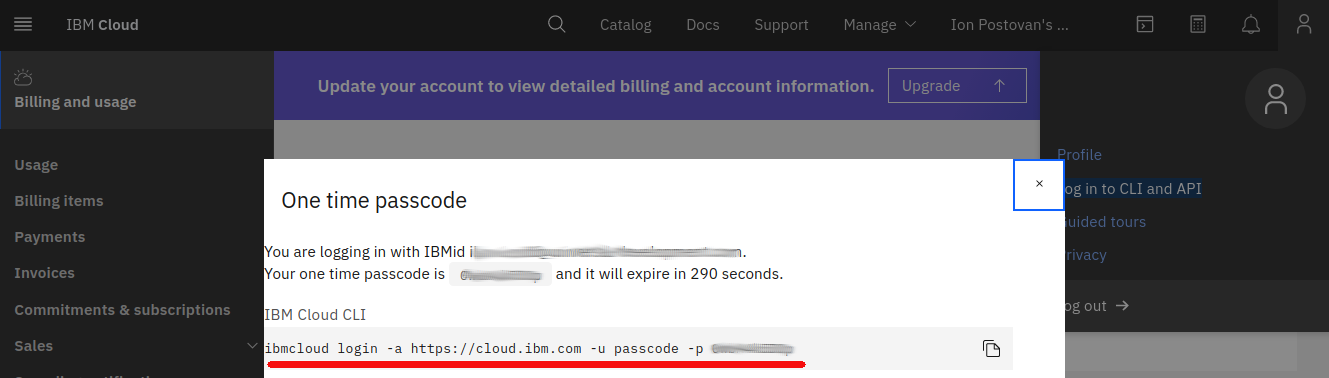
Temporary password
The login will look similar to the command below.
xxxxxxxxxxibmcloud login -a https://cloud.ibm.com -u passcode -p <password>During the login, you will need to provide which region will be used. In this example, we used us-east. Alternatively, the web-based cloud shell can be used, which has the ibmcloud command installed by default and only requires a login.
Step 4 - Configure your Environment
Log in to IBM Cloud with your IBMid. If you have multiple accounts, you will be prompted to select which account to use. If you do not specify a region with the -r flag, you will be required to select a region.
xxxxxxxxxxibmcloud loginIf your credentials are rejected, you might be using a federated ID. To log in with a federated ID, use the |
Step 5 - Add SSH Keys
To access cloud resources, SSH keys should be generated and uploaded to IBM cloud. SSH keys must use RSA and a key size of either 2048 bits or 4096 bits. To create your SSH key via the IBM CLI, execute the command noted below.
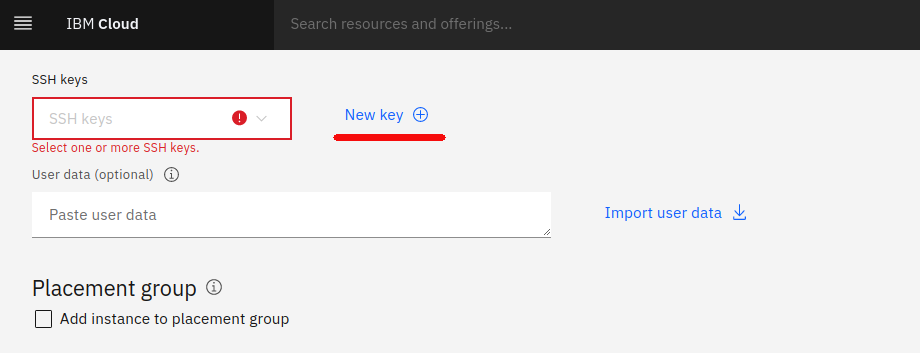
xxxxxxxxxxssh-keygen -t rsaNext, upload SSH your public key (the default location will be located in ~/.ssh/id_rsa.pub) to the UI VPC provisioning page, "SSH keys" section.
The following login command assumed you will use the public SSH key from ~/.ssh/id_rsa.pub and name the key ibm-my-key, the command would format like this:
xxxxxxxxxxibmcloud is key-create ibm-my-key @~/.ssh/id_rsa.pubA similar task can be accomplished using the following example CLI commands.
xxxxxxxxxxibmcloud is key-create KEY_NAME (KEY | @KEY_FILE)ibmcloud is key-create ibm-my-key "ssh-rsa <public-ssh-key> hostname"ibmcloud is key-create my-key @/tmp/my_id_rsa.pubReferences:
Step 6 - Provision your VM
In this section, we described how to provision IBM Cloud resources for use on a Platform 9 deployment. Initially, we begin by deploying the zone setup, listing the available regions and zones. Here we chose us-east.
xxxxxxxxxxibmcloud is regionsibmcloud is zones us-eastWe can also change target zone if required:
xxxxxxxxxxibmcloud target -r 'us-west'Next, we inspect and the provision a private cloud network
ibmcloud is vpcsibmcloud is vpc-create platform9 --address-prefix-management autoReference: https://cloud.ibm.com/docs/vpc?topic=vpc-infrastructure-cli-plugin-vpc-reference#vpcs
Now we can list the available subnets where we want to deploy the VMs.
xxxxxxxxxxibmcloud is subnetsThen, if required, we provision a new subnet.
xxxxxxxxxxibmcloud is subnet-create platform9 AAA-XXX-YYY --ipv4-cidr-block 10.10.10.0/24Reference: https://cloud.ibm.com/docs/vpc?topic=vpc-infrastructure-cli-plugin-vpc-reference#subnets
Next, we will list the available instance profiles to determine which hardware is best suited for our intended purpose.
xxxxxxxxxxibmcloud is instance-profilesTo run an instance on Platform9, the minimal requirements are:
- CPU - Minimum: 4 vCPUs
- RAM -Minimum: 16 GB of RAM
- Storage -Minimum Size: 30 GB and Free Space: 20 GB
In this case, we will use the bx2-4x16 instance profile. To list the available OS images, run the following command.
xxxxxxxxxxibmcloud is imagesExample output:
xxxxxxxxxxID Name OS Arch Created Status Visibility Tagsr010-0b06b73b-6856-4f79-9499-e6c20f15a0de ibm-ubuntu-20-04-2-minimal-amd64-1 available amd64 ubuntu-20-04-amd64 20.04 LTS Focal Fossa Minimal Install 1 public provider none -In this instance, a Ubuntu image will be utilized for deployment with the ID: r010-0b06b73b-6856-4f79-9499-e6c20f15a0de. Next, review the available SSH keys and save the key id which will be used during the instance creation.
xxxxxxxxxxibmcloud is keysNow select the placement group where we will deploy the VM.
xxxxxxxxxxibmcloud is placement-groupsUsing a JSON file, define the persistent volume attachment, IOPs, capacity, and removal behavior for the VM. A 60 GB volume on PMK should be sufficient to prevent storage issues.
xxxxxxxxxx[ { "name": "root-attachment", "delete_volume_on_instance_delete": true, "volume": { "name": "root", "capacity": 60, "iops": 1000, "profile": { "name": "root" } } }]Finally, save the definition asstorage.jsonfile.
References: https://cloud.ibm.com/docs/vpc?topic=vpc-attaching-block-storage&interface=cli#volume_attachment_json
Now, we can provision a VM instance using the following information.
xxxxxxxxxxibmcloud is instance-create \ p9k8s1 \ <VPC_ID> \ <ZONE_NAME> \ <PROFILE_ID> \ <SUBNET_ID> \ --image-id <IMAGE_ID> \ --key-ids <KEY_ID> \ --placement-group <PLACEMENT_GROUP_NAME>The returned result will show the created instance ID of aaaa-bbb-ccc. The provisioned state can then be reviewed via the CLI
xxxxxxxxxxibmcloud is instance aaaa-bbb-cccAdditionally, a floating IP can be requested for fixed address accessibility.
xxxxxxxxxxibmcloud is floating-ip-reserve \plan9-floatingip \--nic-id nic-id-from-instance-detailsOutput:
xxxxxxxxxx...Address aaa.bbb.ccc.ddddName plan9-floatingip...Now the instance can be accessed through aaa.bbb.ccc.dddd using provided SSH key. More details can be found in the official IBM Cloud documentation.
Step 7 - Create PMK Kubernetes Cluster
This section will describe how to deploy Platform9 Kubernetes in an IBM Cloud.
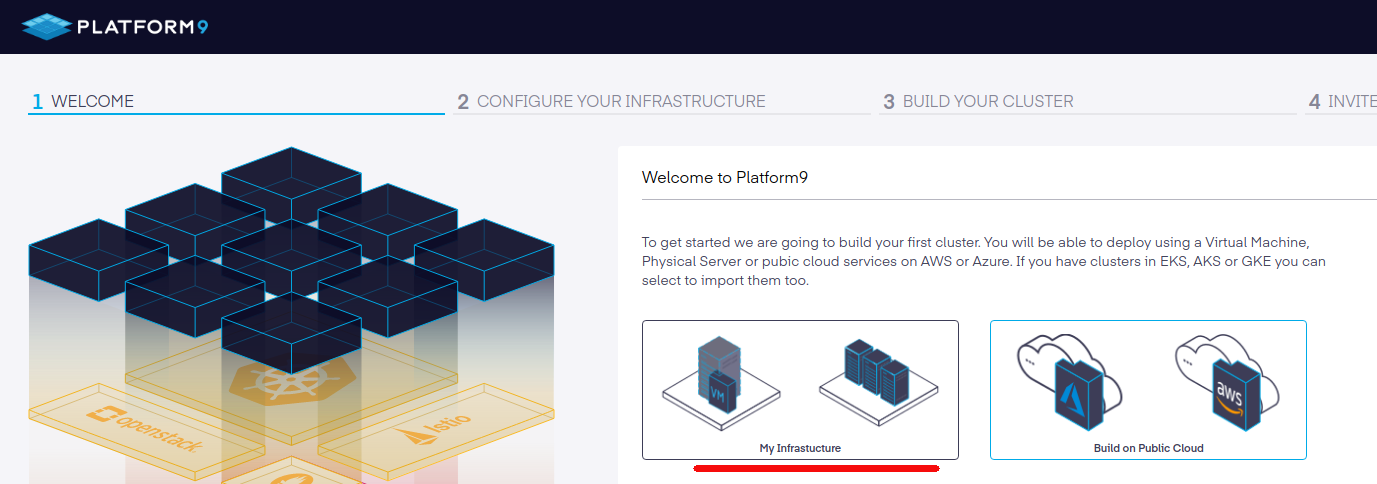
First, obtain your access details from your Platform9 account by going to My infrastructure → Existing Virtual or Physical Infrastructure → Commands for the node setup. This will provide your account URL, username, tenant, and region.
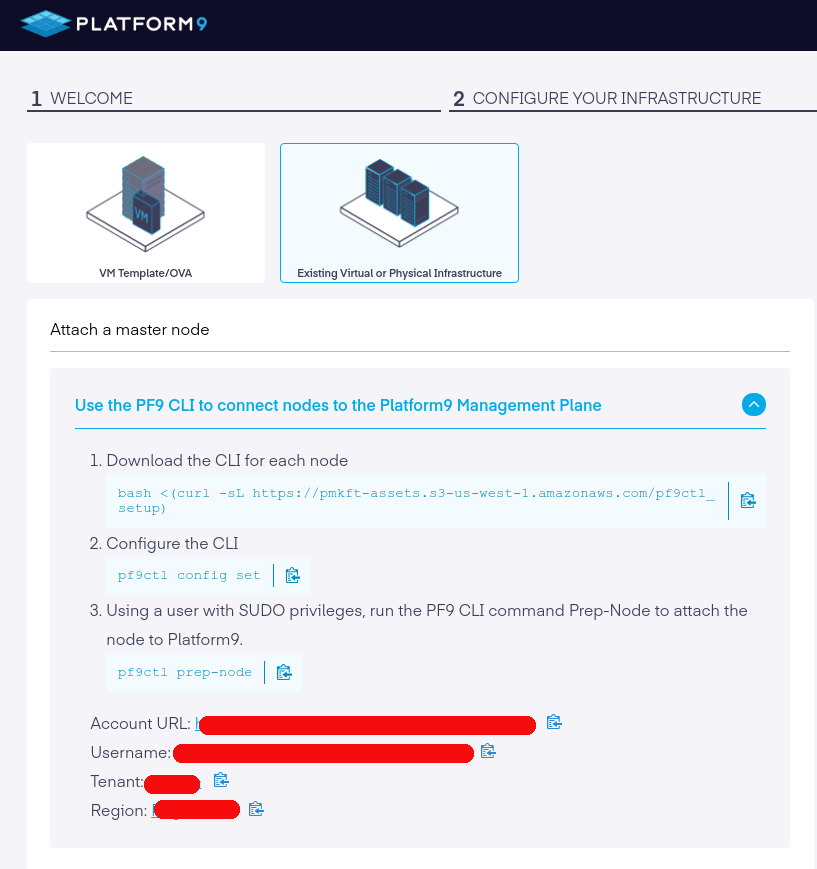
Next, follow the instruction to install the pf9ctl CLI tool on the VM instance.
xxxxxxxxxxbash <(curl -sL https://pmkft-assets.s3-us-west-1.amazonaws.com/pf9ctl_setup)Now, configure Platform 9 on the node by running the following command.
xxxxxxxxxxpf9ctl config setThen, enter the Platform 9 details to prepare and configure the node.
xxxxxxxxxxpf9ctl prep-node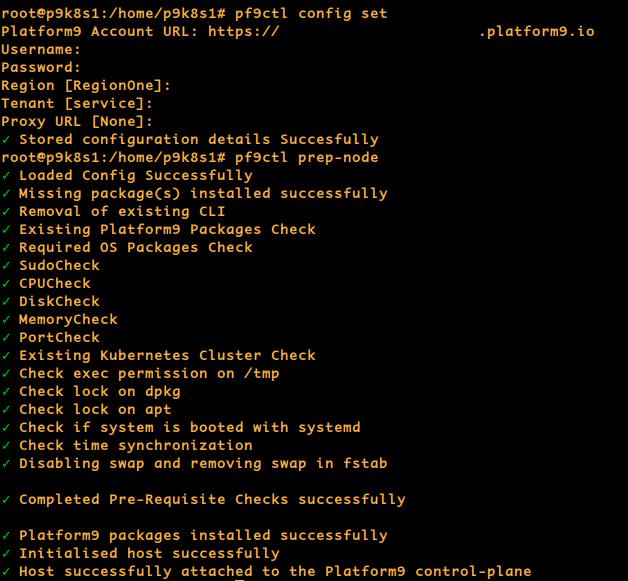
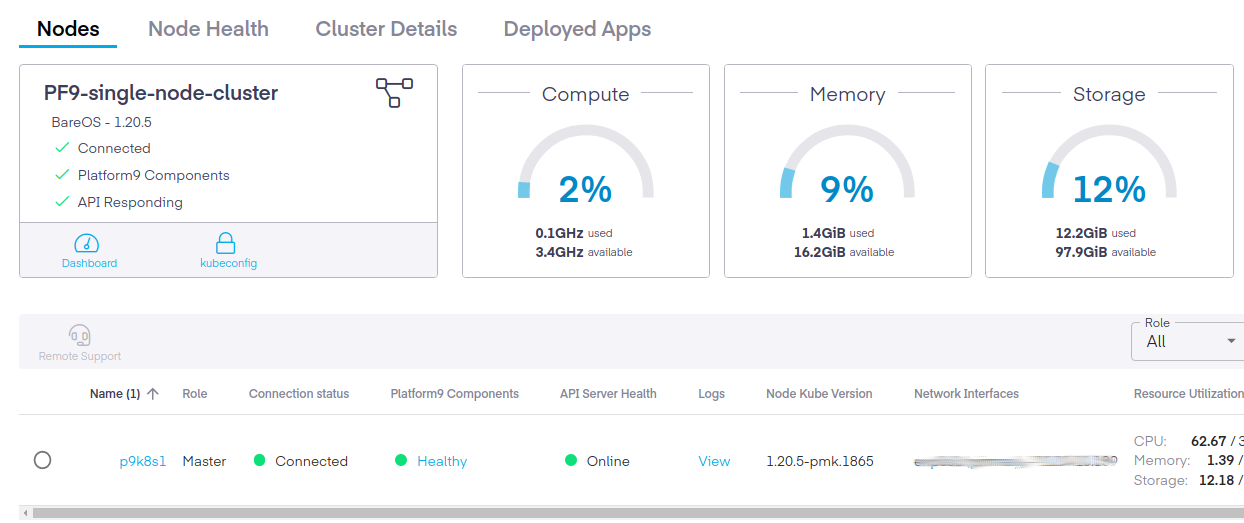
Shortly, a new node will be displayed in the PMK UI. Finally, to finish creating the cluster, click Complete to deploy it.
If more nodes are required, repeat steps 2, 3, and 4 for all additional nodes required.
References: https://platform9.com/docs/kubernetes/on-premise-kubernetes-pre-requisiteshttps://platform9.com/docs/kubernetes/bareos-create-one-click-cluster
Final thoughts
Platform9 can be successfully deployed on IBM Cloud and can cover several use cases including
- multi-cloud deployments with the same cluster type
- hot standby and disaster recovery clusters
- quick deployment of dev/test cluster