Prepare a RHEL Server
This article describes how prepare a RHEL Linux server to be added as a host to Platform9 Managed OpenStack (PMO).
For a description of PMO networking concepts, refer to the Networking Basic Concepts tutorial. Refer to PMO prerequisites for Linux/KVM for systems requirements and supported Ubuntu Operating System versions.
Supported Operating System Version
Platform9 Managed OpenStack supports RHEL versions 7.x and above.
Step 1 - Install RHEL Operating System
Make sure that your server is configured appropriately with access to storage and physical networking. Download and install RHEL 7.6 on your physical server. You can download RHEL distributions from here: RedHat Software
We recommend installing the minimal RHEL operating system. Platform9 agents are prepared to pull in any required package dependencies and get them installed on your server to prepare it to be part of OpenStack. This includes any libvirt/KVM package dependencies.
It’s usually a good practice to get your system up to date with regard to the latest patches and updates.
sudo yum -y updateStep 2 - Register the RHEL server and Subscribe to Red Hat Customer Portal
Run the following commands to register and attach the RHEL server to the Red Hat Customer Portal for updates, and enable the “server-optional” RPM repository.
subscription-manager registersubscription-manager attachsubscription-manager repos —enable=rhel-7-server-optional-rpmsStep 3 - Ensure Virtualization is Enabled
Ensure that virtualization is enabled for your server by checking your server’s BIOS settings. If disabled, enable virtualization for the server to be able to act as a hypervisor within Platform9 Managed OpenStack.
Step 4 - Install, Enable And Start the NTP Daemon.
This is required for all components to have their time synchronized.
yum install -y ntpsystemctl enable ntpdsystemctl start ntpdStep 5 - Configure Networking
PMO supports configuring your networking in two ways:
- Setup one or more dedicated networking servers to handle your networking.
- Setup Distributed Virtual Networking (DVR) and make each host a network host.
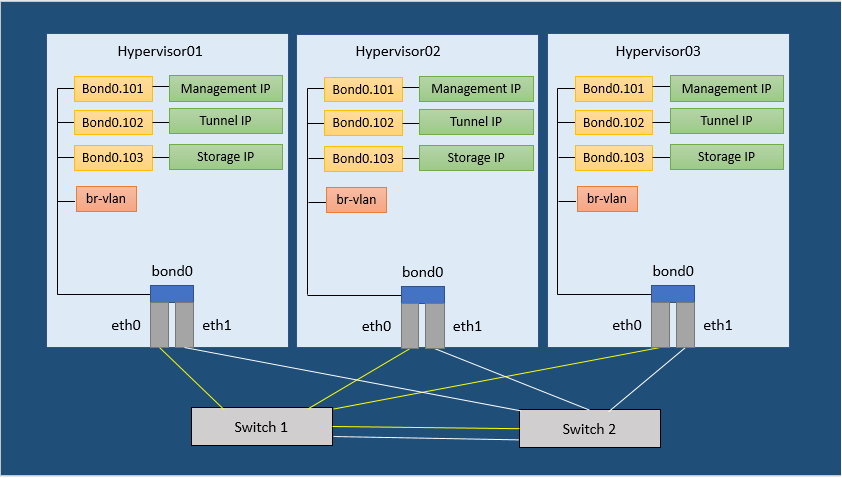
Figure 1. Neutron Network Configuration Example
Step 6 - Set SELinux to permissive
This is required for Open vSwitch (OVS) to be able to manage networking
sed -i s/SELINUX=enforcing/SELINUX=permissive/g /etc/selinux/configsetenforce 0Step 7 - Disable Firewalld and NetworkManager
This is required for KVM and OVS to be able to create iptables rules directly without Firewalld getting in the way.
systemctl disable firewalldsystemctl stop firewalldsystemctl disable NetworkManagersystemctl stop NetworkManagerStep 8 - Enable Network
systemctl enable networkStep 9 - Load the modules needed for Neutron
modprobe bridgemodprobe 8021qmodprobe bondingmodprobe br_netfilterecho bridge > /etc/modules-load.d/pf9.confecho 8021q >> /etc/modules-load.d/pf9.confecho bonding >> /etc/modules-load.d/pf9.confecho br_netfilter >> /etc/modules-load.d/pf9.confStep 10 - Add sysctl options
echo net.ipv4.conf.all.rp_filter=0 >> /etc/sysctl.confecho net.ipv4.conf.default.rp_filter=0 >> /etc/sysctl.confecho net.bridge.bridge-nf-call-iptables=1 >> /etc/sysctl.confecho net.ipv4.ip_forward=1 >> /etc/sysctl.confecho net.ipv4.tcp_mtu_probing=2 >> /etc/sysctl.confsysctl -pStep 11 - Add the Platform9 YUM Repo
Run the following command to install the Platform9 YUM repository.
For Platform9 releases up to and including 4.4:
yum -y install https://s3-us-west-1.amazonaws.com/platform9-neutron/noarch/platform9-neutron-repo-1-0.noarch.rpmFor Platform9 releases from 4.5 onwards:
yum -y install https://s3-us-west-1.amazonaws.com/platform9-neutron/noarch/platform9-neutron-repo.noarch.rpmStep 12 - Install Open vSwitch
yum -y install --disablerepo="*" --enablerepo="platform9-neutron-repo" openvswitchStep 13 - Enable and start Open vSwitch
systemctl enable openvswitchsystemctl start openvswitchStep 14 - Install QEMU KVM RHV
yum install qemu-kvm-rhvStep 15 - Install Router Advertisement Daemon
yum -y install radvdStep 16 - Configure physical interfaces
We are assuming eth0 and eth1. Please substitute your correct interface names. We are assuming an MTU of 9000 (VXLAN requires an MTU of at least 1600) Make sure all physical switches are configured to handle this MTU or you will have problems.
/etc/sysconfig/network-scripts/ifcfg-eth0
DEVICE=eth0ONBOOT=yesBOOTPROTO=noneMTU=9000MASTER=bond0SLAVE=yes/etc/sysconfig/network-scripts/ifcfg-eth1
DEVICE=eth1ONBOOT=yesBOOTPROTO=noneMTU=9000MASTER=bond0SLAVE=yesStep 17 - Setup the Bond interface
We are assuming bonding type=4 (LACP) refer to Bonding Types to learn more.
/etc/sysconfig/network-scripts/ifcfg-bond0
DEVICE=bond0ONBOOT=yesTYPE=OVSPortDEVICETYPE=ovsOVS_BRIDGE=br-vlanBONDING_MASTER=yesBONDING_OPTS="mode=4"MTU=9000Step 18 - Setup the VLAN trunk Bridge
/etc/sysconfig/network-scripts/ifcfg-br-vlan
DEVICE=br-vlanBOOTPROTO=noneONBOOT=yesTYPE=OVSBridgeDEVICETYPE=ovsStep 19 - Setup the Management interface
We are assuming VLAN 101 for the Management network. Please use your correct VLAN ID for your environment. We are assuming subnet 192.0.2.0/24 for Management. Please use your correct subnet.
/etc/sysconfig/network-scripts/ifcfg-bond0.101
DEVICE=bond0.101ONBOOT=yesBOOTPROTO=noneTYPE=VlanVLAN=yesIPADDR=192.0.2.10NETMASK=255.255.255.0GATEWAY=192.0.2.1DNS1=192.0.2.100DNS2=192.0.2.200Step 20 - Setup the VXLAN/GRE tunneling interface (Optional)
We are assuming VLAN 102 for VXLAN/GRE tunneling. Please use your correct VLAN We are assuming subnet 198.51.100.0/24 for VXLAN/GRE tunneling. Please use your correct subnet.
/etc/sysconfig/network-scripts/ifcfg-bond0.102
DEVICE=bond0.102ONBOOT=yesBOOTPROTO=noneTYPE=VlanVLAN=yesIPADDR=198.51.100.10NETMASK=255.255.255.0Step 21 - Setup the External Interface and External Bridge
We are assuming VLAN 103 for the external network. Please use your correct VLAN.
/etc/sysconfig/network-scripts/ifcfg-bond0.103
DEVICE=bond0.104ONBOOT=yesBOOTPROTO=noneTYPE=VlanVLAN=yesIPADDR=203.0.113.10NETMASK=255.255.255.0/etc/sysconfig/network-scripts/ifcfg-br-ext
DEVICE=bond0.104ONBOOT=yesBOOTPROTO=noneTYPE=VlanVLAN=yesIPADDR=203.0.113.10NETMASK=255.255.255.0Step 22 - Setup the Storage interface (Optional)
We are assuming VLAN 104 for the storage network. Please use your correct VLAN. We are assuming subnet 203.0.113.0/24 for the storage network. Please use your correct subnet.
/etc/sysconfig/network-scripts/ifcfg-bond0.104
DEVICE=bond0.104ONBOOT=yesBOOTPROTO=noneTYPE=VlanVLAN=yesIPADDR=203.0.113.10NETMASK=255.255.255.0Step 23 - Restart Networking
Make sure you have console access to your host. You will be disconnected if the configuration is incorrect.
systemctl restart network.serviceStep 24 - Add tag to external bridge (to enable bridge monitoring)
ovs-vsctl br-set-external-id br-ext bridge-id br-extAt this point, your RHEL server is ready to be prepared with rest of storage and networking pre-requisites to be added to Platform9 Managed OpenStack.