Replacing a Master Node in Platform9 Managed Kubernetes Cluster
Overview
This article is specific to manually deployed Kubernetes clusters in Platform9 Managed Kubernetes.
A new Master node that is being introduced to replace an existing Master node should have:
- The same hostname as the existing Master node
- The same IP address (to match the expectation of etcd server once the data is restored)
It must be ensured that the new node being introduced into Platform9 Managed Kubernetes has two components that can be managed by configuration management (in case the new node needs to be bootstrapped):
- The /var/opt/pf9 directory, containing etcd data
- The /var/pf9/host_info.conf containing the host ID
The process, once the current master node is offline, for introducing the newly provisioned node must restore the etcd data to the /var/opt/pf9 directory and the host_info.conf file, before running the Platform9 host installer. The above mentioned components will not be overwritten by the installer, which can be run once the IP address is accessible, the hostname is set, and the data is restored to those two directories.
Automating New Host Setup
The core focus, before moving onto the configuration management component, needs to be on how backups are taken and stored. A backup location e.g. a backup Cinder volume (if one is an OpenStack user), that can be remounted on the new host, might yield the best performance, but a remote filesystem like an NFS mount or a distributed filesystem like GFS will suffice as well.
A cron job like the following to backup the data on an hourly basis needs to be run:
[bash]0 * * * * cd /var/opt/pf9/; tar -zcvf /mnt/your_volume/$(date +%F)_etcd-data.tar.gz kube[/bash]And then a similar job needs to be run to maintain a tag on the last completed backup for use at retrieval time:
[bash]ln -s /mnt/your_volume/`ls -rt /mnt/your_volume | tail -n1` latest.tar.gz[/bash]You’ll also want to create a one-time copy of the /etc/pf9/host_id.conf file to this backup location.
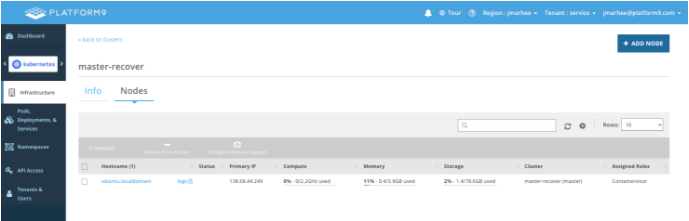
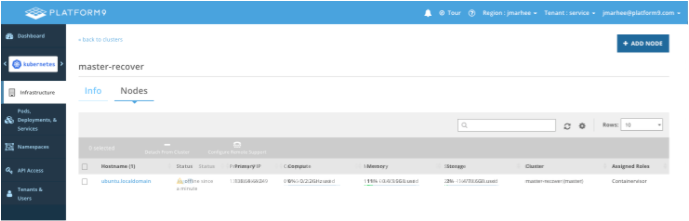
Before beginning, ensure that the current master is reporting as Offline in the Platform9 Control Plane (but do not deauthorize it):
A simple playbook for how this factors into a stateful restore of a host is described below:
A Saltstack state, for example, that (among other requirements one might have for a system environment) maintains an NFS mount:
/mnt/master-recovery:And then a formula for how to handle the backup data on that mount:
mount.mounted:
- device: {{ pillar['nfs_share'] }}
- fstype: nfs
- opts: rw,nolock,hard,intr,nfsvers=3,tcp,rsize=131072,wsize=131072,bg
- mkmnt: True
extract_backup:

  archive.extracted:

    - name: /var/opt/pf9/

    - source: {{ pillar['nfs_share_mountpoint'] }}/latest.tar.gz

    - user: pf9

    - group: pf9group

    - if_missing: /var/opt/pf9/
/var/pf9/host_info.conf:
file.managed:
- source: {{ pillar['nfs_share_mountpoint'] }}/host_info.conf
Then commence the Platform9 installation (provided this script is, in this example, checked into a Saltstack repo–this could apply to any configuration management system):
/home/pf9-user/platform9-install-your_user-platform.sh:

  file.managed:

    - source: salt://files/platform9-install-your_user-platform.sh

    - user: pf9-user

    - group: pf9-user

    - mode: 644
Pf9 Setup:When the script exits, if it completed without error, it will attempt to contact the Platform9 control plane, authorized as the original master’s host ID, and if a match exists between the hostname, IP, and host_id, it will re-register as the cluster master:
cmd.run:
- name: sudo bash platform9-install-your_user-platform.sh