How To Install OpenStack Using TripleO
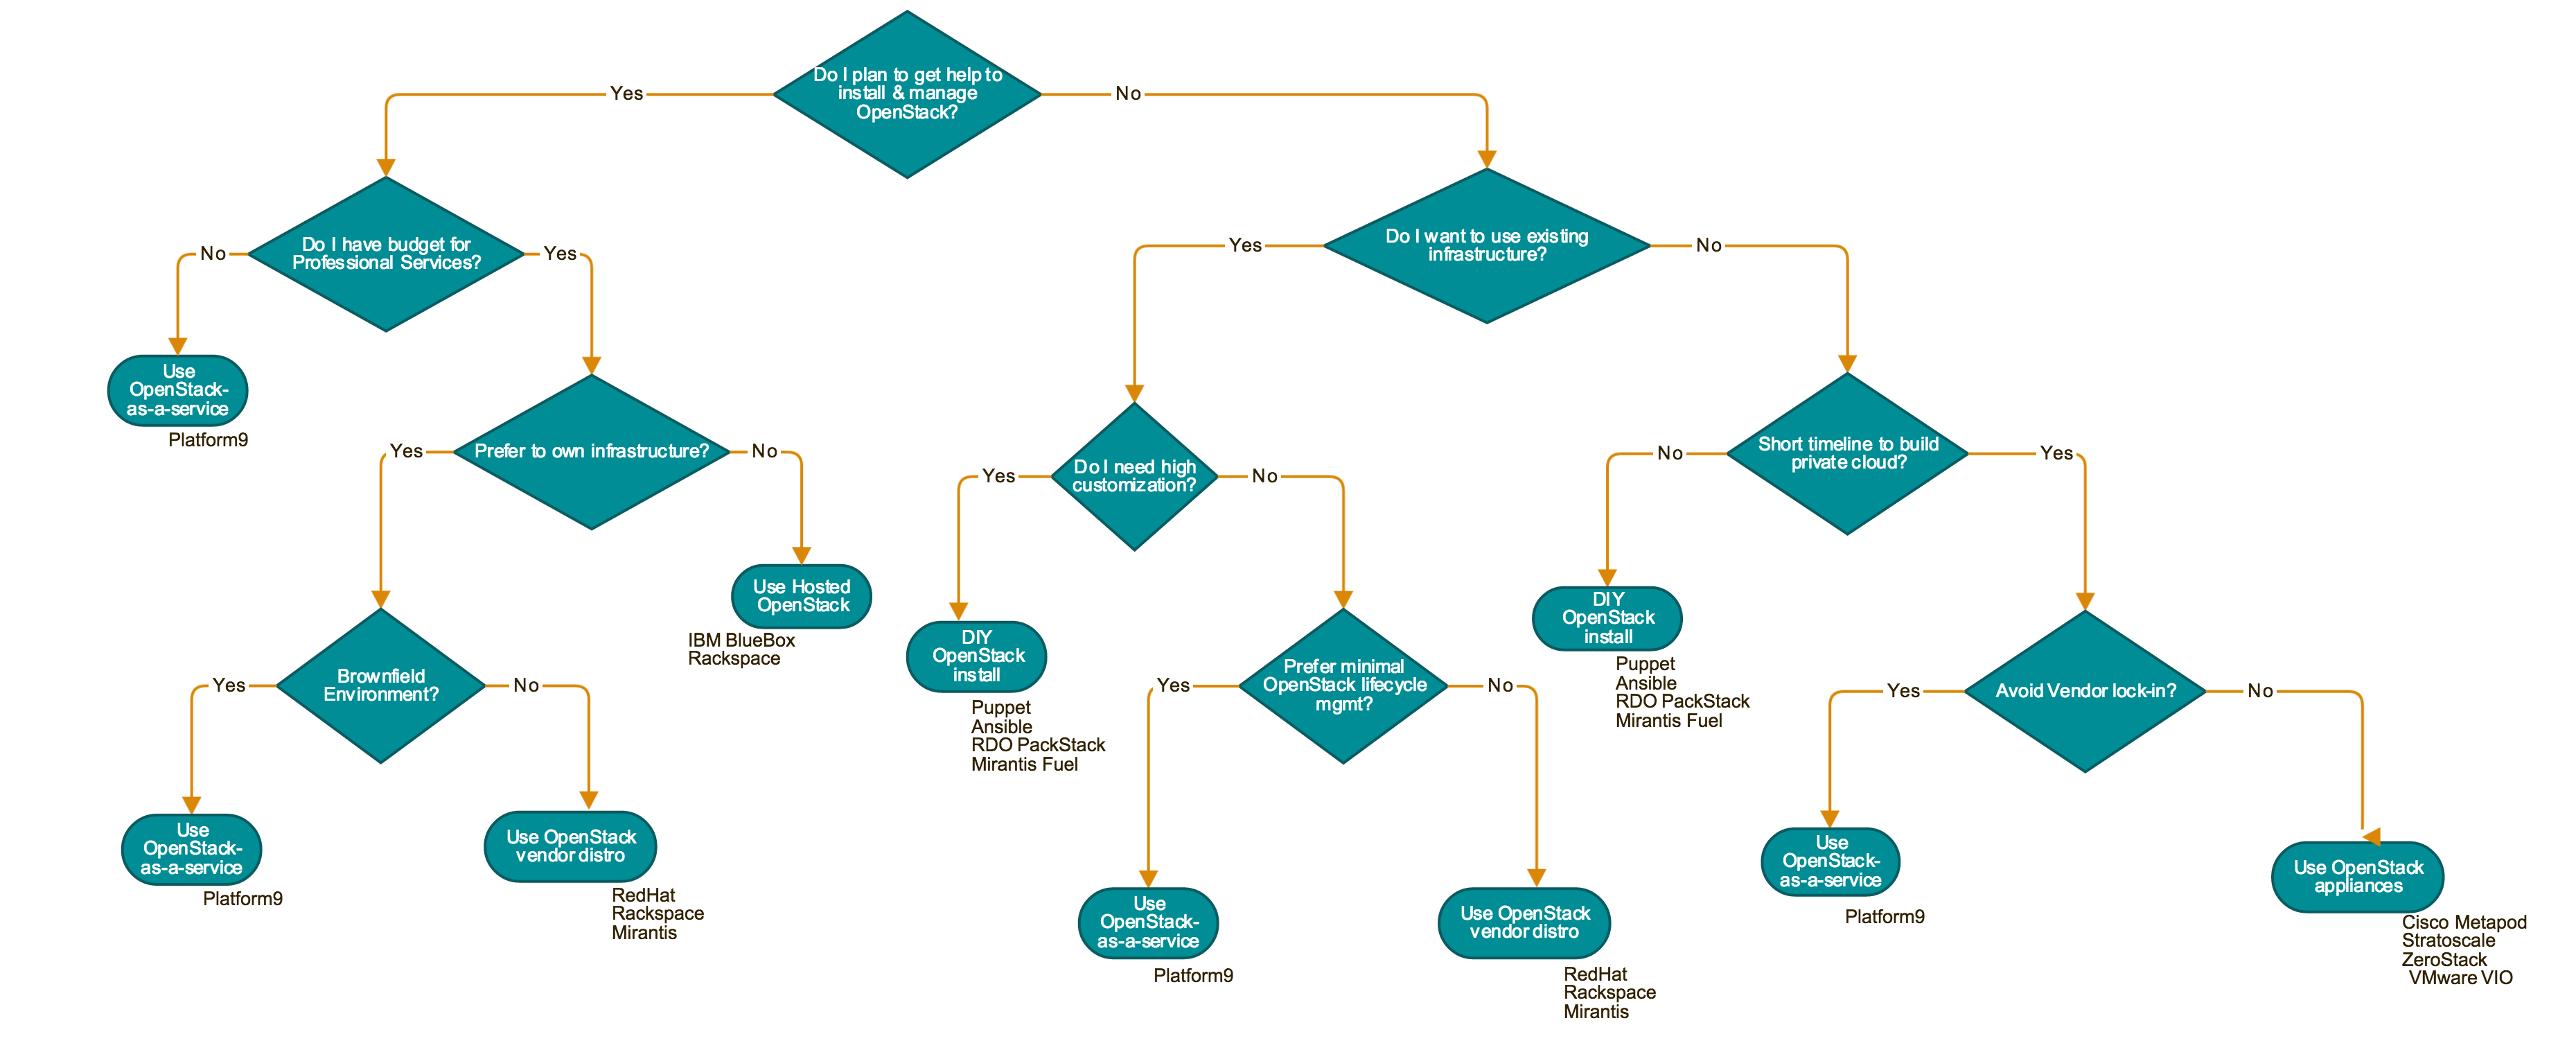
One of the great things about OpenStack is all the options you have for deploying it. A recent blog mentioned various deployment models – and the flowchart below may help as you decide which model is best for you. For example, if you need a highly customized OpenStack deployment, then DIY may be the way to go. Then, there’s the question of which tool to use. Previously, we discussed how to install OpenStack using RDO Packstack and using Openstack-Ansible. This blog will give an overview of the steps required to install OpenStack using TripleO. For detailed instructions, refer to the TripleO Documentation
TripleO is short for “OpenStack on OpenStack”, an official OpenStack project for deploying and managing a production cloud onto bare metal hardware. The first “OpenStack” in the name is for an operator-facing deployment cloud called the Undercloud.This will contain the necessary OpenStack components to deploy and manage a tenant-facing workload cloud called the Overcloud, the second “OpenStack” in the name.
The Undercloud server is a basic single-node OpenStack installation running on a single physical server used to deploy, test, manage and update the Overcloud servers. It contains a strictly limited subset of OpenStack components, just enough to interact with the Overcloud. The Overcloud is the deployed solution and can represent a cloud for dev, test, production etc. The Overcloud is the functional cloud available to run guest virtual machines and workloads.
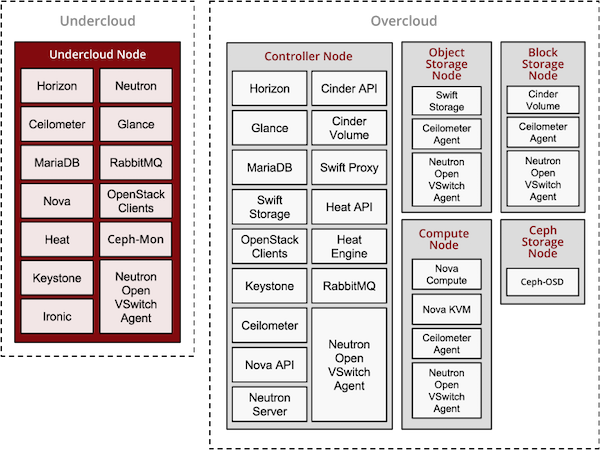
Credit: http://docs.openstack.org/
Overview of the Installation Process
- Prepare the Baremetal or Virtual Environment
- Install Undercloud
- Prepare Images and Flavours for Overcloud
- Deploy Overcloud
Prepare the Baremetal or Virtual Environment
At a minimum, TripleO needs 1 environment for the Undercloud and 1 each for the Overcloud Controller and Compute. All three environments can be virtual machines and each would need 4GB of memory and 40GB of disk space. If all 3 environments are completely on baremetal then each would need multi-core CPU with 4GB memory and 60GB free disk space. For each additional Overcloud role, such as Block Storage or Object Storage, an additional baremetal machine would be required. TripleO supports the following operating systems- RHEL 7.1 x86_64 or CentOS 7 x86_64
The steps below are for a completely virtualized environment.
- Install RHEL 7.1 Server x86_64 or CentOS 7 x86_64 on the host machine.
- Make sure sshd service is installed and running.
- The user performing all of the installation steps on the virt host needs to have sudo enabled. If required, use the following commands to create a new user called stack with password-less sudo enabled. Do not run the rest of the steps in this guide as root.
sudo useradd stack

sudo passwd stack # specify a password

echo "stack ALL=(root) NOPASSWD:ALL" | sudo tee -a /etc/sudoers.d/stack

sudo chmod 0440 /etc/sudoers.d/stack - Enable needed repositories: Enable epel:
sudo yum -y install epel-release
Enable last known good RDO Trunk Delorean repository for core openstack packages
sudo curl -o /etc/yum.repos.d/delorean.repo http://trunk.rdoproject.org/centos7/current-tripleo/delorean.repo
Enable latest RDO Trunk Delorean repository only for the TripleO packages
sudo curl -o /etc/yum.repos.d/delorean-current.repo http://trunk.rdoproject.org/centos7/current/delorean.repo
sudo sed -i 's/\[delorean\]/\[delorean-current\]/' /etc/yum.repos.d/delorean-current.repo
sudo /bin/bash -c "cat <>/etc/yum.repos.d/delorean-current.repo
includepkgs=diskimage-builder,instack,instack-undercloud,os-apply-config,os-cloud-config,os-collect-config,os-net-config,os-refresh-config,python-tripleoclient,tripleo-common,openstack-tripleo-heat-templates,openstack-tripleo-image-elements,openstack-tripleo,openstack-tripleo-puppet-elements,openstack-puppet-modules
EOF"Enable the Delorean Deps repository
sudo curl -o /etc/yum.repos.d/delorean-deps.repo http://trunk.rdoproject.org/centos7/delorean-deps.repo
- Install the Undercloud:
sudo yum install -y instack-undercloud
- The virt setup automatically sets up a vm for the Undercloud, installed with the same base OS as the host.
instack–virt–setup
When the script has completed successfully, it will output the IP address of the VM that has now been installed with a base OS.
You can ssh to the vm as the root user:
ssh root@The vm contains a stack user to be used for installing the Undercloud. You can su – stack to switch to the stack user account.
Install Undercloud
- Log in to your machine (baremetal or VM) where you want to install the Undercloud as a non-root user:
ssh @
- Enable needed repositories using the same commands as in the section above on preparing the environment
- Install the yum-plugin-priorities package so that the Delorean repository takes precedence over the main RDO repositories:
sudo yum -y install yum-plugin-priorities
- Install the TripleO CLI, which will pull in all other necessary packages as dependencies:
sudo yum install -y python-tripleoclient
- Run the command to install the Undercloud:
openstack undercloud install
- Log in to your machine (baremetal or VM) where you want to install the Undercloud as a non-root user:
Once the install has completed, you should take note of the files stackrc and undercloud-passwords.conf. You can source stackrc to interact with the Undercloud via the OpenStack command-line client. undercloud-passwords.conf contains the passwords used for each service in the Undercloud.
Prepare Images and Flavours for Overcloud
- Log into your Undercloud virtual machine as non-root user:
ssh root@ su – stack
- In order to use CLI commands easily you need to source needed environment variables:
source stackrc
- Choose the image operating system: The built images will automatically have the same base OS as the running Undercloud. To choose a different OS set NODE_DIST to ‘centos7’ or ‘rhel7’
- Install the current-tripleo delorean repo and deps repo into the Overcloud images:
export USE_DELOREAN_TRUNK=1

export DELOREAN_TRUNK_REPO="http://trunk.rdoproject.org/centos7/current-tripleo/"

export DELOREAN_REPO_FILE="delorean.repo" - Build the required images:
openstack overcloud image build --all
- Load the images into the Undercloud Glance:
openstack overcloud image upload
- Register and configure nodes for your deployment with Ironic. The file to be imported may be either JSON, YAML or CSV format.
openstack baremetal import instackenv.json
- Introspect hardware attributes of nodes:
openstack baremetal introspection bulk start
Introspection has to finish without errors. The process can take up to 5 minutes for VM and up to 15 minutes for baremetal. - Create flavors i.e. node profiles –The Undercloud will have a number of default flavors created at install time. In most cases, these flavors do not need to be modified. By default, all Overcloud instances will be booted with the baremetal flavor, so all baremetal nodes must have at least as much memory, disk, and cpu as that flavor. In addition, there are profile-specific flavors created which can be used with the profile-matching feature.
- Log into your Undercloud virtual machine as non-root user:
Deploy OverCloud
Overcloud nodes can have a nameserver configured in order to resolve hostnames via DNS. The nameserver is defined in the Undercloud’s neutron subnet. If needed, define the nameserver to be used for the environment:
List the available subnets
neutron subnet-listBy default 1 compute and 1 control node will be deployed, with networking configured for the virtual environment. To customize this, see the output of:
neutron subnet-update –dns-nameserver
openstack help overcloud deploy
Run the deploy command, including any additional parameters as necessary:
openstack overcloud deploy --templates [additional parameters]
When deploying the Compute node in a virtual machine, add –libvirt-type qemu otherwise launching instances on the deployed Overcloud will fail. This command will use Heat to deploy templates. In turn, Heat will use Nova to identify and reserve the appropriate nodes. Nova will use Ironic to startup nodes and install the correct images. Finally, services on nodes of the Overcloud are registered with Keystone.
To deploy the Overcloud with network isolation, bonds or custom network interface configurations, follow the workflow here: Configuring Network Isolation
Openstack Overcloud deploy generates an overcloudrc file appropriate for interacting with the deployed Overcloud in the current user’s home directory. To use it, simply source the file:
source ~/overcloudrc
To return to working with the Undercloud, source the stackrc file again:
source ~/stackrc
Benefits
Since TripleO uses OpenStack components and APIs, it has the following benefits when used to deploying and operating a OpenStack private cloud.
- The APIs are well documented and come with client libraries and command line tools. Users already familiar with OpenStack find it easier to understand TripleO.
- TripleO automatically inherits all the new features, bug fixes and security updates which are added to the included OpenStack components and allows more rapid feature development of TripleO.
- Tight integration with the OpenStack APIs provides a solid architecture that has been extensively reviewed by the OpenStack community.
Things to Consider
TripleO is one more option to deploy a production-grade OpenStack private cloud. It tries to ease the deployment process by “bootstrapping” the process using a subset of OpenStack components to build a smaller cloud first. The benefit of this approach is that operators can use familiar OpenStack APIs to deploy the subsequent consumer-facing OpenStack cloud. While not an intuitive approach, it seems to work well for users of the RedHat distribution of OpenStack
Check out these other resources below for more information on OpenStack Deployments and TripleO
- Beyond Kubernetes Operations: Discover Platform9’s Always-On Assurance™ - November 29, 2023
- Platform9 Introduces Elastic Machine Pool (EMP) at KubeCon 2023 to Optimize Costs on AWS EKS - November 15, 2023
- KubeCon 2023 Through Platform9’s Lens: Key Takeaways and Innovative Demos - November 14, 2023