How to Install OpenStack using Fuel
Fuel OpenStack Tutorial
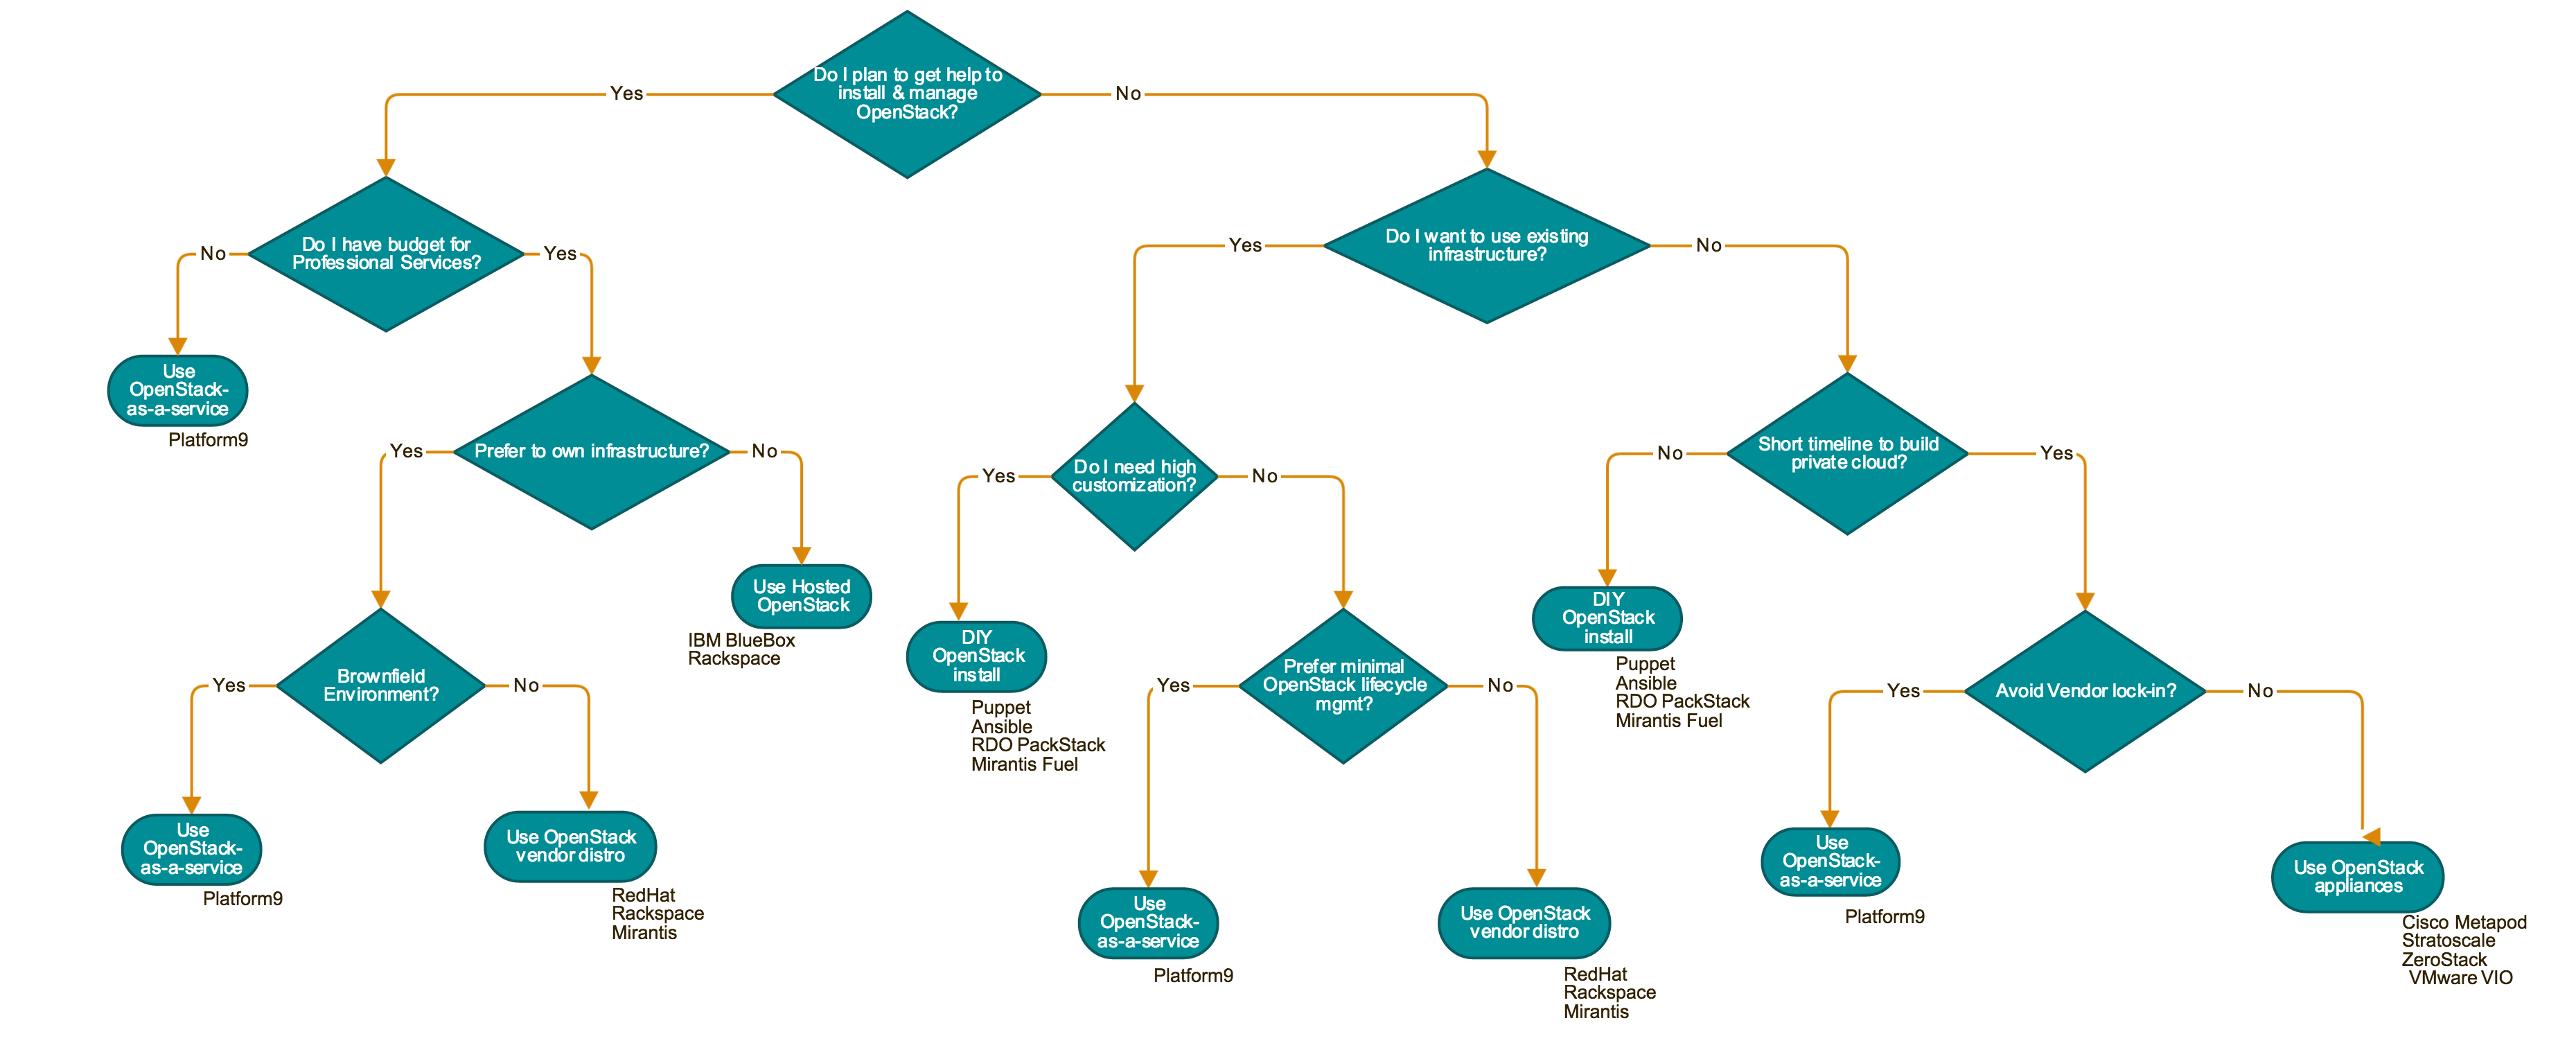
One of the great things about OpenStack is all the options you have for deploying it. A recent blog mentioned various deployment models – and the flowchart below may help as you decide which model is best for you. For example, if you need a highly customized OpenStack deployment, then DIY may be the way to go. Then, there’s the question of which tool to use. Previously, we discussed how to install OpenStack using RDO Packstack, Openstack-Ansible, DevStack or TripleO. This blog will give an overview of the steps required to install OpenStack using Fuel. For detailed instructions, refer to the Fuel Documentation
Fuel is an open-source tool that simplifies and accelerates the initial deployment of OpenStack environments and facilitates their ongoing management. It provides REST APIs, that can be accessed via a graphical or a command line interface, to provision, configure and manage OpenStack environments. Fuel deploys an OpenStack architecture that is highly available and load balanced.
Fuel deploys a master node and multiple slave nodes. The master node is a server with the installed Fuel application that performs initial configuration, provisioning, and PXE booting of the slave nodes, as well as assigning the IP addresses to the slave nodes. The slave nodes are servers provisioned by the master node. A slave node can be a controller, compute, or storage node.
This blog will describe how to install Fuel on Oracle VirtualBox and use it to deploy the Mirantis OpenStack environment. Such an environment is suitable for testing or a quick demo, using the default configurations. For a production environment, the configuration must specify Network topology and IPAM, Storage, the number and flavor of compute, controller, storage and other nodes, Monitoring, any Fuel plug-ins etc.
Fuel Installation Prerequisites
The environment must meet the following software prerequisites:
- A 64-bit host operating system with at least 8 GB RAM and 300 GB of free space with virtualization enabled in the BIOS.
- Access to the Internet or to a local repository containing the required files
- Oracle VirtualBox
- Oracle VM VirtualBox Extension Pack
- Mirantis OpenStack ISO
- Mirantis VirtualBox scripts with a version that matches the version of Mirantis OpenStack.
- The latest versions of VirtualBox would work with these specific versions or newer of – Ubuntu Linux 12, Fedora 19, OpenSUSE 12.2 and Microsoft Windows x64 with cygwin x64. MacOS 10.7.5 requires VirtualBox 4.3.x
Overview of the Installation Process
Mirantis provides VirtualBox scripts that include configurations for the virtual machine network and hardware settings. The script provisions the virtual machines with all required settings automatically. The steps involved in the process are
- Install Oracle VirtualBox and Oracle VM VirtualBox Extension Pack
- Download the Mirantis OpenStack ISO and place it in a directory named iso
- Download the Mirantis VirtualBox scripts
- Modify the config.sh script to specify parameters that automate the Fuel installation. For example, specify the number of virtual nodes to create, as well as how much memory, storage, and CPU to allocate to each machine. The parameter names are listed below along with the default values in ( )
- vm_master_memory_mb (1536)
- vm_master_disk_mb (65 GB)
- vm_master_nat_network (192.168.200.0/24)
- vm_master_ip ( 10.20.0.2)
- vm_master_username (root)
- vm_master_password (r00tme)
- cluster_size
- vm_slave_cpu (1)
- vm_slave_memory_mb (If the host system has 8 GB, default value is 1536 MB. If the host system has 16 GB, default value is 2048 MB)
- Run one of launch.sh, launch_8GB.sh or launch_16GB.sh scripts, depending on the amount of memory on the computer. Each script creates 1 Fuel master node. The slave nodes differ for each script.
- launch.sh – 1 salve node with 2048 MB RAM and 2 slave nodes with 1024 MB RAM each
- launch_8GB.sh – 3 slave nodes with 1536 MB RAM each
- launch_16GB.sh – 5 slave nodes with 2048 MB RAM each
- The script installs the Fuel master node on VirtualBox and may take up to 30 minutes to finish.
- Once the launch script completes, access the Fuel Web UI to create an OpenStack environment as shown below
Create a New OpenStack environment
After the Fuel master node is installed, the slave nodes appear as Unallocated nodes in the web UI. Now the OpenStack environment can be created, configured and deployed. A single Fuel master node can deploy and manage multiple OpenStack environments, but each environment must be created separately.
To create an OpenStack environment:
- Access the Fuel web UI at http://10.20.0.2:8443.
- Log in to the Fuel web UI as admin. The default password is same as set earlier
- Click New OpenStack Environment to start the deployment wizard.
- In the Name and Release screen, type a name of the OpenStack environment and select an OpenStack release and an operating system on which to deploy the OpenStack environment.
- In the Compute screen, select a hypervisor. By default, Fuel uses QEMU with KVM acceleration.
- In the Networking Setup screen, select a network topology. By default, Fuel deploys Neutron with VLAN segmentation.
- In the Storage Backends, select appropriate options. By default, Fuel deploys Logical Volume Management (LVM) for Cinder, local disk for Swift, and Swift for Glance.
- In the Additional Services, select any additional OpenStack programs to deploy.
- In the Finish screen, click Create. Fuel now creates an OpenStack environment. Before using the environment, follow the UI options to add nodes, verify network settings, and complete other configuration tasks.
Things to Consider
Fuel makes it very easy to install a test OpenStack environment using Oracle VirtualBox. The automated script will spin up a master node and configure and deploy the slaves nodes that will host compute, storage and other services of OpenStack. Using Fuel you can also deploy multiple production grade, highly-available OpenStack environments on virtual or bare metal hardware. Fuel can be used to configure and verify network configurations, test interoperability between the OpenStack components and easily scale the OpenStack environment by adding and removing nodes.
Check out these other resources below for more options on installing OpenStack
- Fuel documentation
- Install OpenStack using DevStack
- Install OpenStack using TripleO
- Install OpenStack using OpenStack-Ansible
- Install OpenStack using RDO Packstack
- Technical Guide on OpenStack deployment models
- Beyond Kubernetes Operations: Discover Platform9’s Always-On Assurance™ - November 29, 2023
- Platform9 Introduces Elastic Machine Pool (EMP) at KubeCon 2023 to Optimize Costs on AWS EKS - November 15, 2023
- KubeCon 2023 Through Platform9’s Lens: Key Takeaways and Innovative Demos - November 14, 2023